#Long press the image to scan the QR code and participate in the OSC Year-End Gala#
Original Text:Diving Into MQTT
Link:https://dzone.com/articles/mqtt-protocol-tutorial
Translators:douxingxiang, wnull, xufuji456, 无若, Robbie_Zhu
The MQTT protocol is a machine-to-machine (M2M) protocol that is widely used in the IoT (Internet of Things). It is a message-oriented protocol. For this reason, it is very lightweight and has been widely adopted by the IoT ecosystem. Almost all IoT cloud platforms support sending and receiving data via MQTT with various implementations of IoT smart devices (such as Arduino, Raspberry Pi, etc.).
Of course, there are other IoT protocols, but MQTT is the most efficient.

MQTT Overview

MQTT was developed around 1999, primarily to create a protocol suitable for bandwidth-constrained environments. Additionally, its low power consumption is very attractive for IoT.
This protocol uses a publish-subscribe paradigm, contrasting with the request/response paradigm primarily oriented towards HTTP. It uses binary messages to exchange information, which is very low overhead. It is simpler to implement, superior, and open. Another interesting aspect is that MQTT uses TCP as the underlying transport. All these factors are designed to better accommodate IoT.

MQTT Message Model

As mentioned above, MQTT implements a publisher-subscriber model. The publisher-subscriber model decouples the client that publishes messages (the publisher) from the client that receives messages (the subscriber). Furthermore, compared to HTTP, which is primarily a synchronous protocol, MQTT is an asynchronous protocol that does not block clients while waiting for messages. Additionally, the MQTT protocol does not require that subscribers and publishers are directly connected.

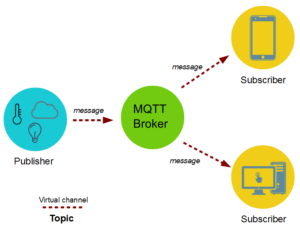
MQTT Publisher-Subscriber Model

As mentioned, MQTT is a message-oriented protocol that implements a publisher-subscriber model. A key component of MQTT is the MQTT broker. The main task of the MQTT broker is to dispatch messages to subscribers. That is, it receives messages from publishers and forwards them to subscribers. When forwarding messages, the MQTT broker uses topics to filter clients. A topic is a string that can be combined by creating topic levels.
Topics act like virtual channels that connect publishers with their subscribers. Topics are managed by the MQTT broker. Through this virtual channel, publishers and subscribers are decoupled, and clients (publishers or subscribers) do not need to know each other. Because there is no direct dependency between message producers (publishers) and message consumers (subscribers), this protocol is highly scalable.
The diagram below illustrates the MQTT architecture:

How to Use MQTT

Now that we have a general understanding, let’s apply it through practical examples. MQTT has many implementations, and we will use Mosquitto developed by Eclipse. The first step is to install the MQTT broker. For our purposes, we will install it on a Raspberry Pi. To install Mosquitto, we need to add the repository where it is located so that we can download it. Before adding the repository, it is necessary to add the key to verify that the downloaded package is legitimate. We can connect to the Raspberry Pi via SSH or remote desktop. Now, in the terminal, enter the following command:

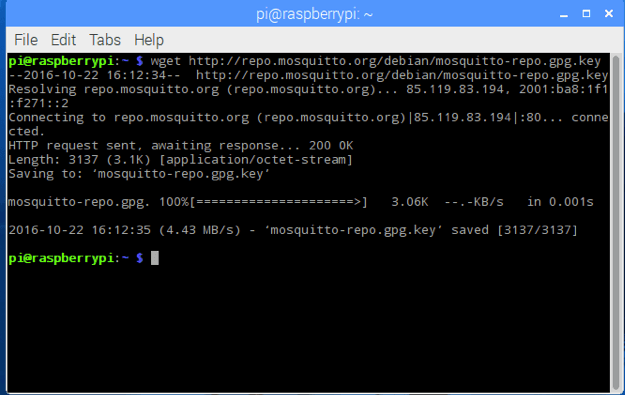
Then, import the key:

Finally, add the .list file:

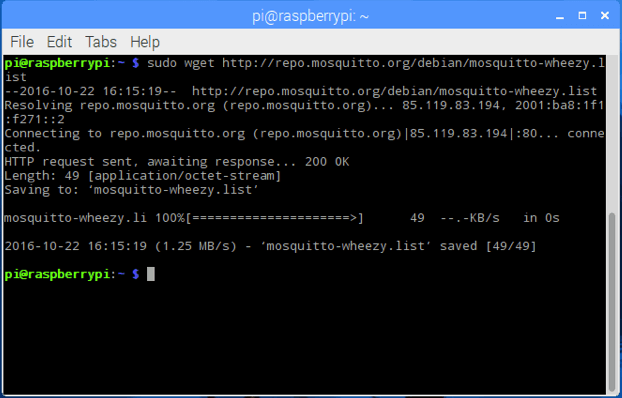
With this, the MQTT server has been installed on the Raspberry Pi. This server is our MQTT broker. Now we need to install the clients (publishers and subscribers). In this example, we will install both the client and the server on the same Raspberry Pi, but you can also install them on different PCs/servers or IoT boards.


How to Send an MQTT Message

Assuming we have successfully installed and configured the client and server, we can now register a user to a specific topic and wait for messages from the publisher. We can use the command below to register a user:
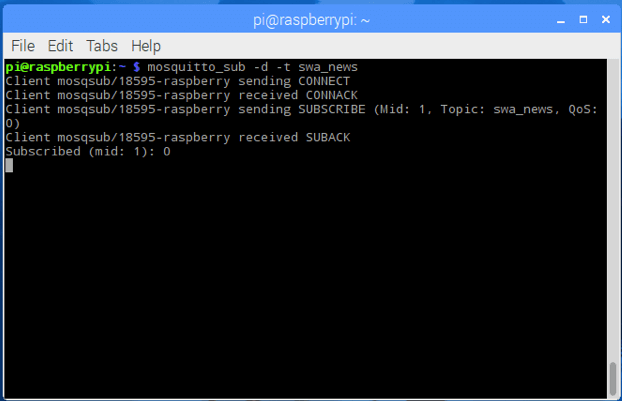
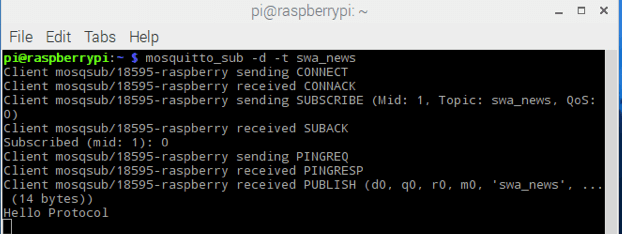
As shown, the user is waiting for messages. In this example, we are using the topic called swa_news. Now, we will use the MQTT publisher to send a message with the topic swa_news.
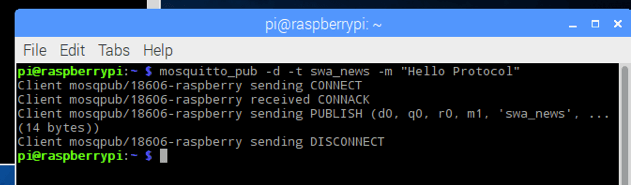
In this example, the MQTT publisher sent the message “Hello Protocol”, and on the user side, we received the following message:

How to Use MQTT on Android Devices

Finally, we will use an Android MQTT client to receive the messages we sent. The video below shows us how to configure an Android MQTT client.
https://www.youtube.com/embed/plnbafCBVtU
We hope you learned what the MQTT protocol is and how to use MQTT to send messages to clients through this article.

Why I Paused My Volunteer Work in the Python Community
15 Top Open Source AI Tools Recommended
Everyday Open Source Tools and Applications (Office Edition)
DB-Engines November Global Database Rankings Released, Oracle’s Dominance Threatened