The previous article “Displaying GIF Images on ESP32 Handheld Device Using LVGL” introduced how to flash the <span>LVGL-Micropython</span> firmware onto the XiaoMiao handheld device, showcasing effects such as displaying GIF images, bar graphs, line graphs, and zooming and rotating images. This note will continue to share how to implement a simple dashboard based on <span>LVGL-Micropython</span>.
1. Development Board Introduction
This handheld device is a custom development board for the Xueersi children’s programming course, with the MCU being <span>ESP32-WROVER-B</span>. It comes equipped with a case, battery, 1.8-inch LCD screen, six buttons, a buzzer, light sensor, thermistor, etc., and supports external sensors.
For details, see “ESP32 Development Board Under 50 Yuan, with Case, Battery, 1.8-inch LCD, Buttons, and Other Modules“
2. LVGL-Micropython Firmware
Referring to “Compile an LVGL-Micropython Firmware in Three Simple Steps” I compiled the <span>LVGL-Micropython</span> firmware suitable for the XiaoMiao handheld device.
Due to the complexity of the screen driver in LVGL-Micropython, we encapsulated it into a driver module <span>screen.py</span>. This module allows for easier initialization of the display, thereby simplifying the development process.
Download link: QQ group or https://gitee.com/py2012/xueersi-eps32-handheld-device
LVGL version: 9.2.2
Micropython version: 1.24.1
3. Test Code
In LVGL version 9.2, the Meter (gauge module) has been merged into Scale (scale module). Previously, I couldn’t find Meter, so I used Arc (arc module) to create a gauge, which was relatively cumbersome and not visually appealing: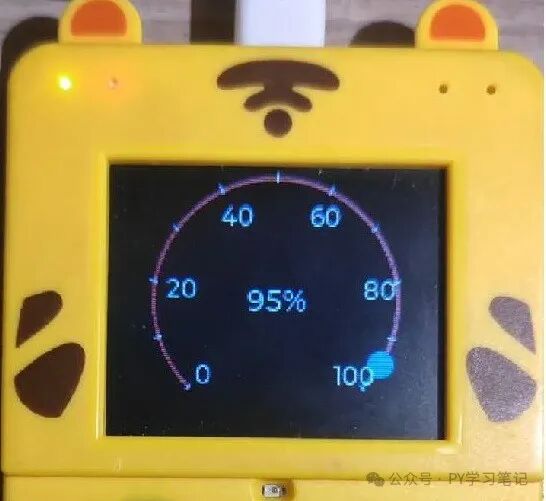 This time, by using Scale, not only is the code much simpler, but the effect is also more aesthetically pleasing.
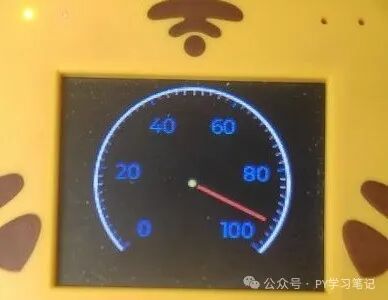
The reference code is as follows:
import screen
import time
import lvgl as lv
from machine import Pin, ADC, Timer
import math

# Initialize screen
scrn = lv.screen_active()
scrn.set_style_bg_color(lv.color_hex(0x000000), 0)

# Hardware initialization (light sensor connected to pin 36)
light_sensor = ADC(Pin(36))
light_sensor.atten(ADC.ATTN_11DB)

class LightMeter:
    def __init__(self, parent):
        self.scale = None
        self.needle = None
        self.label = None
        self.create_meter(parent)
        self.start_timer()

    def create_meter(self, parent):
        """Create light intensity gauge"""
        # Create gauge body
        self.scale = lv.scale(parent)
        self.scale.set_size(120, 120)
        self.scale.set_mode(lv.scale.MODE.ROUND_INNER)
        # ROUND_OUTER: ticks drawn outward from the edge of the circle (labels outside)
        # ROUND_INNER: ticks drawn inward (default more common)
        # HORIZONTAL_TOP: horizontal linear gauge, ticks at the top
        # HORIZONTAL_BOTTOM: horizontal linear gauge, ticks at the bottom
        # VERTICAL_LEFT/VERTICAL_RIGHT: vertical linear gauge

        # Set gauge style
        self.scale.set_style_bg_opa(lv.OPA._60, 0)  # Transparency
        # lv.OPA.COVER: opaque
        # lv.OPA.TRANSP: fully transparent
        # lv.OPA._10 to lv.OPA._90: 10%-90% transparency
        self.scale.set_style_bg_color(lv.color_hex(0x222222), 0)  # Dark gray background
        # Background color
        self.scale.set_style_radius(lv.RADIUS_CIRCLE, 0)
        self.scale.set_style_clip_corner(True, 0)
        self.scale.center()

        # Configure tick system
        self.scale.set_label_show(True)
        labels = ["0", "20", "40", "60", "80", "100"]
        self.scale.set_text_src(labels)
        self.scale.set_style_text_font(lv.font_montserrat_12, 0)
        self.scale.set_total_tick_count(51)  # 50 small ticks
        self.scale.set_major_tick_every(10)  # One major tick every 10%

        # Major tick style (blue)
        style_indicator = lv.style_t()
        style_indicator.init()
        style_indicator.set_text_color(lv.color_hex(0x3498db))
        style_indicator.set_line_color(lv.color_hex(0x3498db))
        style_indicator.set_length(5)  # Major tick length
        style_indicator.set_line_width(1)
        self.scale.add_style(style_indicator, lv.PART.INDICATOR)

        # Minor tick style (light gray)
        style_minor = lv.style_t()
        style_minor.init()
        style_minor.set_line_color(lv.color_hex(0xAAAAAA))
        style_minor.set_length(3)  # Minor tick length
        style_minor.set_line_width(1)
        self.scale.add_style(style_minor, lv.PART.ITEMS)

        # Set range and angle
        self.scale.set_range(0, 100)  # 0-100% range
        self.scale.set_angle_range(270)  # 270-degree sector
        self.scale.set_rotation(135)  # Rotate 135 degrees to make the opening face down

        # Create needle (red)
        self.needle = lv.line(self.scale)
        self.needle.set_style_line_width(2, 0)
        self.needle.set_style_line_rounded(True, 0)
        self.needle.set_style_line_color(lv.color_hex(0xFF4500), 0)

        # Add center point (gold)
        center = lv.obj(self.scale)
        center.set_size(8, 8)
        center.center()
        center.set_style_radius(lv.RADIUS_CIRCLE, 0)
        center.set_style_bg_color(lv.color_hex(0xFFD700), 0)
        center.set_style_bg_opa(lv.OPA.COVER, 0)

    def update_meter(self):
        """Update gauge reading"""
        raw_value = light_sensor.read()
        percentage = min(100, max(0, int(raw_value / 4095 * 100)))
        # Update needle position
        lv.scale.set_line_needle_value(self.scale, self.needle, 50, percentage)

    def timer_callback(self, timer):
        """Timer callback"""
        self.update_meter()

    def start_timer(self):
        """Start hardware timer"""
        self.timer = Timer(-1)
        self.timer.init(period=200, mode=Timer.PERIODIC, callback=self.timer_callback)

# Create light meter instance
light_meter = LightMeter(scrn)

# Main loop
while True:
    lv.timer_handler()
    time.sleep_ms(5)
The performance of XiaoMiao’s screen is too poor, and the needle may stutter.
Recommended Reading:
- Implementing Image Rotation and Scaling on ESP32 Handheld Device Using LVGL
- Implementing Line Graph Effects on ESP32 Handheld Device Using LVGL
- Implementing Temperature Meter Effects on ESP32 Handheld Device Using LVGL
- Practical ESP32C3: Implementing a Brick Breaker Game Using LVGL-Micropython
- Practical ESP32C3: Touch Control to Adjust Screen Backlight Brightness Using LVGL-Micropython
- Practical ESP32C3: Creating a Dynamic Temperature and Humidity Meter Using LVGL-Micropython
-
Practical ESP32C3: Creating a Simple Level Meter Using LVGL
-
Practical ESP32S3: Creating a Simple Music Player Using LVGL
-
Practical ESP32S3: Experiencing an AI Chatbot
-
Using AI Technology to Write Mini Games for XiaoMiao Handheld Device (Part 2)
