Effect Diagram
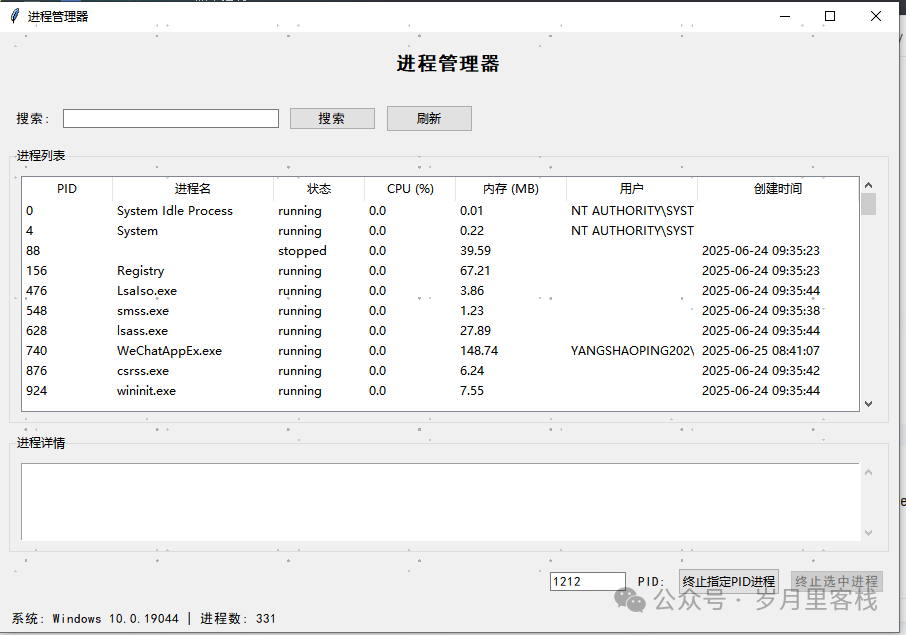
Hello everyone! Today I would like to introduce a particularly useful Python project – the Process Manager. This tool helps us view the processes running on the computer and perform some operations on them, such as terminating processes. The entire code structure is very clear, layer by layer, from initialization to interface construction, then loading processes, refreshing processes, searching processes, and terminating processes. Each step is arranged clearly, making it very user-friendly. Next, I will analyze it in detail.
1. Initialization Part (<span>__init__</span> Method)
def __init__(self, root):
    self.root = root
    self.root.title("Process Manager")
    self.root.geometry("900x600")
    self.root.resizable(True, True)

    # Set font to ensure proper display of Chinese characters
    self.font = ('SimHei', 10)
    self.title_font = ('SimHei', 14, 'bold')

    # Process list
    self.process_list = []
    self.selected_pid = None

    # Create UI
    self.create_widgets()

    # Load processes
    self.load_processes()

    # Set auto-refresh
    self.refresh_interval = 50000  # 5 seconds
    self.root.after(self.refresh_interval, self.refresh_processes)
This part is the starting point of the entire Process Manager, just like laying a foundation before building a house. It first receives the <span>root</span> parameter, which is the main window object of Tkinter, then sets the window title to “Process Manager” and specifies the initial size of the window to be 900×600 pixels, allowing users to resize the window as needed, making it very flexible. Next, to ensure that Chinese characters can be displayed correctly on the interface, two font styles are defined: one for normal text and another bold font for titles, which makes the interface look more layered. Then, two variables related to processes are initialized: <span>self.process_list</span> is used to store the loaded process information, and <span>self.selected_pid</span> is used to record the PID (Process Identifier) of the currently selected process. After that, the <span>create_widgets</span> method is called to build the user interface, and the <span>load_processes</span> method is called to load the current system’s process information. Finally, an automatic refresh interval is set with <span>self.refresh_interval</span>, set to 5 seconds, and the process list is automatically refreshed every 5 seconds using <span>self.root.after</span>, allowing users to see real-time changes in the system processes. The entire initialization process builds the basic framework of this Process Manager step by step, from window settings to font definitions, variable initialization, and subsequent method calls.
2. User Interface Creation Part (<span>create_widgets</span> Method)
def create_widgets(self):
    """Create user interface"""
    # Title area
    title_frame = ttk.Frame(self.root, padding="10")
    title_frame.pack(fill=tk.X)

    title_label = ttk.Label(
        title_frame,
        text="Process Manager",
        font=self.title_font
    )
    title_label.pack(pady=10)

    # Search area
    search_frame = ttk.Frame(self.root, padding="10")
    search_frame.pack(fill=tk.X)

    ttk.Label(search_frame, text="Search:", font=self.font).pack(side=tk.LEFT, padx=5)

    self.search_var = tk.StringVar()
    search_entry = ttk.Entry(
        search_frame,
        textvariable=self.search_var,
        font=self.font,
        width=30
    )
    search_entry.pack(side=tk.LEFT, padx=5)

    search_button = ttk.Button(
        search_frame,
        text="Search",
        command=self.search_processes,
        style="Accent.TButton"
    )
    search_button.pack(side=tk.LEFT, padx=5)

    refresh_button = ttk.Button(
        search_frame,
        text="Refresh",
        command=self.refresh_processes
    )
    refresh_button.pack(side=tk.LEFT, padx=5)
This part builds the user interface of the Process Manager, just like decorating a house, making the entire tool look both beautiful and practical. First, a title area is created, wrapping the title label <span>title_label</span> in a frame <span>title_frame</span>, displaying the title “Process Manager” with the previously defined title font, and placing it at the top of the window using the <span>pack</span> method, making it immediately visible to users. Next is the search area, which contains the components related to searching, housed in a frame <span>search_frame</span>. In this frame, a label displaying “Search:” is placed first, followed by a text entry box <span>search_entry</span>, where users can input the process information they want to search for, such as process names or PIDs. This input box retrieves user input through the <span>StringVar</span> variable <span>self.search_var</span>. Next, there is a “Search” button <span>search_button</span>, which calls the <span>search_processes</span> method to search for matching processes, and a “Refresh” button <span>refresh_button</span>, which allows users to manually refresh the process list to get the latest process information. The entire user interface creation process builds each functional area in order from top to bottom and left to right, with each area having a clear responsibility and a reasonable layout, making it very convenient for users to operate, and through reasonable hierarchical division, the entire interface is both beautiful and practical.
3. Loading Processes Part (<span>load_processes</span> Method)
def load_processes(self):
    """Load all process information"""
    self.status_var.set("Loading process list...")
    self.root.update()

    # Clear the table
    for item in self.tree.get_children():
        self.tree.delete(item)

    # Load processes using a thread to avoid UI freezing
    threading.Thread(target=self._load_processes_thread).start()
This part is one of the core functionalities of the Process Manager, equivalent to equipping this tool with an “eye” that can obtain system process information. It first sets the text of the status bar to “Loading process list…” and updates the window to let users know the tool is working. Then, it clears all previously loaded process information from the table to avoid duplicate displays. Next, a thread is started to load process information; using a thread is to prevent the UI from freezing during the loading process, as loading process information may take some time. If loaded directly in the main thread, it would cause the interface to temporarily become unresponsive. By calling the <span>_load_processes_thread</span> method, the actual process loading work is done in the thread. The entire process of loading processes follows the order of setting the status, clearing the table, and starting the thread to load processes, with clear logic and distinct levels, ensuring that process information is loaded correctly without affecting the user experience.
4. Updating Process Table Part (<span>_update_process_tree</span> Method)
def _update_process_tree(self):
    """Update the process table display"""
    # Sort by CPU usage
    self.process_list.sort(key=lambda x: x['cpu_percent'], reverse=True)

    # Add to the table
    for proc in self.process_list:
        self.tree.insert(
            '',
            tk.END,
            values=(
                proc['pid'],
                proc['name'],
                proc['status'],
                proc['cpu_percent'],
                proc['memory_mb'],
                proc['username'],
                proc['create_time']
            )
        )
This functionality updates the loaded process information to the table on the interface, allowing users to intuitively see the details of each process in the system. First, it sorts the process information in <span>self.process_list</span> by CPU usage, enabling users to quickly understand which processes are consuming more CPU resources, with sorting done in descending order, meaning processes with higher CPU usage are listed first. Then, through a loop, each process’s information is inserted into the table. Each process’s information includes the PID, name, status, CPU usage, memory usage (in MB), user, and creation time, corresponding to each column in the table. Using the <span>self.tree.insert</span> method, this information is added to the table in the form of table rows, allowing users to clearly see the details of each process in the table. The entire process of updating the process table follows the order of sorting process information and looping to insert process information into the table, with simple operations and clear levels, ensuring that process information is accurately and timely displayed to users.
5. Searching Processes Part (<span>search_processes</span> Method)
def search_processes(self):
    """Search for processes"""
    search_text = self.search_var.get().lower()

    # Clear the table
    for item in self.tree.get_children():
        self.tree.delete(item)

    # Filter and display matching processes
    for proc in self.process_list:
        if search_text in str(proc['pid']).lower() or \
                search_text in proc['name'].lower() or \
                search_text in proc['status'].lower() or \
                search_text in str(proc['username']).lower():
            self.tree.insert(
                '',
                tk.END,
                values=(
                    proc['pid'],
                    proc['name'],
                    proc['status'],
                    proc['cpu_percent'],
                    proc['memory_mb'],
                    proc['username'],
                    proc['create_time']
                )
            )
This functionality equips the Process Manager with a “magnifying glass,” allowing users to quickly find the processes they want. It first retrieves the text entered by the user in the search box and converts it to lowercase, making the search case-insensitive for user convenience. Then, it clears all content in the table to prepare for displaying search results. Next, through a loop, it checks each process’s information in <span>self.process_list</span> to see if the PID, name, status, or username contains the user-input search text. If it does, it indicates that this process is what the user is looking for, and its information is inserted into the table, allowing users to see the searched processes in the table. The entire process of searching for processes follows the order of retrieving search text, clearing the table, looping to filter matching processes, and inserting them into the table, with rigorous logic and clear levels, ensuring that users can quickly and accurately find the processes they want, greatly improving the efficiency of process management.
6. Terminating Processes Part (<span>kill_selected_process</span> and <span>kill_pid_process</span> Methods)
def kill_selected_process(self):
    """Terminate the selected process"""
    if not self.selected_pid:
        return

    # Confirmation dialog
    proc_name = next((p['name'] for p in self.process_list if p['pid'] == self.selected_pid), "Unknown Process")
    if messagebox.askyesno("Confirm Termination",
                           f"Are you sure you want to terminate process {proc_name} (PID: {self.selected_pid})?
This action may cause data loss!"):
        try:
            # Attempt to terminate gently
            process = psutil.Process(self.selected_pid)
            process.terminate()

            # Wait for the process to terminate
            try:
                process.wait(timeout=3)
                self.status_var.set(f"Successfully terminated process {proc_name} (PID: {self.selected_pid})")
            except psutil.TimeoutExpired:
                # Force terminate if timeout
                process.kill()
                self.status_var.set(f"Forcefully terminated process {proc_name} (PID: {self.selected_pid})")

            # Refresh process list
            self.refresh_processes()

        except (psutil.NoSuchProcess, psutil.AccessDenied, psutil.ZombieProcess) as e:
            messagebox.showerror("Error", f"Error terminating process: {str(e)}")
def kill_pid_process(self):
    """Terminate the process with the specified PID"""
    pid_text = self.pid_var.get().strip()
    if not pid_text:
        messagebox.showinfo("Tip", "Please enter the PID of the process to terminate")
        return

    try:
        pid = int(pid_text)
    except ValueError:
        messagebox.showerror("Error", "PID must be an integer")
        return

    # Check if PID exists
    if not any(p['pid'] == pid for p in self.process_list):
        messagebox.showerror("Error", f"Cannot find process with PID {pid}")
        return

    # Get process name
    proc_name = next((p['name'] for p in self.process_list if p['pid'] == pid), "Unknown Process")

    # Confirmation dialog
    if messagebox.askyesno("Confirm Termination", f"Are you sure you want to terminate process {proc_name} (PID: {pid})?
This action may cause data loss!"):
        try:
            # Attempt to terminate gently
            process = psutil.Process(pid)
            process.terminate()

            # Wait for the process to terminate
            try:
                process.wait(timeout=3)
                self.status_var.set(f"Successfully terminated process {proc_name} (PID: {pid})")
            except psutil.TimeoutExpired:
                # Force terminate if timeout
                process.kill()
                self.status_var.set(f"Forcefully terminated process {proc_name} (PID: {pid})")

            # Refresh process list
            self.refresh_processes()

        except (psutil.NoSuchProcess, psutil.AccessDenied, psutil.ZombieProcess) as e:
            messagebox.showerror("Error", f"Error terminating process: {str(e)}")
These two functionalities are the “heavy hitters” of the Process Manager, allowing users to terminate unnecessary or problematic processes. The <span>kill_selected_process</span> method is used to terminate the process selected by the user in the table. It first checks if any process is selected; if not, it returns without doing anything. If a process is selected, a confirmation dialog pops up, informing the user of the process name and PID to be terminated, and reminding them that this action may cause data loss, asking for confirmation. If the user confirms, it attempts to gently terminate the process using the <span>psutil.Process.terminate</span> method and waits for the process to terminate within 3 seconds. If the process does not terminate within 3 seconds, it forcefully terminates the process using the <span>psutil.Process.kill</span> method. Regardless of whether the process is gently or forcefully terminated, a corresponding message is displayed in the status bar, and the <span>refresh_processes</span> method is called to refresh the process list, allowing users to see the latest process status. If an error occurs during the termination process, such as the process not existing, lacking permission to access the process, or the process being a zombie process, an error message box pops up displaying the specific error information.
The <span>kill_pid_process</span> method is used to terminate the process specified by the user’s input PID. It first retrieves the PID text entered by the user in the input box and trims any leading or trailing whitespace. If the user has not entered anything, a prompt appears reminding them to enter the PID of the process to terminate. If the user has entered content, it attempts to convert the input to an integer, as the PID is an integer. If the conversion fails, an error message box appears, informing the user that the PID must be an integer. If the conversion is successful, it checks whether this PID exists in <span>self.process_list</span>; if not, an error message box appears, informing the user that the process with this PID cannot be found. If it exists, it retrieves the process name and pops up a confirmation dialog asking the user to confirm whether to terminate this process. If the user confirms, it attempts to gently terminate the process, and if it times out, it forcefully terminates the process, displaying a message in the status bar and refreshing the process list. If an error occurs, an error message box is displayed with the error information.
The entire process of terminating processes follows the order of checking conditions, popping up confirmation dialogs, attempting to terminate processes, handling timeout situations, displaying messages, refreshing the process list, and handling errors, with rigorous logic and clear levels, ensuring that users can safely and effectively terminate unnecessary processes while also protecting the security of their systems.
7. Project Summary
This Python Process Manager project is a very practical system tool that covers several important knowledge points, including Tkinter graphical interface programming, the use of the psutil library, multithreading programming, exception handling, and table data display. The goal of the project is to provide users with an intuitive and easy-to-use process management tool, allowing them to conveniently view the processes running in the system and perform basic operations on them, such as terminating processes. The entire code structure is divided into multiple parts based on functionality, from initialization to user interface creation, loading processes, updating the process table, searching processes, and terminating processes, with each part having a clear function and logical clarity, making it easy to understand and maintain. Through this project, we can learn how to use Tkinter to build beautiful and practical graphical interfaces, how to utilize the psutil library to obtain system process information, and how to use multithreading to avoid UI freezing, which greatly helps improve programming skills and system management capabilities. At the same time, this tool can also be applied in actual system management scenarios, such as when the system experiences lag or certain processes consume excessive resources, helping users quickly locate and resolve issues, thereby improving system operational efficiency.
Python’s 20-Day Learning Plan
Python’s 7-Day Learning Plan
Top 10 Basic Libraries in Python
[Follow for more updates]
A very interesting game in Python – Source Code 2048
A very interesting mini-game in Python – Snake Game
A super practical tool in Python – Word Frequency Statistics Tool
A practical tool in Python – Simple Crawler Weather Tool
A super practical tool in Python – Timed Task Reminder Tool
Python “Guess the Number Game Code Analysis”
Python “Password Generator Code Analysis”
Python “Batch Rename Tool Code Analysis”
Python “Student Grade Management System Code Analysis”
Python “Stock Data Analysis Tool Code Analysis”
Python + AI to implement an intelligent voice assistant
Python “Simple Calculator Code Analysis”
Python + AI to implement an online document generation assistant
A practical tool in Python – Simple Crawler Weather Tool
Implementing a simple practical scenario in Python (such as a simple intelligent Q&A system, text summary generation, etc.)