Preview
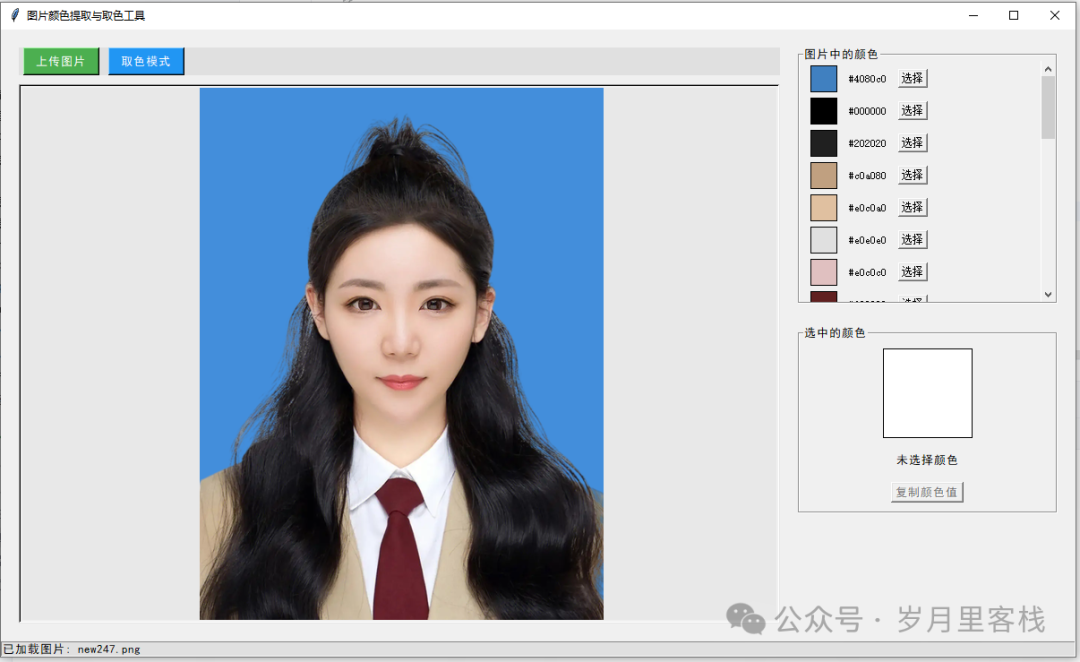
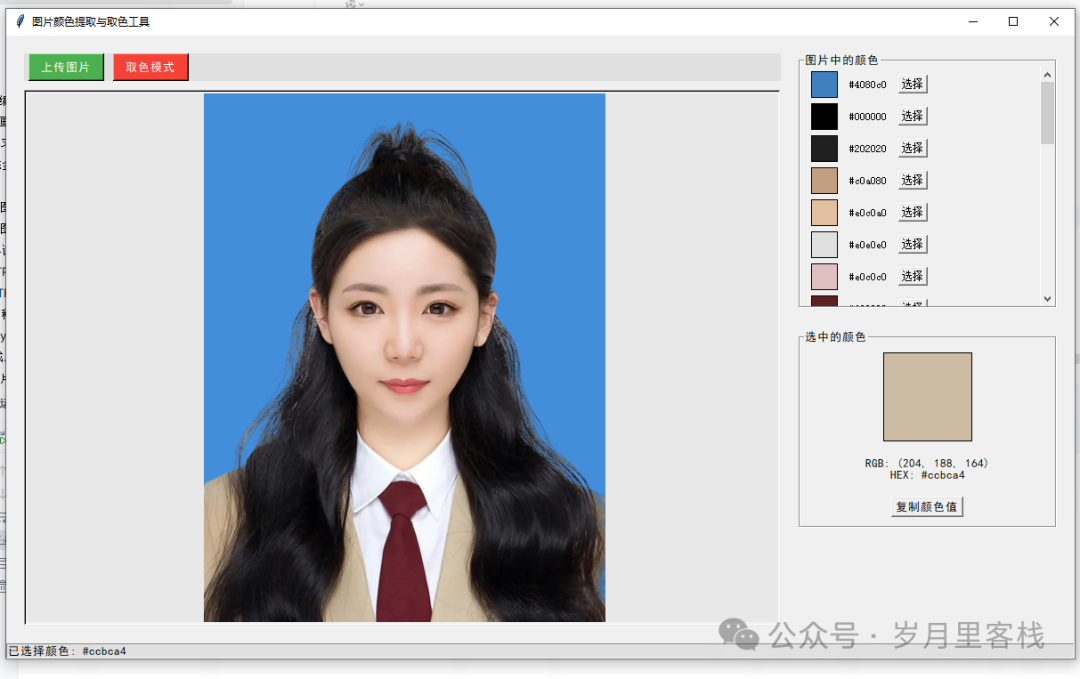
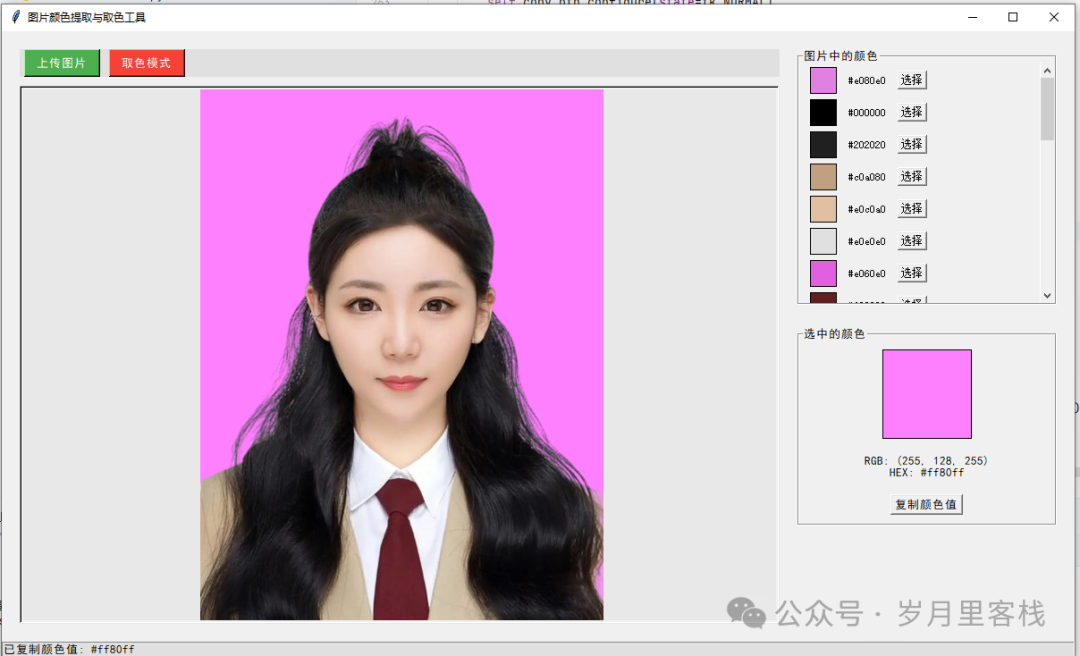
Hi! Imagine this: you drag an image into your computer, and it is instantly broken down into 30 of the most beautiful color swatches, automatically generating color points and allowing you to pick colors at will. You can copy RGB and HEX values with one click, and even draw red boxes on the image to mark areas—this is what we are going to discuss today: “Image Color Extraction and Color Picker Tool.” The entire program is written in Python, using Tkinter for the interface and PIL for image processing. The logic is clear and the structure is well-defined, making it easy for beginners to understand!
📚 Table of Contents
- Project Goals and Overview of Knowledge Points
- Overall Code Structure (Four Main Object Levels)
- Main Window and Global Styles
- Image Display and Interaction on the Left
- Color List and Selection on the Right
- Color Extraction Algorithm
- Color Picking Mode and Marking
- Clipboard and Status Bar
- Summary and Expandable Directions
1️⃣ Project Goals and Overview of Knowledge Points
| Goal | Knowledge Points Involved |
|---|---|
| Upload and Preview Image | Tkinter filedialog, PIL.Image, ImageTk |
| Extract Main Colors | Color Quantization, defaultdict, Sorting |
| Visualize Color Swatches | Tkinter Frame, Label, Button, Canvas |
| Mouse Color Picking | Canvas Event Binding, Coordinate Mapping, Marking Drawing |
| Color Format Conversion | RGB ↔ HEX |
| Clipboard Interaction | Tkinter clipboard |
| Status Feedback | Tkinter StringVar, Status Bar |
2️⃣ Overall Code Structure (Four Main Object Levels)
ImageColorPicker (Main Class)
├── Constructor __init__      # Global Variables & Interface Entry
├── create_widgets()       # UI Creation for Four Main Areas
├── Upload/Display/Extract/Pick Color     # Business Logic
└── Clipboard/Status Bar           # Auxiliary Functions
All functions are organized in a “Entry → Layout → Events → Tools” four-layer progression, with a reading order from top to bottom, making maintenance easy by locating the corresponding method.
3️⃣ Main Window and Global Styles
class ImageColorPicker:
    def __init__(self, root):
        self.root = root
        self.root.title("Image Color Extraction and Color Picker Tool")
        self.root.geometry("1200x700")
        self.root.configure(bg="#f0f0f0")
        self.default_font = font.Font(family="SimHei", size=10)
- Layer 1: Set window size, title, and background color at once to ensure visual consistency.
- Layer 2: Set the Chinese font
<span>SimHei</span>as the default to prevent garbled text, with all subsequent controls inheriting from<span>self.default_font</span>.
4️⃣ Image Display and Interaction on the Left
4.1 Overall Layout
left_frame = tk.Frame(main_frame, bg="#f0f0f0")
left_frame.pack(side=tk.LEFT, fill=tk.BOTH, expand=True, padx=5, pady=5)
- Using
<span>pack(side=tk.LEFT, expand=True)</span>allows the left side to stretch with the window; the right side has a fixed width of 300px, achieving the classic “left image, right color” layout.
4.2 Toolbar
toolbar = tk.Frame(left_frame, bg="#e0e0e0", height=50)
upload_btn = tk.Button(toolbar, text="Upload Image", command=self.upload_image,
                       font=self.default_font, bg="#4CAF50", fg="white")
self.pick_color_btn = tk.Button(toolbar, text="Color Picking Mode", command=self.toggle_color_picking,
                                state=tk.DISABLED)
- The toolbar has a fixed height of 50px and contains two buttons:
- Upload Button: Green indicates “safe to click”.
- Color Picking Button: Disabled by default, enabled only after a successful upload to prevent accidental clicks on an empty image.
4.3 Canvas Adaptive Display
self.canvas = tk.Canvas(self.image_frame, bg="#e8e8e8", cursor="cross")
self.canvas.pack(fill=tk.BOTH, expand=True)
- The canvas has a gray background, indicating “this area is interactive”.
<span>cursor="cross"</span>tells the user that the “cross cursor” indicates clickable areas.
4.4 Dynamic Scaling Algorithm (display_image)
canvas_width = self.image_frame.winfo_width() or 800
self.scale_ratio = min(canvas_width / img_width, canvas_height / img_height)
resized_img = self.original_image.resize((new_width, new_height), Image.LANCZOS)
- Calculating
<span>scale_ratio</span>ensures the image fills proportionally without leaving black edges. <span>LANCZOS</span>is a high-quality filter to prevent aliasing.
5️⃣ Color List and Selection on the Right
5.1 Fixed Width Container
right_frame = tk.Frame(main_frame, bg="#f0f0f0", width=300)
right_frame.pack(side=tk.RIGHT, fill=tk.BOTH, expand=False)
right_frame.pack_propagate(False)
<span>pack_propagate(False)</span>forces a width of 300px, preventing distortion from child widgets.
5.2 Color Swatch List (with Scroll)
self.color_canvas = tk.Canvas(color_list_frame, bg="#f0f0f0")
self.color_frame = tk.Frame(self.color_canvas, bg="#f0f0f0")
self.color_canvas.create_window((0, 0), window=self.color_frame, anchor="nw")
scrollbar = ttk.Scrollbar(color_list_frame, orient="vertical", command=self.color_canvas.yview)
- Using the classic “Canvas + Frame” scrolling solution:
- Canvas provides the scrolling area;
- Frame holds the color swatch rows;
- Bind
<span><Configure></span>to dynamically update<span>scrollregion</span>.
5.3 Single Color Swatch Row
color_row = tk.Frame(self.color_frame, bg="#f0f0f0")
color_block = tk.Frame(color_row, bg=hex_color, width=30, height=30, bd=1, relief=tk.SOLID)
color_label = tk.Label(color_row, text=hex_color, font=font.Font(size=9))
select_btn = tk.Button(color_row, text="Select", command=lambda c=color: self.select_color(c))
- Color swatch row consists of three components: color block, text, and button → arranged horizontally using
<span>pack(side=tk.LEFT)</span>, keeping it neat and clean. <span>lambda</span>captures the current color value to avoid circular reference traps.
6️⃣ Color Extraction Algorithm
img.thumbnail((100, 100))      # Step 1: Downsampling
color_counts = defaultdict(int)
for x in range(width):
    for y in range(height):
        color = img.getpixel((x, y))
        simplified_color = tuple(c // 32 * 32 for c in color)  # Step 2: Quantization
        color_counts[simplified_color] += 1
sorted_colors = sorted(color_counts.items(), key=lambda item: item[1], reverse=True)[:30]
- Downsampling: Resizing to within 100×100, reducing O(n) complexity significantly.
- Quantization: 8 levels per channel (0~255 → 0,32,64…224), merging similar colors.
- Frequency Sorting: Taking the top 30 ensures visual differences without overload.
7️⃣ Color Picking Mode and Marking
7.1 Mode Switching
def toggle_color_picking(self):
    self.picking_color = not self.picking_color
    if self.picking_color:
        self.pick_color_btn.configure(bg="#f44336")
        self.canvas.config(cursor="plus")
- Using a boolean variable
<span>picking_color</span>to control the state machine, changing the button to red and the cursor to a plus sign for intuitive UI feedback.
7.2 Click Coordinate Mapping
img_x = int((event.x - self.image_position[0]) / self.scale_ratio)
- Mapping event coordinates to original image coordinates: subtracting the offset and dividing by the scale ratio ensures accuracy.
7.3 Drawing Red Box Markings
marker_size = 10
self.canvas.create_rectangle(
    x - marker_size, y - marker_size,
    x + marker_size, y + marker_size,
    outline="red", dash=(2, 2), tags="color_marker"
)
<span>dash=(2,2)</span>creates a dashed box, which is visually appealing and does not obscure the original image.- Using
<span>tags="color_marker"</span>to unify markings, allowing for deletion of previous markers on subsequent clicks to avoid overlap.
8️⃣ Clipboard and Status Bar
self.root.clipboard_clear()
self.root.clipboard_append(hex_color)
self.status_var.set(f"Color value copied: {hex_color}")
- Two lines to handle the clipboard, with
<span>clipboard_clear()</span>preventing old values from lingering. <span>status_var</span>uses<span>StringVar</span>for real-time updates, allowing the bottom status bar to reflect the current operation at a glance.
9️⃣ Summary and Expandable Directions
9.1 Knowledge Points Learned
- Interface Hierarchy: Main Window → Left and Right Sections → Internal Modules → Specific Controls, progressing layer by layer.
- Event-Driven: Button commands, Canvas clicks, Window Configure events, with clear logic.
- Image Processing: PIL reading/writing, scaling, pixel traversal, color quantization.
- Data Visualization: Frame grid display of color swatches, Canvas scrolling area.
- User Experience: Status bar, cursor, color feedback, clipboard, with attention to detail.
9.2 Expandable Directions
- Palette Export: One-click generation of
<span>.aco</span>(Photoshop) or<span>.gpl</span>(GIMP) palette files. - Real-time Camera Color Picking: Using OpenCV to capture images, dynamically refreshing with Tkinter.
- Theme Switching: Two sets of CSS-style color schemes for dark/light themes, managed with
<span>ttk.Style</span>. - Color Analysis: Calculating dominant color temperature, complementary colors, similar colors, and providing color matching suggestions.
🏁 Conclusion
This 2000+ word breakdown lays out everything from the “color picker” as a “button” to “a drop of color”: window hierarchy, color algorithms, interaction states, clipboard mechanisms, with each detail presented in a rhythm of “structure first, then code.” I hope you take this magical dropper and not only extract colors but also appreciate the beauty of code!
Python’s 20-Day Learning Plan
Python’s 7-Day Learning Plan
Top 10 Basic Libraries in Python
Developing a Ping Pong Game with Pygame Module
Python Tic-Tac-Toe Game
Opening Local Files Like a Browser in Python
Transforming ID Photos into “Sakura” in Python
Implementing an Image Color Extractor in Python
Creating a Text-to-Speech Assistant in Python
Implementing a Multifunctional 2D Generator in Python
Creating a Foolproof GIF Meme Generator in Python
Implementing a Local Camera Viewer in Python
Simple Implementation of DeepSeek’s Q&A Chat in Python
Implementing a Video Player in Python
Creating a Simple Notepad in Python
Implementing a Multifunctional Application in Python
Creating a Chinese Idiom Matching Game in Python
Implementing a Process Killing System in Python
Creating a Multifunctional Desktop Application in Python
Automatically Generating Text Content with Volcano API in Python
Generating Text Stories with Doubao AI in Python
Creating a Simple Notepad in Python
Implementing a Drawing Browser Tool Code in Python
Implementing Simple Drawing Tool Code in Python
Creating a To-Do Reminder Tool in Python
Implementing a Local Camera Viewer in Python
Converting Markdown to HTML Tool Code in Python
Sending 163 Email Notifications in Python
【Follow for More Updates】
Python: A Very Interesting Game – Source Code for 2048
Python: A Very Interesting Mini Game – Snake
Python: A Super Useful Tool – Word Frequency Statistics Tool
Python: A Practical Tool – Simple Web Scraper for Weather
Python: A Super Useful Tool – Scheduled Task Reminder Tool
Python: “Guess the Number Game Code Analysis”
Python: “Password Generator Code Analysis”
Python: “Batch Renaming Tool Code Analysis”
Python: “Student Grade Management System Code Analysis”
Python: “Stock Data Analysis Tool Code Analysis”
Python + AI: Implementing an Intelligent Voice Assistant
Python: “Simple Calculator Code Analysis”
Python + AI: Implementing an Online Document Generation Assistant
Python: A Practical Tool – Simple Web Scraper for Weather
Python: Implementing a Process Killing System
Python: Implementing a Link Game Code
Python: Implementing an AI Sentiment Analysis Tool
Python: Implementing a Local Camera Viewer
Python: Implementing a Simple Real-World Scenario (like a simple intelligent Q&A system, text summary generation, etc.)