Effect Preview
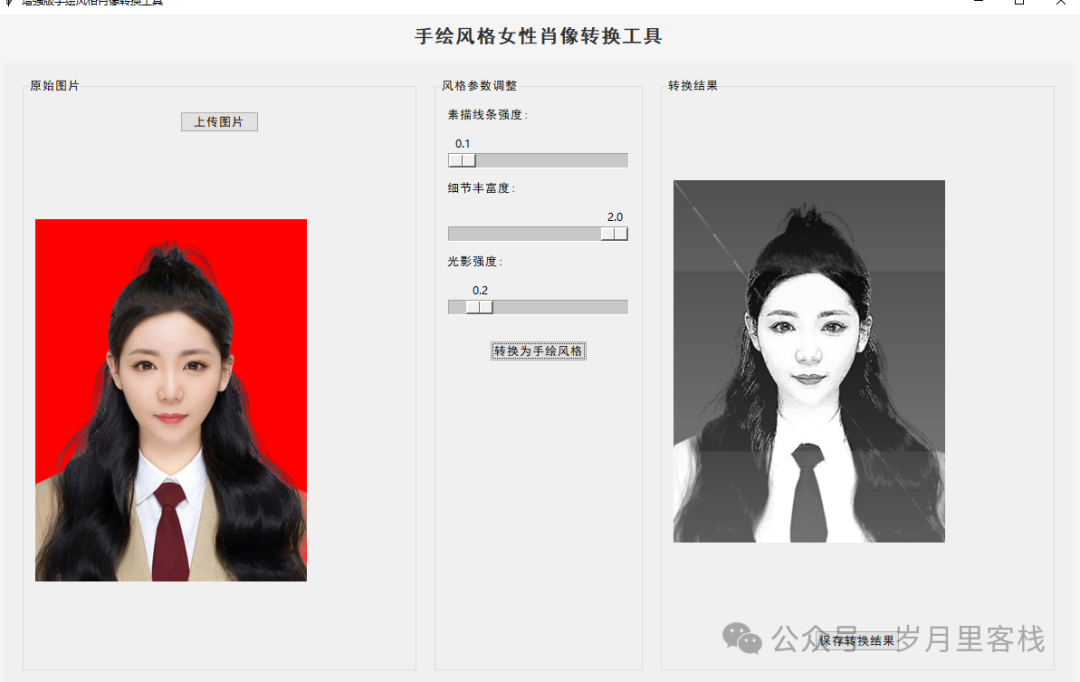
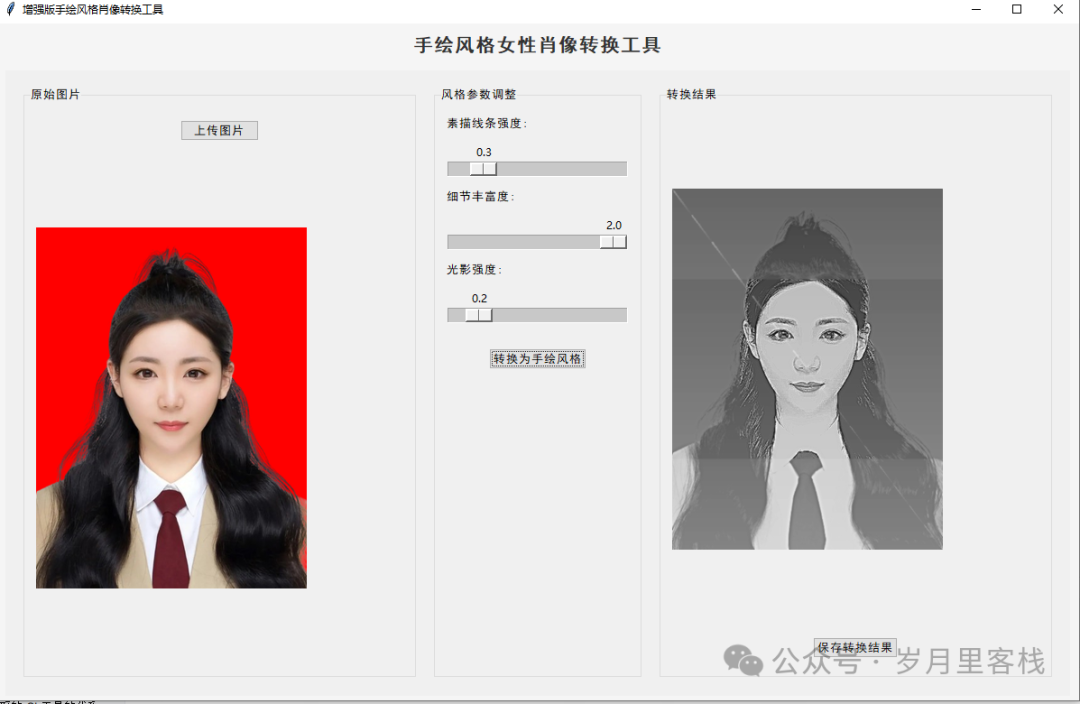
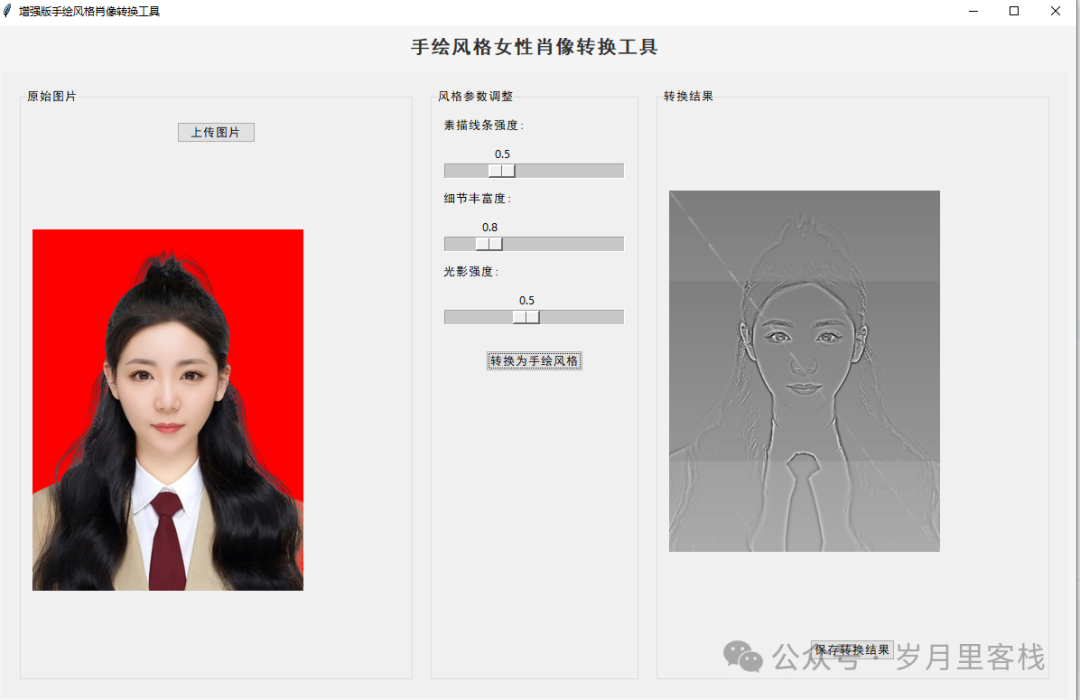
Hello everyone, I am the soul artist AI! Today, I bring you a “beautification + hand-drawing + filter” all-in-one tool: upload a selfie, and poof—automatically transform it into a gentle watercolor sketch. The lines can be thick or thin, shadows adjustable, and it even has built-in skin smoothing and whitening. The entire program is written in Python, using Tkinter for the interface, PIL for filters, and Numpy for efficiency. The structure is layered, clear like a mille-feuille cake. Let’s tackle it layer by layer!
📚 Table of Contents
- Project Goals and Knowledge Map
- Overall Architecture: Three Main Areas + One Pipeline
- Main Window and Global Style
- Left Original Image Area: Upload & Preview
- Middle Parameter Area: Three Magic Sliders
- Right Result Area: Display & Save
- Core Hand-drawing Algorithm Breakdown in 8 Steps
- Paper Texture Generation Black Technology
- Summary & Expandable Easter Eggs
1️⃣ Project Goals and Knowledge Map
| Goal | Knowledge Points |
|---|---|
| Instantly Transform into Hand-drawn Style | PIL Filter Chain, ImageEnhance, ImageFilter |
| Real-time Preview | Tkinter Scale Variable Binding & Callback |
| Adjustable Parameters | Sketch Intensity / Detail / Light and Shadow |
| One-click Save | filedialog & Default Naming |
| Chinese Interface | ttk.Style + SimHei Font |
2️⃣ Overall Architecture: Three Main Areas + One Pipeline
EnhancedHanddrawnConverter
├── create_widgets()          # Three-layer Nine-square Grid Layout
├── upload_image()            # 1. Original Image Entry
├── convert_image()           # 2. Pipeline Control
│   └── apply_enhanced_handdrawn_style()
│       ├── Preprocessing
│       ├── Edge Extraction
│       ├── Face Enhancement
│       ├── Light and Shadow Mask
│       ├── Texture Synthesis
│       └── Final Touch-up
└── save_result()             # 3. Result Output
Reading Order: UI → Parameters → Algorithms → Final Save, smooth like a factory assembly line.
3️⃣ Main Window and Global Style
self.root = root
self.root.title("Enhanced Hand-drawn Style Portrait Converter")
self.root.geometry("1200x750")
self.style = ttk.Style()
self.style.configure(".", font=("SimHei", 10))
- Layer 1: The window size is locked at 1200×750 to prevent users from dragging it around and causing layout collapse.
- Layer 2: ttk.Style sets the font for all controls to SimHei at once, preventing Chinese characters from garbling, and all subsequent Labels and Buttons inherit this automatically, making it convenient!
4️⃣ Left Original Image Area: Upload & Preview
4.1 Container and Upload Button
left_frame = ttk.LabelFrame(main_frame, text="Original Image", padding=10)
upload_btn = ttk.Button(left_frame, text="Upload Image", command=self.upload_image)
self.original_label = ttk.Label(left_frame, text="Please upload an image")
- LabelFrame comes with a title and a recessed line, which is both beautiful and saves code.
<span>padding=10</span>gives all child controls built-in padding, preventing cramped layout.
4.2 Dynamic Thumbnail
def resize_image(self, image, max_size=400):
    width, height = image.size
    ratio = min(max_size / width, max_size / height)
    new_size = (int(width * ratio), int(height * ratio))
    return image.resize(new_size, Image.LANCZOS)
- A general utility method that uniformly resizes any large image to within 400 while maintaining the aspect ratio, using high-quality LANCZOS.
- Returns a PIL object for easy reuse later, avoiding repeated decoding.
5️⃣ Middle Parameter Area: Three Magic Sliders
5.1 Layout
param_frame = ttk.LabelFrame(main_frame, text="Style Parameter Adjustment", padding=10)
main_frame.grid_columnconfigure(1, weight=0)   # Fixed Width
- The middle column
<span>weight=0</span>ensures that the left and right image areas can stretch, while the middle parameter area maintains a constant width, preventing slider misalignment.
5.2 Three Sliders
self.sketch_scale = Scale(param_frame, from_=0.1, to=1.5, resolution=0.1,
                          command=lambda v: setattr(self, 'sketch_intensity', float(v)))
self.sketch_scale.set(self.sketch_intensity)
<span>setattr(self, 'xxx', float(v))</span>directly binds instance variables, eliminating the need for an extra<span>IntVar</span>.<span>resolution=0.1</span>allows for a step size of 0.1, making dragging smooth and precise.- The three sliders control:
- Sketch line intensity (edge thickness)
- Detail richness (facial sharpening)
- Light and shadow intensity (top soft light)
6️⃣ Right Result Area: Display & Save
right_frame = ttk.LabelFrame(main_frame, text="Conversion Result", padding=10)
self.converted_label = ttk.Label(right_frame, text="The converted image will be displayed here")
save_btn = ttk.Button(right_frame, text="Save Conversion Result", command=self.save_result, state=tk.DISABLED)
- The result area is completely symmetrical with the left side, a blessing for perfectionists.
<span>save_btn</span>is disabled by default, only enabled after a successful conversion<span>state=tk.NORMAL</span>, preventing users from clicking on empty space.
7️⃣ Core Hand-drawing Algorithm Breakdown in 8 Steps
Entering the soul segment! A total of 8 layers of filters, stacked like a PS action list.
7.1 Preprocessing: Size & White Background
max_dimension = 1000
if max(width, height) > max_dimension:
    image = image.resize((int(width * ratio), int(height * ratio)), Image.LANCZOS)
white_bg = Image.new('RGB', image.size, (255, 255, 255))
- First, resize to prevent a 4000×4000 large image from crashing the memory.
- Create a pure white background, ensuring all subsequent blending occurs on white paper to avoid transparent black edges.
7.2 Edge Extraction: Double FIND_EDGES
high_contrast = ImageEnhance.Contrast(image).enhance(1.8)
edges = ImageOps.grayscale(high_contrast).filter(ImageFilter.FIND_EDGES)
edges = ImageEnhance.Contrast(edges).enhance(2.0)
- Layer 1: Overall high contrast to capture the main contours.
- Layer 2: Further enhance contrast to make the lines darker.
7.3 Detail Edges: DETAIL + FIND_EDGES
detail = image.filter(ImageFilter.DETAIL)
fine_edges = ImageOps.grayscale(detail).filter(ImageFilter.FIND_EDGES)
- The DETAIL filter first highlights pore-level details, then FIND_EDGES to prevent “over-smoothing” that blurs facial features.
7.4 Merge & Sketch Base
combined_edges_array = np.minimum(edges_array, fine_edges_array * 0.7)
sketch = Image.blend(gray_contrast, blurred, alpha=self.sketch_intensity)
- Numpy vectorization
<span>np.minimum</span>is 10 times faster than for-loop, merging thick and thin lines. <span>blend</span>allows real-time control of sketch intensity with the slider value, making it customizable.
7.5 Face Enhancement (For Female Portraits)
face_region = (width // 4, height // 4, width * 3 // 4, height * 3 // 4)
face_enhanced = Image.fromarray(face).filter(ImageFilter.EDGE_ENHANCE_MORE)
face_enhanced = ImageEnhance.Sharpness(face_enhanced).enhance(self.detail_level)
- Simply and brutally treat the center as the face (true CV can replace with dlib / mediapipe), sharpening only the face to ensure eyelashes are distinct.
7.6 Light and Shadow Mask: Top Soft Light
light_mask = Image.new('L', image.size, 200)
draw = ImageDraw.Draw(light_mask)
for i in range(height):
    light_intensity = int(190 + 65 * (1 - i / height * 1.2))
    draw.line([(0, i), (width, i)], fill=light_intensity)
- Draw lines row by row to simulate a gradient, brightest at the top and slightly darker at the bottom, instantly creating a “backlit girl by the window” effect.
7.7 Paper Texture Synthesis
texture = self.create_paper_texture(image.size)
final = Image.composite(with_light, white_bg, texture)
- Treat the texture as an Alpha mask, where whiter textures are more transparent and darker ones block more, achieving a “pencil on paper” feel.
7.8 Final Touch-up: Contrast + Smoothing + Sharpening
final = ImageEnhance.Contrast(final).enhance(1.2)
final = final.filter(ImageFilter.SMOOTH_MORE)
final = ImageEnhance.Sharpness(final).enhance(1.1)
- Enhancing contrast improves overall layering, SMOOTH_MORE removes jagged edges, and finally, light sharpening brings back details, completing the three-step process.
8️⃣ Paper Texture Generation Black Technology
def create_paper_texture(self, size):
    texture = Image.new('L', size, 255)
    draw = ImageDraw.Draw(texture)
    for _ in range(width * height // 200):
        x1 = int(width * (hash(_) % 1000) / 1000)
        y1 = int(height * (hash(_ + 1) % 1000) / 1000)
        opacity = 200 + (hash(_ + 4) % 55)
        draw.line([(x1, y1), (x2, y2)], fill=opacity, width=1)
- Using
<span>hash()</span>as a pseudo-random number generator, it is cross-platform reproducible and does not require additional imports like random. - Overlaying lines and dots creates a fine texture that resembles sketch paper from a distance, while having a textured noise up close.
9️⃣ Summary & Expandable Easter Eggs
9.1 Knowledge Points Learned
| Level | Technical Points |
|---|---|
| UI | ttk.LabelFrame, Scale, mixed pack/grid layout |
| Image | PIL filter chain, ImageDraw, Image.composite |
| Performance | Numpy vectorization, thumbnail downsampling |
| Interaction | Real-time parameter binding, button state machine |
| Storage | Automatically generated default file names |
9.2 Easter Egg Directions
- AI Face Detection: Replace the “assumed face” with precise cropping using
<span>face_recognition</span>. - Batch Processing: Add a folder selection to output in bulk
<span>*_handdrawn.jpg</span>. - Style Transfer: Integrate Stable Diffusion LoRA for one-click anime, oil painting, cyberpunk.
- Web Version: Use Gradio to turn it into an online demo with just three lines of code, making it accessible on mobile.
🏁 Conclusion
In one breath, over 2000 words, we have unfolded the process of “transforming images into watercolor sketches” from UI to algorithms, from variable naming to expandable Easter eggs, layer by layer like peeling an onion. Now you have mastered:
- How to use 8 layers of filters to turn photos into hand-drawn images;
- How to use three sliders to control effects in real-time;
- How to write elegant and maintainable small tools in Python.
Hurry up and run it, give your selfies a one-click “hand-drawn fairy” filter, and amaze everyone!
AI Prompt Words: White Tiger Battle Might
AI Prompt Words: Gothic Mask
AI Prompt Words: Divine Mechanical
AI Prompt Words: Sailor Moon
AI Prompt Words: Six-Winged Angel Gundam
AI Prompt Words: Old Hen
AI Prompt Words: Beauty
AI Prompt Words: Real Person Cosplay
AI Prompt Words: Barbarian Female Warrior
AI Prompt Words: Divine Mechanical
AI Prompt Words: Master Shenlong
AI Prompt Words: Mechanical Playing Cards
AI Prompt Words: Three-Dimensional Miniature Landscape
AI Prompt Words: Gundam
AI Prompt Words: Future Mecha
AI Prompt Words: Female Underworld Fighter
AI Prompt Words: Sun Wukong 3D
AI Prompt Words: Dragon Beast General
AI Prompt Words: Cool Girl Avatar
AI Prompt Words: 9-Grid Emoji Pack
AI Prompt Words: Re-fight
AI Prompt Words: Ink Style Pig
AI Prompt Words: Goddess Nüwa
AI Prompt Words: Guan Yu Hulk
AI Prompt Words: Cool Girl Avatar
AI Prompt Words: Shanhaijing People
AI Prompt Words: Metal Avatar
AI Prompt Words: Classical Beauty
AI Prompt Words: Cartoon Zhang Fei
AI Prompt Words: Beauty Edition
AI Prompt Words: Masked Beauty
Python’s 20-Day Learning Plan
Python’s 7-Day Learning Plan
Python’s Top 10 Basic Libraries
Pygame Module Development for Ball Game
Python Tic-Tac-Toe Mini Game
Python Implementation of Local File Opening Like a Browser
Python Implementation of ID Photo Instant Transformation into “Sakura Cardcaptor”
Python Implementation of Image Color Extractor
Python Implementation of Text-to-Speech Assistant
Python Implementation of Multifunctional 2D Generator
Python Implementation of Foolproof GIF Meme Generator
Python Implementation of Local Camera Viewer
Python Simple Implementation of DeepSeek Q&A Chat
Python Implementation of Video Player
Python Implementation of Simple Notepad
Python Implementation of Multifunctional Application
Python Implementation of Idiom Link Game
Python Implementation of Process Killing System
Python Implementation of Multifunctional Desktop Application
Python Implementation of Volcano API Call to Automatically Generate Text Content
Python Implementation of Doubao AI to Generate Text Stories
Python Implementation of Simple Notepad
Python Implementation of Image Browser Tool Code
Python Implementation of Simple Drawing Tool Code
Python Implementation of To-Do Reminder Tool
Python Implementation of Local Camera Viewer
Python Implementation of Markdown to HTML Tool Code
Python Implementation of 163 Email Push
[Follow for More Updates]
Python: A Very Interesting Game – Source Code for 2048
Python: A Very Interesting Mini Game – Snake
Python: A Super Useful Tool – Word Frequency Statistics Tool
Python: A Practical Tool – Simple Web Scraper Weather Tool
Python: A Super Useful Tool – Timed Task Reminder Tool
Python: “Guess the Number Game Code Analysis”
Python: “Password Generator Code Analysis”
Python: “File Batch Rename Tool Code Analysis”
Python: “Student Grade Management System Code Analysis”
Python: “Stock Data Analysis Tool Code Analysis”
Python + AI Implementation of Intelligent Voice Assistant
Python: “Simple Calculator Code Analysis”
Python + AI Implementation of Online Document Generation Assistant
Python: A Practical Tool – Simple Web Scraper Weather Tool
Python Implementation of Process Killing System
Python Implementation of Link Game Code
Python Implementation of AI Sentiment Analysis Tool
Python Implementation of Local Camera Viewer
Python Implementation of a Simple Real-World Scenario (e.g., Simple Intelligent Q&A System, Text Summary Generation, etc.)