Author: woshigaowei5146 @CSDN
Editor: 3D Vision Developer Community
Table of Contents
Preparation
content
Preparation
Configuration
Testing
Program
Color Recognition Tracking
Face Recognition
Gesture Recognition
Shape Recognition
Barcode Recognition
QR Code Recognition
Troubleshooting
Preparation
-
Raspberry Pi 4B
-
USB Camera
Configuration
Install python-opencv, reference: https://blog.csdn.net/weixin_45911959/article/details/122709090
Install numpy, pip3 install-U numpy
Install opencv-python, opencv-contrib-python, reference: https://blog.csdn.net/weixin_57605235/article/details/121512923
Testing
Image:
import cv2
a=cv2.imread("/home/pi/2020-06-15-162551_1920x1080_scrot.png")
cv2.imshow("test",a)
cv2.waitKey()
cv2.destroyAllWindows()
Video:
import cv2
cap = cv2.VideoCapture(0)
while True:    ret, frame = cap.read()    cv2.imshow('frame', frame)    # This step is necessary, otherwise the image cannot be displayed    if cv2.waitKey(1) & 0xFF == ord('q'):        break
# When everything is done, release the capture
cap.release()
cv2.destroyAllWindows()
Program
Color Recognition Tracking
import sys
import cv2
import math
import time
import threading
import numpy as np
import HiwonderSDK.yaml_handle as yaml_handle
if sys.version_info.major == 2: print('Please run this program with python3!') sys.exit(0)
range_rgb = { 'red': (0, 0, 255), 'blue': (255, 0, 0), 'green': (0, 255, 0), 'black': (0, 0, 0), 'white': (255, 255, 255)}
__target_color = ('red', 'green', 'blue')
lab_data = yaml_handle.get_yaml_data(yaml_handle.lab_file_path) # Find the contour with the largest area
# The parameter is the list of contours to compare
def getAreaMaxContour(contours): contour_area_temp = 0 contour_area_max = 0 area_max_contour = None
for c in contours: # Iterate through all contours contour_area_temp = math.fabs(cv2.contourArea(c)) # Calculate contour area if contour_area_temp > contour_area_max: contour_area_max = contour_area_temp if contour_area_temp > 300: # Only when the area is greater than 300, the largest area contour is valid, to filter interference area_max_contour = c
return area_max_contour, contour_area_max # Return the largest contour
detect_color = None
color_list = []
start_pick_up = False
size = (640, 480)
def run(img): global rect global detect_color global start_pick_up global color_list img_copy = img.copy() frame_resize = cv2.resize(img_copy, size, interpolation=cv2.INTER_NEAREST) frame_gb = cv2.GaussianBlur(frame_resize, (3, 3), 3) frame_lab = cv2.cvtColor(frame_gb, cv2.COLOR_BGR2LAB) # Convert image to LAB space color_area_max = None max_area = 0 areaMaxContour_max = 0 if not start_pick_up: for i in lab_data: if i in __target_color: frame_mask = cv2.inRange(frame_lab, (lab_data[i]['min'][0], lab_data[i]['min'][1], lab_data[i]['min'][2]), (lab_data[i]['max'][0], lab_data[i]['max'][1], lab_data[i]['max'][2])) # Perform bitwise operation on the original image and mask opened = cv2.morphologyEx(frame_mask, cv2.MORPH_OPEN, np.ones((3, 3), np.uint8)) # Open operation closed = cv2.morphologyEx(opened, cv2.MORPH_CLOSE, np.ones((3, 3), np.uint8)) # Close operation contours = cv2.findContours(closed, cv2.RETR_EXTERNAL, cv2.CHAIN_APPROX_NONE)[-2] # Find contours areaMaxContour, area_max = getAreaMaxContour(contours) # Find the largest contour if areaMaxContour is not None: if area_max > max_area: # Find the largest area max_area = area_max color_area_max = i areaMaxContour_max = areaMaxContour if max_area > 500: # Found the largest area rect = cv2.minAreaRect(areaMaxContour_max) box = np.int0(cv2.boxPoints(rect)) y = int((box[1][0]-box[0][0])/2+box[0][0]) x = int((box[2][1]-box[0][1])/2+box[0][1]) print('X:',x,'Y:',y) # Print coordinates cv2.drawContours(img, [box], -1, range_rgb[color_area_max], 2) if not start_pick_up: if color_area_max == 'red': # Red is the largest color = 1 elif color_area_max == 'green': # Green is the largest color = 2 elif color_area_max == 'blue': # Blue is the largest color = 3 else: color = 0 color_list.append(color) if len(color_list) == 3: # Multiple judgments # Take the average color = int(round(np.mean(np.array(color_list)))) color_list = [] if color == 1: detect_color = 'red'
elif color == 2: detect_color = 'green'
elif color == 3: detect_color = 'blue'
else: detect_color = 'None'
## cv2.putText(img, "Color: " + detect_color, (10, img.shape[0] - 10), cv2.FONT_HERSHEY_SIMPLEX, 0.65, detect_color, 2) return img
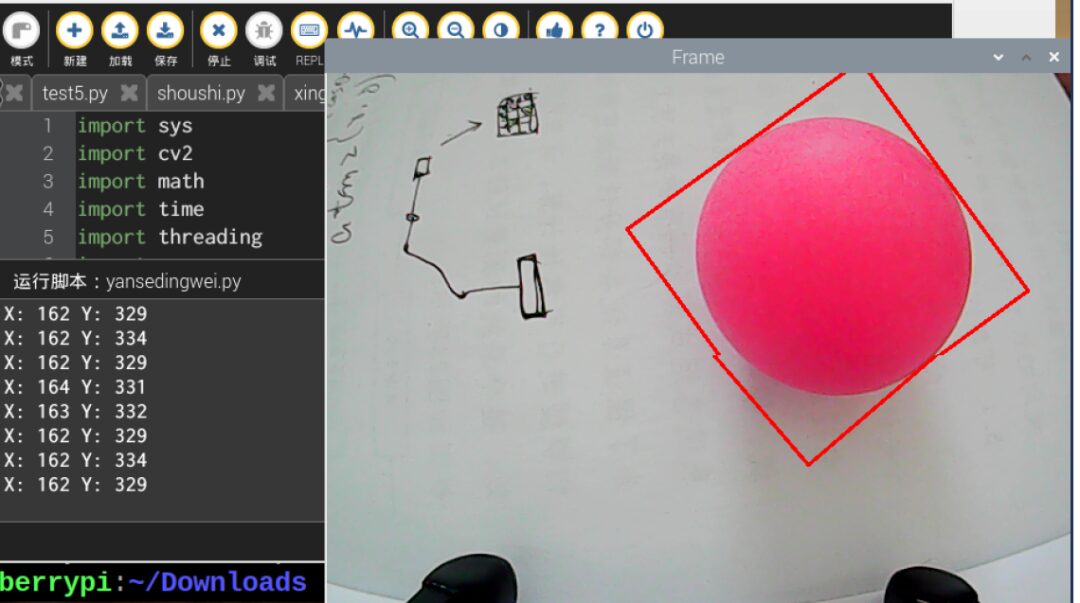
if __name__ == '__main__': cap = cv2.VideoCapture(-1) # Read the camera __target_color = ('red',) while True: ret, img = cap.read() if ret: frame = img.copy() Frame = run(frame) cv2.imshow('Frame', Frame) key = cv2.waitKey(1) if key == 27: break else: time.sleep(0.01) cv2.destroyAllWindows()Effect:
Face Recognition
Utilizes a face dataset trained with Caffe.
import sys
import numpy as np
import cv2
import math
import time
import threading
# Face detection
if sys.version_info.major == 2:    print('Please run this program with python3!')    sys.exit(0)
# Threshold
conf_threshold = 0.6
# Model location
modelFile = "/home/pi/mu_code/models/res10_300x300_ssd_iter_140000_fp16.caffemodel"
configFile = "/home/pi/mu_code/models/deploy.prototxt"
net = cv2.dnn.readNetFromCaffe(configFile, modelFile)
frame_pass = True
x1=x2=y1=y2 = 0
old_time = 0
def run(img):    global old_time    global frame_pass    global x1,x2,y1,y2
    if not frame_pass:        frame_pass = True        cv2.rectangle(img, (x1, y1), (x2, y2), (0, 255, 0), 2, 8)        x1=x2=y1=y2 = 0        return img    else:        frame_pass = False
    img_copy = img.copy()    img_h, img_w = img.shape[:2]    blob = cv2.dnn.blobFromImage(img_copy, 1, (100, 100), [104, 117, 123], False, False)    net.setInput(blob)    detections = net.forward() # Calculate recognition
    for i in range(detections.shape[2]):        confidence = detections[0, 0, i, 2]        if confidence > conf_threshold:            # Convert the coordinates of the detected person back to the original scale            x1 = int(detections[0, 0, i, 3] * img_w)            y1 = int(detections[0, 0, i, 4] * img_h)            x2 = int(detections[0, 0, i, 5] * img_w)            y2 = int(detections[0, 0, i, 6] * img_h)            cv2.rectangle(img, (x1, y1), (x2, y2), (0, 255, 0), 2, 8) # Draw a rectangle around the detected face                        X = (x1 + x2)/2            Y = (y1 + y2)/2            print('X:',X,'Y:',Y)    return img
if __name__ == '__main__':    cap = cv2.VideoCapture(-1) # Read the camera    while True:        ret, img = cap.read()        if ret:            frame = img.copy()            Frame = run(frame)            cv2.imshow('Frame', Frame)            key = cv2.waitKey(1)            if key == 27:                break        else:            time.sleep(0.01)    cv2.destroyAllWindows(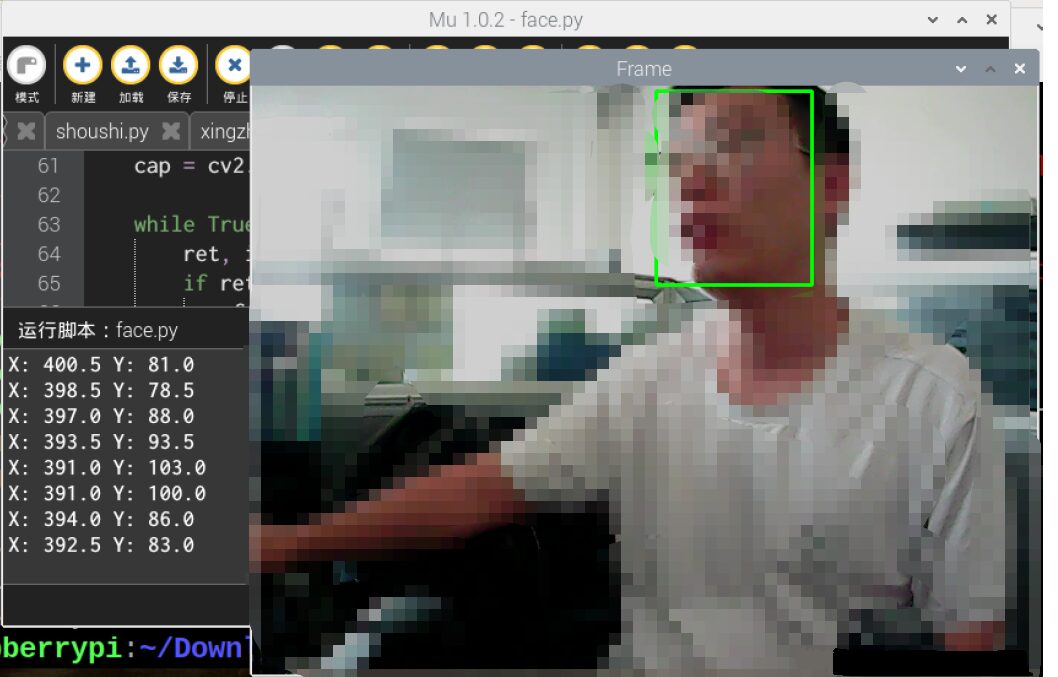
Gesture Recognition
import os
import sys
import cv2
import math
import time
import numpy as np
import HiwonderSDK.Misc as Misc
if sys.version_info.major == 2:    print('Please run this program with python3!')    sys.exit(0)
__finger = 0
__t1 = 0
__step = 0
__count = 0
__get_finger = False
# Initial position
def initMove():    pass
def reset():    global __finger, __t1, __step, __count, __get_finger    __finger = 0    __t1 = 0    __step = 0    __count = 0    __get_finger = False    def init():    reset()    initMove()
class Point(object):  # A coordinate point    x = 0    y = 0
    def __init__(self, x=0, y=0):        self.x = x        self.y = y
class Line(object):  # A line    def __init__(self, p1, p2):        self.p1 = p1        self.p2 = p2
def GetCrossAngle(l1, l2):    '''    Calculate the angle between two lines    :param l1:    :param l2:    :return:    '''    arr_0 = np.array([(l1.p2.x - l1.p1.x), (l1.p2.y - l1.p1.y)])    arr_1 = np.array([(l2.p2.x - l2.p1.x), (l2.p2.y - l2.p1.y)])    cos_value = (float(arr_0.dot(arr_1)) / (np.sqrt(arr_0.dot(arr_0))                                            * np.sqrt(arr_1.dot(arr_1))))   # Note: convert to float for calculation    return np.arccos(cos_value) * (180/np.pi)
def distance(start, end):    """    Calculate the distance between two points    :param start: Start point    :param end: End point    :return: Returns the distance between the two points    """    s_x, s_y = start    e_x, e_y = end    x = s_x - e_x    y = s_y - e_y    return math.sqrt((x**2)+(y**2))
def image_process(image, rw, rh):  # hsv    '''    # Light affects, please modify the range of cb    # Normal yellow race people's Cr component is about 140~160    Recognize skin color    :param image: Image    :return: Binary image after recognition    '''    frame_resize = cv2.resize(image, (rw, rh), interpolation=cv2.INTER_CUBIC)    YUV = cv2.cvtColor(frame_resize, cv2.COLOR_BGR2YCR_CB)  # Convert image to YCrCb    _, Cr, _ = cv2.split(YUV)  # Split YCrCb    Cr = cv2.GaussianBlur(Cr, (5, 5), 0)        _, Cr = cv2.threshold(Cr, 135, 160, cv2.THRESH_BINARY +                          cv2.THRESH_OTSU)  # OTSU Binarization
    # Open operation to remove noise    open_element = cv2.getStructuringElement(cv2.MORPH_RECT, (5, 5))    opend = cv2.morphologyEx(Cr, cv2.MORPH_OPEN, open_element)    # Erosion    kernel = np.ones((3, 3), np.uint8)    erosion = cv2.erode(opend, kernel, iterations=3)
    return erosion
def get_defects_far(defects, contours, img):    '''    Get the farthest point in the convex hull    '''    if defects is None and contours is None:        return None    far_list = []    for i in range(defects.shape[0]):        s, e, f, d = defects[i, 0]        start = tuple(contours[s][0])        end = tuple(contours[e][0])        far = tuple(contours[f][0])        # Calculate the distance between two points        a = distance(start, end)        b = distance(start, far)        c = distance(end, far)        # Calculate the angle between fingers        angle = math.acos((b ** 2 + c ** 2 - a ** 2) /                          (2 * b * c)) * 180 / math.pi        # The angle between fingers is generally not greater than 100 degrees        # Less than 90 degrees        if angle <= 75:  # 90:            # cv.circle(img, far, 10, [0, 0, 255], 1)            far_list.append(far)    return far_list
def get_max_coutour(cou, max_area):    '''    Find the largest contour    Calculate based on area, after finding the largest, judge whether it is less than the minimum area, if less, give up    :param cou: Contour    :return: Return the largest contour    '''    max_coutours = 0    r_c = None    if len(cou) < 1:        return None    else:        for c in cou:            # Calculate area            temp_coutours = math.fabs(cv2.contourArea(c))            if temp_coutours > max_coutours:                max_coutours = temp_coutours                cc = c        # Determine the largest area among all contours        if max_coutours > max_area:            r_c = cc        return r_c
def find_contours(binary, max_area):    '''    CV_RETR_EXTERNAL - Only extract the outermost contour    CV_RETR_LIST - Extract all contours and place them in a list    CV_RETR_CCOMP - Extract all contours and organize them into two layers of hierarchy: the top layer is the outer boundary of the connected domain, and the second layer is the inner boundary of the hole.    CV_RETR_TREE - Extract all contours and reconstruct the entire hierarchy of nested contours    method  Approximating method (for all nodes, excluding using internal approximation CV_RETR_RUNS).    CV_CHAIN_CODE - Output contour of Freeman chain code. Other methods output polygons (point sequence).    CV_CHAIN_APPROX_NONE - Converts all points from chain code form to point sequence form    CV_CHAIN_APPROX_SIMPLE - Compresses horizontal, vertical and diagonal segments, that is, the function only retains the end pixel points;    CV_CHAIN_APPROX_TC89_L1,    CV_CHAIN_APPROX_TC89_KCOS - Apply the Teh-Chin chain approximation algorithm. CV_LINK_RUNS - Uses a completely different contour extraction algorithm by connecting horizontal fragments with a value of 1    :param binary: The binary image passed in    :return: Return the largest contour    '''    # Find all contours    contours = cv2.findContours(        binary, cv2.RETR_EXTERNAL, cv2.CHAIN_APPROX_NONE)[-2]    # Return the largest contour    return get_max_coutour(contours, max_area)
def get_hand_number(binary_image, contours, rw, rh, rgb_image):    '''    :param binary_image:    :param rgb_image:    :return:    '''    # # 2、Find the position of the fingertips    # # Find contours, return the largest contour    x = 0    y = 0    coord_list = []    new_hand_list = []  # Get the final finger coordinates
    if contours is not None:        # Perimeter  0.035 Modify according to recognition situation, the better the recognition, the smaller it is        epsilon = 0.020 * cv2.arcLength(contours, True)        # Contour similarity        approx = cv2.approxPolyDP(contours, epsilon, True)    # Draw polygon
def run(img, debug=False):    global __act_map, __get_finger    global __step, __count, __finger    binary = image_process(img, 320, 240)    contours = find_contours(binary, 3000)    img, finger = get_hand_number(binary, contours, 320, 240, img)    if not __get_finger:        if finger == __finger:            __count += 1        else:            __count = 0        __finger = finger            cv2.putText(img, "Finger(s):%d" % __finger, (50, 480 - 30),                cv2.FONT_HERSHEY_SIMPLEX, 1.2, (0, 255, 255), 2)# Write the number of recognized fingers on the image        return img
if __name__ == '__main__':        init()    cap = cv2.VideoCapture(-1) # Read the camera    while True:        ret, img = cap.read()        if ret:            frame = img.copy()            Frame = run(frame)                       frame_resize = cv2.resize(Frame, (320, 240))            cv2.imshow('frame', frame_resize)            key = cv2.waitKey(1)            if key == 27:                break        else:            time.sleep(0.01)    cv2.destroyAllWindows()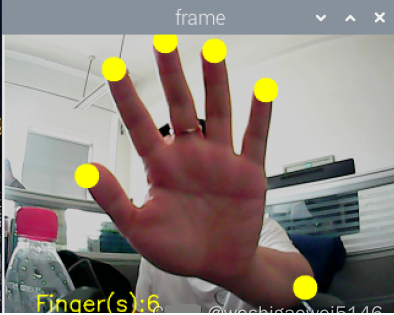
Shape Recognition
import sys
import cv2
import math
import time
import threading
import numpy as np
import HiwonderSDK.tm1640 as tm
import RPi.GPIO as GPIO
GPIO.setwarnings(False)
GPIO.setmode(GPIO.BCM)
color_range = {'red': [(0, 101, 177), (255, 255, 255)], 'green': [(47, 0, 135), (255, 119, 255)], 'blue': [(0, 0, 0), (255, 255, 115)], 'black': [(0, 0, 0), (41, 255, 136)], 'white': [(193, 0, 0), (255, 250, 255)], }
if sys.version_info.major == 2: print('Please run this program with python3!') sys.exit(0) range_rgb = { 'red': (0, 0, 255), 'blue': (255, 0, 0), 'green': (0, 255, 0), 'black': (0, 0, 0), 'white': (255, 255, 255),}
# Find the contour with the largest area
# The parameter is the list of contours to compare
def getAreaMaxContour(contours): contour_area_temp = 0 contour_area_max = 0 area_max_contour = None
for c in contours: # Iterate through all contours contour_area_temp = math.fabs(cv2.contourArea(c)) # Calculate contour area if contour_area_temp > contour_area_max: contour_area_max = contour_area_temp if contour_area_temp > 50: # Only when the area is greater than 50, the largest area contour is valid, to filter interference area_max_contour = c
return area_max_contour, contour_area_max # Return the largest contour
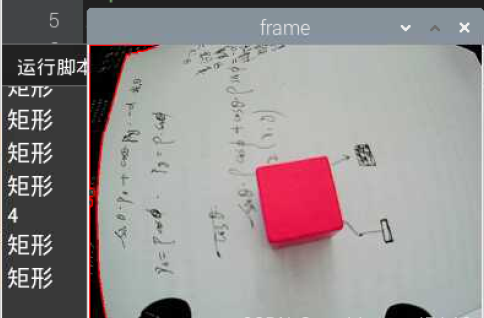
shape_length = 0
def move(): global shape_length while True: if shape_length == 3: print('Triangle') ## Display 'Triangle' tm.display_buf = (0x80, 0xc0, 0xa0, 0x90, 0x88, 0x84, 0x82, 0x81, 0x81, 0x82, 0x84,0x88, 0x90, 0xa0, 0xc0, 0x80) tm.update_display() elif shape_length == 4: print('Rectangle') ## Display 'Rectangle' tm.display_buf = (0x00, 0x00, 0x00, 0x00, 0xff, 0x81, 0x81, 0x81, 0x81, 0x81, 0x81,0xff, 0x00, 0x00, 0x00, 0x00) tm.update_display() elif shape_length >= 6: print('Circle') ## Display 'Circle' tm.display_buf = (0x00, 0x00, 0x00, 0x00, 0x1c, 0x22, 0x41, 0x41, 0x41, 0x22, 0x1c,0x00, 0x00, 0x00, 0x00, 0x00) tm.update_display() time.sleep(0.01) # Run the sub-threadth = threading.Thread(target=move)th.setDaemon(True)th.start()
shape_list = []
action_finish = True
if __name__ == '__main__': cap = cv2.VideoCapture(-1) while True: ret,img = cap.read() if ret: img_copy = img.copy() img_h, img_w = img.shape[:2] frame_gb = cv2.GaussianBlur(img_copy, (3, 3), 3) frame_lab = cv2.cvtColor(frame_gb, cv2.COLOR_BGR2LAB) # Convert image to LAB space max_area = 0 color_area_max = None areaMaxContour_max = 0
if action_finish: for i in color_range: if i != 'white': frame_mask = cv2.inRange(frame_lab, color_range[i][0], color_range[i][1]) # Perform bitwise operation on the original image and mask opened = cv2.morphologyEx(frame_mask, cv2.MORPH_OPEN, np.ones((6,6),np.uint8)) # Open operation closed = cv2.morphologyEx(opened, cv2.MORPH_CLOSE, np.ones((6,6),np.uint8)) # Close operation contours = cv2.findContours(closed, cv2.RETR_EXTERNAL, cv2.CHAIN_APPROX_NONE)[-2] # Find contours areaMaxContour, area_max = getAreaMaxContour(contours) # Find the largest contour if areaMaxContour is not None: if area_max > max_area:# Find the largest area max_area = area_max color_area_max = i areaMaxContour_max = areaMaxContour if max_area > 200: cv2.drawContours(img, areaMaxContour_max, -1, (0, 0, 255), 2) # Recognize shapes # Perimeter 0.035 Modify according to recognition situation, the better the recognition, the smaller it is epsilon = 0.035 * cv2.arcLength(areaMaxContour_max, True) # Contour similarity approx = cv2.approxPolyDP(areaMaxContour_max, epsilon, True) shape_list.append(len(approx)) if len(shape_list) == 30: shape_length = int(round(np.mean(shape_list))) shape_list = [] print(shape_length) frame_resize = cv2.resize(img, (320, 240)) cv2.imshow('frame', frame_resize) key = cv2.waitKey(1) if key == 27: break else: time.sleep(0.01) my_camera.camera_close() cv2.destroyAllWindows()The approxPolyDP() function is used to polygonize a continuous smooth curve.
For example, in the code “approx=cv2.approxPolyDP(areaMaxContour_max,epsilon,True)”, the parameters in parentheses mean:
The first parameter “areaMaxContour_max” is the shape contour input;
The second parameter “epsilon” is the distance value, indicating how close the polygon contour is to the actual contour, the smaller the value, the more precise;
The third parameter “True” indicates that the contour is a closed curve.
The output of the cv2.approxPolyDP() function is the vertex coordinates of the approximate polygon, judging the shape based on the number of vertices.
Barcode Recognition
First, install pyzbar, pip3 install pyzbar
import cv2
import sys
from pyzbar import pyzbar
if sys.version_info.major == 2:    print('Please run this program with python3!')    sys.exit(0)
def run(image):    # Find barcodes in the image and decode each barcode    barcodes = pyzbar.decode(image)    # Loop through detected barcodes    for barcode in barcodes:        # Extract the boundary box position of the barcode        (x, y, w, h) = barcode.rect        # Draw the border of the barcode on the image        cv2.rectangle(image, (x, y), (x + w, y + h), (0, 0, 255), 2)
        barcodeData = barcode.data.decode("utf-8")        barcodeType = barcode.type        # Draw barcode data and barcode type on the image        text = "{} ({})".format(barcodeData, barcodeType)        cv2.putText(image, text, (x, y - 10), cv2.FONT_HERSHEY_SIMPLEX, 0.5, (0, 0, 255), 2)
    return image
if __name__ == '__main__':        cap = cv2.VideoCapture(-1) # Read the camera        while True:        ret, img = cap.read()        if ret:            frame = img.copy()            Frame = run(frame)                       cv2.imshow('Frame', Frame)            key = cv2.waitKey(1)            if key == 27:                break        else:            time.sleep(0.01)    cv2.destroyAllWindows()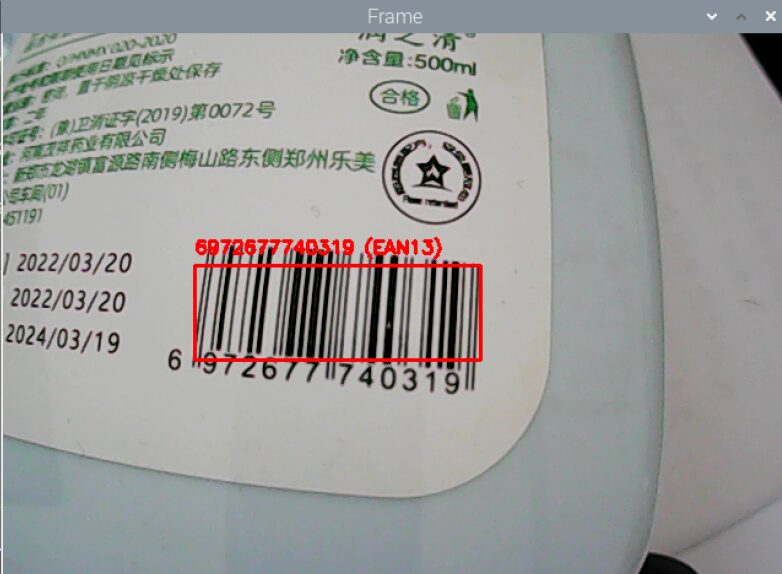
QR Code Recognition
Install apriltag, found installation failed. Still the old way to download locally and then install.
At https://www.piwheels.org/simple/apriltag/, I downloaded apriltag-0.0.16-cp37-cp37mlinux_armv7l.whl.
Use FileZilla to transfer to Raspberry Pi, open the directory where the whl file is located on the Raspberry Pi, and install the whl file, showing successful installation.
cd /home/pi/Downloads
sudo pip3 install apriltag-0.0.16-cp37-cp37m-linux_armv7l.whl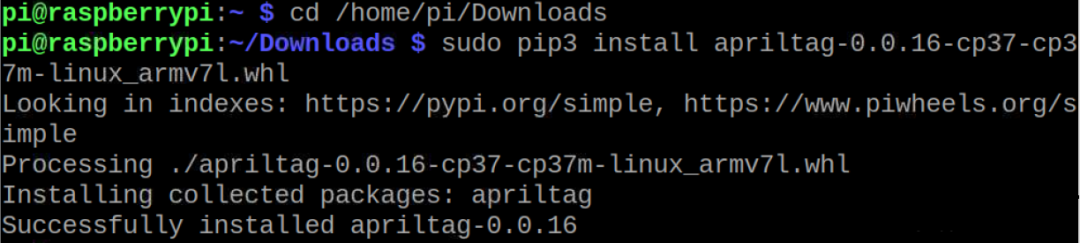
import sys
import cv2
import math
import time
import threading
import numpy as np
import apriltag
# apriltag detection
if sys.version_info.major == 2:    print('Please run this program with python3!')    sys.exit(0)
object_center_x = 0.0
object_center_y = 0.0
# Detect apriltag
detector = apriltag.Detector(searchpath=apriltag._get_demo_searchpath())
def apriltagDetect(img):    global object_center_x, object_center_y        gray = cv2.cvtColor(img, cv2.COLOR_BGR2GRAY)    detections = detector.detect(gray, return_image=False)
    if len(detections) != 0:        for detection in detections:                                   corners = np.rint(detection.corners)  # Get four corner points            cv2.drawContours(img, [np.array(corners, np.int)], -1, (0, 255, 255), 2)
            tag_family = str(detection.tag_family, encoding='utf-8')  # Get tag_family            tag_id = int(detection.tag_id)  # Get tag_id
            object_center_x, object_center_y = int(detection.center[0]), int(detection.center[1])  # Center point                        object_angle = int(math.degrees(math.atan2(corners[0][1] - corners[1][1], corners[0][0] - corners[1][0])))  # Calculate rotation angle                        return tag_family, tag_id                return None, None
def run(img):    global state    global tag_id    global action_finish    global object_center_x, object_center_y         img_h, img_w = img.shape[:2]        tag_family, tag_id = apriltagDetect(img) # apriltag detection        if tag_id is not None:        print('X:',object_center_x,'Y:',object_center_y)        cv2.putText(img, "tag_id: " + str(tag_id), (10, img.shape[0] - 30), cv2.FONT_HERSHEY_SIMPLEX, 0.65, [0, 255, 255], 2)        cv2.putText(img, "tag_family: " + tag_family, (10, img.shape[0] - 10), cv2.FONT_HERSHEY_SIMPLEX, 0.65, [0, 255, 255], 2)    else:        cv2.putText(img, "tag_id: None", (10, img.shape[0] - 30), cv2.FONT_HERSHEY_SIMPLEX, 0.65, [0, 255, 255], 2)        cv2.putText(img, "tag_family: None", (10, img.shape[0] - 10), cv2.FONT_HERSHEY_SIMPLEX, 0.65, [0, 255, 255], 2)        return img
if __name__ == '__main__':        cap = cv2.VideoCapture(-1) # Read the camera        while True:        ret, img = cap.read()        if ret:            frame = img.copy()            Frame = run(frame)                       cv2.imshow('Frame', Frame)            key = cv2.waitKey(1)            if key == 27:                break        else:            time.sleep(0.01)    cv2.destroyAllWindows()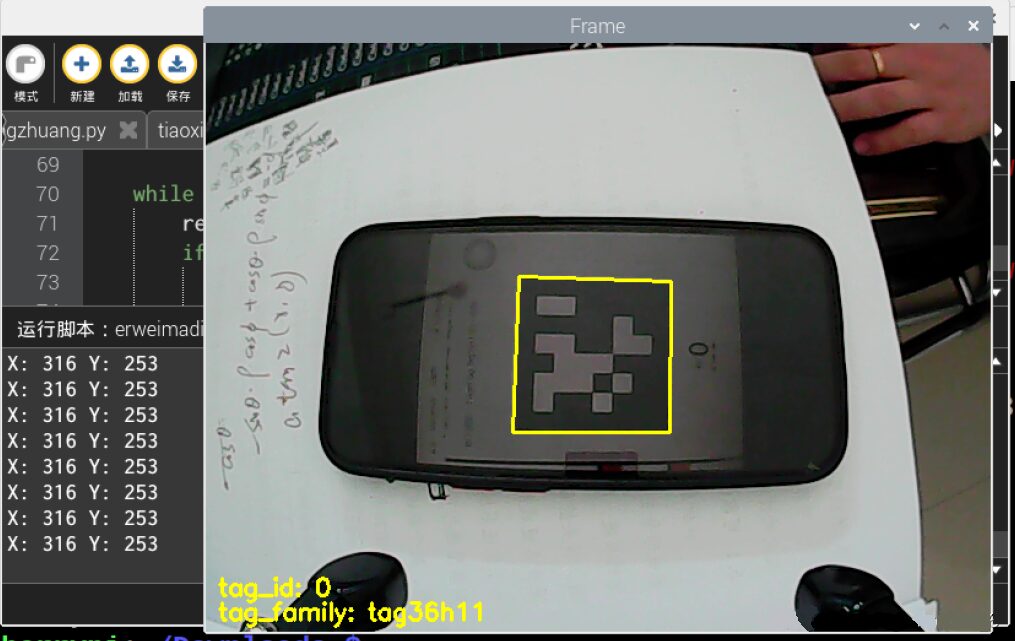
Troubleshooting
module ‘cv2’ has no attribute ‘dnn’
Trying the following commands all have issues, always reporting errors, or displaying that python-opencv cannot be recognized, changing the mirror does not work:
sudo apt install python-opencv or sudo apt install python3-opencv
sudo apt-get install opencv-python
sudo apt-get install opencv-contrib-python
pip install opencv-contrib-python
pip install opencv-python
Finally, it was successfully installed by downloading the local file. First, update the Raspberry Pi system and files
sudo apt-get update
sudo apt-get upgrade
If the download speed is too slow, consider changing the source.
1) Use " sudo nano /etc/apt/sources.list" command to edit the sources.list file, comment out all the contents of the original file, and add the following content:
deb http://mirrors.aliyun.com/raspbian/raspbian/ buster main contrib non-free rpi
deb-src http://mirrors.aliyun.com/raspbian/raspbian/ buster main contrib non-free rpi
Use Ctrl+O shortcut to save the file, Ctrl+X to exit.
2) Use "sudo nano /etc/apt/sources.list.d/raspi.list" command to edit the raspi.list file, comment out all the contents of the original file, and add the following content:
deb http://mirrors.tuna.tsinghua.edu.cn/raspbian/raspbian/ buster maindeb-src http://mirrors.tuna.tsinghua.edu.cn/raspbian/raspbian/ buster main
Use Ctrl+O shortcut to save the file, Ctrl+X to exit.
3) Execute "sudo apt-get update" command.
4) To accelerate the installation speed of Python pip, change the Python software source, the operation method: open the Raspberry Pi command line, enter the following command:
pip config set global.index-url https://pypi.tuna.tsinghua.edu.cn/simple
pip install pip -U
5) Finally, enter the command "sudo reboot" to restart the Raspberry Pi.
Download the whl file and transfer it to the Raspberry Pi, open https://www.piwheels.org/simple/opencv-python/ on the computer.
Download the whl file corresponding to your python version, I downloaded opencv_python-3.4.10.37-cp37-cp37m-linux_armv7l.whl
cp37 indicates the python version, armv7 indicates the processor architecture, Raspberry Pi 4B chooses armv7
Transfer it using FileZilla to the Raspberry Pi, open the directory where the whl file is located on the Raspberry Pi, install the whl file, showing successful installation of opencv-python
cd /home/pi/Downloads
sudo pip3 install opencv_python-3.4.10.37-cp37-cp37m-linux_armv7l.whl
Reference: https://blog.csdn.net/weixin_57605235/article/details/121512923
ImportError:numpy.core.multiarray failed to import
Uninstall the low version of numpy first, then install the new version of numpy, that is
1.  pip uninstall numpy
2.  pip install -U numpy
From https://blog.csdn.net/qq_25603827/article/details/107824977
Invalid.
pip install numpy --upgrade --forceFrom http://www.manongjc.com/article/38668.html
Invalid.
Check the local numpy version:
pip show numpyWhen we install opencv-python, its corresponding numpy version is:
So downgrade numpy version:
pip install -U numpy==1.14.5 -i https://pypi.mirrors.ustc.edu.cn/simple/From https://zhuanlan.zhihu.com/p/280702247
Invalid.
Finally, using pip3 install-Unumpy was successful. Therefore, it is best to use pip3 for python3. There are many attempts on the internet, some upgrading versions, some downgrading versions, various strange phenomena emerge, and the statements are inconsistent, reference:
https://blog.csdn.net/Robin_Pi/article/details/120544691
https://zhuanlan.zhihu.com/p/29026597
1121:error:(-2:Unspecified error) FAILED: fs.is_open(). Can’t open
After searching for a long time, I found that there was an extra dot at the beginning.
3D Vision Workshop Premium Course Official Website:3dcver.com
1. Multi-sensor data fusion technology for autonomous driving
9. Build a structured light 3D reconstruction system from scratch [theory + source code + practice]
Heavy!3DCVer-Academic paper writing and submission WeChat group has been established
Scan to add the assistant’s WeChat, you can apply to join the 3D Vision Workshop – Academic Paper Writing and Submission WeChat group, aiming to communicate about writing and submission matters for top conferences, top journals, SCI, EI, etc.
At the same time, you can also apply to join our subdivided direction group, currently mainly including3D vision、CV & deep learning、SLAM、3D reconstruction、point cloud post-processing、autonomous driving, multi-sensor fusion, CV entry, 3D measurement, VR/AR, 3D face recognition, medical imaging, defect detection, pedestrian re-identification, target tracking, visual product landing, visual competition, license plate recognition, hardware selection, academic exchange, job exchange, ORB-SLAM series source code exchange, depth estimation and other WeChat groups.
Be sure to note: Research direction + School/company + Nickname, for example: “3D vision + Shanghai Jiao Tong University + Jingjing”. Please note according to the format, you can be quickly approved and invited to join the group. Original submissions please contact.

▲Long press to add WeChat group or submit

▲Long press to follow the public account
▲Long press to follow the public account
3D Vision from Entry to Mastery Knowledge Planet: For the 3D vision field’s video courses (3D reconstruction series, 3D point cloud series, structured light series, hand-eye calibration, camera calibration,laser/vision SLAM、autonomous driving and so on), knowledge point summary, entry and advanced learning routes, latest paper sharing, Q&A Five aspects for in-depth cultivation, and various algorithm engineers from major companies provide technical guidance. At the same time, the planet will work with well-known companies to release 3D vision-related algorithm development positions and project docking information, creating a hardcore fan gathering area that integrates technology and employment, nearly 4000 planet members work together to create a better AI world together progress, knowledge planet entrance:
Learn the core technology of 3D vision, scan to view the introduction, unconditional refund within 3 days

There are high-quality tutorial materials, answer questions, and help you solve problems efficiently
If you find it useful, please give a thumbs up and look at it~