In the workplace, a significant amount of time and effort is spent analyzing NOP instructions, which has become a concern for reverse engineers and security responders. NOP instructions are a series of instructions that have no actual significance. Besides wasting time, I have found that some people are also shocked and excited by the NOP instructions they discover. This is because they find executable code in memory that normally cannot execute code, which is akin to discovering a vulnerability exploit or a sample of advanced malware.
In this article, I will discuss the reasons behind the generation of NOP instructions and how to identify them. We will focus on x86 disassembly, although similar situations occur on other platforms.
Generation of the Problem
During the process of analyzing assembly code, many people assume that all assembly code is actual code instructions because disassemblers disassemble NOP instructions into valid instructions. This is the first mistake made by many. Since x86 platform instructions are densely encoded, many instructions are single-byte encoded. At first glance, almost all data disassembled code could produce valid x86 code.
For example, I generated a 16kb random data file and disassembled it. This produced 6,455 valid 32-bit x86 instructions, with only 239 bytes of unrecognized data. This means that the disassembler could not parse the data into valid instructions. It can be seen that over 98% of the random data can be disassembled into valid instructions.
Let’s take a look at the first part of the disassembly of this random data; we can see many instructions and a byte of unrecognized data.
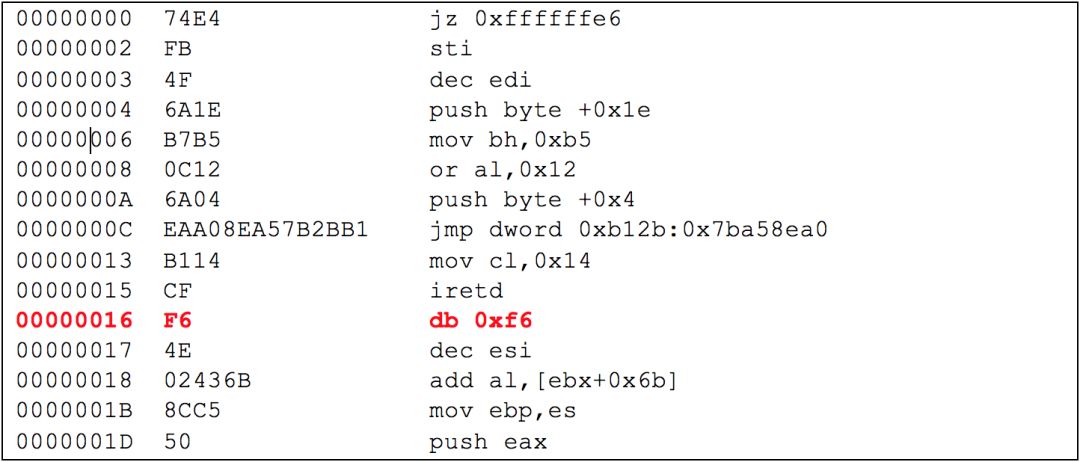
The first column of data in this snippet is the data offset. The second column shows the bytes that make up the instruction, and the third column shows the disassembled representation of these bytes. For all lines except the highlighted line (offset 0x16), the disassembly shows a valid instruction.
The offset 0x16 indicates content that may look like an instruction, but the symbol “db” is just an assembly notation to declare a byte. The disassembler indicates that at this position is byte 0xF6, which it cannot recognize as part of an instruction. The x86 instruction set is so densely encoded that every byte value could potentially be the start of the next instruction.
In this case, 0xF6 could be a valid start of an instruction depending on the subsequent bytes, but in this case, it does not constitute a valid operand with the following byte 0x4E. In the 16kb of random data, there were 274 unrecognized bytes with only 27 different values. Among these 27 values, the only one that overlaps with the common English character range is the letter “b” (0x62).
In this article, we will stick to 32-bit disassembly because it is smoother, but the same problems occur in 16-bit and 64-bit Intel assembly. When the previously provided random data was split into 16-bit code, it produced 96% valid instructions, while splitting into 64-bit yielded 95% valid instructions.
You might wonder how to represent a large area of zeros in this memory space where no code exists; that would be wonderful. Advanced disassemblers may intelligently recognize large amounts of zero code and skip disassembly, but they still disassemble a significant amount of zero into valid x86 instructions. Here are some disassembled zero bytes to illustrate this:

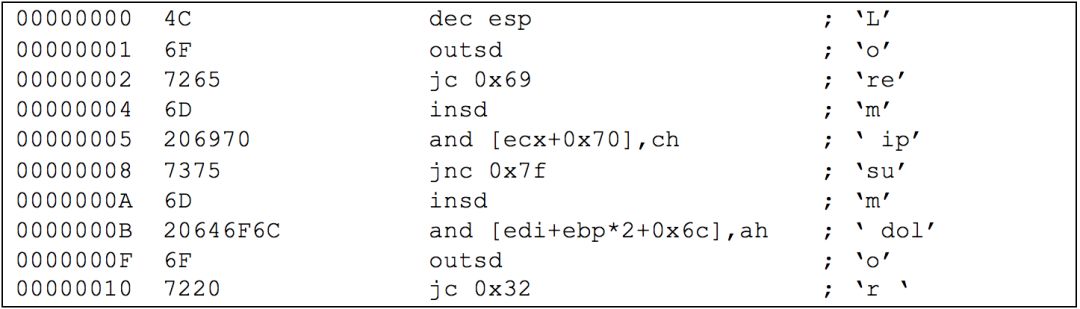
The problem with English text is even more serious. I generated a 60kb file containing random text (lorem ipsum) and disassembled it, generating 23,170 instructions with no unrecognized data. Therefore, 100% of the random text was disassembled into valid instructions. The following snippet shows the first three words of standard Lorem ipsum disassembled (“Lorem ipsum dolor”):
So, when looking at disassembled code, we should not only check whether the corresponding sequence can be successfully disassembled but also whether it is valid instructions.
Solution
Although writing better heuristic scripts to filter out NOP instructions is feasible, our best weapon remains the human brain. For an experienced reverse engineer, there is a lot in the code snippets seen so far in this article that are key to learning how to judge whether the code you see is NOP instructions.
👉 Privileged Instructions
x86 processors have four “rings” for protection, much like the “One Ring,” but less interesting. Two of the rings (Ring1 and Ring2) are usually not used at all. Kernel mode executes in Ring0 while user mode executes in Ring3, which are the two commonly used privilege levels. Certain instructions can only run in Ring0. These special privileged instructions also happen to be single-byte opcodes and frequently occur in disassembled NOP instructions. Let’s take another look at the disassembled instructions from “Lorem ipsum,” but this time I will highlight the privileged instruction:
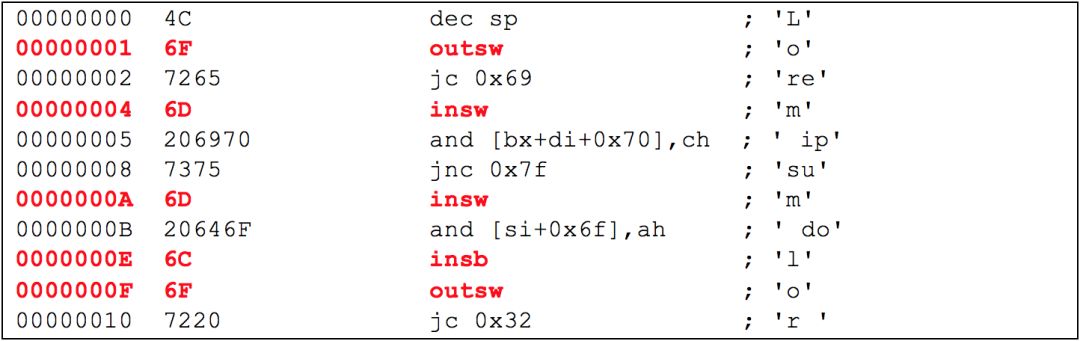
If you know that the code you are looking at is not running as an operating system bootloader, kernel, or device driver, then when you see these privileged instructions, we should realize that this disassembled code is not actually valid code. The highlighted instructions are all variants of IN and OUT instructions, which primarily serve to read and write data from hardware ports. These possible instructions must be used in device drivers, and if executed in Ring3 user mode, they will produce an exception. Even if you try to disassemble kernel code, the frequency of these instructions will be much higher than when disassembling any file of the operating system. Here is a list of some common Ring0 instructions that you will often see in disassembled NOP instructions:
-
IN (INS, INSB, INSW, INSD)
-
OUT (OUTS, OUTSB, OUTSW, OUTSD)
-
IRET
-
IRETD
-
ARPL
-
ICEBP / INT 1
-
CLI
-
STI
-
HLT
👉 Rare Instructions
Many Ring3 instructions in user mode code are valid, but very rare in compiled code. We can classify these instructions into three categories: convenience instructions, unlikely mathematical instructions, and far pointer instructions. Let’s take a look at these categories.
👉 Convenience Instructions
-
ENTER
-
LEAVE
-
LOOP (LOOPE/LOOPZ, LOOPNE/LOOPNZ)
-
PUSHA
-
POPA
Assembly language programmers can use ENTER and LEAVE instructions to obtain function prologues and epilogues, which can be manually accomplished using PUSH, MOV, and SUB. Modern compilers tend to avoid using ENTER and LEAVE, so most programmers do not use them either. Because they occupy nearly 1% of the opcode range together, their occurrence in NOP instruction code is very common.
The LOOP instruction and its conditional counterparts LOOPZ and LOOPNZ provide a very intuitive and useful way to write loops in assembly language. Compilers typically choose not to use these, opting instead to use JMP and conditional jump instructions to create their own loops.
The PUSHA and POPA instructions provide a mechanism for saving the state of all registers to the stack. This offers assembly language programmers a potentially convenient macro-like instruction. Since it also saves and restores the stack pointer itself, this complicates the potential use of a lazy coder blindly saving register information at function startup and restoring them at function end. You won’t find these instructions in compiled code, but they also occupy nearly 1% of the available opcode range, so they frequently appear in NOP instructions.
👉 Unlikely Mathematical Instructions
-
Floating Point Instructions
-
F*
-
WAIT/FWAIT
Floating point instructions typically start with the letter “F.” While some programs use floating point mathematics, most programs do not. Floating point instructions occupy a large portion of the opcode range, so they are prevalent in NOP instructions. This is where your knowledge of the code design you are trying to reverse engineer will come in handy. If you are reverse engineering a program that uses 3D graphics, you will need to look for a potentially large number of floating point instructions. In our work at the FLARE team, malware analysis, floating point mathematics is quite rare. Notable exceptions are that shellcode often uses some floating point instructions to obtain pointers to itself.
-
SAHF
-
LAHF
SAHF and LAHF instructions copy the contents of the AH register into the flag register EFLAGS. This is a programming behavior that does not translate from high-level languages, so compilers typically do not output these instructions. Unless manually written in assembly code, these instructions will be rare. Since these are single-byte instructions within a single opcode range, they frequently appear in disassembled NOP instructions.
-
ASCII Adjustment Instructions
-
AAA
-
AAS
-
AAM
-
AAD
The “AA” series of instructions involves processing data in binary-coded decimal form. This is an older coding method that is generally hard to encounter in modern computing. However, you will often encounter these instructions in disassembled NOP instructions, as they are single-byte instructions.
-
SBB
The SBB instruction is similar to SUB, except it adds the carry flag to the source operand. This can be seen in legitimate code, especially when trying to perform arithmetic on numbers larger than the machine word length (64-bit math in 32-bit code). Unfortunately, SBB instructions have no fewer than nine opcodes, occupying 3.5% of the possible range. They are not single-byte instructions, but there are many forms and many opcodes, so they frequently appear in disassembled NOP instructions.
-
XLAT
In your assembly code, XLAT is an interesting instruction. It does not translate directly to a single high-level language structure, so compilers do not favor it like we at the FLARE team do. Since it is a single-byte instruction, you will find it more frequently than finding programmers who use assembly language.
-
CLC
-
STC
-
CLD
-
STD
These instructions clear and set the carry and direction flags. They may be found in compiler-generated code near stream operations (usually around a REP prefix). Nevertheless, since they are all single-byte instructions, their likelihood of appearing in NOP instructions is very high.
Far Pointer Instructions
-
LDS
-
LSS
-
LES
-
LFS
-
LGS
In the Intel architecture, the use of far pointers did not exist in the 16-bit era. However, the instructions for setting far pointers still occupy three values in the single-byte opcode and two-byte opcode range. Therefore, you will often see these instructions appear in disassembled NOP instructions.
Instruction Prefixes
Instructions in x86 can have prefixes. Prefix bytes typically modify the behavior of subsequent instructions. A common use of prefixes is to change the size of the operands. For example, if you are executing instructions in 32-bit mode and want to perform calculations using 16-bit registers or operands, you can add a prefix to the calculation instruction to inform the CPU that it is a 16-bit instruction instead of a 32-bit one. There are many such prefixes; unfortunately, many of them fall within the letter range of the ASCII table. This means that when disassembling ASCII text (such as our lorem ipsum), instruction prefixes will be very common. These instruction prefixes will appear in normal instructions but will not appear as frequently in NOP instructions. If you are disassembling 32-bit code and see a large number of 16-bit registers being used (AX, BX, CX, DX, SP, BP, etc., instead of EAX, EBX, ECX, EDX, ESP, and EBP), you may be looking at NOP instructions.
The disassembler will also represent certain symbols added before the instruction mnemonics as other prefixes. If you frequently see any of these keywords in the code, it is likely NOP instruction code:
-
LOCK
-
BOUND
-
WAIT
Segment Selectors
-
FS
-
GS
-
SS
-
ES
In 16-bit mode, segment registers (CS, DS, FS, GS, SS, ES) are used to address memory. The code of the program is usually referenced based on the CS “code segment” register, while the data processed by the program is referenced from the DS “data segment” register. FS and GS are additional data segment registers that are legitimately used in 32-bit code, but this is a more advanced topic. There are segment selector prefix bytes that can be added before an instruction to force it to reference memory based on a specific segment rather than the default segment it was designed to use. Since these occupy that precious single-byte opcode space, they frequently appear in disassembled NOP instructions. The following instructions derived from the random data I disassembled show a segment selector prefix using the GS register on an instruction that does not address memory:

Disassembled garbage also uses these segment registers more frequently than normal code, and compilers do not output them. Let’s take a look at another line of disassembled NOP instructions:

This instruction pops the SS “stack” register. This is a perfectly valid instruction; however, this is disassembled 32-bit code, and segment registers usually do not change as they do in 16-bit mode. In the same disassembly, only the above few lines of code are another strange line of code:  32-bit architecture supports more segment registers addressing than naming the segment registers. This instruction moves some data into the 7th segment register, which my disassembler names “segr7.”
Conclusion
To put it mildly, disassembling NOP instruction code can waste your time and effort. In the worst case, it can lead you to analyze incorrect data. In this article, we learned to discover disassembled NOP instructions by recognizing and understanding impossible code. We broke down unusual code classifications into the most common cases and discussed their significance, why they frequently occur, and why they should not appear. By learning these indicators, you can easily identify NOP instruction code in disassembly and save your time.

This article was translated by the Kanxue Translation Team, source fireeye@Nick Harbour
Please indicate that it is from the Kanxue Community
Popular Reads
-
A Simple Android Global Injection Scheme
-
PE Structure Export/Import Table Parsing – Beginner
-
CVE-2018-0758 String Concatenation Integer Overflow Leading to Heap Overflow
-
Enterprise Shell Anti-Debugging and Hook Detection Analysis
Click to read the original/read,
More dry goods are waiting for you~