The measurement process of a digital multimeter involves converting the measured value into a direct current voltage signal through a conversion circuit, then converting the analog voltage into a digital quantity via an analog-to-digital (A/D) converter. The result is then counted by an electronic counter and displayed directly on the screen as a digital readout.
The multimeter’s functions of measuring voltage, current, and resistance are realized through the conversion circuit, where the measurements of current and resistance are based on the measurement of voltage. In other words, the digital multimeter is an extension of the digital direct current voltmeter.
The A/D converter of the digital direct current voltmeter converts the continuously varying analog voltage over time into a digital quantity, which is counted by the electronic counter to obtain the measurement result, and then displayed by the decoding display circuit. The logic control circuit coordinates the operation of the circuit, completing the entire measurement process sequentially under the control of a clock.
How to Measure Voltage with a Multimeter
1. The multimeter is a commonly used testing tool.
It is mainly used to test parameters such as voltage, resistance, and current, playing a significant role in the testing, maintenance, and production of electronic products. The main components of a multimeter include an ammeter, a dial, a range selection switch, and test leads. There are many models of multimeters, but the basic usage is generally the same. Below, we introduce how to measure power and the principle of measuring voltage with a multimeter.

2. Method of Measuring Voltage with a Multimeter
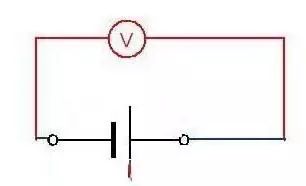
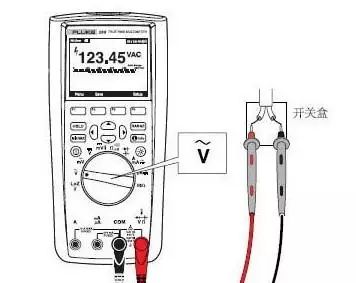
To measure voltage with a multimeter, first set the range switch to the section marked with V within the five-position range (for measuring AC voltage, set it to the AC voltage range; for measuring DC voltage, set it to the DC voltage range). When measuring voltage, connect the multimeter leads to the circuit being measured. Choose an appropriate range based on the approximate value of the circuit. For example, a dry battery has a maximum value of 1.5V, so it can be set to the 5V range. At this point, a full-scale reading of 500 on the panel should be read as 5, meaning a reduction of 100 times. If the needle points to the 300 scale, it reads as 3V. Note that the value indicated by the range switch corresponds to the full-scale reading on the meter; simply calculate accordingly to obtain the actual value. All ranges except the resistance range should be read in this manner. In practical measurements, if the approximate value of the voltage cannot be determined, the switch can be set to the maximum range first, then gradually reduced to an appropriate position. When measuring DC voltage, pay attention to the polarity; if the leads are reversed, the needle will deflect in the opposite direction. If the polarity of the circuit is unknown, set the multimeter to the maximum range and quickly test it on the circuit to see how the needle deflects, which will indicate the polarity.
3. Measuring 220V AC
Set the range switch to the AC 500V range. At this point, the full scale is 500V, and the reading should be taken according to a 1:1 scale. Insert the two leads into the power outlet; the position indicated by the needle is the measured voltage value. When measuring AC voltage, there is no positive or negative distinction for the leads.
4. Principle of Voltage Measurement with a Multimeter
1. DC Voltage Conversion Circuit

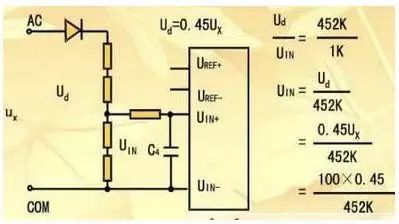
2. AC Voltage Conversion Circuit
5. Precautions for Using a Multimeter
(1) Before using the multimeter, perform a “mechanical zeroing” to ensure that the pointer indicates zero voltage or zero current when no measured quantity is present.
(2) During the use of the multimeter, do not touch the metal parts of the leads with your hands, as this ensures measurement accuracy and personal safety.
(3) When measuring a certain electrical quantity, do not change the range while measuring, especially when measuring high voltage or high current, as this could damage the multimeter. If a range change is necessary, disconnect the leads first, change the range, and then proceed with the measurement.
(4) The multimeter must be placed horizontally during use to avoid errors. Additionally, be cautious of external magnetic fields that could affect the multimeter.
(5) After using the multimeter, set the range switch to the maximum AC voltage range. If not used for a long time, remove the battery from the multimeter to prevent corrosion of internal components.
Methods for Using a Multimeter
1. Familiarize yourself with the functions of the multimeter before use, and correctly select the range, scale, and lead socket based on the object being measured.
2. When the size of the measured data is unknown, first set the range switch to the maximum value, then switch from a high range to a lower range until the needle indicates above half of the full scale.
3. When measuring resistance, after selecting the appropriate range, touch the two leads together to ensure the needle points to zero. If the needle is off zero, adjust the “zeroing” knob to bring the needle back to zero to ensure measurement accuracy. If zeroing is not possible or the digital display emits a low voltage alarm, check promptly.
4. When measuring the resistance of a circuit, the power supply to the circuit must be turned off; do not measure while powered.
5. When using the multimeter for measurements, ensure the safety of both personnel and equipment. Do not touch the metal parts of the leads with your hands, and do not switch ranges while powered to ensure measurement accuracy and avoid electric shock or damage to the instrument.