Click the “Programmer’s Reading Club” above, and select “Pin to Public Account”
At critical moments, we deliver information at the first time!


Cracking Wi-Fi passwords, impersonating accounts, and testing network vulnerabilities are already quite interesting, but if you want to perform these operations on the go, you will need a simple portable setup. Consider using Kali Linux and Raspberry Pi.
Kali Linux is an operating system for network penetration testing. You can run it on a laptop to crack nearby Wi-Fi passwords, spoof networks, test Bluetooth vulnerabilities, and a bunch of other things. Remember, using this knowledge to infiltrate protected networks may get you arrested and face felony charges – perhaps violating the Federal Computer Security Act. This knowledge is only to be used for good, solely for personal learning, and only on networks you control. We have previously discussed a lot about using Kali Linux, so we won’t cover it again in this article, but you can check out the guide to get an idea of what you can do with it. We will also provide all versions suitable for Raspberry Pi here.
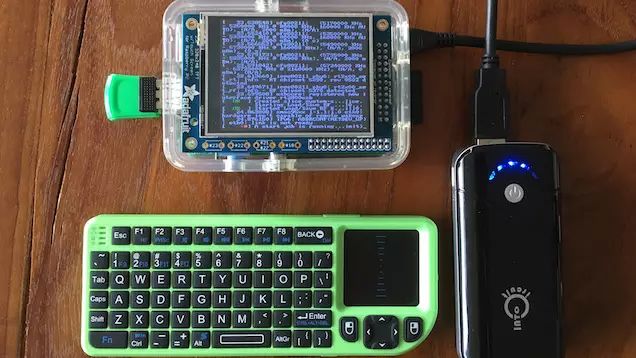
The Raspberry Pi is a credit card-sized computer that doesn’t require much power to operate. When you combine the Raspberry Pi with Kali Linux, it becomes a super portable network testing machine that you can take anywhere. In this guide, we will demonstrate how to boot Kali and run it on the Raspberry Pi using a touchscreen. This way, you never need to install Kali Linux on your main computer.
What you need:
-
Raspberry Pi (B+ or 2 is better)
-
A battery pack (any external 5V battery with a USB port for charging smartphones should work, of course, there are more elegant methods if you’re interested)
-
A wireless network card
-
An 8GB SD card
-
A PiTFT touchscreen (if you prefer a better screen and don’t mind carrying a larger device, you can also use the official 7-inch touchscreen)
-
A case (optional, but useful if you carry the Raspberry Pi around. It’s great to put the PiTFT and Raspberry Pi into this Adafruit case)
-
A keyboard (I prefer a small wireless keyboard with a touchpad that fits into a small bag.)
-
A desktop computer (to complete the initial installation)
Step 1: Install Kali on the Raspberry Pi
Video link: https://youtu.be/aTQjuDfEGWc
Before starting, you need to download and install the Kali Linux touchscreen version image that supports Raspberry Pi. It’s the same as installing any other Raspberry Pi operating system, here’s a simplified version:
How to Install Kali to SD Card on Windows
-
Download the Kali Linux Raspberry Pi TFT image, and extract the .img file inside. Note: If you are not using a touchscreen, please download the regular version of Kali Linux for Raspberry Pi.
-
Download Win32DiskImager and extract the program (.exe file).
-
Use a card reader to insert the SD card into your Windows PC.
-
Double-click to open the downloaded program Win32DiskImager.exe. If you are running Windows 7 or 8, right-click the program and select “Run as Administrator”.
-
If the SD card is not automatically detected by the program, click the dropdown menu at the top right (the “Device” field) and select the SD card from the list.
-
In the application’s image file selection area, click the small folder icon and select the Raspbian.img file.
-
Click the Write button and wait for Win32DiskImager to complete. When it’s done, you can safely eject the SD card and insert it into the Raspberry Pi.
How to Install Kali to SD Card on OS X
-
Download the Kali Linux Raspberry Pi TFT image, and extract the .img file inside. Note: If you are not using a touchscreen, please download the regular version of Kali Linux for Raspberry Pi.
-
Download RPi-sd card builder (make sure to choose the appropriate version for your installed OS X) and extract the program.
-
Use a card reader to insert the SD card into your Mac.
-
Open RPi-sd card builder. You will be immediately prompted to select a Raspbian image. Choose the .img file you downloaded earlier.
-
You will be asked if the SD card is connected. Since we already plugged it in, it is connected, so click Continue. Then you will see the SD card selection interface. If you only inserted one and it’s not seen in the list, it will be automatically selected. Otherwise, select the desired SD card and click OK.
-
Enter your admin password and click OK.
-
You will be asked if the SD card has been ejected. This is normal because it needs to be unmounted before it can perform a direct copy. Confirm again that the SD card is no longer in use in Finder. Do not remove it from the USB port. When you are sure you want to eject it, click Continue.
-
RPi-sd card builder will complete the preparation of the SD card, safely eject the card and insert it into the Raspberry Pi.
Step 2: Connect the Display
The Raspberry Pi has a GPIO (General Purpose Input/Output) that is compatible with the touchscreen, which is a set of pins on the corner of the Raspberry Pi board, and how to use it is obvious. Go ahead and insert the display into the Raspberry Pi.
Step 3: Plug in All Power and Start
After installing the display, it’s time to power the other components. Connect the Wi-Fi adapter and keyboard to the USB ports. Then connect the Raspberry Pi to the battery pack.
The boot process may be a bit slow and crude, don’t worry about it. First, a white screen will display for a while before the login screen appears.
Step 4: Log in and Enable the Wireless Network Card
Now it’s time to log in and enable the wireless network card so you can actually use the tools in Kali Linux. The Raspberry Pi will automatically recognize the wireless network card, but you still need to connect to the network. First, you need to start the Kali Linux graphical user interface and ensure everything is working properly:
-
The command line on the Raspberry Pi will prompt for a username and password. Enter username root and password toor (you will change this password shortly).
-
Type startx and press enter to start the Kali graphical interface. Loading on the Raspberry Pi may take some time.
-
Now you can control the Raspberry Pi using the touchscreen and keyboard. Click on the terminal icon in the bottom taskbar to open the command line.
-
Set up the wireless network card by entering nano /etc/network/interfaces in the command line and pressing enter to load the Wi-Fi configuration file.
-
Add the following text to the file you just opened, replacing with your own network information:
auto wlan0 iface wlan0 inet dhcp wpa-ssid “Your Network Name” wpa-psk “Network Password”
When finished, press Ctrl+X to save and exit. The wireless network card should now be usable (you may need to reboot first).
Step 5: Change the Password
Before starting any operations, it’s important to change the root password of the device (to prevent others with similar hacking skills from taking control). Fortunately, this process is very simple.
-
If you are still in the command line (if not, click the terminal icon in Kali to reopen it), type passwd and press enter.
-
Enter the new password twice.
-
Reconfiguring OpenSSH is also beneficial, so it won’t be using the default settings. Type dpkg-reconfigure openssh-server and press enter.
Now your small portable system is set up and secure.
What You Can Do with This Device
From now on, what you do with this small portable hacking workstation is entirely up to you. You can use the touchscreen for basic control, running any programs you want on Kali Linux. If you don’t know where to start, here are some suggestions:
-
Set up SSH for remote access to the Raspberry Pi
-
Learn the basics of the command line
-
Crack Wi-Fi passwords, create phishing websites, or spy on another device’s traffic
-
Monitor networks
-
More Kali Linux guides
The world is in your hands, but please be a responsible hacker, thank you.

-
Translation: Author of Jobbole Online Column – Tan Ni
-
English: Thorin Klosowski
-
http://blog.jobbole.com/95031/
-
Published by the Programmer’s Reading Club, please contact the author for authorization

 [Click to Become a Coding God]