In the company, some development environments (network environments, remote login environments, etc.) are set up by system engineers, and we just need to use them. However, when playing around on my own, I still have to tinker with it myself. Recently, I set up the network environment and remote login environment for my board, and encountered many pitfalls during the process.From driver porting, kernel compilation, to cross-compiling upper-level software libraries, I faced many challenges. Below is a brief record of the entire process for future reference and for friends who may need it.
WiFi Card (RTL8723) Driver Porting
1. Place the WiFi driver folder in the kernel folder
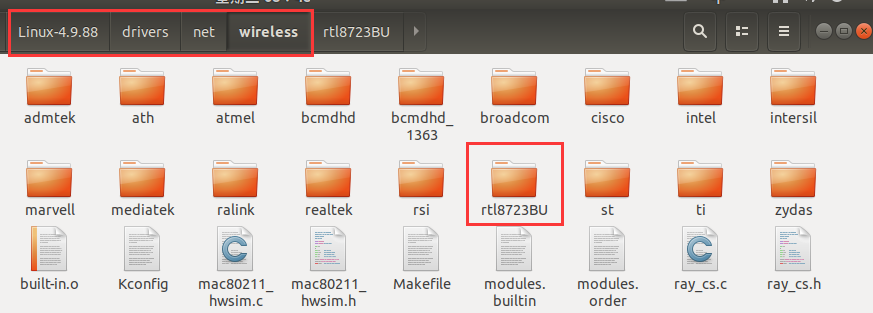
Place the RTL8723 driver folder in <span>Linux-4.9.88/drivers/net/wireless</span>. The WiFi driver can be found online.
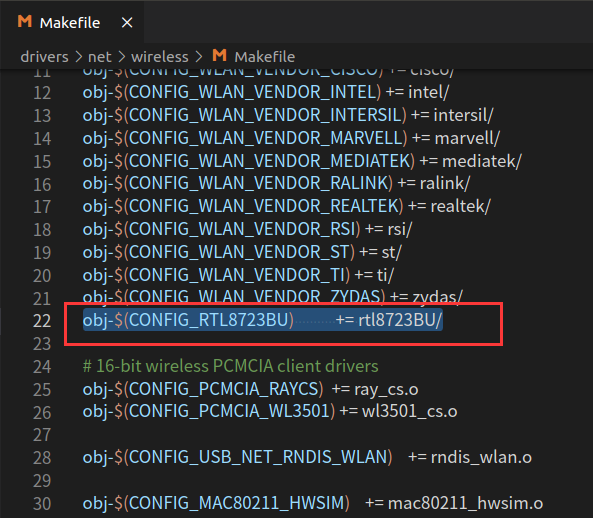
2. Modify Kconfig and Makefile
Modify the Kconfig and Makefile files in the <span>Linux-4.9.88/drivers/net/wireless</span> folder. Add the following content to the Kconfig file:
source "drivers/net/wireless/rtl8723BU/Kconfig"

Add the following content to the Makefile:
obj-$(CONFIG_RTL8723BU) += rtl8723BU/
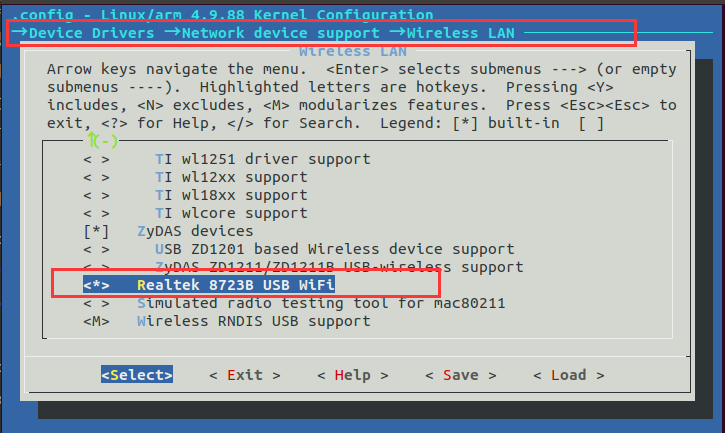
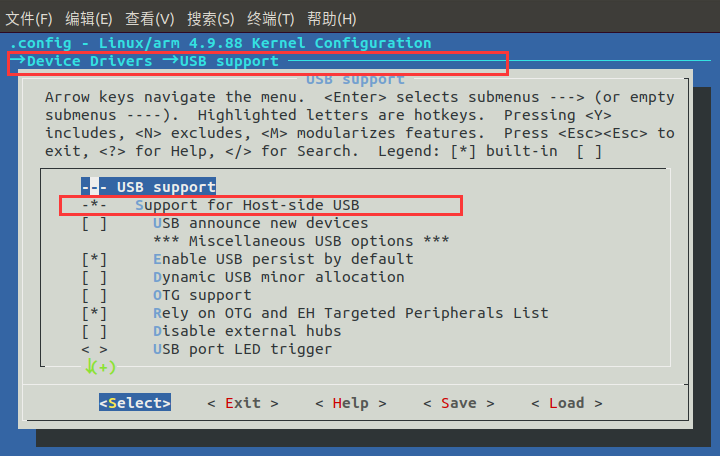
3. Configure the kernel with make menuconfig
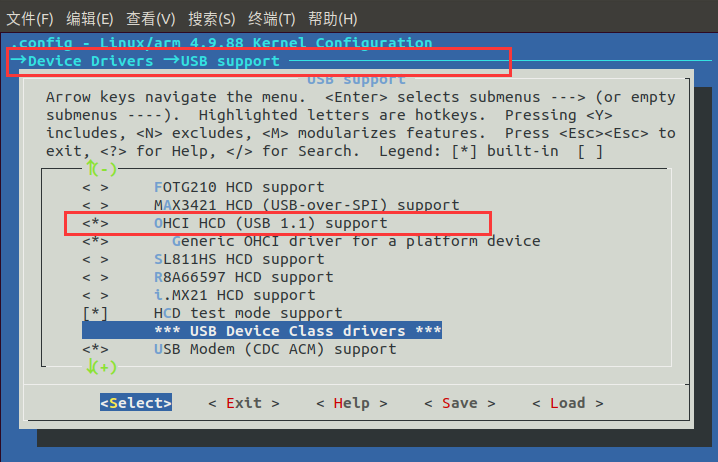
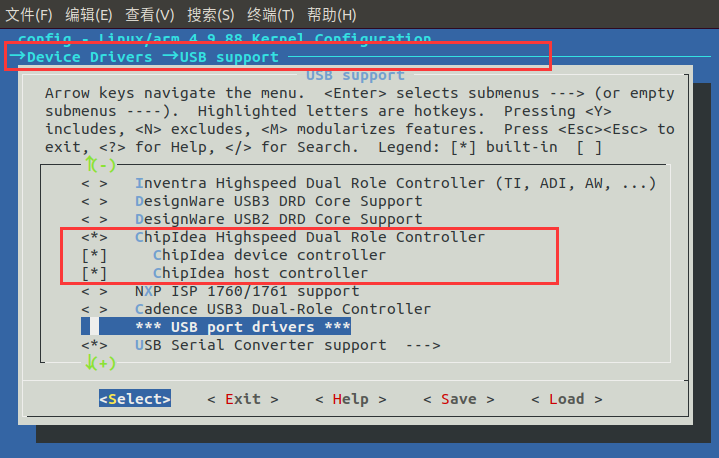
We need to load the rtl8723BU driver and configure the kernel, such as enabling support for USB devices, WiFi devices, etc.Enter the command <span>make menuconfig</span> in the kernel path to access the kernel configuration interface.
(1)Select the rtl8723BU module
(2)Support USB devices
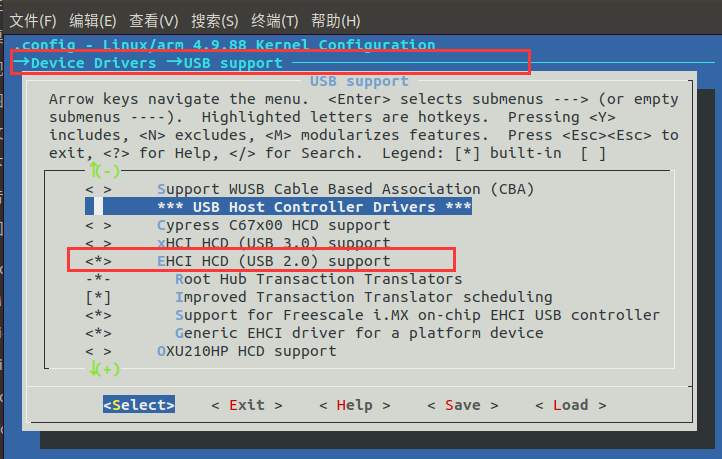
(3)Support WiFi devices
(4)Support wireless network IEEE 802.11
After configuration, you can compile the rtl8723BU driver into the kernel or compile it as a kernel module and load it dynamically.
Regarding kernel modules, I previously shared related basic driver learning, such as:
【Linux Notes】LED Driver Experiment (Bus Device Driver Model)【Linux Notes】Device Tree Instance AnalysisSharing of AP3216 Three-in-One Integrated Light Sensor Experiment Based on Linux
Here we will compile the rtl8723BU driver directly into the kernel.
Porting wpa_supplicant
With the previous step completed, we need to configure the wireless network using some configuration tools, and wpa_supplicant is the tool used for configuring wireless networks. Next, we will port wpa_supplicant to the board.
Cross-compiling wpa_supplicant requires dependencies on the libnl and openssl libraries, so we need to cross-compile these two libraries first. There are many versions of these libraries, and version mismatch issues may arise. The versions I used are as follows:
- openssl-1.0.2
- libnl-3.2.23
- wpa_supplicant-2.9
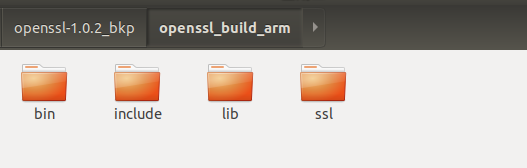
(1)Cross-compile openssl-1.0.2
./config no-asm -shared --prefix=/home/LinuxZn/git_clone/openssl-1.0.2/openssl_build_arm os/compiler:/home/LinuxZn/100ask_imx6ull-sdk/ToolChain/gcc-linaro-6.2.1-2016.11-x86_64_arm-linux-gnueabihf/bin/arm-linux-gnueabihf-gcc
make
make install
Run the config script to generate the Makefile. Here, I added some configuration parameters, setting the installation location to the openssl_build_arm folder and specifying the cross-compiler as arm-linux-gnueabihf-gcc.If make fails, check if the cross-compiler configuration in the Makefile is correct. The correct configuration is as follows:
CROSS_COMPILE= arm-linux-gnueabihf-
CC= /home/LinuxZn/100ask_imx6ull-sdk/ToolChain/gcc-linaro-6.2.1-2016.11-x86_64_arm-linux-gnueabihf/bin/$(CROSS_COMPILE)gcc
After compilation, we need to check if the generated executable and libraries are ARM versions; otherwise, there will be issues when cross-compiling wpa_supplicant. For example:
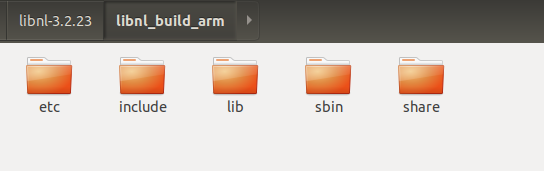
Next, we will cross-compile libnl-3.2.23.
(2)Cross-compile libnl-3.2.23
./configure --prefix=/home/LinuxZn/git_clone/libnl-3.2.23/libnl_build_arm --host=arm-linux-gnueabihf
make
make install
After cross-compiling, we get:
(3)Cross-compile wpa_supplicant-2.9
Copy the wpa_supplicant source code to the Linux host and extract it, then enter the wpa_supplicant directory. Copy the defconfig file in the wpa_supplicant directory and rename it to .config, then open the .config file:
cp defconfig .config
vim .config
Add the following content to the .config file, where the paths for the openssl and libnl libraries are the installation locations we just used:
# Cross-compiler
CC=arm-linux-gnueabihf-gcc
# openssl library and header file paths
CFLAGS += -I/home/LinuxZn/git_clone/openssl-1.0.2/openssl_build_arm/include
LIBS += -L/home/LinuxZn/git_clone/openssl-1.0.2/openssl_build_arm/lib
# libnl library and header file paths
CFLAGS += -I/home/LinuxZn/git_clone/libnl-3.2.23/libnl_build_arm/include/libnl3
LIBS += -L/home/LinuxZn/git_clone/libnl-3.2.23/libnl_build_arm/lib
Next, we also need to specify the pkgconfig path for the libnl library. The environment variable PKG_CONFIG_PATH holds the pkgconfig package path:
export PKG_CONFIG_PATH=/home/LinuxZn/git_clone/libnl-3.2.23/libnl_build_arm/lib/pkgconfig:$PKG_CONFIG_PATH
Compile:
make
If compilation fails, you may encounter the following error. In this case, simply comment out the following two lines in .config:
#CONFIG_CTRL_IFACE_DBUS_NEW=y
#CONFIG_CTRL_IFACE_DBUS_INTRO=y
After compilation, the wpa_supplicant and wpa_cli tools will be generated in the current directory. Copy these two files to the development board’s /usr/bin directory.
First, create a <span>wpa_supplicant.conf</span> file in the development board’s /etc directory with the following content:
ctrl_interface=/var/run/wpa_supplicant
update_config=1
ctrl_interface_group=root
ap_scan=1
network={
  ssid="ChinaNet-9ee9"
  psk="s6iyvweq"
  key_mgmt=WPA-PSK
}
Next, create the <span>/var/run/wpa_supplicant</span> directory:
mkdir -p /var/run/wpa_supplicant
Finally, use the following command to connect to WiFi:
wpa_supplicant -Dwext -c /etc/wpa_supplicant.conf -i wlan1&
If the output shows (wlan1: <span>CTRL-EVENT-CONNECTED</span>), it indicates a successful connection.
[root@imx6ull:/etc]# [  968.615223] ------------[ cut here ]------------
[  968.622210] WARNING: CPU: 0 PID: 127 at net/wireless/sme.c:733 __cfg80211_connect_result+0x2e4/0x404
[  968.635489] ---[ end trace c94b130fc23cc767 ]---
wlan1: Associated with 28:bf:89:7b:a1:23
wlan1: WPA: Key negotiation compl[  968.655338] IPv6: ADDRCONF(NETDEV_CHANGE): wlan1: link becomes ready
eted with 28:bf:89:7b:a1:23 [PTK=CCMP GTK=CCMP]
wlan1: CTRL-EVENT-CONNECTED - Connection to 28:bf:89:7b:a1:23 completed [id=0 id_str=]
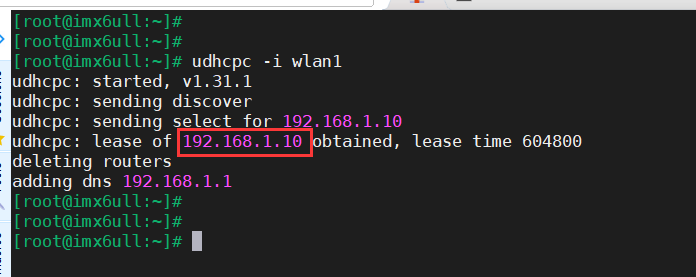
At this point, the connection is successful, and you can dynamically obtain an IP address.
udhcpc -i wlan1 //-i specifies the network card
Then execute ifconfig to see the wireless network card that has been assigned an IP address. If wlan1 still does not have an IP address, it may be that the obtained IP address has not yet been written to the network card device.
The IP assigned to our development board is as follows:
If our router has internet access, we can ping the external network. If the router does not have internet access, we can ping our Ubuntu host for testing.Here, we ping Baidu to test, which indicates that our development board has set up the network environment:
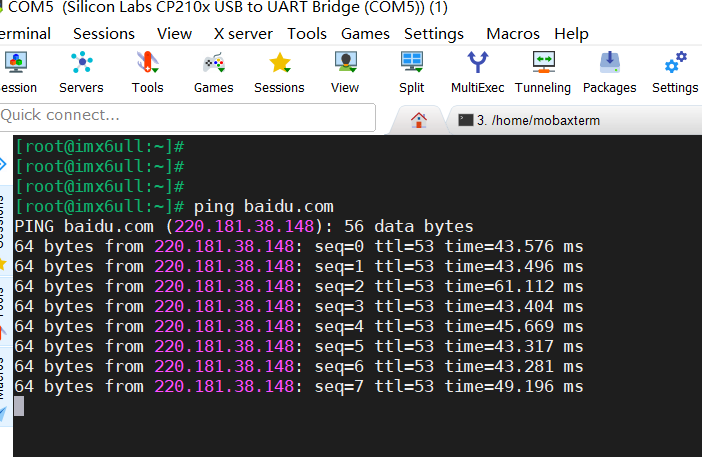
Now we can have fun!
SSH Porting
The previous two steps have enabled our development board to have a wireless network environment. It is necessary to set up a practical environment: the SSH environment.Secure Shell (SSH) is a secure network protocol established on the application layer by IETF (The Internet Engineering Task Force).It is specifically designed to provide security for <span>remote login sessions</span> (it can even be used for file transfer between Windows and Linux servers) and other network services, effectively addressing vulnerabilities in the network. We often use SSH in our work, and the Ubuntu host can easily interact with the development board.Cross-compiling OpenSSH requires dependencies on zlib and openssl libraries, so we need to cross-compile these two libraries first. There are many versions of these libraries, and version mismatch issues may arise. The versions I used are as follows:
- openssl-1.0.2
- zlib-1.2.3
- openssh-4.6p1
(1)Cross-compile openssl-1.0.2
The cross-compilation of openssl-1.0.2 has been demonstrated in the previous wpa_supplicant-2.9 compilation, so I will not demonstrate it again here.
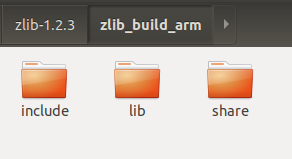
(2)Cross-compile zlib-1.2.3
./configure --prefix=/home/LinuxZn/git_clone/zlib-1.2.3/zlib_build_arm
Generate the Makefile and modify the CC to the cross-compiler:
CC=arm-linux-gnueabihf-gcc

CFLAGS=-O3 -DUSE_MMAP
#CFLAGS=-O -DMAX_WBITS=14 -DMAX_MEM_LEVEL=7
#CFLAGS=-g -DDEBUG
#CFLAGS=-O3 -Wall -Wwrite-strings -Wpointer-arith -Wconversion \
#           -Wstrict-prototypes -Wmissing-prototypes

LDFLAGS=-L. libz.a
LDSHARED=arm-linux-gnueabihf-gcc
CPP=arm-linux-gnueabihf-gcc -E
Then execute:
make
make install
After compilation, we get:
(3)Cross-compile openssh-4.6p1
./configure --host=arm-linux-gnueabihf --with-libs --with-zlib=/home/LinuxZn/git_clone/zlib-1.2.3/zlib_build_arm --with-ssl-dir=/home/LinuxZn/git_clone/openssl-1.0.2/openssl_build_arm --disable-etc-default-login CC=/home/LinuxZn/100ask_imx6ull-sdk/ToolChain/gcc-linaro-6.2.1-2016.11-x86_64_arm-linux-gnueabihf/bin/arm-linux-gnueabihf-gcc AR=/home/LinuxZn/100ask_imx6ull-sdk/ToolChain/gcc-linaro-6.2.1-2016.11-x86_64_arm-linux-gnueabihf/bin/arm-linux-gnueabihf-ar
make
Where the meanings of the parameters are as follows:
- –host indicates the platform on which it runs.
- –with-libs indicates the required library files.
- –with-zlib indicates the installation path of the zlib library file.
- –with-ssl-dir indicates the installation path of the openssl files.
- –disable-etc-default-login indicates not to use the current environment variable’s compiler, so later configuration parameters directly specify the CC and AR compilers.
- CC indicates the compiler to be used.
- AR indicates the path of the compiler to be used.
Compile:
make
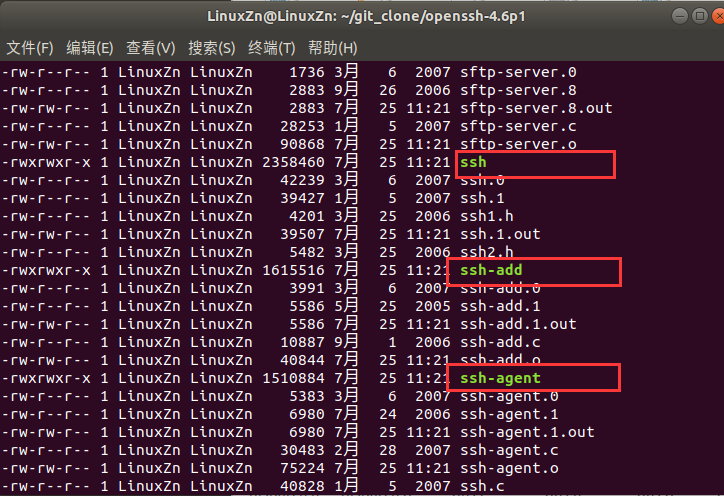
At this point, tools such as scp, sftp, ssh, sshd, ssh-add, and ssh-agent will be generated in the openssh-4.6p1 directory:
Create three directories on the board: “/usr/libexec“, “/usr/local/etc ”, and “/usr/local/bin ”:
mkdir -p /usr/libexec /usr/local/etc /usr/local/bin
Next, copy the relevant tools to the development board for later use:
① Copy the generated “scp, sftp, ssh, sshd, ssh-add, ssh-agent, ssh-keygen, ssh-keyscan” executable files from openssh-6.6p1 to the development board’s <span>/usr/local/bin</span> directory:
mv scp sftp ssh sshd ssh-add ssh-agent ssh-keygen ssh-keyscan /usr/local/bin/
② Copy “moduli, ssh_config, sshd_config” to the development board’s <span>/usr/local/etc</span> directory.
mv moduli ssh_config sshd_config /usr/local/etc
③ Copy “sftp-server, ssh-keysign” to the development board’s <span>/usr/libexec</span> directory.
mv sftp-server ssh-keysign /usr/libexec
④ Use “ssh-keygen” to generate four key files: “ssh_host_rsa_key”, “ssh_host_dsa_key”, “ssh_host_ecdsa_key”, and “ssh_host_ed25519_key”. In the openssh-4.6p1 directory, enter the command:
ssh-keygen -t rsa -f ssh_host_rsa_key -N ""
ssh-keygen -t dsa -f ssh_host_dsa_key -N ""
ssh-keygen -t ecdsa -f ssh_host_ecdsa_key -N ""
ssh-keygen -t dsa -f ssh_host_ed25519_key -N ""
After execution, copy the generated files to the development board’s <span>/usr/local/etc/</span> directory:
- ssh_host_rsa_key
- ssh_host_dsa_key
- ssh_host_ecdsa_key
- ssh_host_ed25519_key
Then change their permissions to 600.
mv ssh_host_rsa_key ssh_host_dsa_key ssh_host_ecdsa_key ssh_host_ed25519_key /usr/local/etc/
chmod 600 ssh_host_rsa_key ssh_host_dsa_key ssh_host_ecdsa_key ssh_host_ed25519_key
In the development board terminal, use the command <span>vi /etc/passwd</span> to open the ssh key file, and add the following content at the bottom of the <span>/etc/passwd</span> file:
sshd:x:74:74:Privilege-separated
SSH:/var/empty/sshd:/sbin/nologin
Next, create a root account on the development board using the command:
passwd root
Then run the sshd binary file on the development board with the command:
/usr/local/bin/sshd
You may encounter the following error:
/usr/local/bin/sshd: error while loading shared libraries: libnsl.so.1: cannot open shared object file: No such file or directory
Copy the relevant libraries from the cross-compiler to the board. Run it again, and you may encounter the error:
Could not load host key: /usr/local/etc/ssh_host_key
Disabling protocol version 1. Could not load host key
However, this does not affect usage.
Finally, use SSH to log into our development board from our Ubuntu host. First, ensure that the IP of our Ubuntu host and the IP of the development board are in the same subnet, for example:
Ubuntu IP:192.168.1.9
Development Board IP:192.168.1.10
Use the following command in Ubuntu to log into the development board:
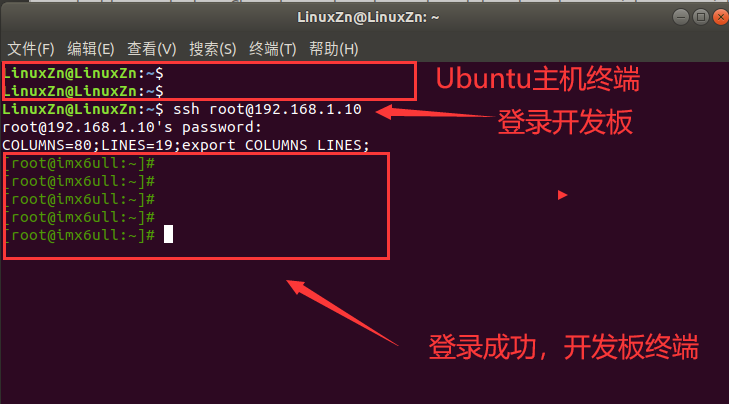
At this point, our SSH environment has been successfully set up. Now we can have fun!
This concludes my sharing. The entire process involves many steps, and I encountered many issues. I also referred to many blog posts online, and even following the relevant steps, I still faced many problems. It took me several days of spare time to get it all working.
Working with Linux is like this; you will encounter many issues. If you follow this article and encounter results that differ from those in this article, you will need to analyze the specific problems and compare with multiple articles.
On the Shoulders of Giants:
1. http://bbs.100ask.net/article/412. https://blog.csdn.net/qq_24835087/article/details/1047839903. https://blog.csdn.net/Chihiro_S/article/details/1091608994. https://blog.csdn.net/qq_22902919/article
END
Source: Embedded Miscellaneous
Copyright belongs to the original author. If there is any infringement, please contact for deletion.▍Recommended ReadingAfter reading these C language examples, you will definitely say “Wow!” five times!A development tool that has been active for 17 years, so good it takes off~What is the principle of the recently popular electronic blood oxygen meter? Is it accurate?
→ Follow to avoid getting lost ←