When installing the system on the Raspberry Pi, the system is usually directly flashed onto the memory card. Although convenient, the inherent limitations of the memory card mean that its capacity and speed do not meet our requirements. To enhance the experience, we choose to install the system on an external hard drive to solve this issue. However, the Raspberry Pi defaults to booting from the TF card, so if we directly flash the system onto the external hard drive, the system will not boot. What should we do? 🧐
Experimental Environment
-
Raspberry Pi 4B. -
A TF memory card for the first boot of the Raspberry Pi. -
A DC power supply with 2A current and 5V voltage. -
An external hard drive. -
Win32 Disk Imagersoftware for system backup. -
Raspberry Pi image burning software for writing the system to the external hard drive.
Creating .img File
In a Linux system, we first use the df command to check the location of the USB drive. After recording the location, we can create an img file using the dd command.
dd if=/dev/zero of=kali.img bs=512 count=2880
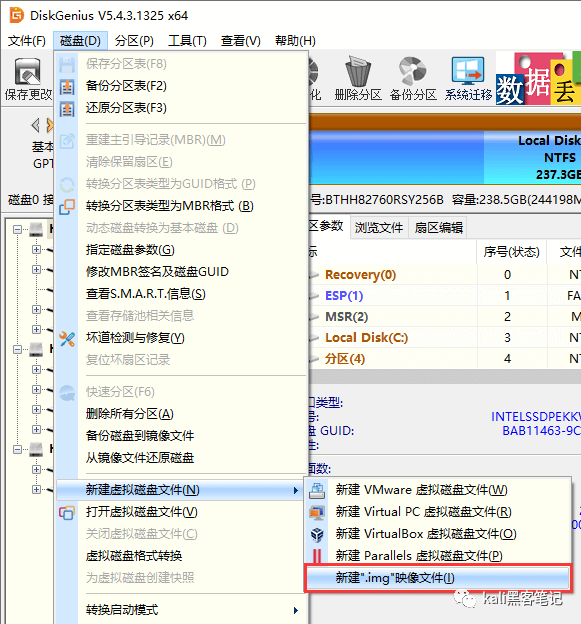
If you are using Windows, you can use the partition tool DiskGenius to create it. Click Disk – Create Virtual Disk File – Create .img Image File

Backing Up the System
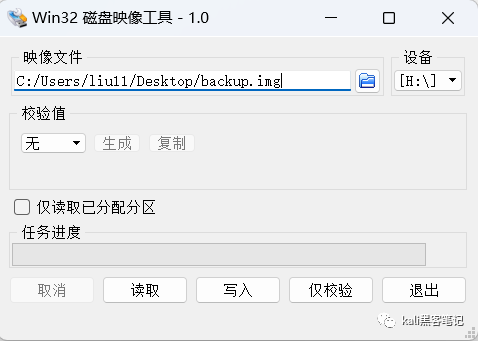
Open Win32 Disk Imager, select the path to write the backup file (i.e., the path of the empty img file), select the TF card to back up, click Read, and wait for completion.

Transfer OS
Open the Raspberry Pi image burning tool, select the system as a custom system image, select the external hard drive (make sure not to select incorrectly, as data is invaluable), and click burn.
 Once completed, you can pop the champagne to celebrate. Toss the TF card, insert the external hard drive, and enjoy!

For more exciting articles, follow us