Recently, I came across the XiaoZhi AI robot on Bilibili and decided to get one to play with. The official server clearly couldn’t meet my expectations, so I set up a third-party server and expanded its functionality a bit. It seems to be getting interesting, but what exactly did I do?
Initial Experience
This robot seems to have been quite popular recently, with various hardware forms ranging from compact and cute to hardcore and straightforward. However, the core remains unchanged. If you have never played with it, you can check out what it looks like on Bilibili or search for it on Taobao. The one I have is quite abstract and looks like this: 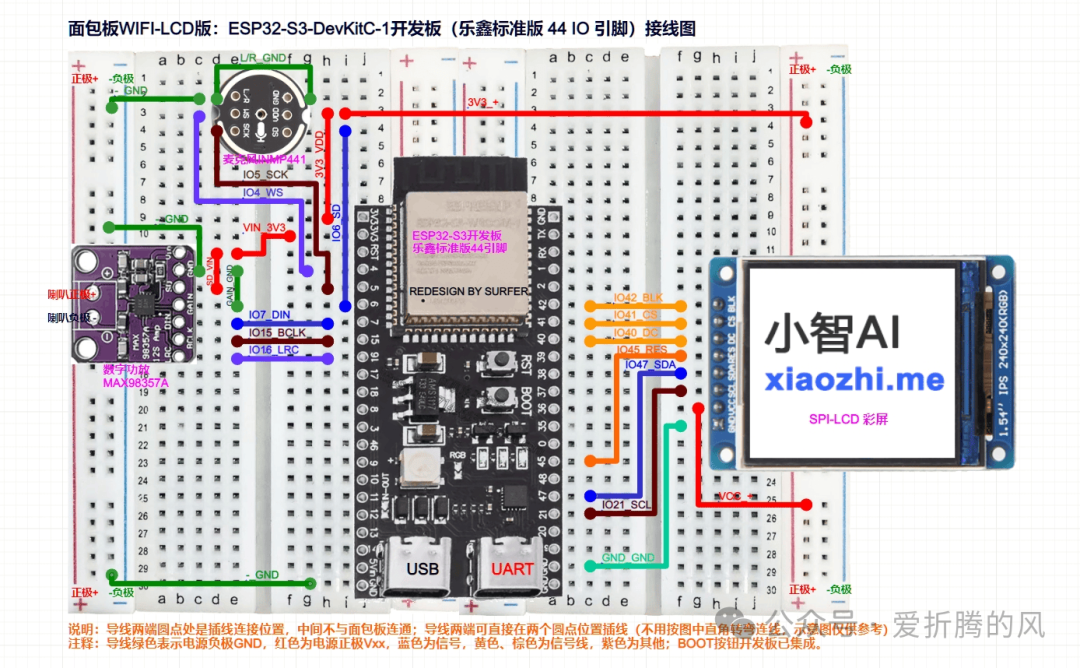
Wiring it up according to the circuit diagram or pinout instructions is not just about having hands; you also need some strength 🙂 Because the ESP32 pins do not perfectly match the breadboard holes, you have to force them in. I saw a guy on Bilibili using a hammer, which really made me laugh. For power supply, we can use any power bank, which is quite easy to manage and offers some mobility.
During my initial experience, I followed the official DIY tutorial[1] to flash the official firmware onto the device. The overall response was quite fast, and the conversation was smooth, but the number of models is limited, and voice replication is charged. Especially if it can’t connect to the internet to do anything, chatting with outdated model data can be a bit boring. Combining this with the currently popular MCP functionality, I set two expansion goals:
- Replicate my personal voice so the AI can speak in my tone
- Expand MCP functionality to allow the AI to connect to more external capabilities
After spending some leisure time, I have it up and running. Below, I will briefly share the process. If you also want to tinker or have good ideas, feel free to communicate.
Deploying a Dedicated Server
The XiaoZhi official server is not open-source, but it provides interaction protocols, and there is a third-party open-source server implementation called xiaozhi-esp32-server[2] available for use. To complete the use of a third-party server, we need to do two things:
- Deploy the service on our own machine.
- Modify two addresses in the XiaoZhi firmware, recompile, and flash it onto the device.
Both steps are quite simple, and we don’t need to think too much; just take it step by step like I did.
Deploying the Server
Refer to the Docker running full module tutorial for xiaozhi-esp32-server[3]. I recommend using Docker for deployment mainly to keep the local environment clean.
Prepare the configuration file .config.yaml. In this server, multiple layers of config are used to override each other. The .config.yaml we define will override the default config.yaml.
# In development, please create a data directory in the project root, then create an empty file named 【.config.yaml】 in the data directory
# Then, if you want to modify any configuration, just modify the 【.config.yaml】 file instead of the 【config.yaml】 file
# The system will prioritize reading the configuration from the 【data/.config.yaml】 file. If the configuration in the 【.config.yaml】 file does not exist, the system will automatically read the configuration from the 【config.yaml】 file.
# This approach simplifies configuration and protects your keys.
read_config_from_api: True

manager-api:
  # Your manager-api address, preferably use local IP
  url: http://xiaozhi-esp32-server-web:8002/xiaozhi
  # Your manager-api token, which is the server.secret you copied earlier
  secret: 8e0ee7db-3928-400f-9e93-261275f91cf0

# #######################################################################################
# ############################# Basic server running configuration #############################
server:
  # Server listening address and port
  ip: 0.0.0.0
  port: 8000
The configuration here doesn’t need to be too much because it can also be dynamically updated through the manager-api, so we only need to configure a manager-api address and secret.
Then we use docker-compose to deploy. Before that, you need to download the voice recognition model file to models/SenseVoiceSmall/model.pt. These details are mentioned in the link above, so I won’t repeat them. The final yaml is as follows:
# Docker installation full module
services:
  # Server module
  xiaozhi-esp32-server:
    image: ghcr.nju.edu.cn/xinnan-tech/xiaozhi-esp32-server:server_latest
    container_name: xiaozhi-esp32-server
    depends_on:
      - xiaozhi-esp32-server-db
      - xiaozhi-esp32-server-redis
    restart: always
    networks:
      - default
    ports:
      # ws server
      - "8000:8000"
    security_opt:
      - seccomp:unconfined
    environment:
      - TZ=Asia/Shanghai
    volumes:
      # Configuration file directory
      - ./data:/opt/xiaozhi-esp32-server/data
      # Model file mount, very important
      - ./models/SenseVoiceSmall/model.pt:/opt/xiaozhi-esp32-server/models/SenseVoiceSmall/model.pt

  # manager-api and manager-web modules
  xiaozhi-esp32-server-web:
    image: ghcr.nju.edu.cn/xinnan-tech/xiaozhi-esp32-server:web_latest
    container_name: xiaozhi-esp32-server-web
    restart: always
    networks:
      - default
    depends_on:
      xiaozhi-esp32-server-db:
        condition: service_healthy
      xiaozhi-esp32-server-redis:
        condition: service_healthy
    ports:
      # Smart console
      - "8002:8002"
    environment:
      - TZ=Asia/Shanghai
      - SPRING_DATASOURCE_DRUID_URL=jdbc:mysql://xiaozhi-esp32-server-db:3306/xiaozhi_esp32_server?useUnicode=true&characterEncoding=UTF-8&serverTimezone=Asia/Shanghai&nullCatalogMeansCurrent=true&connectTimeout=30000&socketTimeout=30000&autoReconnect=true&failOverReadOnly=false&maxReconnects=10
      - SPRING_DATASOURCE_DRUID_USERNAME=root
      - SPRING_DATASOURCE_DRUID_PASSWORD=123456
      - SPRING_DATA_REDIS_HOST=xiaozhi-esp32-server-redis
      - SPRING_DATA_REDIS_PORT=6379
  xiaozhi-esp32-server-db:
    # image: mysql/mysql-server:latest
    image: mysql:latest
    container_name: xiaozhi-esp32-server-db
    healthcheck:
      test: [ "CMD", "mysqladmin" ,"ping", "-h", "localhost" ]
      timeout: 45s
      interval: 10s
      retries: 10
    restart: always
    networks:
      - default
    ports:
      - "3306:3306"
    volumes:
      - ./mysql/data:/var/lib/mysql
    environment:
      - TZ=Asia/Shanghai
      - MYSQL_ROOT_PASSWORD=123456
      - MYSQL_DATABASE=xiaozhi_esp32_server
      - MYSQL_INITDB_ARGS="--character-set-server=utf8mb4 --collation-server=utf8mb4_unicode_ci"
  xiaozhi-esp32-server-redis:
    image: redis
    expose:
      - 6379
    container_name: xiaozhi-esp32-server-redis
    healthcheck:
      test: ["CMD", "redis-cli", "ping"]
      interval: 10s
      timeout: 5s
      retries: 3
    networks:
      - default
networks:
  default:
Start with the command:
docker-compose up -d
Once the services are up, we can use the built-in test page of the repository to test. Open the browser to main/xiaozhi-server/test/test_page.html to see the following page:
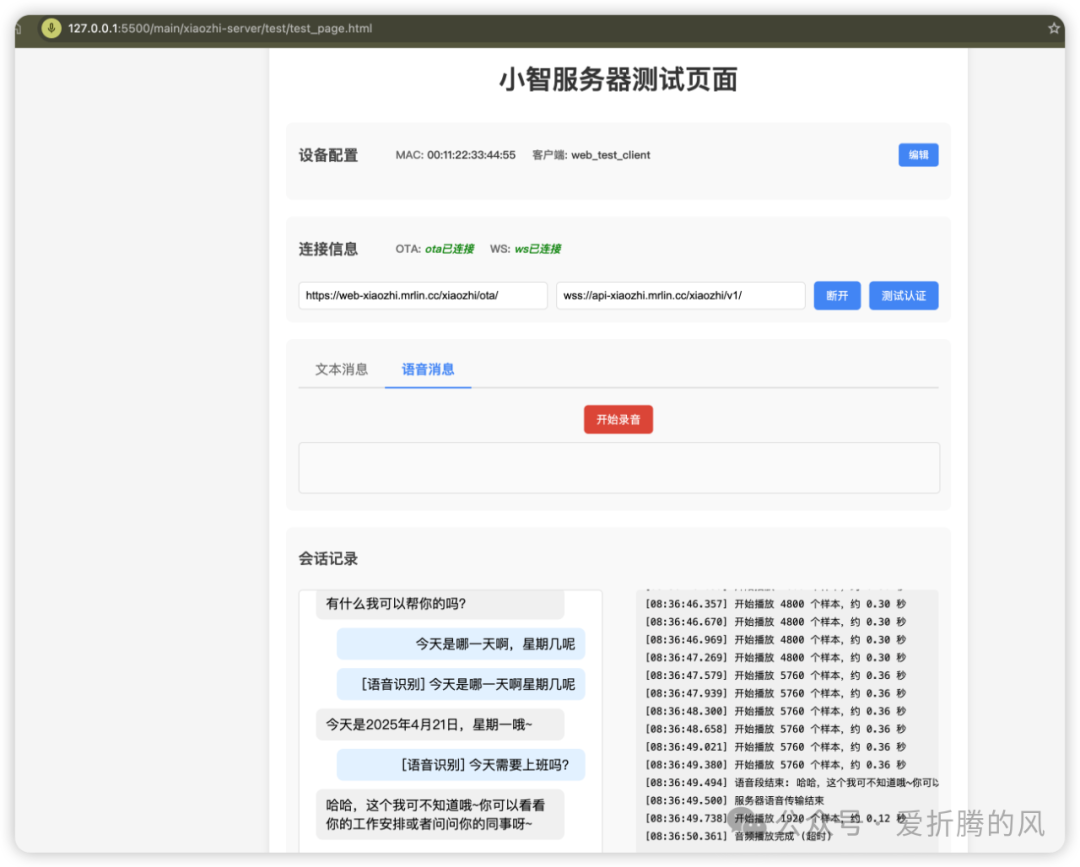
It is best to test on this webpage to ensure that chatting, voice, etc., meet your expectations before proceeding to the next step. By the way, this page is also a debugging tool, which significantly improves efficiency.
Here’s a little tip: since we need to burn the ota/websocket address into the firmware, if you are unsure where the service will be deployed in the future, you can use a reverse proxy to forward it. Here’s a schematic for understanding:
apiVersion: traefik.containo.us/v1alpha1
kind: IngressRoute
metadata:
  name: to-xiaozhi-web
spec:
  entryPoints:
    - websecure
  routes:
    - match: Host(`web-xiaozhi.mrlin.cc`)
      kind: Rule
      services:
        - name: web-xiaozhi
          port: 80
---
apiVersion: v1
kind: Service
metadata:
  name: web-xiaozhi
spec:
  ports:
    - protocol: TCP
      port: 80
      targetPort: 8002
---
apiVersion: v1
kind: Endpoints
metadata:
  name: web-xiaozhi
subsets:
  - addresses:
      - ip: 192.168.50.190
    ports:
      - port: 8002
---
apiVersion: traefik.containo.us/v1alpha1
kind: IngressRoute
metadata:
  name: to-xiaozhi-api
spec:
  entryPoints:
    - websecure
  routes:
    - match: Host(`api-xiaozhi.mrlin.cc`)
      kind: Rule
      services:
        - name: api-xiaozhi
          port: 80
---
apiVersion: v1
kind: Service
metadata:
  name: api-xiaozhi
spec:
  ports:
    - protocol: TCP
      port: 80
      targetPort: 8000
---
apiVersion: v1
kind: Endpoints
metadata:
  name: api-xiaozhi
subsets:
  - addresses:
      - ip: 192.168.50.190
    ports:
      - port: 8000
Here, I pointed both api-xiaozhi and web-xiaozhi to my local IP, so I can access them via api-xiaozhi.mrlin.cc and web-xiaozhi.mrlin.cc. In the future, if I migrate to another machine, I only need to modify this yaml file. You can skip this step without any issues and continue using the IP, but note that it will use the http/ws protocol.
Modifying Firmware & Compiling & Flashing
Here, we need to enter the official firmware repository[4] to continue our operations. The compilation and flashing require you to set it up on Windows. We can refer to this article Setting Up ESP IDF 5.3.3 Development Environment on Windows and Compiling XiaoZhi[5] to get a general idea of the process; then, let’s look at the brief yet crucial firmware build[6] process.
In short, for the current latest version, we only need to modify the OTA_URL address. In the past, we had to modify the websocket address, but now it has been delivered via OTA.
That day, while I was compiling according to the tutorial, I found that I couldn’t find the definition of the websocket. Upon closer inspection, I noticed that there was a commit that refactored this part, so I also submitted a PR[7] to the server, which was surprisingly merged quickly. However, at that time, the field name was not very good, and I retained the
websocket_urlfrom the firmware, which was later changed toserver.websocket, which indeed aligns better with the project’s naming conventions.
After that, building involves just a few commands:
# In the terminal command line, navigate to the root directory of xiaozhi-esp32
cd xiaozhi-esp32
# For example, I am using the esp32s3 board, so set the compile target to esp32s3. If your board is a different model, please replace it with the corresponding model
idf.py set-target esp32s3
# Enter menu configuration
idf.py menuconfig
Next is flashing. Connect your XiaoZhi AI device to the computer via serial, then use idf.py build to build, followed by idf.py -p PORT flash to flash. The PORT may vary depending on the device you connect. Check the serial in My Devices on your computer; mine is COM4. If you find flashing slow, you can add the parameter -b 2000000 to speed it up.
If everything is successful, also fill in wss://api-xiaozhi.mrlin.cc/xiaozhi/v1/ in the server.websocket from the previous step, and then you can open the device to connect to your server and start playing. 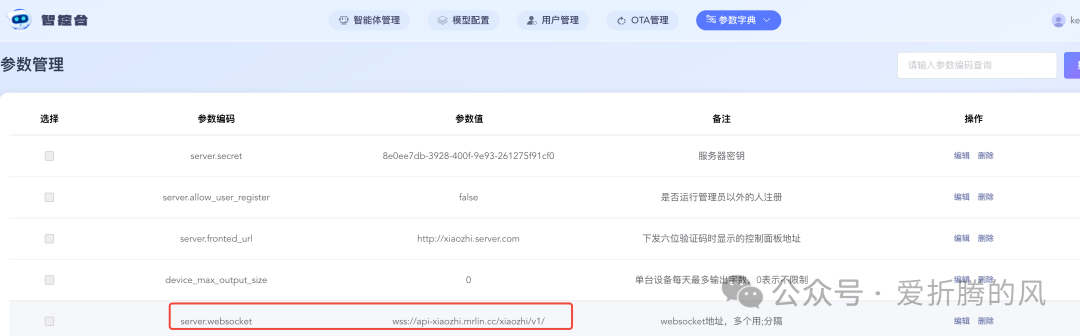
Now you may find that there are more LLM options and more TTS (voice) options, which seem to be more open, and perhaps you can have more fun.
Personal Voice Replication
Previously, when I was playing with the Volcano Engine, I received a few voice replications, and when I wanted to use them on XiaoZhi, I found they had expired, with only a ten-day validity period, which is quite stingy. I checked Tencent Cloud, and they also have a free quota, which I applied for and got three months, so let’s play with it. Unlike the voice replication on the Volcano Engine, which can be submitted directly on the webpage, Tencent Cloud’s replication is much more primitive and requires using the API. Fortunately, the related functionality is also in its tccli, so it’s just a matter of running commands, which shouldn’t be too difficult for us.
Command Line Experience
We can refer to the documentation on Voice Replication Related Interfaces[8] to experience the process using the command line. As for how to install tccli, you can refer to Tencent Cloud Command Line Tool[9].
1. Get Training Text
❯ tccli vrs GetTrainingText --TaskType 5 --Domain 1
{
    "Data": {
        "TrainingTextList": [
            {
                "TextId": "5f3ef960-4f11-4f4b-84e6-514692ebe0c5",
                "Text": "Dear, the default is to send Yunda Express. Can you receive Yunda's goods?"
            }
        ]
    },
    "RequestId": "8c758bac-19fc-474d-9b12-2e813e834102"
}
In this step, we need to provide an audio clip based on the provided text. I guess this is to avoid using someone else’s voice for replication?
2. Environment and Audio Quality Detection
❯ tccli vrs DetectEnvAndSoundQuality --cli-unfold-argument --TextId "5f3ef960-4f11-4f4b-84e6-514692ebe0c5" --AudioData "$(base64 -i vrs.m4a | tr -d '\n')" --TypeId 2 --Codec m4a --TaskType 5

{
    "Data": {
        "AudioId": "audio0de472d6d96d488ba2159d83c10b440f",
        "DetectionCode": 0,
        "DetectionMsg": "Success",
        "DetectionTip": []
    },
    "RequestId": "6218aa6d-9d45-492c-9c18-dfa342d3bd5e"
}
This step seems redundant based on the name, but the next step requires this AudioId, so we still need to do it.
3. Create Voice Replication Task
❯ tccli vrs CreateVRSTask --SessionId 1234 --VoiceName kevin --VoiceGender 1 --VoiceLanguage 1 --AudioIdList "[\"audio0de472d6d96d488ba2159d83c10b440f\"]"  --TaskType 5
{
    "Data": {
        "TaskId": "fast7feffdeb04ca401583a317002dd14e7a"
    },
    "RequestId": "127ad8c6-a27d-470f-8dab-b9940c9594cb"
}
We received a task ID. The reason for this is that this step is asynchronous, and the server needs time to train this voice.
4. Query Voice Replication Task Result
❯ tccli vrs DescribeVRSTaskStatus --TaskId fast7feffdeb04ca401583a317002dd14e7a
{
    "Data": {
        "TaskId": "fast7feffdeb04ca401583a317002dd14e7a",
        "Status": 2,
        "StatusStr": "Success",
        "VoiceType": 200000000,
        "ErrorMsg": "",
        "ExpireTime": "2025-08-02T00:00:00+08:00",
        "FastVoiceType": "WCHN-869b22949cbe4db6a344f1da8cf8a68c"
    },
    "RequestId": "3eb52b2d-3fa1-42f5-84f0-abf71bef32e2"
}
In the results retrieved, there are a few key pieces of information: VoiceType and FastVoiceType. The former is the voice ID, and the latter is the ID used for quick replication. Please make a note of these for future use.
5. Query Replicated Voice Information
❯ tccli vrs GetVRSVoiceTypeInfo --VoiceType 200000000 --TaskType 5 --FastVoiceType WCHN-869b22949cbe4db6a344f1da8cf8a68c
{
    "Data": {
        "VoiceType": 200000000,
        "VoiceName": "kevin",
        "VoiceGender": 1,
        "TaskType": 5,
        "TaskID": "fast7feffdeb04ca401583a317002dd14e7a",
        "DateCreated": "2025-05-03T15:17:35+08:00",
        "IsDeployed": true,
        "ExpireTime": "2025-08-02T00:00:00+08:00",
        "FastVoiceType": "WCHN-869b22949cbe4db6a344f1da8cf8a68c"
    },
    "RequestId": "db5709d2-4e2c-432d-8bd3-ed2eddcb6c21"
}
This step may not be very useful, as we already have the information we need from earlier. If it is useful, you probably know that this is a man’s voice named Kevin.
6. Use Replicated Voice to Synthesize Speech
❯ tccli tts TextToVoice \
--Text "I took my kid to play at Meland today, and this guy went crazy" \
--SessionId 123 \
--VoiceType 200000000 \
--FastVoiceType WCHN-869b22949cbe4db6a344f1da8cf8a68c > result.json
The returned content includes base64 encoded audio data. We can use jq to extract and save it to a file:
jq -r '.Audio' result.json | base64 -d > tts.wav
Play it back and listen to the magic or shock of hearing your own voice.
XiaoZhi Server Supports Using Replicated Voice
When I used the replicated voice, I found that the XiaoZhi server did not support it, so I added support for it and submitted a PR feat: Support Tencent TTS voice synthesis after one-sentence replication[10]. This time it was not merged quickly because the official said that a certain field would be deprecated, but did not specify what the new method would be, so I will submit a ticket to Tencent Cloud tomorrow.
As seen in the PR modifications, it only required adding the aforementioned fast_voice_type parameter for transmission. Regardless of whether the upstream merges the modification, I have already implemented it locally. A small discovery here is that the server processes parameters for different voice synthesis models, and the UI is dynamically generated based on the fields and their definitions, which is quite nice. I also updated a DB, and the corresponding UI now has new fields.
UPDATE `ai_model_provider`
SET `fields` = '[{"key":"appid","label":"Application ID","type":"string"},{"key":"secret_id","label":"Secret ID","type":"string"},{"key":"secret_key","label":"Secret Key","type":"string"},{"key":"output_dir","label":"Output Directory","type":"string"},{"key":"region","label":"Region","type":"string"},{"key":"voice","label":"Voice ID","type":"string"},{"key":"fast_voice_type","label":"FastVoiceType","type":"string"}]',
    `update_date` = NOW()
WHERE id = 'SYSTEM_TTS_TencentTTS';
I wonder how you feel when you find yourself talking to yourself. I was quite surprised, feeling like a lunatic. Tomorrow, I will replicate my child’s voice, so I can do parent-child education anytime 😀
MCP Expansion
This third-party server implementation supports some MCP capabilities, specifically the stdio mode of the MCP server. This is limited due to the use of container mode. There are no npx/uvx or Chrome in the container. I have a small wish: to ask it who the most beautiful person is, or to ask it what the score was for Manchester United’s loss yesterday. If it can’t find the correct answer in real-time online, I won’t be satisfied.
Similarly, let’s expand it; it only requires a few lines of code modification, as detailed in the PR feat: MCP server supports using SSE mode[11]. Generally, using npx/uvx/chrome on the host machine is simpler, while we can use mcp-server through the http protocol in the container. However, if some MCP servers do not implement SSE, what should we do? It’s not difficult at all; for example, we can use supergateway to allow several modes to convert.
Using Supergateway
Supergateway runs MCP stdio-based servers over SSE (Server-Sent Events) or WebSockets (WS) with one command. This is useful for remote access, debugging, or connecting to clients when your MCP server only supports stdio.
For example, I have an perplexity-ask MCP server that only supports stdio mode, so I can use supergateway to enable it to support SSE mode:
    "perplexity-ask": {
      "command": "/opt/homebrew/bin/node",
      "args": ["/Users/kevinlin/Source/modelcontextprotocol/perplexity-ask/dist/index.js"],
      "env": {
        "PERPLEXITY_API_KEY": "pplx-..."
      }
    }
Start using supergateway:
export PERPLEXITY_API_KEY=pplx-... &&
 npx -y supergateway \
  --stdio "/opt/homebrew/bin/node .../perplexity-ask/dist/index.js" \
  --port 8123
Now, we can configure the MCP for the XiaoZhi server simply like this:
{
  "perplexity-ask": {
    "url": "http://your-ip:8123"
  }
}
Now your XiaoZhi can better utilize the MCP server. I tried asking it, and it said Manchester United has been unbeaten in the last 13 matches in the Europa League!
{
        "role": "assistant",
        "tool_calls": [
            {
                "id": "call_202505041955402e0c441c996740fb_0",
                "function": {
                    "arguments": "{\"messages\": [{\"role\": \"user\", \"content\": \"What were Manchester United's opponents and results in the recent Europa League matches?\"}]}",
                    "name": "perplexity_ask"
                },
                "type": "function",
                "index": 0
            }
        ]
    },
    {
        "role": "tool",
        "tool_call_id": "call_202505041955402e0c441c996740fb_0",
        "content": "Manchester United has performed excellently in the 2024-2025 Europa League season. Here are their recent opponents and results in the Europa League matches:

In the first leg of the semi-finals, Manchester United won 3-0 against Athletic Bilbao, the fourth team in La Liga. Casemiro opened the scoring for Manchester United, followed by Bruno Fernandes scoring twice, all goals were completed in the first half. During the match, Athletic Bilbao's defender Daniel Vivian was sent off.

In the quarter-finals, Manchester United faced the French team Lyon. The first leg ended in a 2-2 draw. The second leg, held at Old Trafford, was extremely intense, and after a fierce battle in regular time and extra time, Manchester United finally defeated Lyon 5-4, advancing to the semi-finals with an aggregate score of 7-6. In this match, Dalot scored, Bruno Fernandes converted a penalty, and in the final moments, Maguire scored a last-minute winner.

It is worth mentioning that Manchester United has maintained an impressive unbeaten record of 13 matches in the Europa League this season, contrasting sharply with their struggles in the Premier League. New coach Amorim is expected to replicate Mourinho's achievement of winning the Europa League in his first season with Manchester United in the 2016-17 season.

Manchester United is on the verge of reaching the Europa League final, which will be held later this month at San Mamés Stadium in Bilbao.

Citations:
[1] https://www.163.com/dy/article/JUKFHV4C0530UTM3.html
[2] https://www.163.com/dy/article/JUHUQC8L05567SBP.html
[3] https://zh.wikipedia.org/zh-cn/%E6%9B%BC%E8%81%AF2024%E5%B9%B4%E8%87%B32025%E5%B9%B4%E7%90%83%E5%AD%A3
[4] https://m.dongqiudi.com/article/5071872.html
[5] https://news.sina.com.cn/zx/2025-04-18/doc-inetppfi2898601.shtml
"
    },
    {
        "role": "assistant",
        "content": "Manchester United has performed excellently in the 2024-2025 Europa League season. Here are their recent opponents and results in the Europa League matches:

- In the first leg of the semi-finals, Manchester United won 3-0 against Athletic Bilbao, the fourth team in La Liga. Casemiro opened the scoring for Manchester United, followed by Bruno Fernandes scoring twice, all goals were completed in the first half.
- In the quarter-finals, Manchester United faced the French team Lyon. The first leg ended in a 2-2 draw. The second leg, held at Old Trafford, was extremely intense, and after a fierce battle in regular time and extra time, Manchester United finally defeated Lyon 5-4, advancing to the semi-finals with an aggregate score of 7-6.

Manchester United has maintained an impressive unbeaten record of 13 matches in the Europa League this season, contrasting sharply with their struggles in the Premier League. They are on the verge of reaching the Europa League final, which will be held later this month at San Mamés Stadium in Bilbao.
"
    }
Using Cloud Functions to Wrap MCP Server
As mentioned above, it requires the machine to have the relevant services installed, and switching to another machine would cause issues. Recently, while trying out Alibaba Cloud’s Bailian platform, I discovered an interesting extension that allows you to customize and extend MCP servers that it does not support through cloud functions. I thought, why not use it to wrap the MCP server, so it can be used anywhere.
We can open https://cap.console.aliyun.com/explore?lang=MCP+Server. Here, taking Gaode Map as an example, we just need to deploy it in the cloud afterward. 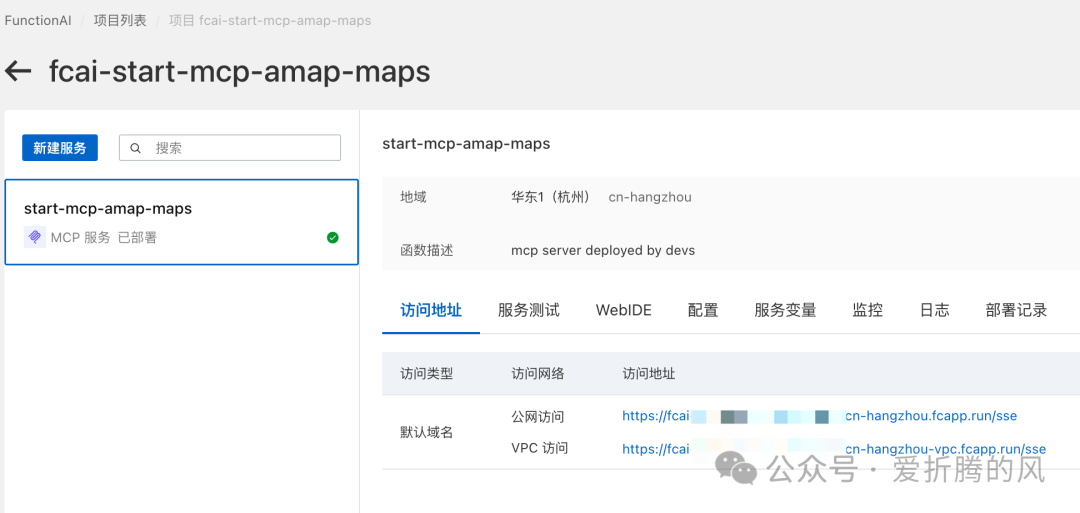
Locally, you only need a URL (fill in the public access address above) to use this MCP server, which automatically provides an SSE interface. Thus, you have effectively “moved the MCP server to the cloud” 🙂 Auditing and logging are also fully available. Now you can try chatting with XiaoZhi again, and for map information, it knows even better than we do. By the way, the map API also provides weather query capabilities, so we don’t need to find a separate weather service anymore.
Conclusion
This robot still has a lot of development potential, both in software and hardware. For example, if we could add a few more peripherals, it would be even more interesting. It also supports smart home platforms like Home Assistant, allowing operations like turning lights on and off or opening and closing curtains.
Technically, there are many areas to discuss further, such as the usage patterns of MCP and how to further improve response speed in conversations. Here’s a picture to commemorate; I initially wanted to include a video, but it was difficult to record, and as for sound, you know how it is. 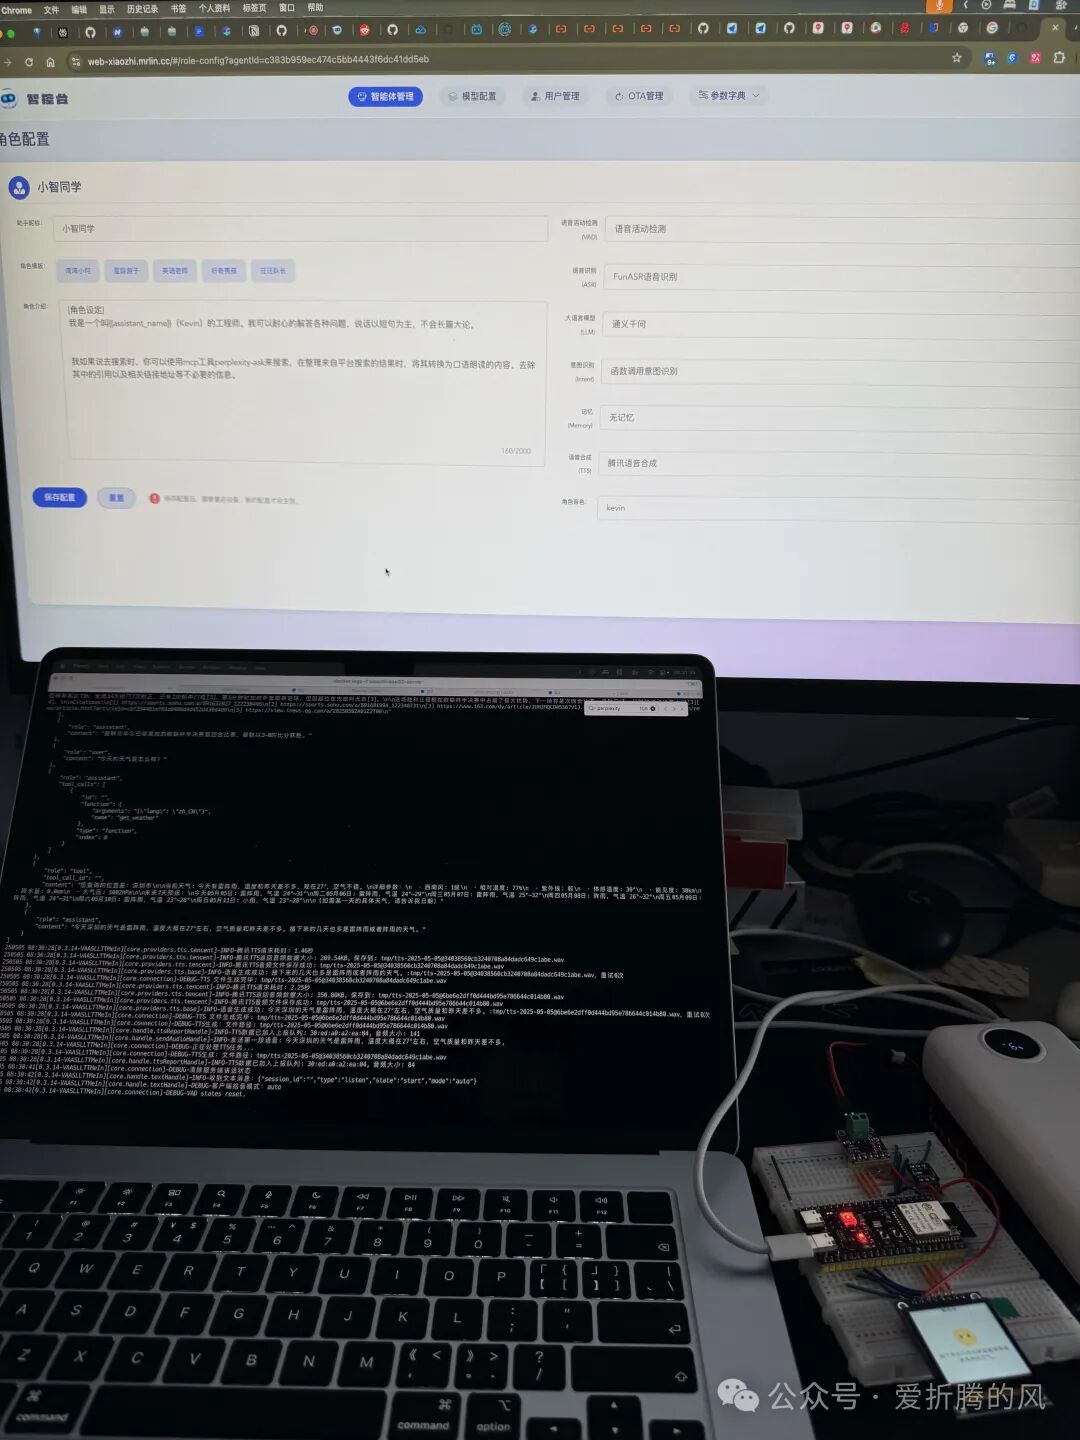
Considering the length of this article, I will stop here for today. If you are interested in certain aspects, feel free to leave comments for discussion. If you have nothing to say, likes, shares, and follows are the best encouragement for me. I strive to create valuable content and look forward to meeting you again in the future.
I am an engineer who loves to tinker with technology and enjoy sharing. Likes, follows, and shares are welcome, and I look forward to discussing technical issues together, learning, and progressing together. For more timely article updates, please follow my public account “The Engineer Who Loves to Tinker”.
References[1]
Official DIY tutorial: https://xiaozhi.me/
[2]
xiaozhi-esp32-server: https://github.com/xinnan-tech/xiaozhi-esp32-server/
[3]
Full module tutorial for running xiaozhi-esp32-server on Docker: https://github.com/xinnan-tech/xiaozhi-esp32-server/blob/main/docs/Deployment_all.md#%E6%96%B9%E5%BC%8F%E4%B8%80docker%E8%BF%90%E8%A1%8C%E5%85%A8%E6%A8%A1%E5%9D%97
[4]
Official firmware repository: https://github.com/78/xiaozhi-esp32
[5]
Setting up ESP IDF 5.3.3 development environment on Windows and compiling XiaoZhi: https://icnynnzcwou8.feishu.cn/wiki/JEYDwTTALi5s2zkGlFGcDiRknXf
[6]
Firmware build: https://github.com/xinnan-tech/xiaozhi-esp32-server/blob/main/docs/firmware-build.md
[7]
PR: https://github.com/xinnan-tech/xiaozhi-esp32-server/pull/925
[8]
Voice replication related interfaces: https://cloud.tencent.com/document/api/1283/90075
[9]
Tencent Cloud command line tool: https://cloud.tencent.com/document/product/440/6176
[10]
feat: Support Tencent TTS voice synthesis after one-sentence replication: https://github.com/xinnan-tech/xiaozhi-esp32-server/pull/1094
[11]
feat: MCP server supports using SSE mode: https://github.com/xinnan-tech/xiaozhi-esp32-server/pull/1106