Introduction
New Tang Technology provides an industrial IoT development platform using the NUC980DK61Y microprocessor. This is a complete industrial IoT development platform that includes comprehensive hardware design and software reference design. The core is a NUC’s ARM9 MPU with a speed of 300 MHz, built-in 64 MB DDR memory, a single 10/100 Ethernet port, 2 high-speed USB hosts, a 1 Gb SPI NAND Flash storage device, microphone input, stereo headphone output, and Arduino compatible interfaces.
The appearance of the development board is shown in the figure below:
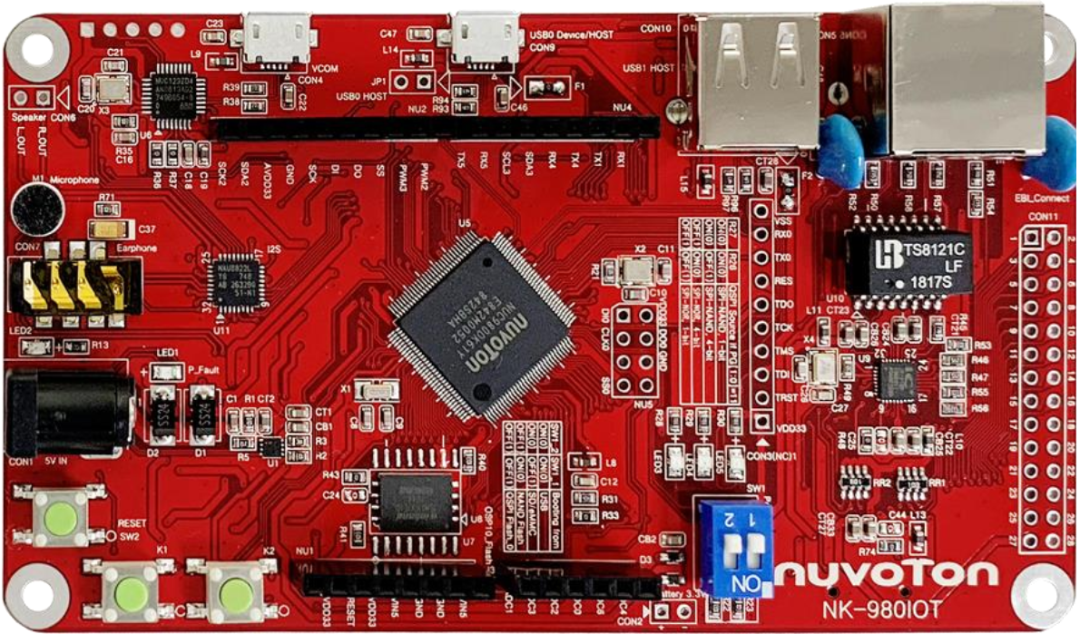
The commonly used on-board resources of this development board are as follows:
-
MPU:
NUC980DK61Y, clock speed 300MHz, embedded 64MB DDR SDRAM
-
External devices:
1Gbit SPI-NAND Flash, NAU8822 Audio Codec
-
Common peripherals
-
LED:
3 pieces
-
Buttons:
3 pieces
-
Common interfaces:
Arduino, USB to serial, RJ-45 interface, 1xUSB host 2.0, 1xUSB Dual-role 2.0, Micro SD.
-
Debugging interface:
External J-link debugging or using NuWriter burning software, SDRAM download.
Software and Hardware Requirements
Software Requirements
-
Windows 10 operating system.
-
Env RT-Thread development auxiliary tools.
-
Arm MDK v5 (or v4) – project compilation software.
(Optional)
-
RT-Thread Studio (Optional)
-
Terminal connection tools, such as Tera Term.
-
RT-Thread source code.
Hardware Requirements
-
NK-980IoT development board.
-
2 USB Micro data transfer cables.
(Video explanation version)
Preparation Work
The NK-980IoT board support package provides MDK5 and GCC development environments, introducing how to run the sample program. Before running the sample program, the following preparations are needed:
-
Source code acquisition
Run
git clonein the env window to copy the program to the local end. Source code directory descriptiongit clone https://github.com/RT-Thread/rt-thread -
Development environment
Supports GCC, MDK5, RT-Thread Studio development environments.
-
IDE/Compiler Tested version MDK5 5.26.2 GCC GCC 5.4.1 20160919 (release) RT-Thread Studio -
PC connection
Use two USB cables to connect the development board’s VCOM and USB0 Device/HOST port to the PC.
Run On-board Function Demonstration
-
Download the corresponding project suite
Execute the following command to download the project-related files.
    # cd rt-thread
    # cd bsp/nuvoton/nk-980iot
    # menuconfig --generate
    # pkgs --update
    Cloning into 'C:\rt-thread\bsp\nuvoton\nk-980iot\packages\netutils-latest'...
    remote: Enumerating objects: 442, done.
    remote: Total 442 (delta 0), reused 0 (delta 0), pack-reused 442R
    Receiving objects: 100% (442/442), 8.15 MiB | 36.00 KiB/s, done.
    Resolving deltas: 100% (237/237), done.
    ==============================>  FAL v0.4.0 is downloaded successfully.
    ==============================>  netutils update done
Operation completed successfully.-
GCC compile project
Execute the following commands to compile the project with gcc, the generated file will be
rtthread.bin.
    # cd rt-thread
    # cd bsp/nuvoton/nk-980iot
    # scons
    …
    …
    LINK rtthread.elf
    arm-none-eabi-objcopy -O binary rtthread.elf rtthread.bin
    arm-none-eabi-size rtthread.elf
       text    data     bss     dec     hex filename     245020    4556   10260  259836   3f6fc rtthread.elf
    scons: done building targets.

<Path-to-rt-thread>\bsp\nuvoton\nk-980iot\rtthread.bin-
MDK5 compile project
Generate MDK5 project files by selecting the following commands. The MDK project files will be generated in this directory, with the filename
project.uvprojx.
    # cd rt-thread
    # cd bsp/nuvoton/nk-980iot
    # scons --target=mdk5 –s

    <Path-to-rt-thread>\bsp\nuvoton\nk-980iot\project.uvprojx
Using NuWriter Tool
Before performing the following operations, set the Power-on setting to USB booting. Download NuWriter
Download firmware to SDRAM address
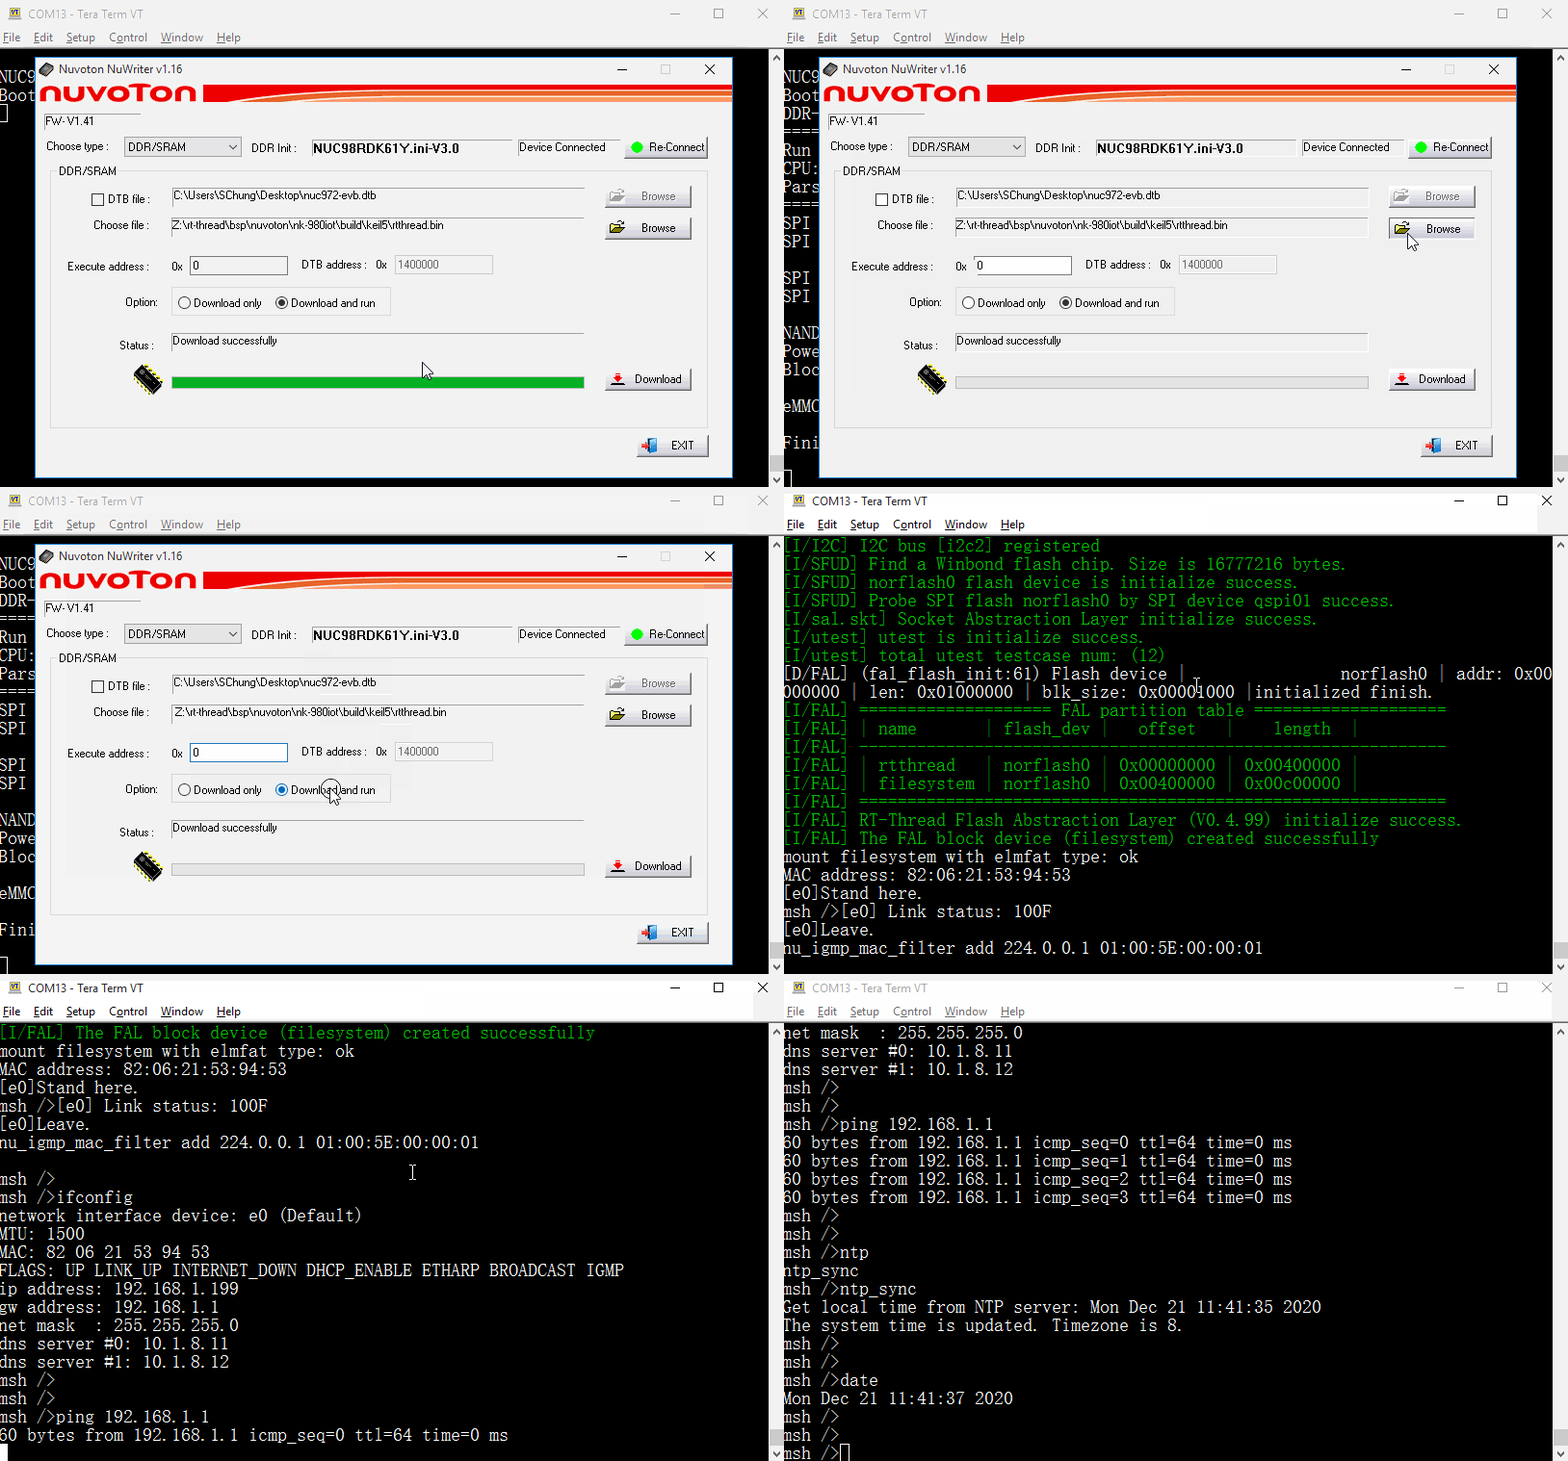
Step 1: Choose download type Choose type: DDR/SRAM.
Step 2: Press Re-Connect.
Step 3: Choose Choose file: Specify path of your rtthread.bin file..
Step 4: Input Execute Address: 0x0.
Step 5: Press Option: Download and run.
Step 6: Press Download.
Step 7: Check if RT-Thread is running.
Burn firmware to SPI NAND Flash
Step 1: Choose download type Choose type: SPINAND.
Step 2: Press Re-Connect.
Step 3: Press Erase
Step 4: Choose Erase All
Step 5: Press OK
Step 6: Choose Choose file: Specify path of uboot-spl.bin file..
Step 7: Select Image Type: Loader
Step 8: Input Execute Address: 0x200.
Step 9: Press Program and wait for completion.
Step 10: Choose Choose file: Specify path of uboot.bin file..
Step 11: Select Image Type: Data
Step 12: Input Image start address: 0x100000.
Step 13: Press Program and wait for completion.
Step 14: Choose Choose file: Specify path of rtthread.bin file..
Step 15: Select Image Type: Data
Step 16: Input Image start address: 0x200000.
Step 17: Press Program and wait for completion.
Step 18: Choose Choose file: Specify path of env.txt file..
Step 19: Select Image Type: Environment
Step 20: Input Image start address: 0x80000.
Step 21: Press Program and wait for completion.
Step 22: Set Power-on setting to SPI NAND booting
Step 23: Press Reset button.
Step 24: Check if rtthread is running.
U-boot settings for SPI NAND booting
.....
setspi=sf probe 0 75000000
loadkernel=nand read 0x80000000 0x200000 0x200000
bootcmd=run loadkernel;go 0
watchdog=off
.....
Burn firmware to SPI NOR Flash (the board needs to replace NOR flash and solder)
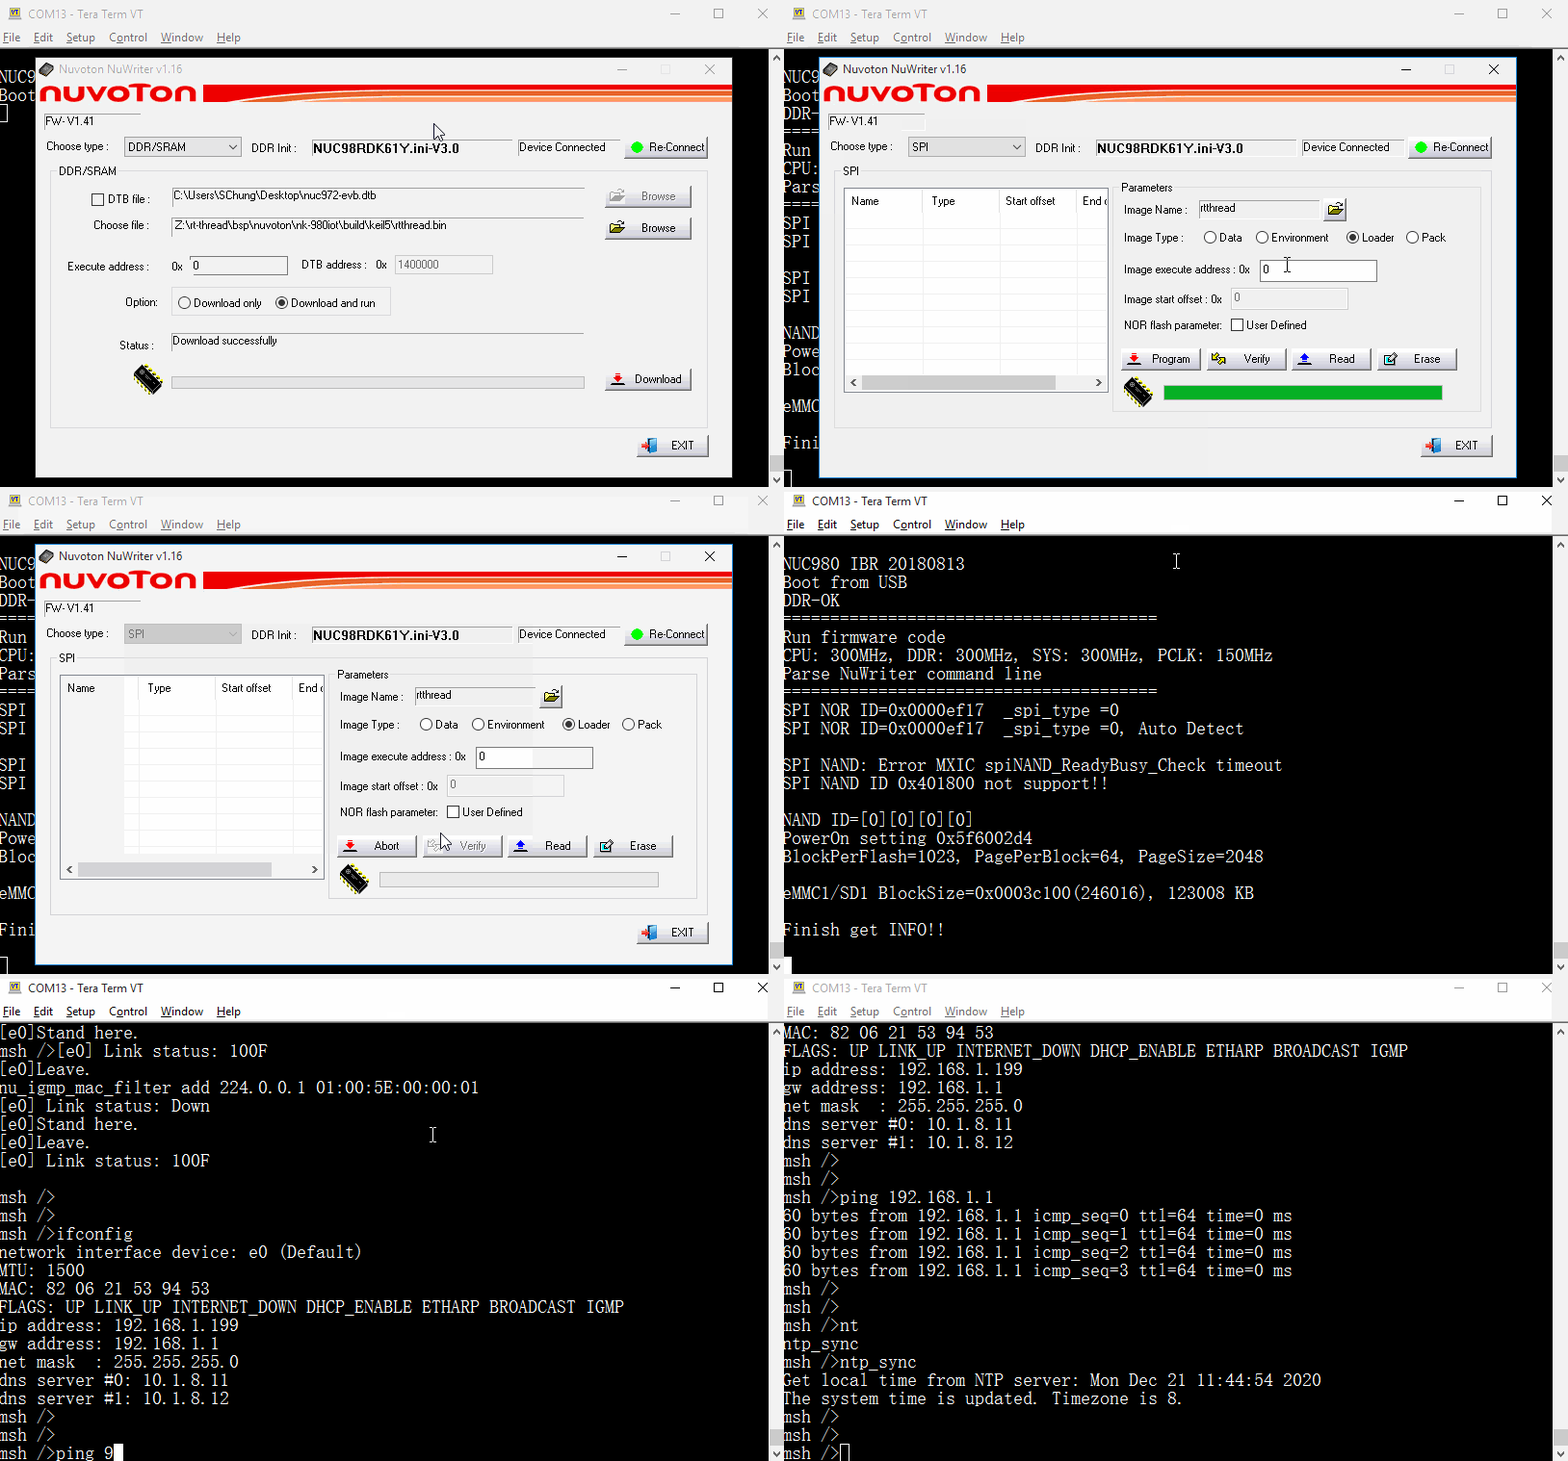
Step 1: Choose download type Choose type: SPI.
Step 2: Press Re-Connect.
Step 3: Choose Choose file: Specify path of your rtthread.bin file..
Step 4: Select Image Type: Loader
Step 5: Input Execute Address: 0x0.
Step 6: Press Program and wait for completion.
Step 7: Set Power-on setting to SPI NOR booting.
Step 8: Press Reset button.
Step 9: Check if RT-Thread is running.
Run
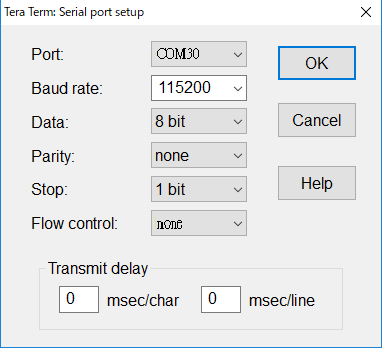
Use Tera Term terminal software to operate the rt-thread finsh/msh command line function. The configuration of the serial port is shown in the figure. (Note: The corresponding serial port number of the Nuvoton Virtual Com Port can be found in the device manager. For example: Serial port number is COM30, 115200N81.)
In the console, use the ifconfig command to print the obtained IP address, and use the ping command to test the gateway connection.