
Introduction by Ali Mei
The process of analyzing problems is also a path of technical growth. This article starts from a crash caused by GCC compilation optimization and gradually unfolds the exploration of compiler optimization details, opening a new world in the analysis process…
Background: An Ordinary Crash
Last year, a customer reported a bug and provided us with a screenshot of a segmentation fault, resulting in a reproducible crash.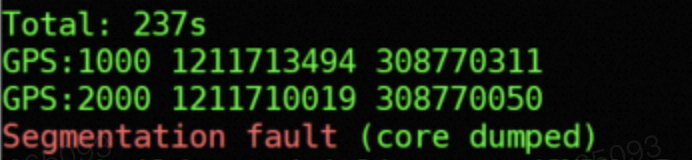 I was not worried about this reproducible issue because a great person once said: “Reproducible issues are not problems!”A segmentation fault is merely an illegal memory access caused by issues like use after free or out-of-bounds read/write. An ordinary crash, let’s analyze it!
1. Finding the Culprit
1.1 An Intense Analysis
After intense analysis, the problem was finally pinpointed to a loop assignment function:
void* readTileContentIndexCallback(TileContentIndexStruct *tileIndexData, int32_t count) { TileContentIndex* tileContentIndexList = new TileContentIndex[count]; for (int32_t index = 0; index < count; index++) { TileContentIndexStruct &inData = tileIndexData[index]; TileContentIndex &outData = tileContentIndexList[index]; outData.urID = inData.urCode; outData.adcode = inData.adcode; outData.level = inData.levelNumber; outData.southWestTileId = inData.southWestTileId; outData.numRows = inData.numRows; outData.numColumns = inData.numColumns; outData.tileIndex = inData.tileContentIndex; } return tileContentIndexList;}There was an issue with the assignment inside, causing illegal addresses when the upper layer accessed the data.
However, the logic of this loop assignment operation is very simple, and I couldn’t see any problems, so the analysis hit a deadlock.
1.2 The Clever Zonghan
Zonghan is a very clever guy in our group. He pointed out that this piece of code hadn’t been modified for a long time, and this reproducible crash was caused by changing the GCC optimization level from O2 to O3. He found that after changing it back to O2, the reproducible crash disappeared.Thus, the problem became clear. Let’s take a look at what optimizations GCC O3 does compared to O2.Is it just enough?
Optimize yet more. -O3 turns on all optimizations specified by -O2 and also turns on the following optimization flags:-fgcse-after-reload -fipa-cp-clone-floop-interchange-floop-unroll-and-jam -fpeel-loops -fpredictive-commoning -fsplit-loops-fsplit-paths -ftree-loop-distribution -ftree-partial-pre -funswitch-loops -fvect-cost-model=dynamic -fversion-loops-for-strides
1.3 Problem Simulation and Reproduction
Although I knew it was a compiler optimization issue, the GCC official website did not provide code examples for each optimization option, only a few explanations. Looking at their explanations, I still didn’t know which optimization our code hit.Fortunately, I am also very clever!I decided to write a small demo similar to our problematic code and use the problematic environment’s compilation chain to reproduce this issue. The specific approach is as follows: I wrote a demo with similar logic to the problematic code,and then tried to compile it using the problematic environment’s toolchain,first trying O2.
g++ -O2 -S -o main2.s main.cpp // This command generates the assembly file under O2
g++ -o main2 main2.s // Generate executable program main2 based on the assembly fileAfter executing, everything was normal.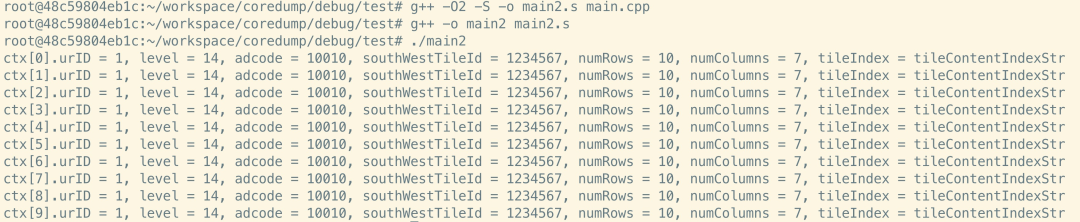 Then I tried O3:g++ -O3 -S -o mainO3.s main.cppg++ -o mainO3 mainO3.sThe issue was reproduced!
1.4 Checking Compilation Optimization Options
First, check what compilation optimizations are enabled for the current version GCC compiler for O2 and O3 using the command:gcc/g++ -Q -O<number> –help=optimizersFor example:
gcc/g++ -Q -O2 –help=optimizers
gcc/g++ -Q -O3 –help=optimizersThe differences are as follows (O3 on the left, O2 on the right):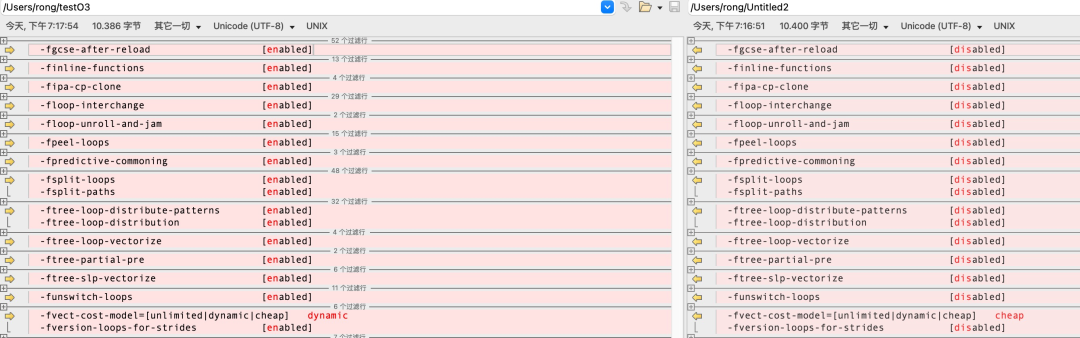 It can be seen that in addition to the several options mentioned above on the official website, O3 also has the following additional optimizations compared to O2:
- -ftree-loop-distribute-patterns
- -ftree-loop-vectorize
- -finline-functions
-
-ftree-slp-vectorize
Among them, the following several are loop-related:
- -floop-interchange
- -floop-unroll-and-jam
- -ftree-loop-distribution
- -funswitch-loops
- -fversion-loops-for-strides
- -ftree-loop-distribute-patterns
-
-ftree-loop-vectorize
Taking -ftree-loop-vectorize as an example, -f indicates turning on a certain option, and changing it to -fno- before the prefix means turning it off. Checking -fno-tree-loop-vectorize again: This way, I can at least turn off each optimization option that O3 has over O2 to confirm which optimization option caused the issue~Through simple testing, it was found that the optimization option -ftree-loop-vectorize caused the issue, with the compilation command as follows:
g++ -O3 -fno-tree-loop-vectorize -S -o main3t.s main.cpp // Open O3 but close tree-loop-vectorize
g++ -o main3t main3t.s // Generate executable program main3tThe reproducible crash disappeared!!
1.5 Understanding -ftree-loop-vectorize
The GCC official website states that this optimization option is enabled by default at O2.
Perform loop vectorization on trees. This flag is enabled by default at -O2 and by -ftree-vectorize, -fprofile-use, and -fauto-profile.
This contradicts the actual measurements (the official website may not be accurate or may have version prerequisites),g++ -Q -O2 –help=optimizers|grep tree-loop-vectorize In fact, in the problematic environment, this optimization option is only enabled at O3. As mentioned above, this optimization caused the crash. So what exactly does it optimize? The description on the official website is a bit sparse. The general idea is to unroll simple loop statements to reduce the number of times the loop body is executed. For example, the following loop assignment code:
for (int i = 0; i < 16; i++) { a[i] = b[i];}May be optimized to:
for (int i = 0; i < 16; i+=4) { a[i] = b[i]; a[i + 1] = b[i + 1]; a[i + 2] = b[i + 2]; a[i + 3] = b[i + 3];}By increasing the step of the loop, the number of times the loop body is executed is reduced, thus improving code efficiency. In the example above, one vector unit performs four assignments internally, while four loops would be required to execute before optimization.
Let’s check which codes in the demo were vectorized using the command g++ -fopt-info-vec-optimized main.cpp -O3 It can be seen that it was the loop assignment code (line number 38).
1.6 Initial Results & Tactical Retreat
By now, the culprit has been apprehended—loop vectorization optimization caused this crash.As an SDK delivery team, we must keep our compilation toolchain consistent with the customer’s, and the compilation options should also be as consistent as possible. Therefore, we need to enable O3 (this should also be the case for normal release versions), but specifically turn off tree-loop-vectorize to avoid this issue.So, how exactly does loop vectorization optimization lead to a crash? Is it a bug in GCC or is there a problem with our own code?Due to my weak assembly skills at the time, it was difficult to find out the motive and detailed method of the culprit. I chose to tactically retreat and go back to improve my skills to fight again another day.
2. Further Investigation of the Crime Details
One year later.Recently, I have learned some assembly and feel that I have improved!! Therefore, I revisited this issue! I decided to dig deeper into its root cause and unfold the culprit’s process in detail, proclaiming to the world—justice, though delayed, will arrive!
2.1 Rewriting the Demo to Reproduce the Issue
A year later, some materials have been lost, so I constructed the demo again to reproduce this issue. The demo code can be found at the end of the article link test2 (for convenience in gdb debugging, I used global variables for input and output parameters).The core code is as follows:
struct TileContentIndexStruct {    int32_t           urCode; // 4 bytes    int32_t           adcode; // 4 bytes    int32_t           levelNumber; // 4 bytes    int32_t           southWestTileId; // 4 bytes    int32_t           numRows; // 4 bytes    int32_t           numColumns; // 4 bytes    uint8_t*    tileContentIndex; // 8 bytes    int32_t           dataSize; // 4 bytes    //64-bit system 8-byte alignment, padding 4 bytes}; // Total 40 bytes
struct TileContentIndex {    uint16_t urID; // 2 bytes    uint16_t level; // 2 bytes    uint32_t adcode; // 4 bytes    uint32_t southWestTileId; // 4 bytes    uint16_t numRows; // 2 bytes    uint16_t numColumns; // 2 bytes (up to 8-byte alignment, no padding)    uint8_t* tileIndex; // 8 bytes}; // Total 24 bytes
int g_rowCount = 10;TileContentIndex g_tileContentIndexList[10]; // Copied TileContentIndexStruct g_tileContentVector[10]; // Source data
void* readTileContentIndexCallback(TileContentIndexStruct *tileIndexData, int32_t count){    for (int32_t index = 0; index < count; index++) {        TileContentIndexStruct &inData = tileIndexData[index];        TileContentIndex &outData = g_tileContentIndexList[index];
        outData.urID = (uint16_t)inData.urCode;        outData.adcode = (uint32_t)inData.adcode;        outData.level = (uint16_t)inData.levelNumber;        outData.southWestTileId = (uint32_t)inData.southWestTileId;        outData.numRows = (uint16_t)inData.numRows;        outData.numColumns = (uint16_t)inData.numColumns;        outData.tileIndex = inData.tileContentIndex;    }    return g_tileContentIndexList;}
// Note: The parameters passed when calling readTileContentIndexCallback are g_tileContentVector and g_rowCount
2.2 Comparing Assembly Before and After Optimization
The assembly before optimization involves fewer instructions and looks much simpler.It should be noted that the function readTileContentIndexCallback only has two parameters, so they can be passed through registers. Therefore, the first parameter of the function readTileContentIndexCallback is passed using the x0 register, and the second parameter is passed using the x1 register, while the w1 register is the low 32 bits of x1.
_Z28readTileContentIndexCallbackP22TileContentIndexStructi:.LFB48: .cfi_startproc cmp w1, 0 // Compare the value of w1 register with 0 (w1 corresponds to input parameter count) ble .L2 // If comparison result w1 <= 0, jump to .L2 mov x2, x0 // x2 = x0 (x0 corresponds to input parameter tileIndexData) adrp x3, .LANCHOR0 // Load the high address of .LANCHOR0 (low 12 bits cleared to zero) into register x3 add x3, x3, :lo12:.LANCHOR0 // Add the low 12 bits of .LANCHOR0 to x3, now x3 has the complete address of .LANCHOR0, which is the address of global variable g_tileContentIndexList sub w1, w1, #1 // w1 is decremented and stored back to w1, w1 is the low 32 bits of x1 add x1, x1, x1, lsl 2 // Add the value of register x1 to the value of register x1 shifted left by 2 bits, and store the result back to register x1. Equivalent to multiplying the value of register x1 by 5 add x0, x0, 40 // x0 = x0 + 40 add x0, x0, x1, lsl 3 // x0 = (x1 << 3) + x0 // In summary, these 4 lines are equivalent to x0 = (x1 - 1) * 40 + (x0 + 40) = x1 * 40 + x0.L3: ldr w1, [x2] // w1 = tileIndexData->urCode, load the value pointed to by register x2 into register w1 strh w1, [x3] // Store the value of register w1 into the address pointed by register x3 (because it is cast to uint16_t, it is stored as half-word, only the low 16 bits are stored) ldr w1, [x2, 4] // w1 = tileIndexData->adcode str w1, [x3, 4] // [x3 + 4] = w1 ldr w1, [x2, 8] // w1 = tileIndexData->levelNumber strh w1, [x3, 2] // g_tileContentIndexList.level = (uint16_t)inData.levelNumber ldr w1, [x2, 12] // w1 = tileIndexData->southWestTileId str w1, [x3, 8] // Store to g_tileContentIndexList.southWestTileId ldr w1, [x2, 16] // tileIndexData->numRows strh w1, [x3, 12] // Store to g_tileContentIndexList.numRows ldr w1, [x2, 20] // tileIndexData->numColumns strh w1, [x3, 14] // Store to g_tileContentIndexList.numColumns ldr x1, [x2, 24] // x1 = tileIndexData->tileContentIndex str x1, [x3, 16] // Store to g_tileContentIndexList.tileIndex add x2, x2, 40 // tileIndexData++ (sizeof(TileContentIndexStruct) = 40) add x3, x3, 24 // g_tileContentIndexList++ (sizeof(TileContentIndex) = 24) cmp x2, x0 // Compare x2 and x0 bne .L3 // If x2 is not equal to x0, jump to .L3 to continue looping.L2: adrp x0, .LANCHOR0 add x0, x0, :lo12:.LANCHOR0 // These two instructions assign the address of .LANCHOR0 to register x0 ret // Return .cfi_endproc.LFE48: .size _Z28readTileContentIndexCallbackP22TileContentIndexStructi, .-_Z28readTileContentIndexCallbackP22TileContentIndexStructi .align 2 .global _Z15readTileContentRiPFPvP22TileContentIndexStructiE .type _Z15readTileContentRiPFPvP22TileContentIndexStructiE, %functionAs I expected, these assembly instructions are not difficult at all, and I interpreted them line by line.It can be seen that this for loop is just copying the contents of the struct TileContentIndexStruct g_tileContentVector[10] array to the struct TileContentIndex g_tileContentIndexList[10] array. The size of sizeof(TileContentIndexStruct) = 40, sizeof(TileContentIndex) = 24. In the assembly, throughx0 = (x1 – 1) * 40 + (x0 + 40) = x1 * 40 + x0the value of x0 is assigned to the address of g_tileContentVector + 40 * count, i.e., the end address of the array. Before the loop starts, x2 is the address of g_tileContentVector[0], and at the end of each loop, it executesadd x2, x2, 40to increment x2 by 40 to the address of the next element of the array until x2 == x0 when the loop ends.The assembly after enabling loop vectorization can be found in the link at the end as est_bad.S, the content is lengthy, so I won’t go through it line by line, see the analysis below.
2.3 Detailed Analysis of Optimized Assembly
2.3.1 Experiencing the Power of Loop Vectorization Optimization
Before looking at the assembly, let’s experience the power of loop vectorization optimization.As shown below, before entering the loop assignment, all members of the g_tileContentIndexList array are still initialized to 0. After executing two lines of code, it is found that g_tileContentIndexList[0]~g_tileContentIndexList[3] have already had two components assigned: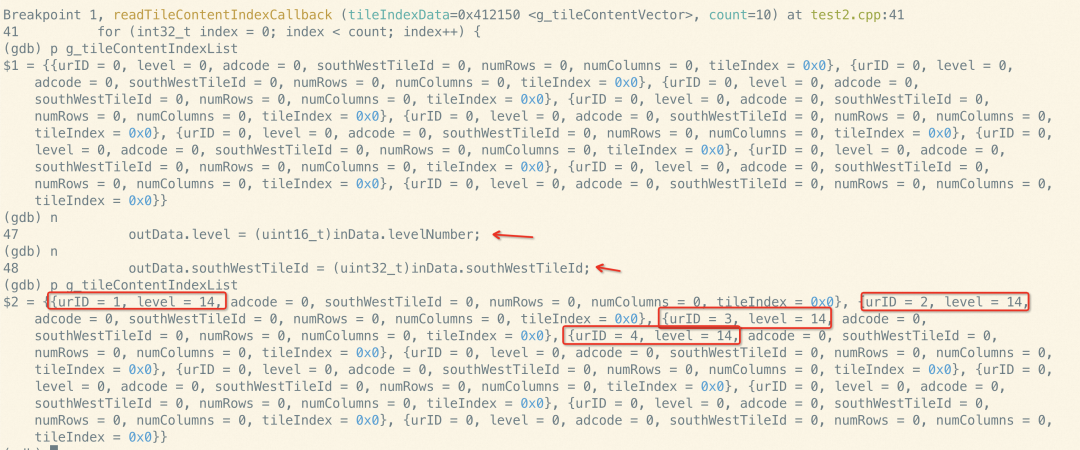 This is the power of loop vectorization optimization—reducing the number of loops so that one loop can complete the assignment of four array members!
Understanding the Register Logic Behind Assembly Instructions
First, let’s take a look at the content of the first label in the function readTileContentIndexCallback, .LFB48. I won’t explain it line by line anymore; in fact, the assembly syntax is not complicated. It’s just that if the assembly instructions are not commonly used, they are indeed hard to remember, but we can look them up in the dictionary, referring to the ARMv8 A64 Quick Reference.However, just relying on these is still not enough to understand the assembly instructions; this is just a remnant of ARM assembly. We also need to know the implicit logic of the ARM registers. It should be particularly noted that in the ARMv8-A architecture AARCH64 running mode, the first parameter of a function is stored in x0, and the second parameter is stored in x1. The general registers xn are 64 bits, and Wn represents the low 32 bits of Xn. If Wn is assigned a value, the high 32 bits of Xn will be cleared.In addition, .LFB48 also contains many conditional operations, all of which revolve around condition flags. Refer to the official document Condition-flags. For example, the CMP operation is equivalent to subtraction (SUB) but does not store the result of the subtraction operation, yet it affects the condition flags. The four flags N (Negative), Z (Zero), C (Carry), and V (Overflow) are explained as follows:
NSet to 1 when the result of the operation is negative, cleared to 0 otherwise.ZSet to 1 when the result of the operation is zero, cleared to 0 otherwise.CSet to 1 when the operation results in a carry, or when a subtraction results in no borrow, cleared to 0 otherwise.VSet to 1 when the operation causes overflow, cleared to 0 otherwise.
We focus on Z and C. It should be noted that C is the carry flag, but if borrowing occurs, C will be cleared. For example, CMP x0, x1, if x0 < x1, then x0 – x1 produces borrowing, resulting in C=0; otherwise, C=1. For a more detailed introduction, refer to the official document Carry-flag.
For a subtraction, including the comparison instruction CMP, C is set to 0 if the subtraction produced a borrow (that is, an unsigned underflow), and to 1 otherwise.
Another thing to note is the meaning of the condition code. For example, the explanation for the CCMP instruction in ARMv8 A64 Quick Reference is: If cc is true, CCMP executes an operation similar to CMP and affects the flags; otherwise, the flags are set to the value set by the instruction f. Here, cc is one of the condition codes, indicating that carry is clear, i.e., C == 0. Refer to the official document Condition Flags and Codes.
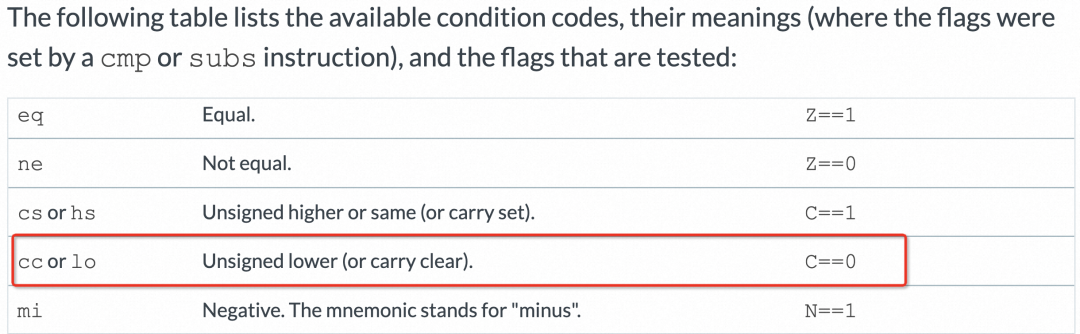 Using gdb for debugging, gdb will directly display the set flag bits. For example, the C indicates C=1:
(gdb) i reg cpsr
cpsr 0x20200000 [ EL=0 SS C ]Combining these documents, we can complete a small cycle of understanding. For those parts of the official documents that are not clear, we can set gdb toset disassemble-next-line onand, through the ni command, debug each assembly instruction. The arrow points to the instruction to be executed (if it’s too slow, you canni <num>to execute <num> instructions) and combinei reg <register>to check the register content to practice and verify. Thus, through the combination of theory and practice, you will find that all this assembly suddenly becomes understandable! It’s like opening the meridians!
2.3.3 Understanding NEON
The ARMv8 A64 Quick Reference indeed contains most of the commonly used instructions. The previous method allows us to move forward smoothly. However, when looking at .L5, I found some instructions that are not found in the Quit Reference, such as zip1, zip2, ins, xtn, etc. In fact, these are all NEON instructions, which is the advanced single instruction multiple data (SIMD) technology. NEON requires the use of vector registers, and the ARMv8-A architecture has 32 vector registers v0~v31 (also called floating-point registers), refer to the official document Parameters-in-NEON-and-floating-point-registers. A vector register is 128 bits, as shown in the figure below: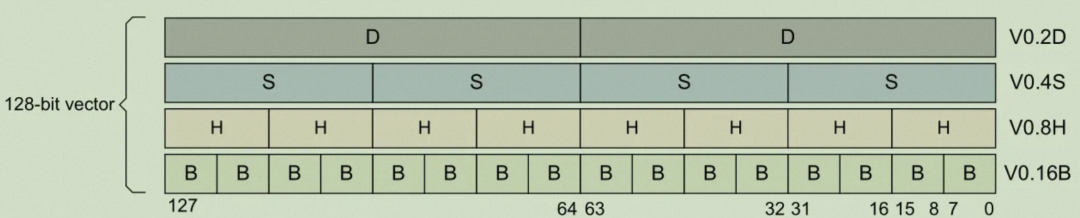 V can be divided into two D, for example, the low 64 bits of V0 is D0, and the high 64 bits are {V0.D}[1] (note that it is not D1, D1 is the low 64 bits of V1). One D (double word) can again be divided into two S (single word), and so on, it can also be divided into H (half word) and B.Usually, each NEON instruction has n parallel operations, where n is the number of lanes the input vector is divided into. For example, V0.8H indicates 8-channel parallel operations,add V0.8H V1.8H V2.8Hindicates the following effect:
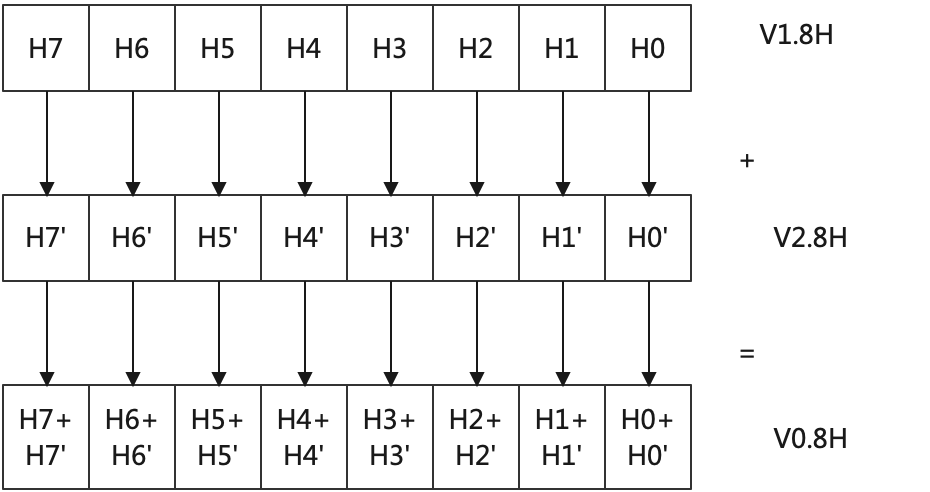 This is the charm of SIMD, one instruction operates on multiple data!NEON-related instructions can be found in the official document Arm® A64 Instruction Set Architecture. Now, looking at the content of label .L5, it should be enlightening.
.L5: // Earlier, we already did mov x2, x0, so at this point x2 contains the address of &g_tileContentVector ldr d0, [x2] // Load 8 bytes of memory starting from x2 into d0, i.e., d0 stores the values of g_tileContentVector[0].urCode (4 bytes) and g_tileContentVector[0].adcode (4 bytes) ldr d1, [x2, 8] // d1 stores g_tileContentVector[0].levelNumber (4 bytes) and g_tileContentVector[0].southWestTileId (4 bytes) zip1 v0.2s, v0.2s, v1.2s // See the following figurezip1 v0.2s, v0.2s, v1.2shas the following effect (note: [0].adcode represents g_tileContentVector[0].adcode):
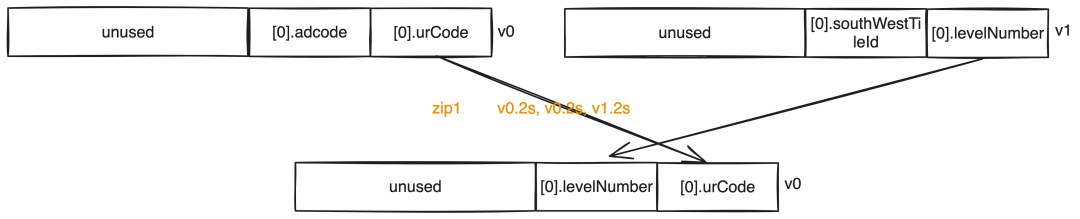
.L5: ... ldr d1, [x2, 40] ldr d2, [x2, 48] zip1 v1.2s, v1.2s, v2.2s ins v0.d[1], v1.d[0] xtn v1.4h, v0.4sSimilarly, in the .L5 fragment 2,zip1 v1.2s, v1.2s, v2.2safter execution, the content of register v1 is as follows (the size of each member of the array g_tileContentVector is 40):
 ins v0.d[1], v1.d[0]has the following effect (ins means insert):
 The next xtn v1.4h, v0.4s instruction indicates Extract Narrow, which is a narrow instruction that extracts data into a smaller-width register. The 4h and 4s in it indicate the number of lanes, while h and s refer to half-word and single-word, respectively. The execution effect is as follows:
 This is the final purpose of the assembly in fragments 1 and 2, which is to store the first two elements of the input array (g_tileContentVector[0] and g_tileContentVector[1]) into registers v1 and v0. Now that we have stored the contents of urCode and levelNumber from g_tileContentVector[0]~g_tileContentVector[3] into v0 and v1, the next step is naturally to store these data from the registers into the output memory. See the segment of .L5:
.L5:... mov x7, x4 // Store the address of &g_tileContentIndexList into x7 str s1, [x7], 24 // str s1, [x7] then make x7 = x7 + 24 st1 {v1.s}[1], [x7] str s0, [x4, 48] add x3, x4, 72 st1 {v0.s}[1], [x3]Note that before entering .L5, i.e., at the end of .LFB48, we have already stored the address of the global variable g_tileContentIndexList in x4, which is the output array. Note that the members of the output array are of type struct TileContentIndex, which is 24 bytes in size. Therefore, the execution effect of fragment 4 is that the urID and level values of g_tileContentIndexList[0]~g_tileContentIndexList[3] have all been assigned:
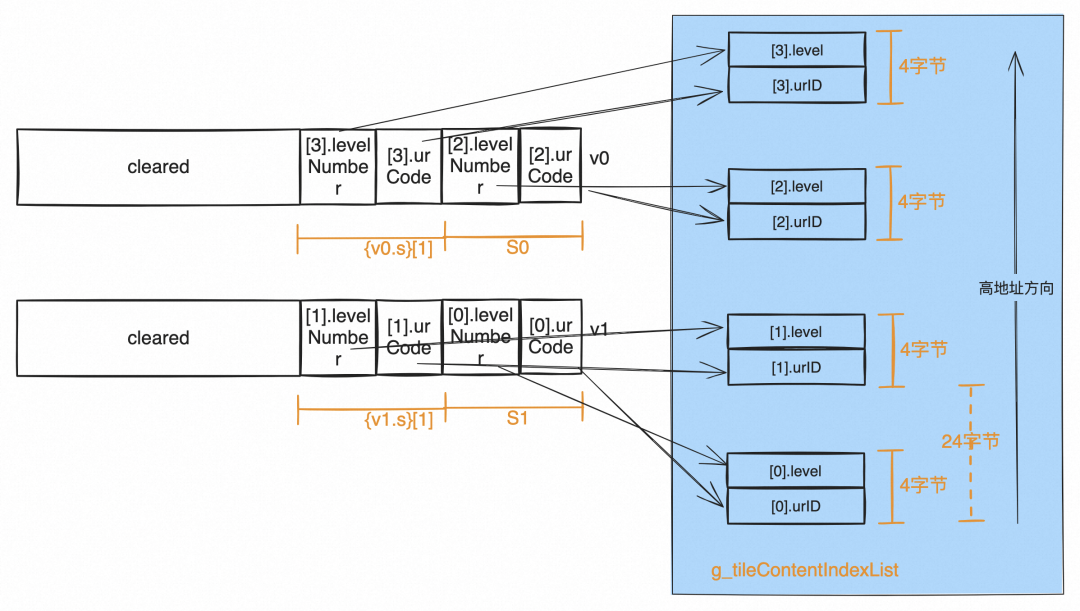
.L5:... ldr d2, [x2, 40] ldr d0, [x2, 48] zip2 v2.2s, v2.2s, v0.2s ldr d1, [x2, 80] ldr d0, [x2, 88] zip2 v1.2s, v1.2s, v0.2s ldr d0, [x2, 120] ldr d3, [x2, 128] zip2 v0.2s, v0.2s, v3.2s ldr d3, [x2] ldr d4, [x2, 8] zip2 v3.2s, v3.2s, v4.2sThis segment mainly loads data from the nearby memory addresses of the x6 register and stores it into the memory near the x4 register. x6 is the address of the input g_tileContentVector, and in the last line of .LFB48, x6 was assigned the value of x0, which is the first input parameter. x4 has already been mentioned as the address of the output g_tileContentIndexList. Therefore, these four ldr and str instructions assign values to the members uint8_t* tileIndex of g_tileContentIndexList[0]~g_tileContentIndexList[3]. The data source comes from the uint8_t* tileContentIndex members of g_tileContentVector[0]~g_tileContentVector[3]. It was unexpected that there was an issue here. Looking back at the key code of the demo, the members of g_tileContentVector are of type struct TileContentIndexStruct, and the size of this structure is 40 bytes:
struct TileContentIndexStruct { int32_t urCode; // 4 bytes int32_t adcode; // 4 bytes int32_t levelNumber; // 4 bytes int32_t southWestTileId; // 4 bytes int32_t numRows; // 4 bytes int32_t numColumns; // 4 bytes uint8_t* tileContentIndex; // 8 bytes int32_t dataSize; // 4 bytes //64-bit system 8-byte alignment, padding 4 bytes}; // Total 40 bytesTherefore,
g_tileContentVector[0].tileContentIndex~g_tileContentVector[3].tileContentIndexshould correspond to [x6, 24], [x6, 64], [x6, 104], [x6, 144]. However, the assembly above mistakenly accessed [x6, 24], [x6, 32], [x6, 40], and [x6, 48], which clearly treats the size of the structure as 8 bytes.The stored output parameter address is correct because the output structure TileContentIndex is 24 bytes in size:
struct TileContentIndex { uint16_t urID; // 2 bytes uint16_t level; // 2 bytes uint32_t adcode; // 4 bytes uint32_t southWestTileId; // 4 bytes uint16_t numRows; // 2 bytes uint16_t numColumns; // 2 bytes (up to 8-byte alignment, no padding) uint8_t* tileIndex; // 8 bytes}; // Total 24 bytesThe memory corresponding to g_tileContentIndexList[0].tileIndex~g_tileContentIndexList[3].tileIndex is [x4, 16], [x4, 40], [x4, 64], [x4, 88], which is correct.
We trace the first erroneous array element g_tileContentIndexList[1].tileIndex, whose value comes from x8, and x8 comes from [x6, 32], which is the value of g_tileContentVector[0].dataSize. This value is the length of the string tileContentIndex plus 1, i.e.,strlen(“tileContentIndexStr”) + 1 = 20.This int variable is obviously not a string address, so when accessing the string g_tileContentIndexList[1].tileIndex in the print function, a crash occurred!
3. Verification and Conclusion
3.1 Modifying the Problematic Assembly Code
Manually modify the assembly instructions in the .S file to correct the offset calculations. See the link at the end for details.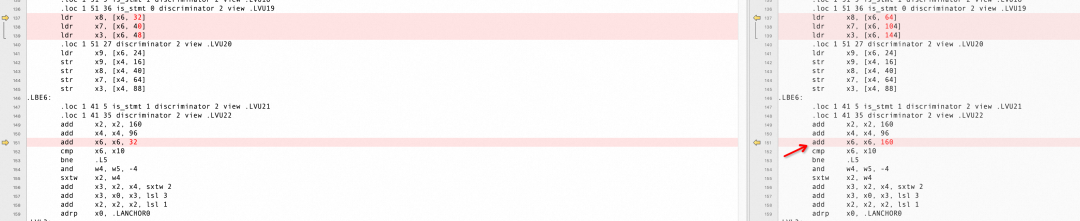 Additionally, in the label .LBE6, there is an issue with add x6, x6, 32. The vectorization processes 4 members at a time, and since sizeof(TileContentIndexStruct) = 40, this should be corrected to 40*4 = 160.Moreover, in .LBE6, comparing x6 and x10 to determine whether to continue the vectorization operation (whether to continue processing 4 at a time), we defined g_rowCount = 10, so it can only process two rounds of 4 at a time. Therefore, the expected value of x10 should be x6 + 8*40,
cmp x6, x10 bne .L5Thus, the assignment instruction add x10, x0, x10, lsl 5 (x10 = x0 + 64, where 64 = 8 * 8, also treating size = 40 as 8) should also be corrected. We will change it to add x10, x0, 320.
Here is the complete patch content: Compile the modified assembly into binary: g++ test_bad_fix_debugv3.S -o test_bad_fix_debugv3The running result is as follows:
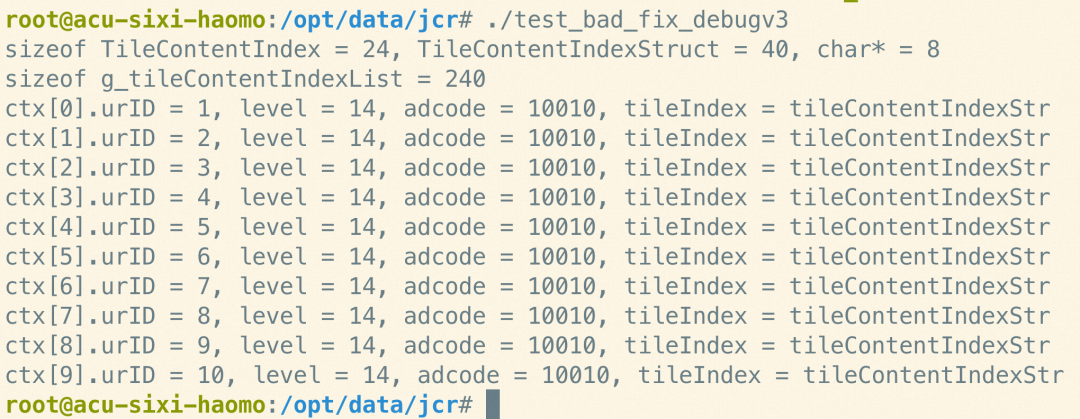 The crash issue has been fixed!!
3.2 Cross-Comparison of Compilers
It is incredible that GCC suddenly treated a structure of size 40 bytes as 8 bytes. This inevitably raises the question of whether it is a bug in GCC or a bug in our code?However, this code is merely copying two different struct arrays in a for loop. Since we believe our code is fine, let’s control the variables—keep the code unchanged and change the compiler for experimentation.
3.2.1 Clang Has No Issues
The same code using Clang (version: clang-1400.0.29.102) still compiles an executable for the arm64 architecture and uses#pragma clang loop vectorize(enable) to enable Clang’s loop vectorization optimization. The program runs normally. However, the compiled product of GCC’s loop vector optimization processes 4 array elements at a time, while Clang processes 8.
3.2.2 Higher Version GCC Also Has No Issues
The problematic version of GCC is gcc-arm-9.2-2019.12-x86_64-aarch64-none-linux-gnu. When using a higher version of GCC, such as gcc-arm-10.3-2021.07-x86_64-aarch64-none-linux-gnu, it is found that under the same code and compilation parameters, GCC 10.3 does not enable loop vectorization optimization. It was seen that there are some patches in GCC 10 that tighten the triggering conditions for loop vectorization optimization, which may be related to these modifications, causing the same code not to be optimized anymore.
3.3 Conclusion
This is a bug in GCC-arm-9.2!The final solution remains as concluded in section 1.6, which is to enable O3 while turning off tree-loop-vectorize.Since the code itself is fine, there is no need to modify the code, and it is impossible to assess whether there are other places that may hit this optimization after a single-point modification of the code. As an SDK delivery team, we cannot modify the compiler version, so we can only specifically turn off loop vectorization optimization to avoid this issue.
4. To Be Continued
This time we tracked a year-old bug, successfully answering our question from a year ago, and validating what we learned. However, the matter is far from over. The process of problem analysis is also a path of technical growth. In the course of our journey, we opened the doors to the microscopic world within the code!In this world, there is a very tempting path of performance optimization, which has two forks: one is at the compiler feature level, and the other is at the ARM chip architecture instruction technology level.
4.1 Compiler Optimization
This time we mainly encountered tree-loop-vectorize, i.e., loop vectorization optimization. In the early days, some even wrote code with similar ideas specifically for performance, as seen in the article “20 Lines of Classic C Code That Many People Can’t Understand“. Today, we certainly do not recommend everyone to write such code that is not conducive to maintenance. We have compilers to help us. However, enabling performance optimization in the compiler also has some triggering conditions. For example, tree-loop-vectorize will only be triggered when the content of the loop is very simple. If the pointer assignment in the demo code is changed to allocate memory first and then memcpy, GCC-arm-9.2 will not perform loop vectorization optimization on it.The compiler has been committed to optimizing code since its design inception, which includes optimizing binary size, optimizing code runtime performance, and many other aspects. In addition to tree-loop-vectorize, the compiler also provides various performance optimization features, and exploring the details of these features, especially those that may be used inadvertently, is a very interesting and meaningful topic. To be continued…
4.2 ARM Chip Architecture Instructions
The specific implementation of performance optimization by the compiler can be said to be varied. In this example, GCC introduced NEON technology in the implementation of loop vector optimization, while in the comparison experiment, Clang did not use NEON for loop vector optimization (of course, the point of issue this time was not NEON). However, how compilers utilize different techniques and what underlying ammunition they can use is a topic worth exploring. Taking NEON as an example, if the compiler implementation does not use NEON, we can also explicitly use it, i.e., the NEON intrinsic functions mentioned in section 2.3.4, which are widely used in algorithm scenarios involving matrix operations. Whether it is a deeper understanding of NEON or learning about other performance optimization techniques of the ARM architecture is an engaging topic, to be continued…
4.3 Final Words
Being a programmer is a profession of lifelong learning. Whether in the industry or personally, our technical iteration has always been ongoing…
Attachment link:
https://files.alicdn.com/tpsservice/c9c5f648084bc821509305041ad99bd8.zip
Welcome to Join the [Aliyun Developer Public Account] Reader Group
This is a communication space specifically for readers of the “Aliyun Developer” public account.💡 Here you can discuss technology and practice, and we will also regularly release group benefits and activities~Welcome to add WeChat: argentinaliu to join the group