
链接:https://www.cnblogs.com/heyongshen/p/16417712.html
Linux Bridge Management
Concept of a Bridge
- • In everyday life, a bridge is a structure that connects two places, allowing pedestrians, vehicles, etc., to safely cross obstacles (such as rivers or highways).
- • In computer networking technology, a bridge is a physical or logical device that operates at the data link layer and can be used to connect two or more local area network segments. It forwards or filters frames based on MAC addresses, effectively segmenting broadcast domains.
- • In Linux, a bridge is a logical device used to link two or more network interfaces (e.g., eth0, eth1), allowing them to function logically as a single interface. Bridge technology is used in virtualization to connect physical hosts and virtual machines or different virtual machines.
Working Principle of a Bridge
1. Role of Network Interfaces
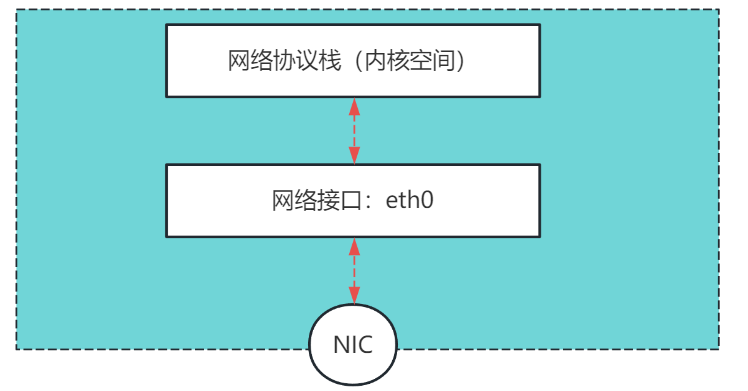
- • In Linux, udev is the daemon responsible for dynamically managing device nodes. When hardware devices are inserted or removed, udev generates or removes the corresponding device nodes based on the rules defined in the /lib/udev/rules.d/ directory, managing their naming and configuration.
- • Network interface names (e.g., eth0, ens33) are specified by udev rules; they are merely logical names used to reference specific network devices in user space. This name does not directly point to a physical device but is associated with the network device data structure in the kernel.
- • Therefore, user-space tools (e.g., ifconfig, nmcli, etc.) can interact with the kernel’s network protocol stack using this network interface name as an identifier, providing a clear reference point for specifying which particular network device they wish to configure or query.
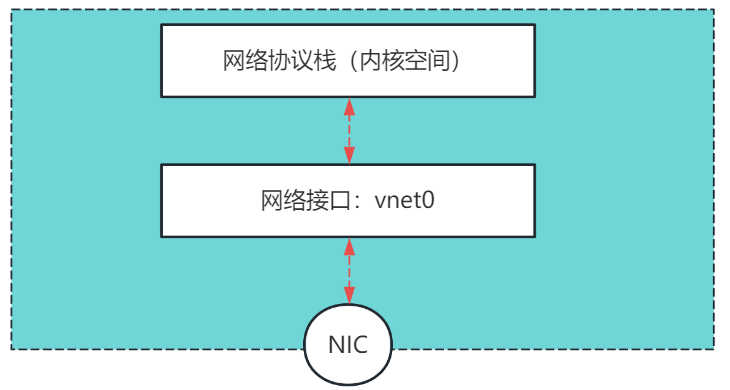
A virtual network card is a logical network interface (vnetX) represented as a network device in the Linux kernel but does not correspond to any physical hardware.
2. Member Interfaces of the Bridge
When creating a bridge device, this bridge device, like a virtual network card, does not have corresponding physical hardware and is considered a logical device. Bridging physical network cards and virtual network cards makes them member interfaces of the bridge; at this point, communication between eth0 and vnetX is no longer directly with the kernel but with the bridge br0. However, vnetX and eth0 can still send and receive frames at the data link layer. (They cannot directly send messages to the kernel’s network protocol stack but can only receive messages from it). Once bridged, vnetX and eth0 share the same network segment. Logically, they are both connected to the same data link layer subnet.
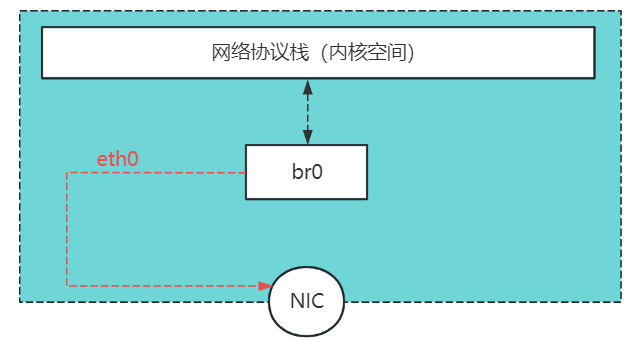
It can be simply understood that after bridging, the physical network card becomes a wire connecting external hardware devices.
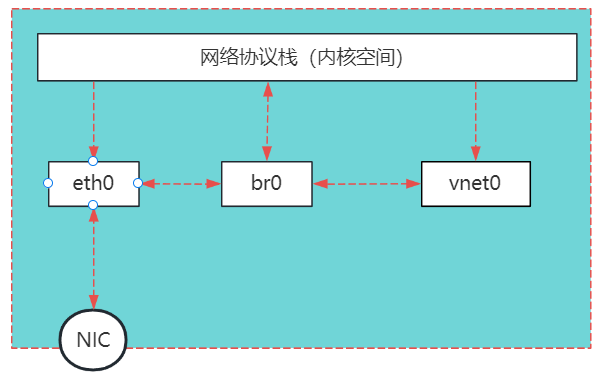
Note: Bridging between two network interfaces (whether physical or virtual) typically requires a bridging device. You cannot directly bridge two network interfaces without creating a bridging device.
Bridge Explanation:
- • Data Flow After Bridging: When a physical network card (e.g., eth0) is added to a bridge (e.g., br0), it no longer communicates directly with the network protocol stack. All data link layer communications are managed and forwarded through the bridge interface. At this point, the bridge interface acts as a virtual switch, responsible for forwarding data link layer frames between its member interfaces.
- • IP Address Assignment: Once the bridging configuration is complete, the bridge interface (like br0) becomes the primary interface for interacting with the network protocol stack, so it should be assigned an IP address. This explains why the original IP address of eth0 is removed after bridging. Meanwhile, member interfaces of the bridge (like vnetX) typically do not require an IP address, as they no longer interact directly with the network protocol stack but transmit data through the bridge interface br0.
- • Role of the Physical Network Card: In the bridging configuration, the physical network card can be viewed as a transmission medium or “cable” connecting computer hardware to the external network. It ensures that the bridge interface and its members can communicate with external devices at the data link layer.
Linux Bridge Management
Managing Bridges with Tools
1. Creating a Bridge with brctl
brctl is a tool provided by the bridge-utils package that allows for easy creation of bridges. However, with the development and popularity of the iproute2 suite, the ip command has begun to offer similar functionality, making brctl no longer the preferred tool for bridge management.
Bridges created with brctl are temporary by default and will not persist after a system reboot.
Creating a Bridge:
# br0 is the name of the created bridge interface

$ sudo brctl addbr br0
Adding Member Interfaces to the Bridge:
# ens33 and ens37 are physical network cards
$ brctl addif ens33
$ brctl addif ens37
Starting the Bridge: The default state of the bridge is down
ifconfig br_name up or ip link set br_name upDeleting the Bridge:
brctl delbr br_nameRemoving Sub-Interfaces:
brctl delif br_name device_nameEnabling STP Functionality:
brctl stp br_name on2. Configuring Bridges with NetworkManager
Generally, bridges are managed using the command-line tool nmcli provided by NetworkManager. Most modern Linux distributions use NetworkManager as the network management tool, and when configuring with nmcli, NetworkManager writes these configurations to its configuration files to ensure they persist after a system reboot. These configuration files are typically located in the /etc/NetworkManager/system-connections/ directory.
Creating a Bridge:
nmcli con add type bridge con-name br0 ifname br0Adding Member Interfaces to the Bridge:
# con-name is the connection name of the physical network card in the bridge
mcli con add type bridge-slave con-name br0-eth1 ifname eth1 master br0

# Deleting Member Interfaces
mcli con delete connection_name_of_physical_network_card
Starting or Stopping the Bridge:
nmcli con up br0
mcli con down br0
Deleting the Bridge:
nmcli con delete br0Viewing Bridge Configuration:
nmcli con show | grep bridgeNote: The connection name is a core concept of NetworkManager, facilitating easier management of various network settings, not just through network interface names. In NetworkManager, each network configuration (whether wired, bridged, etc.) is treated as a “connection”. This connection has a name, often referred to as the “connection name”, which is arbitrary and used for subsequent identification and management of that specific connection.
Enabling STP Functionality:
nmcli con modify br_name bridge.stp yes3. Managing Bridges with the ip Command
The ip command is provided by the iproute2 suite, which includes commands like ip and ss. Configuring bridges with the ip command is also temporary. To make these configurations persist after a reboot, you need to add these commands to the system’s startup scripts or use dedicated network configuration files to persist the settings.
Creating a Bridge:
ip link add name br0 type bridgeAdding Member Interfaces:
ip link set dev eth1 master br0Starting or Stopping the Bridge:
# up
ip link set dev br0 up

# down
ip link set dev br0 down
Deleting the Bridge:
ip link delete dev br0 type bridgeRemoving Member Interfaces:
ip link set dev eth1 nomasterViewing Bridge Configuration:
ip link show type bridgeEnabling STP Functionality:
sudo ip link set br_name type bridge stp_state 1Configuring IP Address for the Bridge
When creating a bridge and adding one or more network interfaces as its members, the IP address configuration on the member interfaces typically becomes ineffective. Therefore, you need to configure an IP address for the bridge interface itself so that it can participate in network communication.
At this point, you can configure the bridge device just like a regular network interface (e.g., eth0), and remember to configure routing as well.
For example:
# Network Interface Configuration
ip addr add 192.168.1.10/24 dev br0

# Routing Configuration
ip route add default via 192.168.1.1 dev br0
Managing Bridges through Configuration Files
1. CentOS 7:
Prerequisite: Check if the bridge module is loaded; if not, it needs to be loaded manually and set to persist.
lsmod  | grep bridge
bridge                151336  0
stp                    12976  1 bridge
llc                    14552  2 stp,bridge

# Load the module
modeprobe bridge

# Make it persistent
vim /etc
1. Create Bridge Configuration File The configuration file is located at: Create bridge configuration file /etc/sysconfig/network-scripts/ifcfg-br_name
vim /etc/sysconfig/network-scripts/ifcfg-br0
DEVICE=br0
TYPE=Bridge
ONBOOT=yes
BOOTPROTO=static
IPADDR=10.0.0.20
NETMASK=255.255.255.0
GATEWAY=10.0.0.2
DNS1=180.76.76.76
DNS2=223.6.6.6
STP=on  # Enable STP functionality
2. Modify the Configuration File of the Physical Network Card Interface For example, set eth0 and eth1 as sub-interfaces of the bridge br0.
vim /etc/sysconfig/network-scripts/ifcfg-eth0
TYPE="Ethernet"
NAME="eth0"
DEVICE="eth0"
ONBOOT="yes"
BRIDGE=br0

vim /etc/sysconfig/network-scripts/ifcfg-eth1
TYPE="Ethernet"
NAME="eth1"
DEVICE="eth1"
ONBOOT="yes"
BRIDGE=br0  # Indicates that the current network interface (e.g., eth0) should be added to the bridge named br0 as a member interface
eth0:

eth1:

3. Restart the Service CentOS 7 uses NetworkManager as the default network management service. By using traditional network scripts to configure the network, you can still utilize NetworkManager to manage and apply these configurations.
systemctl restart NetworkManager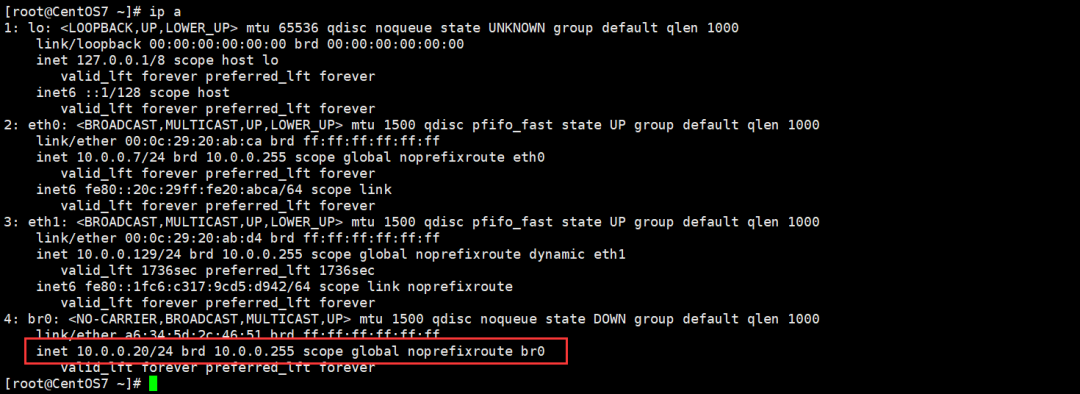
2. Ubuntu 16.04:
Prerequisite:
The bridge module needs to be loaded.
sudo modeprobe bridge

sudo vim /etc/modules
bridge
The bridge-utils package needs to be installed; in some older versions, the bridge-utils package is necessary.
sudo apt install bridge-utils1. Modify the Configuration File
sudo vim /etc/network/interfaces
auto lo
iface lo inet loopback

auto br0
iface br0 inet static
    address 192.168.14.108
    netmask 255.255.248.0
    gateway 192.168.12.1
    dns-nameserver 180.76.76.76
    bridge_ports ens33 ens37
    bridge_stp on

auto ens33
iface ens33 inet manual
    up ip link set $IFACE up
    down ip link set $IFACE down

auto ens37
iface ens37 inet manual
    up ip link set $IFACE up
    down ip link set $IFACE down
Note:
- 1. The purpose of adding auto ens33 and auto ens37 in the configuration file is to ensure that the network interfaces start automatically on boot.
- 2. Configuring up and down commands for ens33 and ens37 ensures that the interfaces can correctly go up and down (when the system starts or the network service is restarted).
- 3. Using manual mode for physical network interfaces ensures that the system recognizes these interfaces exist and does not attempt to automatically assign IP addresses to them.
- 4. bridge_stp needs to be set to on, especially if the member interfaces of the bridge are on the same switch; not enabling it can cause looping issues.
- 5. $IFACE is a special variable that automatically references the name of the currently configured network interface.
2. Restart the Service
sudo systemctl restart networking3. Ubuntu 20.04
Prerequisite: The bridge module needs to be loaded.
# Check if the module is loaded
lsmod | grep bridge

# Load the module
sudo modprobe bridge

# Persistent Configuration
sudo vim /etc/modules
bridge
1. Edit the Configuration File
network:
  version:2
renderer:networkd
ethernets:
    ens33:
      dhcp4:no
    ens34:
      dhcp4:no

bridges:
    br0:
      interfaces: [ens33, ens34]
      dhcp4:yes
      parameters:
        stp:true
        forward-delay: 4
2. Apply Configuration
After editing the netplan configuration file, these changes will not take effect immediately. To apply these changes, you need to run sudo netplan apply. This way, netplan will read the modified configuration file and call the underlying network management tools (such as networkd or NetworkManager) to apply these configuration changes.
sudo netplan apply3. Check if it is Effective
bridge link show br0Introduction to STP Functionality
STP stands for Spanning Tree Protocol, which is used to prevent layer 2 loops and is implemented on layer 2 switches. A bridge acts like a switch, so when adding member interfaces (physical network cards) to the bridge, the STP protocol needs to be enabled. Otherwise, if two physical network cards are connected to the same switch, it can cause broadcast storms, leading to network instability in the entire local area network.
When configuring a bridge and enabling the STP protocol, to avoid potential network loops, each port (a port is a physical network card) added to the bridge will undergo several state transitions to determine the network topology and which ports should be placed in forwarding state and which should be blocked. Initially, it enters a blocking state. Before transitioning from the blocking state to the forwarding state, the port must go through two intermediate states:
- • Listening: In this state, the port listens for potential conflicting bridging packets but does not learn MAC addresses. This state lasts for 15 seconds by default (which is half of the Forward Delay).
- • Learning: In this state, the port begins to learn MAC addresses to build its forwarding database but still does not forward frames. This state also lasts for 15 seconds (which is the other half of the Forward Delay).
The spring recruitment has begun! If you do not prepare adequately, it will be difficult to find a good job during the spring recruitment.
Here’s a job-seeking gift package for everyone, so you can prepare for the spring recruitment and find a good job!