1. Overview of Ansible
Ansible is an increasingly popular open-source automation tool for operations management. It enables automation of operations, improving the efficiency of operations engineers and reducing human errors.Ansible can perform various management tasks through its rich set of integrated modules, with over a thousand built-in modules. More importantly, it is very easy to use, allowing even beginners to get started quickly, while offering a wealth of features that can accomplish almost anything in the operations field.
1. Features of Ansible
Since its release in 2012, Ansible has quickly gained popularity worldwide, with the following features:
- Ansible is developed in Python, making it relatively easy for operations engineers to perform secondary development;
- Ansible’s rich built-in modules can meet almost all requirements;
- The management model is very simple, allowing a single command to affect thousands of hosts;
- It operates in a no-client mode, communicating over SSH;
- Since its release, Ansible has been adopted and utilized by major companies such as AWS, Google Cloud Platform, Microsoft Azure, Cisco, HP, VMware, and Twitter;
2. Roles of Ansible
- Users: How to use Ansible for automated operations?
- Ansible Toolset: What functionalities can Ansible achieve?
- Target Objects: Which hosts can Ansible affect?
1. Users
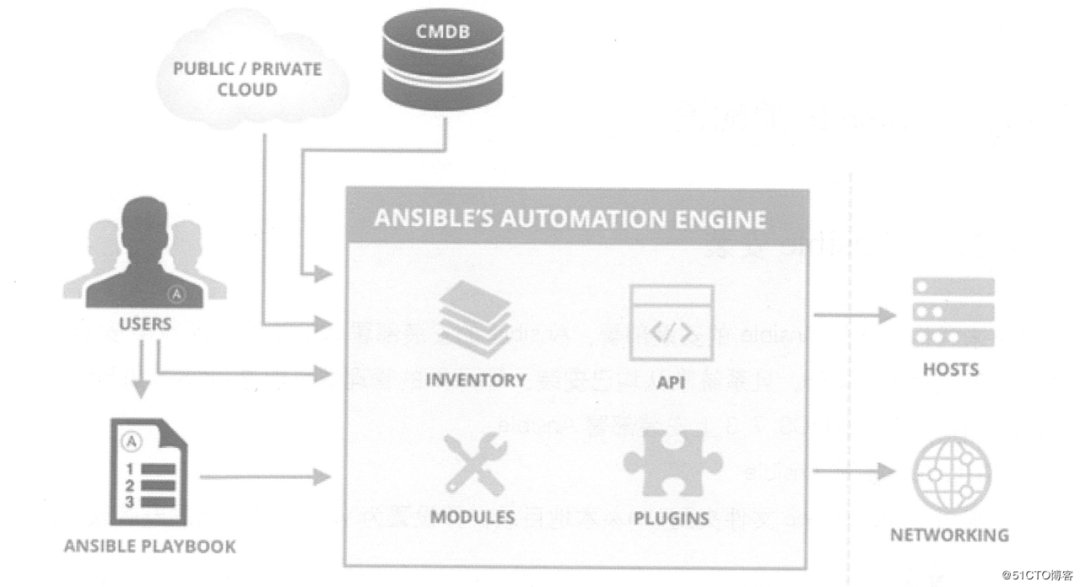
As shown in the figure below, Ansible users can interact with Ansible in various ways, with four methods displayed in the image:
- CMDB: The CMDB stores and manages configuration information within the enterprise IT architecture, serving as a core tool for building ITIL projects. Operations personnel can combine CMDB with Ansible to directly issue commands to call the Ansible toolset to achieve desired goals;
- PUBLIC/PRIVATE Method: In addition to its rich built-in modules, Ansible also provides a variety of API language interfaces, such as PHP, Python, PERL, and other popular languages. Based on PUBLIC/PRIVATE, Ansible operates via API calls;
- Ad-Hoc Command Set: Users can directly call the Ansible toolset through Ad-Hoc command sets to complete tasks;
- Playbooks: Users can pre-write Ansible Playbooks and execute the pre-arranged task sets in the Playbooks sequentially;
2. Ansible Toolset
The Ansible toolset includes Inventory, Modules, Plugins, and API.Specifically: Inventory: Used to manage the list of devices, which can be grouped to directly affect all hosts within the group; Modules: Various execution modules, with almost all management tasks executed through modules; Plugins: Provide various additional functionalities; API: Provides an interface for programmers to perform secondary development based on Ansible; The specifics are as follows:
-
Ansible Playbooks: Task scripts that define Ansible tasks and configuration files, executed sequentially by Ansible, usually in JSON format YML files;
-
Inventory: The list of hosts managed by Ansible;
-
Modules: Functional modules for executing commands, mostly built-in core modules, but can also be customized;
-
Plugins: Supplementary functionalities for modules, such as connection type plugins, loop plugins, variable plugins, filter plugins, etc., which are not commonly used;
-
API: Application programming interface for third-party program calls;
-
Ansible: This part is not very obvious in the image, but the combination of Inventory, API, Modules, and Plugins can be understood as the Ansible command tool, which is the core execution tool;
3. Target Objects
Ansible’s target objects are not limited to Linux and non-Linux operating system hosts; it can also affect various PUBLIC/PRIVATE, commercial, and non-commercial network facilities.When users use Ansible or Ansible-Playbooks, after entering Ansible’s Ad-Hoc command set or Playbooks in the server terminal, Ansible will follow the pre-selected rules to gradually decompose the Playbooks into Plays, then organize the Plays into tasks recognizable by Ansible, subsequently calling all modules and plugins involved in the tasks, and transmitting the task set to the remote client for execution via SSH based on the host list defined in the Inventory, either as temporary files or commands, returning the execution results. If it is a temporary file, it will be automatically deleted after execution.
4. Ansible Configuration
1. Installing Ansible
The installation and deployment of Ansible is very simple. Taking RPM installation as an example, its only dependencies are Python and SSH, which are both installed by default on the system. The management end of Ansible can only be Linux, such as Redhat, Debian, Centos.
1) Install Ansible via YUM
You can download the required software packages for Ansible directly from the internet. This blog provides the necessary dependency software packages for installing the Ansible automation operation tool.
[root@centos01 ~]# cd /mnt/ansiblerepo/ansiblerepo/repodata/
[root@centos01 ansiblerepo]# vim /etc/yum.repos.d/local.repo
[local]
name=centos
baseurl=file:///mnt/ansiblerepo/ansiblerepo  <!--Modify yum path-->
enabled=1
gpgcheck=0
[root@centos01 ~]# yum -y install ansible
                <!--Install Ansible automation operation tool-->
2) Verify Installation Results
[root@centos01 ~]# ansible --version
    <!--If the command executes normally, it indicates that the Ansible tool has been successfully installed-->
ansible 2.3.1.0
  config file = /etc/ansible/ansible.cfg
  configured module search path = Default w/o overrides
  python version = 2.7.5 (default, Nov  6 2016, 00:28:07) [GCC 4.8.5 20150623 (Red Hat 4.8.5-11)]
3) Create SSH Keyless Login
Ansible manages devices via SSH, which includes two authentication methods: one is password authentication, and the other is key pair verification. The former requires interaction with the system, while the latter allows for keyless login. If you want to manage devices automatically through Ansible, you should configure keyless login for the managed devices.
[root@centos01 ~]# ssh-keygen -t rsa  <!--Generate key pair-->
Generating public/private rsa key pair.
Enter file in which to save the key (/root/.ssh/id_rsa):<!--Key pair storage path-->
Created directory '/root/.ssh'.
Enter passphrase (empty for no passphrase):
       <!--Press Enter for no passphrase-->
Enter same passphrase again:    <!--Enter again-->
Your identification has been saved in /root/.ssh/id_rsa.
Your public key has been saved in /root/.ssh/id_rsa.pub.
The key fingerprint is:
SHA256:cJz6NRTrvMDxX+Jpce6LRnWI3vVEl/zvARL7D10q9WY root@centos01
The key's randomart image is:
+---[RSA 2048]----+
|          .   . .|
|       . . +   oo|
|      . = o o. oo|
|       = * o..+ *|
|      . S *.=+=*+|
|       . o =+XooE|
|        . ..=.++.|
|           ..o ..|
|           .. o. |
+----[SHA256]-----+
[root@centos01 ~]# ssh-copy-id -i .ssh/id_rsa.pub  [email protected]   <!--Copy public key to remote 192.168.100.20-->
[root@centos01 ~]# ssh-copy-id -i .ssh/id_rsa.pub  [email protected]    <!--Copy public key to remote 192.168.100.30-->
At this point, Ansible has been deployed, and you can now manage devices through Ansible.
2. Ansible Configuration
Inventory is the configuration file for managing host information in Ansible, similar to the system Hosts file, and is stored by default in /etc/ansible/hosts.In the hosts file, devices are organized by groups, and Ansible defines hosts and groups through Inventory. You can specify the Inventory in the ansible command using the options<span>-i</span>or<span>--inventory-file</span>:
[root@centos01 ~]# ansible -i /etc/ansible/hosts web -m pingIf you use the default Inventory file (/etc/ansible/hosts), you can also omit specifying the Inventory file, for example:
[root@centos01 ~]# ansible web -m pingAnsible manages devices by adding them to the /etc/ansible/hosts file in a grouped manner, so before formal management, you must first prepare the hosts file. In the hosts file, the sections enclosed in [ ] represent group names, and the device list supports both hostnames and IP addresses.By default, devices are managed via port 22 (SSH). If the target host uses a non-default SSH port, you can specify it after the hostname using a colon, separating configurations by line. Additionally, the hosts file supports wildcards.
[root@centos01 ~]# vim /etc/ansible/hosts
............   <!--Omitted part-->
[web]
192.168.100.20
192.168.100.30
[test]
www.benet.com:222                         <!--Manage devices via port 222-->
[mail]
yj1.kgc.cn
yj[2:5].kgc.cn
<!--[2:5] indicates all numbers between 2 and 5, meaning all hosts yj2.kgc.cn, yj3.kgc.cn, etc.-->
You can place a single host in multiple groups simultaneously.After configuration, you can perform remote operations on the groups defined in the hosts file, or operate on one or more hosts within a group. For example:1) Operate only on the host 192.168.1.2 in the web group, limiting the host changes using the –limit parameter.
[root@centos01 ~]# ansible web -m command -a "systemctl status httpd" --limit "192.168.100.20"
192.168.100.20 | SUCCESS | rc=0 >>
<!--Seeing SUCCESS indicates success, so the following content-->
<!--If testing the httpd service, the tested host must have the httpd service installed and started-->
2) Operate only on the host 192.168.100.20. Limit the host changes by IP.
[root@centos01 ~]# ansible 192.168.100.20 -m command -a "systemctl status httpd"
192.168.100.20 | SUCCESS | rc=0 >>
3) Operate only on hosts in the 192.168.100.0 subnet, which requires using wildcards to limit host changes.
[root@centos01 ~]# ansible 192.168.1.* -m command -a "systemctl status httpd"
192.168.100.20 | SUCCESS | rc=0 >>
.......  <!--Omitted part-->
192.168.100.30 | SUCCESS | rc=0 >>
.......    <!--Omitted part-->
3. Ansible Commands
Most of Ansible’s maintenance commands start with ansible. By entering ansible in the terminal and pressing the Tab key twice, all commands related to ansible will be completed.
[root@centos01 ~]# ansible  <!--Press Tab key twice-->
ansible               ansible-console-2     ansible-galaxy        ansible-playbook-2.7  ansible-vault-2
ansible-2             ansible-console-2.7   ansible-galaxy-2      ansible-pull          ansible-vault-2.7
ansible-2.7           ansible-doc           ansible-galaxy-2.7    ansible-pull-2
ansible-connection    ansible-doc-2         ansible-playbook      ansible-pull-2.7
ansible-console       ansible-doc-2.7       ansible-playbook-2    ansible-vault
1) ansible
ansible is one of the most frequently used commands in production environments, mainly used in the following scenarios:Non-fixed requirements;Temporary one-time operations;Secondary development interface calls;Non-fixed requirements refer to temporary maintenance tasks, such as checking the disk usage of the web server group, copying a file to another machine, etc. These irregular, temporary tasks are referred to as non-fixed requirements. The syntax for temporary one-time operations is as follows:
Ansible [options]- -v (—verbose): Outputs detailed execution process information, providing all information about the execution process;
- -i PATH (—inventory=PATH): Specifies inventory information, defaulting to /etc/ansible/hosts;
- -f NUM (—forks=NUM): Number of concurrent threads, defaulting to 5 threads;
- —private-key=PRIVATE_KEY_FILE: Specifies the key file;
- -m NAME, —module-name=NAME: Specifies the module to be used for execution;
- -M DIRECTORY (—module-path=DIRECTORY): Specifies the module storage path, defaulting to /usr/share/ansible;
- -a ARGUMENTS (—args=ARGUMENTS): Specifies module parameters;
- -u USERNAME (—user=USERNAME): Specifies the username to run commands on the remote host;
- -l subset (—limit=SUBSET): Limits the running hosts;
① Check if all hosts are alive, execute the command as follows:
[root@centos01 ~]# ansible all -f 5 -m ping
<!--Call the ping module, all indicates all hosts in the /etc/ansible/hosts file, no need to create an all group (default exists)-->
192.168.100.20 | SUCCESS => {               <!--Indicates execution success-->
    "changed": false,                        <!--No changes made to the host-->
    "ping": "pong"                  <!--Indicates the return result of the ping command-->
}
192.168.100.30 | SUCCESS => {
    "changed": false,
    "ping": "pong"
}
② List all hosts in the web group, execute the command as follows:
[root@centos01 ~]# ansible web --list <!-- -list: Indicates to list host information-->③ Batch display disk usage space in the web group, execute the command as follows:
[root@centos01 ~]# ansible web -m command -a "df -hT"
192.168.100.30 | SUCCESS | rc=0 >>
Filesystem            Type      Size  Used Avail Use% Mounted on
/dev/mapper/cl-root xfs        17G  4.4G   13G   26% /
devtmpfs            devtmpfs  897M     0897M    0% /dev
tmpfs               tmpfs     912M   84K  912M    1% /dev/shm
tmpfs               tmpfs     912M     0912M    0% /sys/fs/cgroup
/dev/sda1           xfs      1014M  173M  842M   18% /boot
tmpfs               tmpfs     183M   16K  183M    1% /run/user/42
tmpfs               tmpfs     183M     0183M    0% /run/user/0

192.168.100.20 | SUCCESS | rc=0 >>
Filesystem            Type      Size  Used Avail Use% Mounted on
/dev/mapper/cl-root xfs        17G  4.3G   13G   26% /
devtmpfs            devtmpfs  897M     0897M    0% /dev
tmpfs               tmpfs     912M   84K  912M    1% /dev/shm
tmpfs               tmpfs     912M     0912M    0% /sys/fs/cgroup
/dev/sda1           xfs      1014M  173M  842M   18% /boot
tmpfs               tmpfs     183M   16K  183M    1% /run/user/42
tmpfs               tmpfs     183M     0183M    0% /run/user/0
/dev/sr0            iso9660   4.1G  4.1G     0100% /mnt
The web keyword needs to be defined in the /etc/ansible/hosts file in advance.Ansible’s return results are very user-friendly, generally using three colors to indicate execution results:
- Red: Indicates an exception occurred during execution;
- Orange: Indicates that the target has a status change after command execution;
- Green: Indicates successful execution with no modifications made to the target machine;
2) Ansible-doc
Ansible-doc is used to query the documentation for ansible modules, similar to the man command, with detailed usage instructions and application case introductions for each module. The syntax is as follows:
ansible-doc [options] [module……]List supported modules:
[root@centos01 ~]#ansible-doc -lQuery the description of the ping module:
[root@centos01 ~]# ansible-doc ping
> PING    (/usr/lib/python2.7/site-packages/ansible/modules/system/ping.py)

  A trivial test module, this module always returns `pong' on successful contact. It
  does not make sense in playbooks, but it is useful from `/usr/bin/ansible' to verify
  the ability to login and that a usable python is configured. This is NOT ICMP ping,
  this is just a trivial test module.

EXAMPLES:
# Test we can logon to 'webservers' and execute python with json lib.
ansible webservers -m ping

MAINTAINERS: Ansible Core Team, Michael DeHaan

METADATA:
        Status: ['stableinterface']
        Supported_by: core
3) Ansible-playbook
Ansible-playbook is the most frequently used command in daily applications, similar to the sh or source command in Linux, used to execute a series of tasks.Its working mechanism: by reading pre-written playbook files to achieve centralized task processing. The Ansible-playbook command is followed by the yml formatted playbook file, which contains the task code to be executed. The command usage is as follows:
Ansible-playbook playbook.yml
<!--The playbook.yml file should be pre-written, it is recommended to use the absolute path-->
4) Ansible-console
Ansible-console is an interactive tool provided by Ansible for users, similar to cmd in Windows or shell in Linux. Users can use various built-in Ansible commands in the terminal created by ansible-console, providing a good user experience for those accustomed to using shell interactively. After entering the ansible-console command in the terminal, the following is displayed:
[root@centos01 ~]# ansible-console
Welcome to the ansible console.
Type help or ? to list commands.
      <!--Type help or ? for assistance-->
root@all (2)[f:5]$ cd web    <!--Use the cd command to switch hosts or groups-->
root@web (2)[f:5]$ list                  <!--List current devices-->
192.168.100.20
192.168.100.30
<!--Supports Tab key completion, shortcut keys Ctrl+D or Ctrl+C can exit the current virtual terminal-->
4. Ansible Modules
1) Command Module
The command module executes commands on remote hosts and does not support shell features such as pipes and redirection. Common parameters are as follows:
- chdir: The directory to enter on the remote host before running the command;
- creates: Creates a file during command execution; if the file already exists, the creation task will not be executed;
- removes: Removes a file during command execution; if the file does not exist, the removal task will not be executed;
- executeable: Specifies the shell program to run the command;
Run the “ls ./” command on all hosts, switching to the /home directory before running. The operation is as follows:
[root@centos01 ~]# ansible web -m command -a "chdir=/ ls ./"2) Shell Module
The shell module executes commands on remote hosts, equivalent to calling the remote host’s Shell process, then opening a sub-shell to run the command. The difference from the command module is that it supports shell features such as pipes and redirection.Example:
[root@centos01 ~]# ansible web -m shell -a "echo hello world "        <!--Output to screen-->
192.168.100.20 | SUCCESS | rc=0 >>
hello world

192.168.100.30 | SUCCESS | rc=0 >>
hello world
[root@centos01 ~]# ansible web -m shell -a "echo hello world > /1.txt"   <!--Output to 1.txt file-->
192.168.100.20 | SUCCESS | rc=0 >>

192.168.100.30 | SUCCESS | rc=0 >>
3) Copy Module
The copy module is used to copy specified files from the host to a specified location on the remote host. Common parameters are as follows:
- dest: Specifies the target directory for the copied file, using an absolute path. If the source is a directory, the target must also be a directory; if the target file already exists, it will overwrite the original content;
- src: Specifies the path of the source file, which can use relative and absolute paths, supporting direct specification of directories. If the source is a directory, the target must also be a directory;
- mode: Specifies the permissions of the target file during copying, optional;
- owner: Specifies the owner of the target file during copying, optional;
- group: Specifies the group of the target file during copying, optional;
- content: Specifies the content to be copied to the target host, cannot be used with src, equivalent to copying the data specified by content to the target file;
Example:
[root@centos01 ~]# ansible web -m copy -a "src=/etc/hosts
dest=/root/a1.hosts mode=777 owner=root group=root"
<!--Copy the hosts file from the local machine to all hosts in the web group, stored in the home directory as a1.hosts, with permissions set to 777, owner as root, and group as root-->
4) Hostname Module
The hostname module is used to manage the hostname on remote hosts. Common parameters are as follows:name:Specifies the hostname;Example:
[root@centos01 ~]# ansible 192.168.100.20 -m hostname -a "name=test"
<!--Change the hostname of 192.168.100.20 to test, but it requires a bash command to take effect-->
5) Yum Module
The yum module manages packages on remote hosts based on the yum mechanism. Common parameters are as follows:
- name: Package name, which can include a version number. If no version is specified, the latest version is used by default;
- state=present|latest|absent: Specifies the operation to be performed on the package: present indicates to install the package, latest indicates to install the latest version of the package, absent indicates to uninstall the package;
- disablerepo: Temporarily disable a repository ID when using yum to install;
- enablerepo: Temporarily enable a repository ID when using yum to install;
- conf_file: The configuration file used by yum during runtime, rather than the default configuration file;
- disable_gpg_check=yes|no: Whether to enable integrity check functionality;
Example:
[root@centos01 ~]# ansible web -m shell -a "/usr/bin/rm -rf
/etc/yum.repos.d/CentOS-*"
          <!--Batch delete yum sources from hosts in the web group-->
[root@centos01 ~]# ansible web -m shell -a "/usr/bin/mount
/dev/cdrom /mnt"   <!--Batch mount the CD-->
 [WARNING]: Consider using mount module rather than running mount

192.168.100.20 | SUCCESS | rc=0 >>
mount: /dev/sr0 is write-protected, mounting read-only

192.168.100.30 | SUCCESS | rc=0 >>
mount: /dev/sr0 is write-protected, mounting read-only
[root@centos01 ~]# ansible web -m yum -a "name=httpd
state=present"  <!--Batch install httpd program-->
[root@centos01 ~]# ansible web -m shell -a "rpm -qa | grep httpd"
    <!--Batch check installed httpd packages-->
 [WARNING]: Consider using yum, dnf or zypper module rather than running rpm

192.168.100.20 | SUCCESS | rc=0 >>
httpd-2.4.6-67.el7.centos.x86_64
httpd-tools-2.4.6-67.el7.centos.x86_64

192.168.100.30 | SUCCESS | rc=0 >>
httpd-2.4.6-67.el7.centos.x86_64
httpd-tools-2.4.6-67.el7.centos.x86_64
[root@centos01 ~]# ansible web -m shell -a "systemctl start httpd"       <!--Batch start service-->
[root@centos01 ~]# ansible web -m shell -a "netstat -anptu | grep httpd"     <!--Batch check if httpd service started successfully-->
192.168.100.20 | SUCCESS | rc=0 >>
tcp6       0      0 :::80                   :::*                    LISTEN      2072/httpd

192.168.100.30 | SUCCESS | rc=0 >>
tcp6       0      0 :::80                   :::*                    LISTEN      3098/httpd
The management end only sends yum commands to the managed end; the managed end must have an available yum repository for successful installation.
6) Service Module
The service module is used to manage services on remote hosts. Common parameters are as follows:
- name: The name of the service to be managed;
- state=started|stopped|restarted: Actions include starting, stopping, or restarting;
- enable=yes|no: Indicates whether to set the service to start automatically on boot;
- runlevel: If enabled for automatic startup, it defines which run levels the service should start automatically;
Example:
[root@centos01 ~]# ansible web -m service -a "name=httpd
enabled=yes state=restarted"
<!--Set httpd service to restart and start automatically on boot-->
7) User Module
The user module is mainly used to manage user accounts on remote hosts. Common parameters are as follows:name: Required parameter, account name;state=present|absent: Create or delete the account, present indicates creation, absent indicates deletion;system=yes|no: Indicates whether it is a system account;uid: User UID;group: User’s primary group;groups: User’s additional groups;shell: Default shell used;home: User’s home directory;mve_home=yes|no: If the home directory already exists, whether to move the existing home directory;password: User’s password, it is recommended to use an encrypted string;comment: User’s comment information;remore=yes|no: When state=absent, whether to delete the user’s home directory;Example of creating a user:
[root@centos01 ~]# ansible web -m user -a "name=user01
system=yes uid=502 group=root groups=root shell=/etc/nologin
home=/home/user01 password=pwd@123"
<!--Create a system user on all hosts in the web group, UID 502, group is root, name is user01, password is pwd@123-->
4. Playbook Configuration Files
1. Executing Configuration Files
Playbook configuration files use YAML syntax, characterized by simplicity and clarity. Playbook configuration files are similar to shell scripts, serving as a YAML formatted file to save a list of tasks for specific needs. While the ansible command introduced above can accomplish various tasks, entering them one by one becomes inefficient for configuring complex tasks.A more effective solution is to place all task code in the playbook configuration file and execute it using the ansible-playbook command, achieving automated operations. The extension of YAML files is usually .yaml or .yml.The YAML syntax is similar to other high-level languages, with structure displayed through indentation, using “-” to represent items; “:” is used to separate keys and values; the entire file starts with “—” and ends with “…”, as shown below:
[root@centos01 ~]# grep -v ^# /etc/ansible/hosts | grep -v ^$              <!--View group information in hosts-->
[web1]
192.168.100.20
[web2]
192.168.100.30
[root@centos01 ~]# vim /etc/ansible/a.yml
                   <!--Create a.yml file and write the following content-->
---
- hosts: web1                   <!--Operations targeting the web1 group-->
  remote_user: root                    <!--Remote execution user identity is root-->
  tasks:                <!--Task list-->
        - name: adduser                               <!--Task name-->
          user: name=user1 state=present <!--Execute user module to create user-->
          tags:                <!--Create tag-->
          - aaa                 <!--Tag is aaa-->
        - name: addgroup           <!--Task name-->
          group: name=root system=yes <!--Execute group module to create group-->
          tags:               <!--Create tag-->
          - bbb               <!--Tag is bbb-->
- hosts: web2               <!--Operations targeting the web2 group-->
  remote_user: root        <!--Remote execution user identity is root-->
  tasks:                     <!--Task list-->
        - name: copy file to web            <!--Task name-->
          copy: src=/etc/passwd dest=/home        <!--Execute copy module to copy file-->
          tags:                        <!--Create tag-->
          - ccc                     <!--Tag is ccc-->
...
All “-” and “:” must have spaces after them, and pay attention to indentation and alignment, as shown in the image below: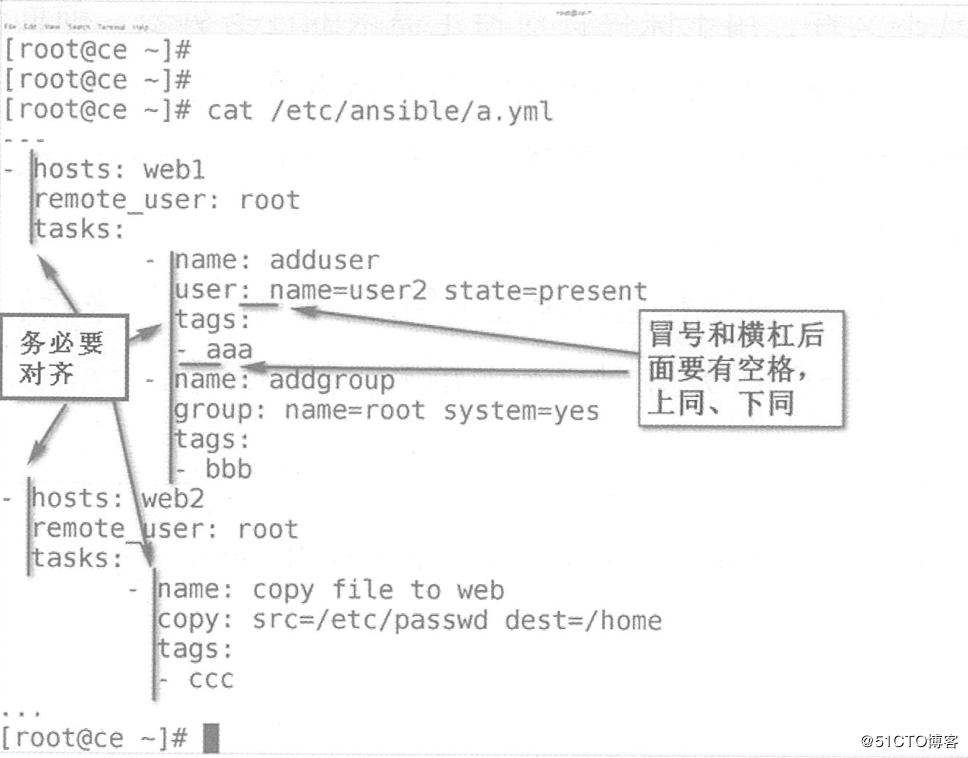 The core elements of a playbook include:hosts:The target hosts for the tasks, multiple hosts are separated by colons, generally calling group information from /etc/ansible/hosts;remote_user:The default identity for running this task on the remote host is root;tasks: Tasks, which are specific tasks defined by a list of operations defined by modules;handlers:Triggers, similar to tasks, but only executed under specific conditions.When the state of a task is changed after execution, it can notify the corresponding handlers to trigger execution;roles: Roles, which separate hosts, consisting of a specific structural collection of tasks, handlers, etc.;Tasks defined in the playbook file need to be called and executed using the ansible-playbook command. The usage of the ansible-playbook command is as follows:
ansible-playbook [option] /PATH/TO/PLAYBOOK.yamlAmong them, the functions of the [option] part include:
- —syntax-check: Checks the syntax of the yaml file;
- -C (—check): Predictive test, will not change any settings on the target host;
- —list-hosts: Lists the hosts affected by the yaml file;
- —list-tasks: Lists the task list of the yaml file;
- —list-tags: Lists the tags in the yaml file;
- -t TAGS (—tags=TAGS): Indicates to execute only the tasks with specified tags;
- —skip-tags=SKIP_TAGS: Indicates to execute other tasks except those with specified tags;
- —start-at-task=START_AT: Starts running from the specified task;
Example of executing a playbook:
[root@centos01 ~]# ansible-playbook --syntax-check /etc/ansible/a.yml    <!--Syntax check-->

playbook: /etc/ansible/a.yml     <!--Indicates no errors-->
[root@centos01 ~]# ansible-playbook -C /etc/ansible/a.yml
         <!--Predictive test for a.yml-->
    .................<!--Omitted part-->
192.168.100.20       : ok=3    changed=1    unreachable=0    failed=0
192.168.100.30       : ok=2    changed=1    unreachable=0    failed=0
<!--Return results indicate no errors, all can be executed successfully.-->
Generally, first execute the command ansible-playbook -C /PATH/TO/PLAYBOOK.yaml for predictive testing, and if there are no issues, then execute the ansible-playbook /PATH/TO/PLAYBOOK.yml command.
2. Triggers
Tasks that need to be triggered for execution, when a previously defined task in tasks is successfully executed, if you want to trigger other tasks based on that, you need to define handlers. For example, after modifying the configuration file of the target host through Ansible’s module, if the task is executed successfully, a trigger can be activated to define the operation of restarting the service on the target host to make the configuration file effective. Handlers have the following characteristics:
-
Handlers are one of the conditional mechanisms provided by Ansible.
-
Handlers are similar to tasks, but they will only be executed when notified by a task.
-
Handlers will only execute after all tasks have been completed.
-
Even if notified multiple times, they will only execute once.
-
Handlers are executed in the order defined.
Example of using handlers:
[root@centos01 ~]# ssh 192.168.100.20 netstat -anpt | grep 80                  <!--Query the listening port of host 100.20-->
tcp6       0      0 :::80         :::*          LISTEN      94858/httpd
<!--It can be seen that it is listening on port 80, now change it to port 8080 via the script and make it effective.-->
[root@centos01 ~]# vim /etc/ansible/httpd.yml
            <!--Edit httpd.yml file and write the following content-->

---
- hosts: web1
  remote_user: root
  tasks:
        - name: change port
          command: sed -i 's/Listen\ 80/Listen\ 8080/g' /etc/httpd/conf/httpd.conf
          notify:                             <!--Configure trigger condition-->
                - restart httpd server    <!--Call the trigger named "restart httpd server" after completing this task-->
  handlers:                                      <!--Configure trigger-->
        - name: restart httpd server  <!--Specify the trigger name, which must match the name specified in "notify" above-->
          service: name=httpd state=restarted<!--Trigger task is to restart the httpd service-->
...
<!--After writing, save and exit-->
3. Roles
Roles are directories where multiple different task files are stored together. Roles are generally stored in the /etc/ansible/roles/ directory, and the default role directory can be adjusted through Ansible’s configuration file. The /etc/ansible/roles/ directory contains many subdirectories, each corresponding to a role, and each role has its own directory structure, as shown in the image below: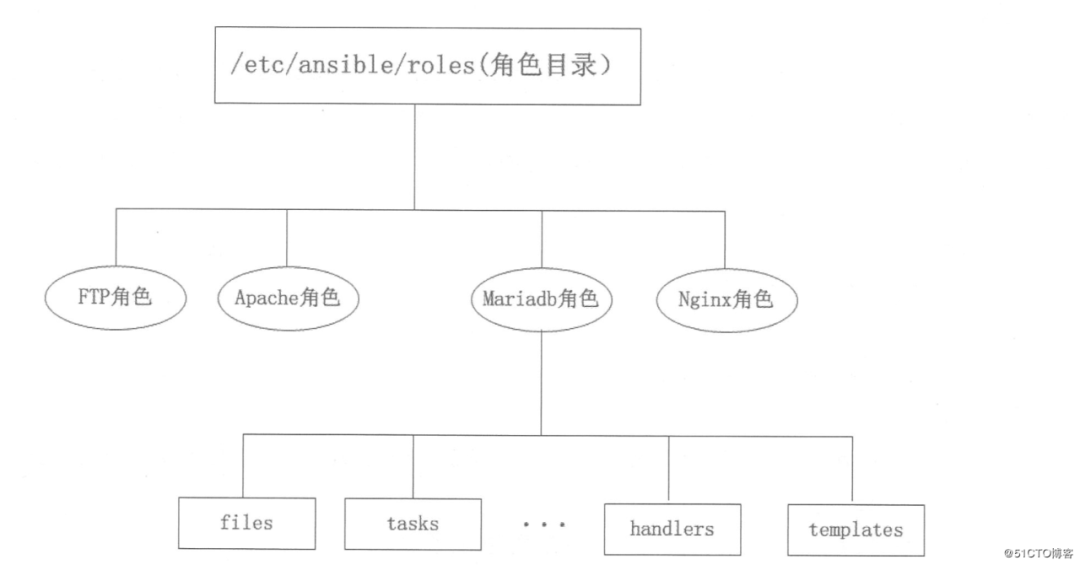 /etc/ansible/roles/ is the collection of roles, and this directory contains custom subdirectories for each role:
- mariadb: mysql role;
- Apache: httpd role;
- Nginx: Nginx role;
Each role is defined with a specific hierarchical directory structure. Taking mariadb (mysql role) as an example:
- files: Stores files called by modules such as copy or script;
- templates: Stores the directory where template module looks for template files, such as mysql configuration file templates;
- tasks: Directory for storing tasks;
- handlers: Directory for storing related trigger executions;
- vars: Directory for storing variables;
- meta: Used to store metadata for this role;
- default: Directory for storing default variables, where the default variables used by this role are defined;
Among the above directories, tasks, handlers, vars, meta, and default should contain at least one main.yml file. Other .yml files can also be present in this directory, but they need to be included in the main.yml file using the include directive.With roles, you can directly call roles in the yaml file (playbook configuration file), as shown in the example below:
- hosts: web
  remote_user: root
  roles:
  - mysql        <!--Call role name-->
  - httpd             <!--Call role name-->
You can call a single role or multiple roles. Once roles are defined, you can execute them using the ansible-playbook PLAYBOOK file. At this point, ansible will look for the mysql and httpd directories in the role collection directory (/etc/ansible/roles) and sequentially run all the code in the mysql and httpd directories.Next, let’s look at an example of installing and configuring the mariadb database.Requirement Analysis:
-
It is required to automatically install mariadb on the managed host, upload a pre-prepared configuration file to the remote host, restart the service, and then create a testdb database, allowing the test user to have all permissions on it.
-
The managed host configures the yum repository, self-configured. If the managed end can connect to the internet, it can directly point the yum repository to the internet.
Source: Linux Should Be Learned This Way
 End of Article Benefits
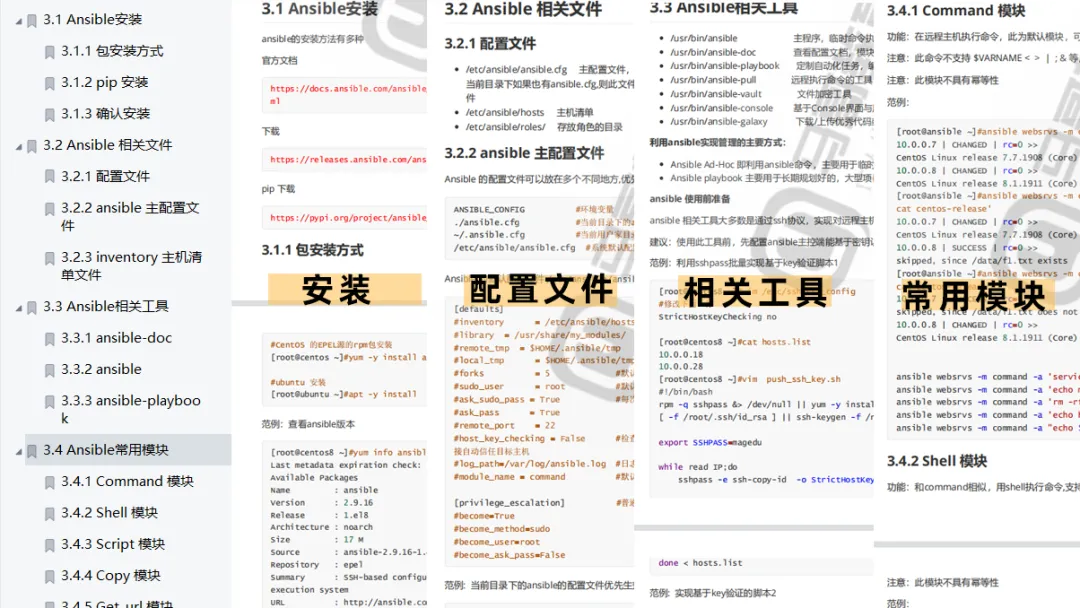
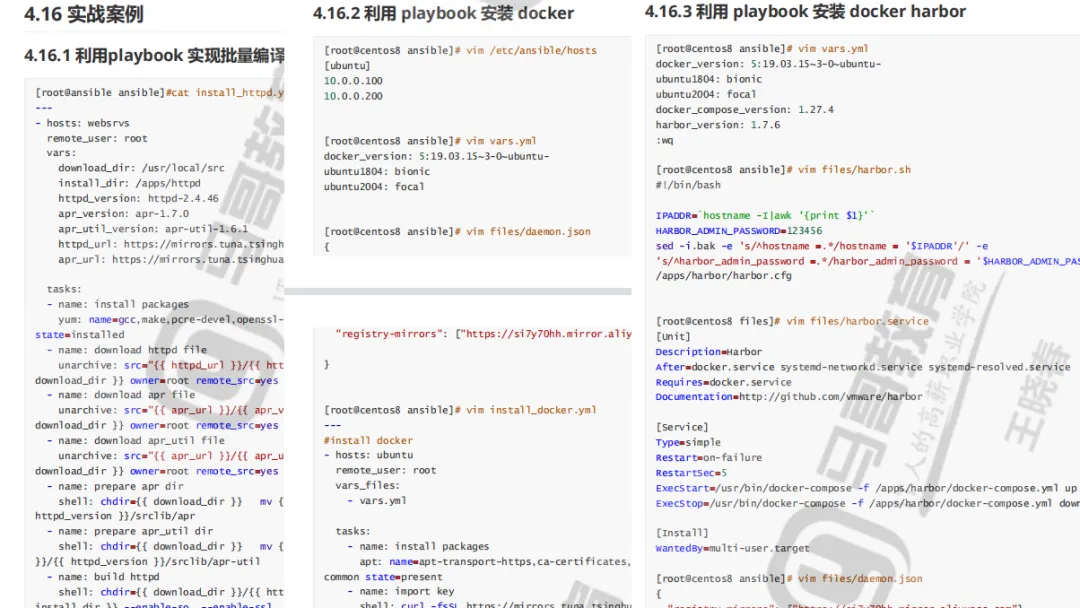
 We also share a collection of Ansible learning materials.The content is detailed, including comprehensive ansiblemind maps3 pieces, ansibleChinese manual45 pages,ansibleinterview questions17 questions, and also91 pageseasily mastering ansible for enterprise-level automated operations!
Easy mastery of ansible for enterprise-level automated operations——Directory
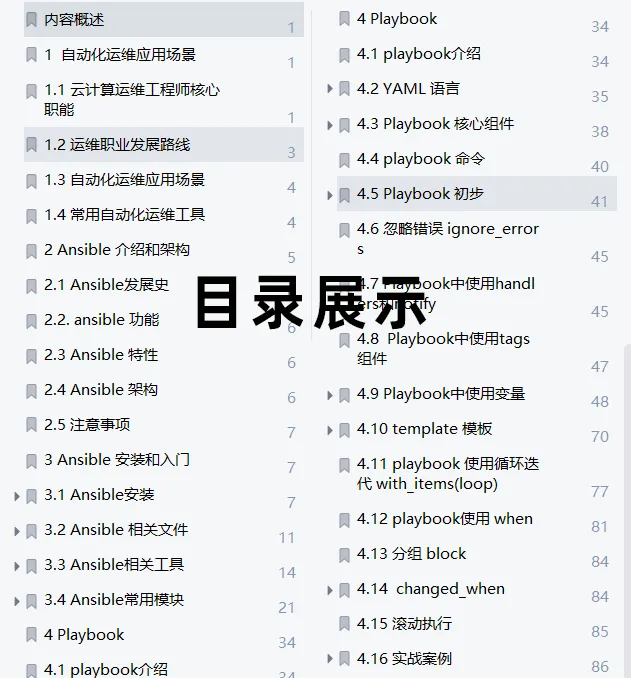
 ▲▲▲Scan the QR codeNote:ansible collectionto take everything away
I hope this article can help readers fully understand and master Ansible configuration automation technology, flexibly apply it in practical work, and enhance the level of operational automation.