As per international norms, let’s first take a look at the demonstration effect:
A few days ago, I saw a real-time data interface for the national new coronavirus outbreak in the chat group: https://lab.isaaclin.cn/nCoV/
Since I’ve been quarantined at home with nothing to do, and I’ve always been concerned about the data of the new coronavirus outbreak, I decided to use the ESP32 development board I have to create a “COVID-19 Weather Indicator” to check the latest outbreak data in real-time next to my computer.
Note: Friends who do not have the ESP32 can use other ESP32 or ESP8266 development boards to achieve this.
# nCoV API Explanation
Open the website: https://lab.isaaclin.cn/nCoV/, which lists several request interfaces:
-
1: /nCoV/api/overall: Returns the virus research status and overview of the national outbreak.
-
2: /nCoV/api/provinceName: Returns a list of provinces, regions, and municipalities directly under the central government that have data entries in the database.
-
3: /nCoV/api/area: Returns the time series data of all epidemic information changes in all provinces, regions, or municipalities in China and other countries around the world (down to the city), allowing tracing of confirmed/suspected infections/cured/death numbers over time.
-
4: /nCoV/api/news: Returns all news related to the epidemic, including data sources and links to data sources.
-
5: /nCoV/api/rumors: Returns rumors related to the epidemic and the refutations from Dingxiangyuan.
It can be seen that the precise epidemic data is mainly in the 3rd interface, let’s take a closer look at the details of the 3rd interface.
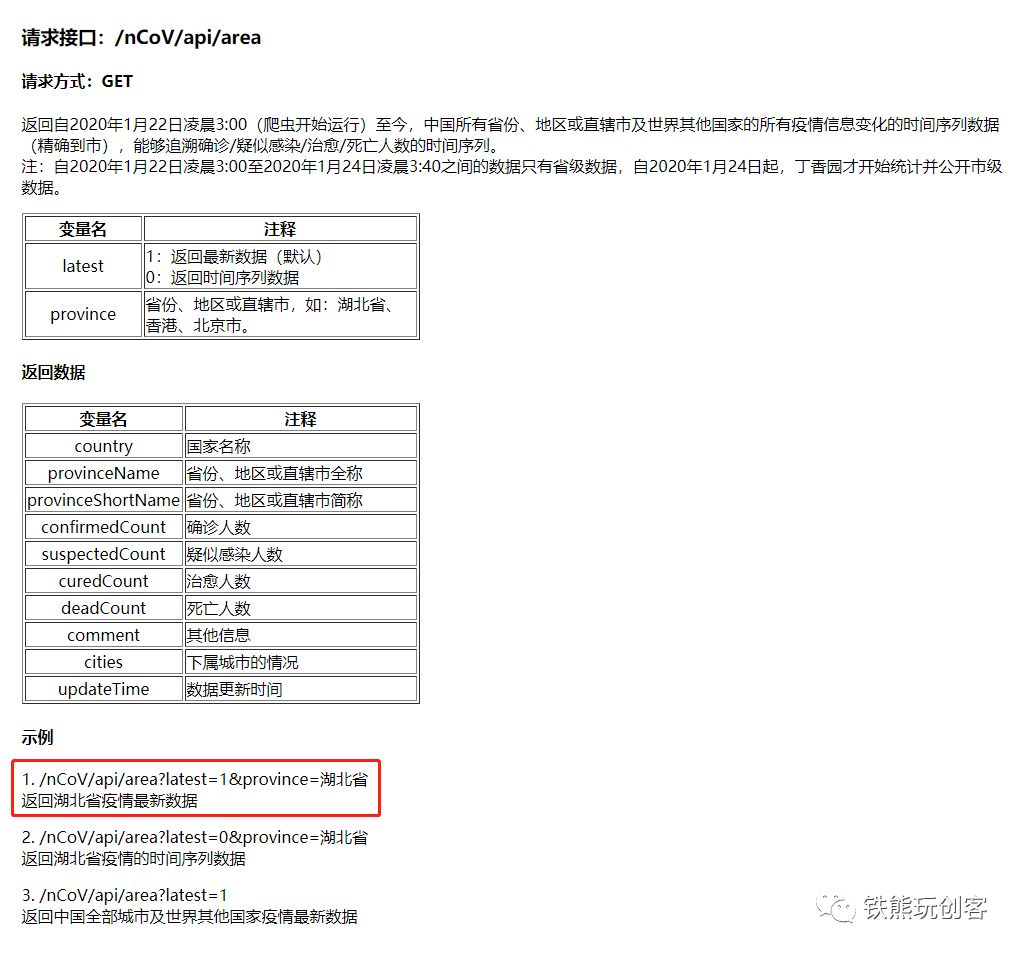
According to the example, if we want to get the latest epidemic data for “Zhejiang Province”, the interface URL should be: https://lab.isaaclin.cn/nCoV/api/area?latest=1&province=Zhejiang
We input this URL into the browser’s address bar to check the corresponding data, and indeed, data is returned.
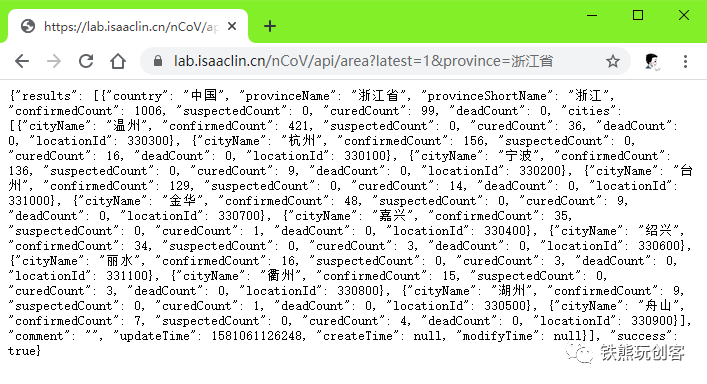
However, the returned data is too messy and inconvenient to view. Therefore, I copied this data into VS Code and set the data format to JSON in the lower right corner. Then I right-clicked in the file and selected Format Document command.
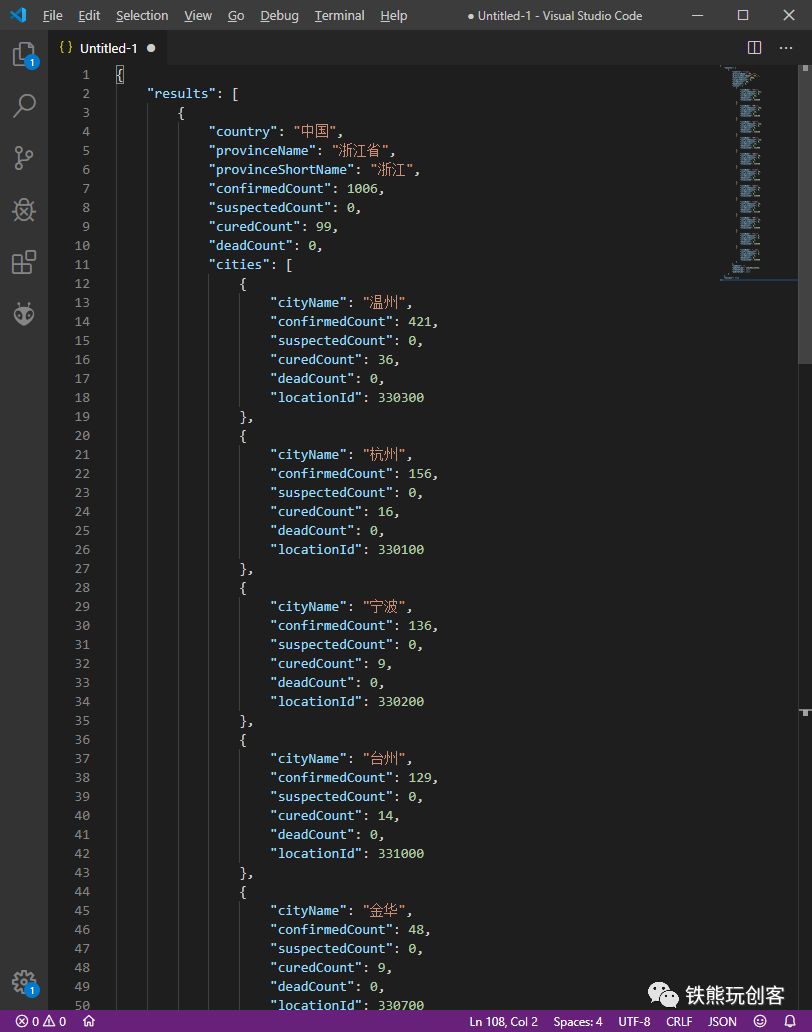
After formatting, we can see orderly and clearly structured data. This is a bunch of JSON formatted data, and we can see that the confirmed cases in Zhejiang Province are 1006, the number of cured cases is 99, and the number of confirmed cases in Hangzhou is 156, etc.

Since it is JSON formatted data, we can easily read it using code.
As for real-time data updates, that’s even simpler; we just need to periodically access this interface to get the latest data. What? Do we still need to manually access this URL? Of course not, the ESP32 development board has networking capabilities, and although I have nothing to do, it’s best to let the program handle such automated tasks.
Next, let’s take a look at how to write the specific code.
# Software Selection
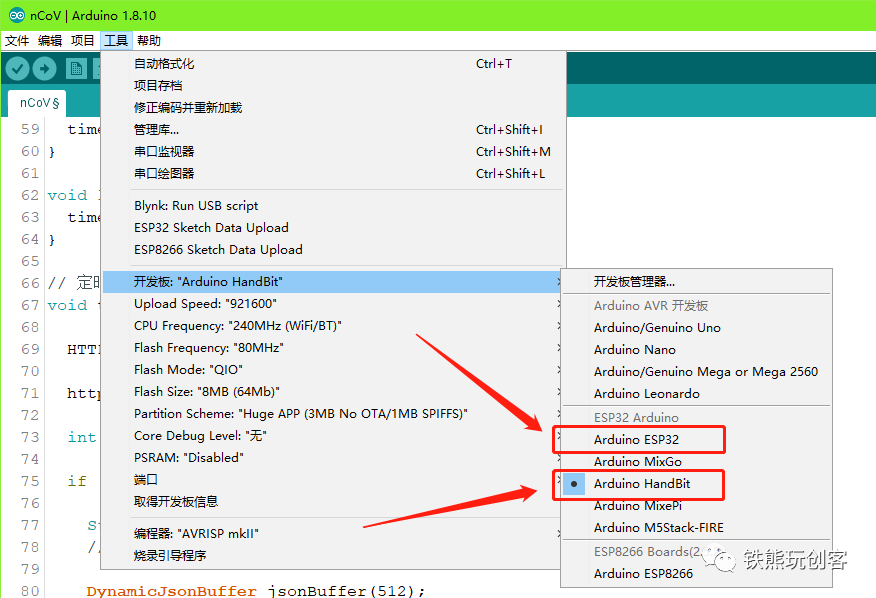
Here we choose Arduino software for code writing. To simplify the configuration of the ESP32 development environment in Arduino, we directly use the built-in Arduino software in Mixly, which has already configured the corresponding ESP32 development environment for us.
If you want to configure the ESP32 development environment in Arduino by yourself, you can also refer to the official tutorial: https://github.com/espressif/arduino-esp32
Mixly download address: https://mixly.readthedocs.io/zh_CN/latest/basic/02Installation-update.html

After configuring the corresponding development environment, it’s time to select the development board, write the program, and finally download the program. If you are using the built-in Arduino like I am, you can select Arduino ESP32 (General ESP32 Development Board) or Arduino HandBit (ESP32 Development Board). If you are configuring the ESP32 development environment yourself, just select the corresponding development board.
# Code Writing
## Connect to Network
First, connect to the network and initialize the serial port for future debugging. The code for network connection is as follows, using the built-in WiFi library of ESP32:
#include <WiFi.h>
#include <Wire.h>

const char *ssid = "wifi-name";
const char *password = "wifi-password";

void setup() {
  Serial.begin(115200);

  // Connect to network
  WiFi.begin(ssid, password);

  while (WiFi.status() != WL_CONNECTED) {
    delay(500);
    Serial.print(".");
  }
  Serial.print("Local IP: ");
  Serial.println(WiFi.localIP());
}

void loop() {
}
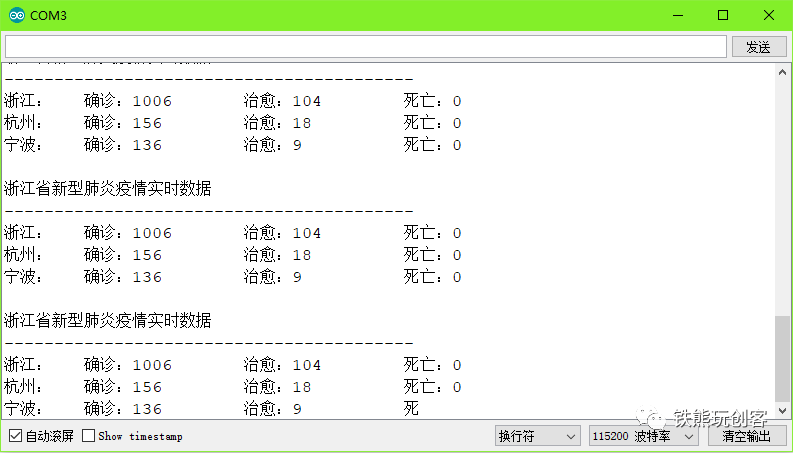
Upload the program, open the serial monitor, and if you see the printed serial output, it indicates that the network connection is successful.

## Set Timer
Next, we will set a timer. Why set a timer? Firstly, it reduces the frequency of accessing the data interface and lessens the load on the server; secondly, it allows us to avoid using the delay() function, making the program more efficient. Here we use the SimpleTimer.h library, which is relatively simple to use. The program is as follows:
Due to space constraints, the code related to network functionality is omitted here; we just need to add the timer-related code in the appropriate place.
#include <SimpleTimer.h>

// other codes ...

SimpleTimer timer;

void setup() {
  // setup codes ...

  // Set timer
  timer.setInterval(10000L, timerCallback);  // 10000ms = 10s
}

void loop() {
  timer.run();
}

// Timer callback function
void timerCallback() {
    // timer code here...
}
At the beginning of the program, we include the SimpleTimer.h library, then initialize a timer object timer. In the setup(), we initialize the timer and set the timer callback function timerCallback(), here set to call the timer every 10 seconds (10000ms); you can modify it to another time.
Then, in the timer callback function, we will obtain the real-time data of the COVID-19 outbreak. Here we need to use two libraries: HTTPClient.h and ArduinoJson.h. The HTTPClient.h library is used to connect to the network and obtain the data from the above API interfaces, while the ArduinoJson.h library helps parse the returned JSON data and obtain the data we care about.
Then set the API interface address apiUrl; you can modify it to the data address you want. Then set several variables to store the data we care about, where xx_confirmedCount indicates the number of confirmed cases, xx_suspectedCount indicates the number of suspected cases, xx_curedCount indicates the number of cured cases, and xx_deadCount indicates the number of deaths; the prefix xx can be modified to zj (Zhejiang), hangzhou (Hangzhou), ningbo (Ningbo), etc.
#include <HTTPClient.h>
#include <ArduinoJson.h>

// other codes ...

String apiUrl = "https://lab.isaaclin.cn/nCoV/api/area?latest=1&province=Zhejiang";

// Zhejiang epidemic data variables
int zj_confirmedCount;
int zj_suspectedCount;
int zj_curedCount;
int zj_deadCount;

// Hangzhou epidemic data variables
int hangzhou_confirmedCount;
int hangzhou_suspectedCount;
int hangzhou_curedCount;
int hangzhou_deadCount;

// Ningbo epidemic data variables
int ningbo_confirmedCount;
int ningbo_suspectedCount;
int ningbo_curedCount;
int ningbo_deadCount;

void setup() {
  // setup codes ...
}

void loop() {
  // loop codes ...
}

// Timer callback function
void timerCallback() {

  HTTPClient http;
  http.begin(apiUrl);

  int httpCode = http.GET();
  if (httpCode == HTTP_CODE_OK) {
    String results = http.getString();
    //    Serial.println(results); // Web content

    DynamicJsonBuffer jsonBuffer(512);
    JsonObject& resultsJson = jsonBuffer.parseObject(results);

    if (!resultsJson.success()) {
      Serial.println("parseObject() failed");
      return;
    }

    // -------- Zhejiang Province Data -----------
    JsonObject& provinces = resultsJson["results"][0];

    const char* country = provinces["country"]; // "China"
    const char* provinceName = provinces["provinceName"]; // "Zhejiang Province"
    const char* provinceShortName = provinces["provinceShortName"]; // "Zhejiang"
    zj_confirmedCount = provinces["confirmedCount"];
    zj_suspectedCount = provinces["suspectedCount"];
    zj_curedCount = provinces["curedCount"];
    zj_deadCount = provinces["deadCount"];

    // -------- cities -----------
    JsonArray& cities = provinces["cities"];

    // -------- Hangzhou Data -----------
    JsonObject& hangzhou = cities[1];
    const char* hangzhou_cityName = hangzhou["cityName"]; // "Hangzhou"
    hangzhou_confirmedCount = hangzhou["confirmedCount"];
    hangzhou_suspectedCount = hangzhou["suspectedCount"];
    hangzhou_curedCount = hangzhou["curedCount"];
    hangzhou_deadCount = hangzhou["deadCount"];
    //    long hangzhou_locationId = hangzhou["locationId"]; // 330100

    // -------- Ningbo Data -----------
    JsonObject& ningbo = cities[2];
    const char* ningbo_cityName = ningbo["cityName"]; // "Ningbo"
    ningbo_confirmedCount = ningbo["confirmedCount"];
    ningbo_suspectedCount = ningbo["suspectedCount"];
    ningbo_curedCount = ningbo["curedCount"];
    ningbo_deadCount = ningbo["deadCount"];
    //    long ningbo_locationId = ningbo["locationId"]; // 330200

    // -------- Serial Print Real-Time Epidemic Information -----------
    Serial.println("Zhejiang Province COVID-19 Real-Time Data");

    Serial.println("-----------------------------------------");

    Serial.print("Zhejiang:	Confirmed:");
    Serial.print(zj_confirmedCount);
    Serial.print("\tCured:");
    Serial.print(zj_curedCount);
    Serial.print("\t	Death:");
    Serial.println(zj_deadCount);

    Serial.print("Hangzhou:	Confirmed:");
    Serial.print(hangzhou_confirmedCount);
    Serial.print("\tCured:");
    Serial.print(hangzhou_curedCount);
    Serial.print("\t	Death:");
    Serial.println(hangzhou_deadCount);

    Serial.print("Ningbo:	Confirmed:");
    Serial.print(ningbo_confirmedCount);
    Serial.print("\tCured:");
    Serial.print(ningbo_curedCount);
    Serial.print("\t	Death:");
    Serial.println(ningbo_deadCount);

    Serial.println();

  } else {
    Serial.println("GET Error.");
  }

  http.end();
}
In the timerCallback() callback function, initialize an HTTPClient object http and use http.begin(apiUrl) to access the API address, then use http.GET() to download the corresponding data and save it as a String array with http.getString().
Then use the following code to parse the result into JSON format and recursively parse the data according to the JSON structure.
DynamicJsonBuffer jsonBuffer(512);
JsonObject& resultsJson = jsonBuffer.parseObject(results);
Upload the program, and now we can view the corresponding data in the serial monitor.
## Display Data on OLED Screen
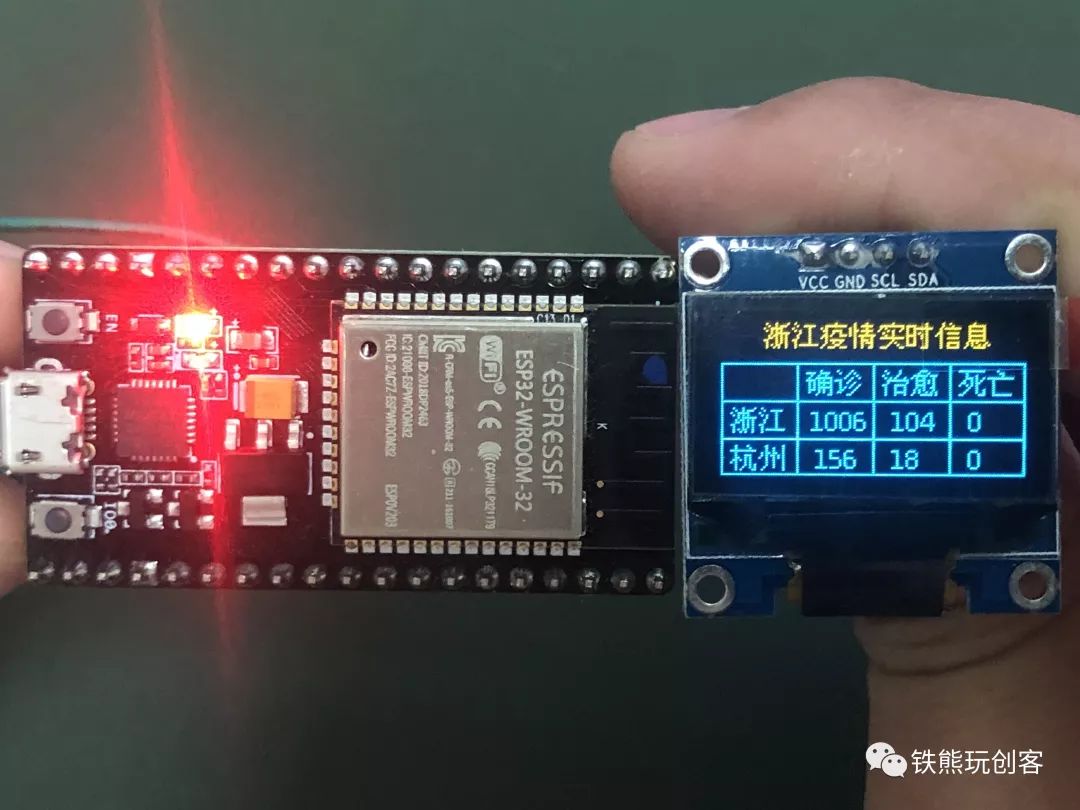
However, we cannot always check the data in the serial monitor, so for convenience, we can display the data on the OLED screen; here we choose the OLED 12864 display to show the data, which is also the display screen that comes with the ESP32 development board.
First, include the U8g2lib.h library at the beginning of the program, which is used to control the OLED screen display content, then initialize the display object u8g2. There are two common sizes for the OLED 12864: 1.3 inches and 0.96 inches; you can choose the corresponding initialization program according to your screen size and the corresponding display control chip; the screen size corresponding to the ESP32 development board is 1.3 inches.
Next, initialize the u8g2 object in the setup() and set the font to u8g2_font_wqy12_t_gb2312a, which is a Song font set containing more than 4000 commonly used characters, and the font size can be set to 12, 13, 14, 15, or 16. Here, since the content to be displayed is relatively large, we set it to the smallest size of 12 points.
#include <U8g2lib.h>

// other codes ...

// For selected display, comment out the corresponding program
// 1.3 inch OLED 12864 display
U8G2_SH1106_128X64_NONAME_F_HW_I2C u8g2(U8G2_R0, U8X8_PIN_NONE);
// 0.96 inch OLED 12864 display
//U8G2_SSD1306_128X64_NONAME_F_HW_I2C u8g2(U8G2_R0, U8X8_PIN_NONE);

void setup() {
  // Initialize OLED display
  u8g2.begin();
  u8g2.enableUTF8Print();
  u8g2.setFont(u8g2_font_wqy12_t_gb2312a);
  u8g2.setFontPosTop();
  u8g2.clearDisplay();

  // setup codes ...
}

void loop() {
  // loop codes ...
}

// Timer callback function
void timerCallback() {
  // other codes ...

  u8g2.firstPage();
  do
  {
    displayData();
  }
  while (u8g2.nextPage());
}

// Display real-time epidemic data on OLED
void displayData() {
  u8g2.clearDisplay();

  // Draw table
  u8g2.drawFrame(0, 16, 128, 48);
  u8g2.drawLine(0, 32, 127, 32);
  u8g2.drawLine(0, 48, 127, 48);
  u8g2.drawLine(32, 16, 32, 63);
  u8g2.drawLine(64, 16, 64, 63);
  u8g2.drawLine(96, 16, 96, 63);

  // Title
  u8g2.setCursor(18, 2);
  u8g2.print("Zhejiang Epidemic Real-Time Information");

  // Table categories
  u8g2.setCursor(36, 20);
  u8g2.print("Confirmed");
  u8g2.setCursor(68, 20);
  u8g2.print("Cured");
  u8g2.setCursor(100, 20);
  u8g2.print("Death");

  // Zhejiang situation
  u8g2.setCursor(4, 36);
  u8g2.print("Zhejiang");
  u8g2.setCursor(38, 36);
  u8g2.print(zj_confirmedCount);
  u8g2.setCursor(72, 36);
  u8g2.print(zj_curedCount);
  u8g2.setCursor(104, 36);
  u8g2.print(zj_deadCount);

  // Hangzhou situation
  u8g2.setCursor(4, 52);
  u8g2.print("Hangzhou");
  u8g2.setCursor(40, 52);
  u8g2.print(hangzhou_confirmedCount);
  u8g2.setCursor(72, 52);
  u8g2.print(hangzhou_curedCount);
  u8g2.setCursor(104, 52);
  u8g2.print(hangzhou_deadCount);
}
Finally, in the timerCallback() callback function, call the OLED screen display function displayData().
After uploading the program, you can view the real-time COVID-19 data on the ESP32 development board with a built-in OLED screen or on the NodeMCU-32S (ESP32 development board, requires external OLED screen).

Thus, the “Real-Time COVID-19 Data Display” is completed.
# Code Download
Follow this public account “Tie Xiong Play Maker” and reply “Epidemic” to get the complete code.
# Related Recommendations
## 51maker WeChat Official Account
51maker is a WeChat official account maintained by a team of teachers from all over the country, dedicated to Scratch programming and maker introductory course development, providing frontline teachers with resources such as micro-videos, teaching materials, and teaching designs, contributing to the popularization of programming and maker education.
## Knowledge Planet Maker Education Energy Station
Activate course production sharing, realize knowledge monetization! The energy station is a paid knowledge community that gathers a large number of excellent teachers, with high-quality maker education content shared almost every day. You can scan the QR code below to join for a fee; this is my recommendation code, and you can get a discount, and of course, I will also receive some returns.


I know you are watching!