Hello everyone, this article introduces the MQTT protocol and how to use the MQTT client and develop it in the OpenWrt system, along with relevant example code.
Introduction to MQTT
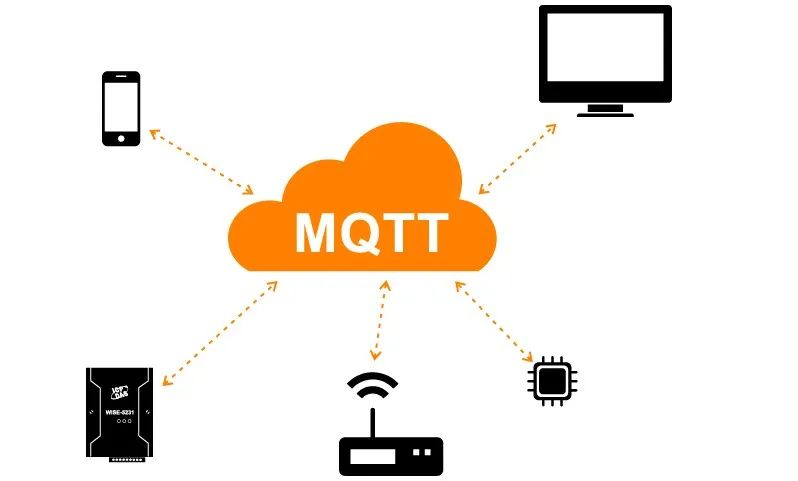
MQTT (Message Queuing Telemetry Transport) is a lightweight communication protocol designed for transmitting messages in low bandwidth and unstable network environments. It was originally developed by IBM to connect remote devices and sensors to the network and supports a publish/subscribe model for message communication.
MQTT is widely used in the Internet of Things (IoT) field, where a large number of devices need to communicate and exchange data in real time. It adopts a publish/subscribe model, where the sender of the message (publisher) publishes the message to a specific topic, and subscribers can selectively subscribe to topics of interest to receive corresponding messages.
Features of MQTT
Here are some key features of MQTT:
Lightweight: The design of MQTT is very lightweight, with a very small protocol header and a small amount of data transmitted, making it suitable for bandwidth-limited network environments such as low-speed, high-latency, or unstable networks.
Simple: The MQTT protocol specification is relatively simple and easy to implement and deploy. It defines a small number of message types and protocol operations, allowing developers to get started quickly.
Asynchronous Communication: MQTT uses an asynchronous communication model, where the publisher sends a message and does not need to wait for a response from the receiver, allowing it to continue executing other operations. This asynchronous communication model is suitable for operation in resource-limited devices and networks.
Reliability: MQTT supports three different message delivery quality (QoS) levels: QoS 0 (at most once), QoS 1 (at least once), and QoS 2 (exactly once). This allows for the selection of the appropriate message delivery guarantee level based on application requirements.
Network Adaptability: MQTT can adapt to unstable network conditions, such as network interruptions and reconnections. It has a mechanism for automatic reconnection after disconnection, ensuring reliable message transmission.
Publish and Subscribe Model
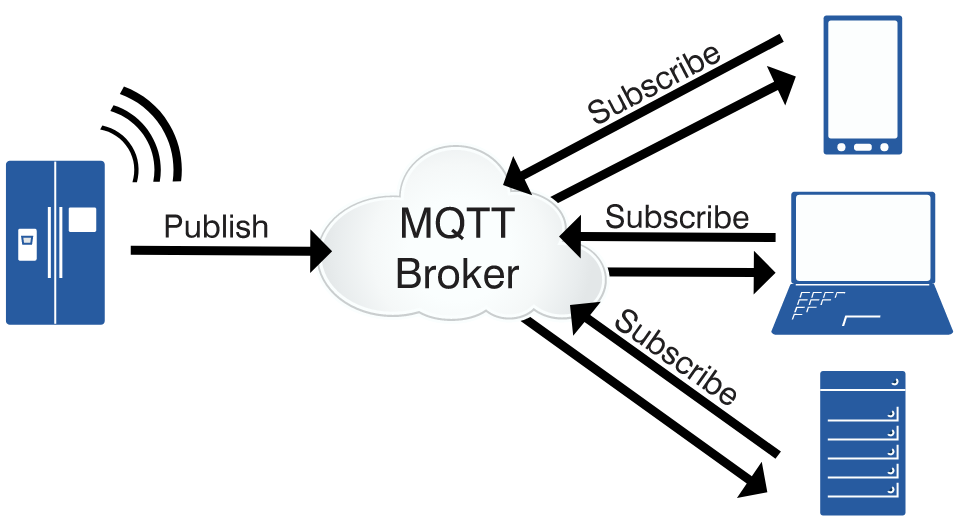
Publisher: The publisher is the sender of the message, publishing messages to a specific topic. There can be one or more publishers.
Subscriber: The subscriber is an entity interested in the messages, selectively subscribing to one or more topics. Once subscribed to a topic, it will receive the corresponding messages.
MQTT Broker: The MQTT broker is middleware responsible for receiving messages sent by publishers and routing them to the corresponding subscribers. It maintains a registry of topics and subscriptions and ensures reliable message delivery.
The workflow is as follows:
The publisher publishes a message to a specific topic.
The MQTT broker receives the message and routes it to the corresponding subscribers based on the subscriber registration information.
The subscriber receives the message published by the publisher and processes it accordingly.
Through the publish/subscribe model, MQTT allows for decoupling and flexibility, as there is no need for a direct point-to-point connection between publishers and subscribers; instead, messages are relayed and routed through the MQTT broker. This model is very suitable for large-scale communication and data exchange between devices in the Internet of Things.
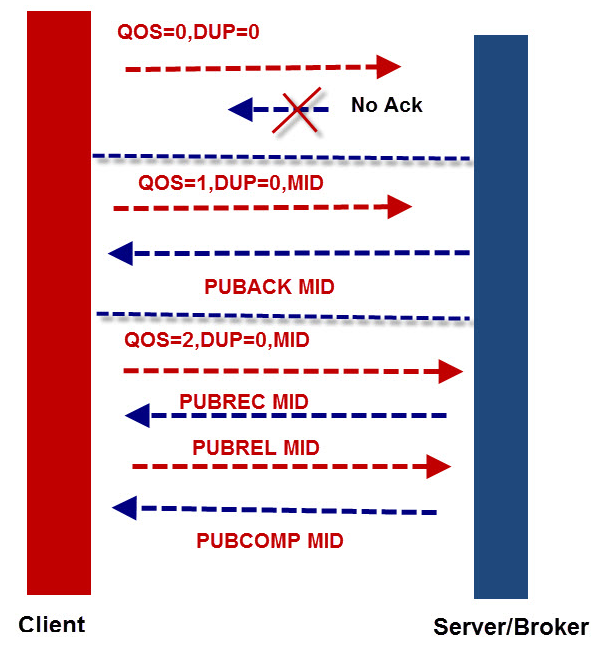
MQTT QoS
The MQTT (Message Queuing Telemetry Transport) protocol supports three different QoS (Quality of Service) levels to control message reliability and transmission guarantees. Here are the three QoS levels of MQTT:
QoS 0 (At Most Once):
At QoS 0 level, messages are transmitted with “at most once” delivery, meaning there is no acknowledgment mechanism. After a message is published, the publisher does not receive confirmation about whether the message was successfully transmitted or delivered. The MQTT broker will make its best effort to deliver the message to the subscriber, but message loss or duplication may occur. This level is suitable for scenarios where reliability requirements for message transmission are not high, such as temporary updates of sensor data.
QoS 1 (At Least Once):
At QoS 1 level, messages are transmitted with “at least once” delivery, ensuring that they are transmitted at least once. After a publisher sends a message, it waits for the MQTT broker to send a confirmation message (PUBACK) to confirm the receipt of the message.
If the publisher does not receive the confirmation message, it will resend the same message until it receives confirmation. The MQTT broker will ensure that the message is transmitted at least once to the subscriber, but duplication may occur. This level is suitable for scenarios where reliability requirements for message transmission are higher, such as the delivery of control commands.
QoS 2 (Exactly Once):
At QoS 2 level, messages are transmitted with “exactly once” delivery, ensuring that they are transmitted only once. After a publisher sends a message, it waits for the MQTT broker to send two confirmation messages (PUBREC and PUBCOMP) to confirm the receipt and completion of the message. The MQTT broker will ensure that the message is transmitted only once to the subscriber, without duplication.
This level provides the highest message transmission reliability but also incurs higher network overhead. This level is suitable for scenarios with very high reliability requirements for message transmission, such as financial transactions or strict data synchronization. Choosing the appropriate QoS level depends on the application’s requirements for message transmission reliability and network overhead. Higher QoS levels provide more reliable transmission but also increase network overhead. Therefore, it is necessary to select the appropriate level based on specific scenario needs.
Using Mosquitto in OpenWrt
Plugin Installation
The default installation does not include the Mosquitto client and broker, so we can manually install the relevant plugins. To test, we need to install both the broker and client, starting with updating the OpenWrt software source.
opkg update
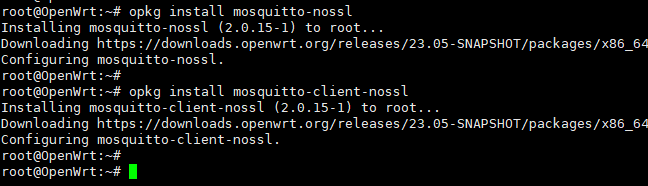
Then, use the following commands to install the Mosquitto broker and client. Here we choose the nossl version, which does not require SSL encryption for easier testing.
opkg install mosquitto-nossl
opkg install mosquitto-client-nossl
Mosquitto Service
After installation, the broker and client can be used. First, we need to start the Mosquitto broker service, 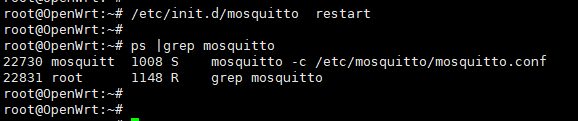
The Mosquitto broker service configuration file is located in the /etc/mosquitto/ directory, where we can modify server-related information such as the listening port, interface, IP address, etc.
root@OpenWrt:~# ls /etc/mosquitto/mosquitto.conf
/etc/mosquitto/mosquitto.conf
root@OpenWrt:~#
Mosquitto Client
The Mosquitto client consists of sub and pub parts, used for subscribing and publishing respectively.
To subscribe to a topic:
mosquitto_sub -h <MQTT Broker IP> -p <MQTT Broker Port> -t <Topic>
Where
Example:
mosquitto_sub -h 192.168.1.1 -p 1883 -t test/topic
To publish to a topic:
mosquitto_pub -h <MQTT Broker IP> -p <MQTT Broker Port> -t <Topic> -m <Message>
Where
Example:
mosquitto_pub -h 192.168.1.1 -p 1883 -t test/topic -m "Hello, MQTT!"
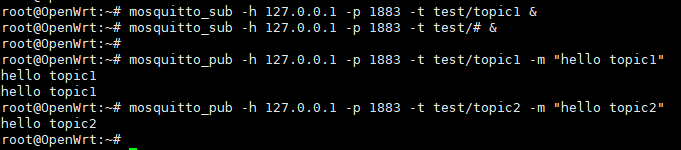
Running result: Since both the subscriber and publisher clients are local, use the localhost address 127.0.0.1.
root@OpenWrt:~# mosquitto_sub -h 127.0.0.1 -p 1883 -t test/topic &
root@OpenWrt:~# mosquitto_pub -h 127.0.0.1 -p 1883 -t test/topic -m "hello MQTT."
root@OpenWrt:~# hello MQTT.
When subscribing to a topic, we can also use wildcards. The most common wildcard is “#”, which can match multiple levels of topics. For example, if you subscribe to the topic “test/#”, you will receive all topics that start with “test/”, such as “test/topic1”, “test/hello”, etc. In the following examples, both subscribed to “test/#” and “test/topic1” will receive the message when “test/topic1” is published, while only one will receive the message when “test/topic2” is published.
In addition to the wildcard “#”, there are also wildcards like “$” and “+”, which are not explained here.
Using a cloud-based public broker, EMQX provides a public free broker for developers to test. Note that it should not be used in production environments and is for testing purposes only. We can prepare two different devices, both connected to broker.emqx.io. These two devices can be in different areas, and through the public broker, communication between the two devices can be easily achieved.
-
Client 1 subscribes to the openwrt/topic message
mosquitto_sub -h broker.emqx.io -p 1883 -i client_001 -t openwrt/topic
-
Client 2 sends a message to the openwrt/topic topic, allowing client 1 to receive the message
mosquitto_pub -h broker.emqx.io -p 1883 -t openwrt/topic -i client_002 -m "hello client1, I am from client2"

Developing Based on Libmosquitto in OpenWrt
Earlier, I demonstrated the use of the Mosquitto client, but the command-line client is only for testing. In the development process, we need to customize messages and be able to parse messages in real time, which is not as convenient with command-line handling. We need to call the underlying API of Mosquitto to achieve the desired functionality.
Libmosquitto Library
The Mosquitto library is integrated by default in the OpenWrt system and can be directly called. The corresponding dependent libraries are: libmosquitto-nossl for non-SSL encryption and libmosquitto for SSL encryption.
API Interface Details
mosquitto_lib_init: Initializes the libmosquitto library. This function should be called first before using other libmosquitto functions.
mosquitto_lib_version: Retrieves the version information of the libmosquitto library.
mosquitto_new: Creates a new Mosquitto object (MQTT client).
mosquitto_connect: Establishes a connection with the MQTT broker server.
mosquitto_disconnect: Disconnects from the MQTT broker server.
mosquitto_publish: Publishes a message to a specified topic.
mosquitto_subscribe: Subscribes to one or more topics.
mosquitto_unsubscribe: Unsubscribes from one or more topics.
mosquitto_loop_start: Starts a thread to handle the MQTT message loop.
mosquitto_loop_forever: Starts a blocking loop to handle MQTT messages.
mosquitto_loop: Handles MQTT messages in non-blocking mode.
mosquitto_message_callback_set: Sets the callback function for receiving subscribed messages.
mosquitto_username_pw_set: Sets the username and password used for connection.
mosquitto_tls_set: Enables SSL/TLS encryption for the MQTT connection.
mosquitto_tls_opts_set: Sets SSL/TLS options such as CA certificate, client certificate, and private key.
mosquitto_tls_insecure_set: Sets whether to allow insecure options in SSL/TLS connections.
mosquitto_will_set: Sets the will message, which is published when the client disconnects unexpectedly.
Implementing a Message Subscription Program Based on Libmosquitto
Source Code
#include <unistd.h>
#include <stdio.h>
#include <stdlib.h>
#include <string.h>
#include <mosquitto.h>
#include <sys/time.h>
#include <sys/sysinfo.h>

struct mosquitto *g_test_mosq = NULL;

void mqtt_connect_callback(struct mosquitto *mosq, void *userdata, int result)
{
 printf("connect to mqtt server ok\n");
 if (MOSQ_ERR_SUCCESS != mosquitto_subscribe(mosq, NULL, "openwrt/#", 0))
 {
  printf("sub topic openwrt/# failed...\n");
 }
 else{
  printf("sub topic openwrt/# failed...\n");
 }
}

void mqtt_disconnect_callback(struct mosquitto *mosq, void *userdata, int result)
{
 if (result)
  printf("disconnect %s\n", mosquitto_connack_string(result));
 else
  printf("disconnect from mqtt server.\n");
}

void mqtt_sub_callback(struct mosquitto *mosq,
        void *userdata,
        int mid,
        int qos_count,
        const int *granted_qos)
{
 printf("sub callback\n");
}

void mqtt_msg_callback(struct mosquitto *mosq,
        void *userdata,
        struct mosquitto_message *message)
{
 printf("callback recv mqtt msg, topic = %s, payload = %s\n", message->topic, message->payload);
}

struct mosquitto *connect_to_mqtt_server(char *server_ip)
{
 struct mosquitto *mosq = NULL;
 int rc;
 char mqtt_user[128] = {0};
 char mqtt_pwd[128] = {0};
 char client_id[128] = {0};
    struct timeval tv;
    gettimeofday(&tv, NULL);
 mosquitto_lib_init();
 snprintf(client_id, sizeof(client_id), "test_%d", tv.tv_sec);
 printf("connect to mqtt server..client_id=%s\n", client_id);
 mosq = mosquitto_new(client_id, true, NULL);

 if (!mosq)
 {
  return NULL;
 }
#if 0
 rc = mosquitto_username_pw_set(mosq, "test", "test");
 if (rc)
 {
  mosquitto_destroy(mosq);
  return NULL;
 }
#endif

 mosquitto_connect_callback_set(mosq, mqtt_connect_callback);
 mosquitto_message_callback_set(mosq, mqtt_msg_callback);
 mosquitto_subscribe_callback_set(mosq, mqtt_sub_callback);
 mosquitto_disconnect_callback_set(mosq, mqtt_disconnect_callback);
 rc = mosquitto_connect(mosq, server_ip, 1883, 30);
 if (rc)
 {
  printf("Unable to connect mqtt server rc=%d\n", rc);
  mosquitto_destroy(mosq);
  return NULL;
 }
 return mosq;
}

int mqtt_bcast_msg(char *api, char *data, int len)
{
 char topic[128] = {0};
 int mid;
 if (!api || !data || len == 0)
  return -1;
 if (!g_test_mosq)
  return -1;
 sprintf(topic, "openwrt/%s", api);
 return mosquitto_publish(g_test_mosq, &mid, topic, len, data, 0, 0);
}

int main(int argc, char *argv[]){
 char *host = NULL;
 if (argc < 2){
  host = "127.0.0.1";
  printf("use default ip: 127.0.0.1\n");
 }
 else{
  host = argv[1];
  printf("use ip: %s\n", host);
 }
 g_test_mosq = connect_to_mqtt_server(host);
 if (!g_test_mosq){
  printf("connect to server %s failed\n", host);
  exit(0);
 }
 mosquitto_loop_forever(g_test_mosq, -1, 1);
 mosquitto_destroy(g_test_mosq);
 mosquitto_lib_cleanup();
 return 0;
}
Example Source Code Compilation Copy the source code package to the OpenWrt source package directory
The complete OpenWrt source package and PDF tutorial can be downloaded from my knowledge planet
Click to view the introduction to the knowledge planet
Enable the mqtt_test macro and generate default dependency configuration
echo "CONFIG_PACKAGE_mqtt_test=y" >>.config
make defconfig
Compile
make package/mqtt_test/compile V=s
Plugin installation: mqtt_test depends on the libmosquitto library, and libmosquitto depends on libcares, so three plugins need to be installed.
-
libcares -
libmosquitto-nossl -
mqtt_test
Upload the plugins to the OpenWrt system using WinSCP or other tools and execute the following commands to install (using X86 as an example)
opkg install libcares_1.18.1-1_x86_64.ipk
opkg install libmosquitto-nossl_2.0.15-1_x86_64.ipk
opkg install mqtt_test_1.0-1_x86_64.ipk
Run:
mqtt_test connects to the local broker by default, but you can also specify the IP
If an error occurs when running, it indicates that the server has not started or the parameters are abnormal; please confirm that the Mosquitto service has started.
use default ip: 127.0.0.1
connect to mqtt server..client_id=test_1686993389
Unable to connect mqtt server rc=14
connect to server 127.0.0.1 failed
Successful run
root@OpenWrt:~# mqtt_test
use default ip: 127.0.0.1
connect to mqtt server..client_id=test_1686993598
connect to mqtt server ok
sub callback
Now an MQTT client has been started, subscribed to openwrt/#. You can use the mosquitto_pub tool to send commands to this client. The current processing method of the client is to output the received message. In actual development, it can parse commands and execute corresponding commands, such as rebooting when receiving a reboot command.
The pub command is as follows:
root@OpenWrt:~# mosquitto_pub -h 127.0.0.1 -p 1883 -t openwrt/send_msg -m "hello openwrt"
root@OpenWrt:~# mosquitto_pub -h 127.0.0.1 -p 1883 -t openwrt/send_msg -m "你好"
root@OpenWrt:~# mosquitto_pub -h 127.0.0.1 -p 1883 -t openwrt/send_msg -m "你好"
root@OpenWrt:~# mosquitto_pub -h 127.0.0.1 -p 1883 -t openwrt/send_msg -m "reboot"
root@OpenWrt:~# mosquitto_pub -h 127.0.0.1 -p 1883 -t openwrt/send_msg -m "reboot"
The client output is as follows:
callback recv mqtt msg, topic = openwrt/send_msg, payload = hello openwrt
callback recv mqtt msg, topic = openwrt/send_msg, payload = 你好
callback recv mqtt msg, topic = openwrt/send_msg, payload = 你好
callback recv mqtt msg, topic = openwrt/send_msg, payload = reboot
callback recv mqtt msg, topic = openwrt/send_msg, payload = reboot
If the client connects to the cloud broker, remote operations on devices can be achieved, such as remotely rebooting devices and configuring delivery.
Conclusion
In IoT development, we often use the MQTT protocol, commonly for communication between edge devices and the cloud, reporting real-time status, remote management, etc. It can also facilitate communication between nodes within a local area network, such as implementing mesh data synchronization and centralized management of AC. With the MQTT protocol, we do not need to implement a private protocol through low-level sockets but can focus solely on business processing, greatly improving program stability. However, MQTT also has some drawbacks; the publish/subscribe model makes real-time reply messages somewhat cumbersome and is not suitable for more complex state interactions.
If you also want to engage in OpenWrt development, you can join my knowledge planet (OpenWrt Development Circle), where I will periodically share my notes and source code for OpenWrt development, covering OpenWrt plugin development, Linux application development, Linux kernel development, computer networking, etc. You can also ask me questions at any time to avoid detours.
OpenWrt Development Circle Knowledge Planet Introduction