Introduction
Previously, I wrote two blogs introducing how to communicate between Raspberry Pi and STM32 chips. Here are the links:
1. Chassis Control of Shopping Robot with STM32F427IIH6 Chip Communication Data Scheme
(*https://www.guyuehome.com/33278)
2. Duplex Communication between STM32F427IIH6 Chip and Raspberry Pi via DMA+USART
(*https://www.guyuehome.com/33264)
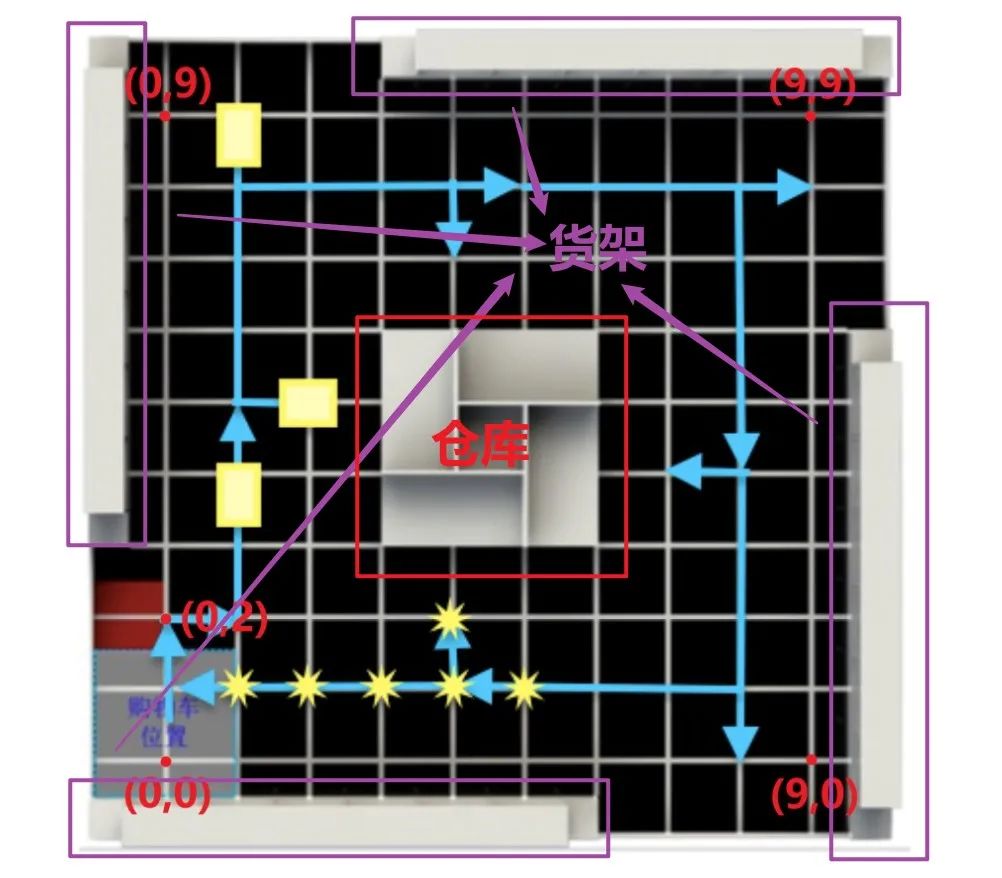
These two blogs technically achieved communication between Raspberry Pi and STM32 chips. Our ultimate goal is to make Raspberry Pi the system’s master control to control the chassis, enabling it to complete the tracking task along a specific route on the entire map. The image below shows the competition map, where I marked the positions of five points. Based on the pattern of these five points, we can write out the coordinates of every point on the field, and I will use these coordinates to complete the line-following logic for the entire map.

Logical Analysis
Flowchart
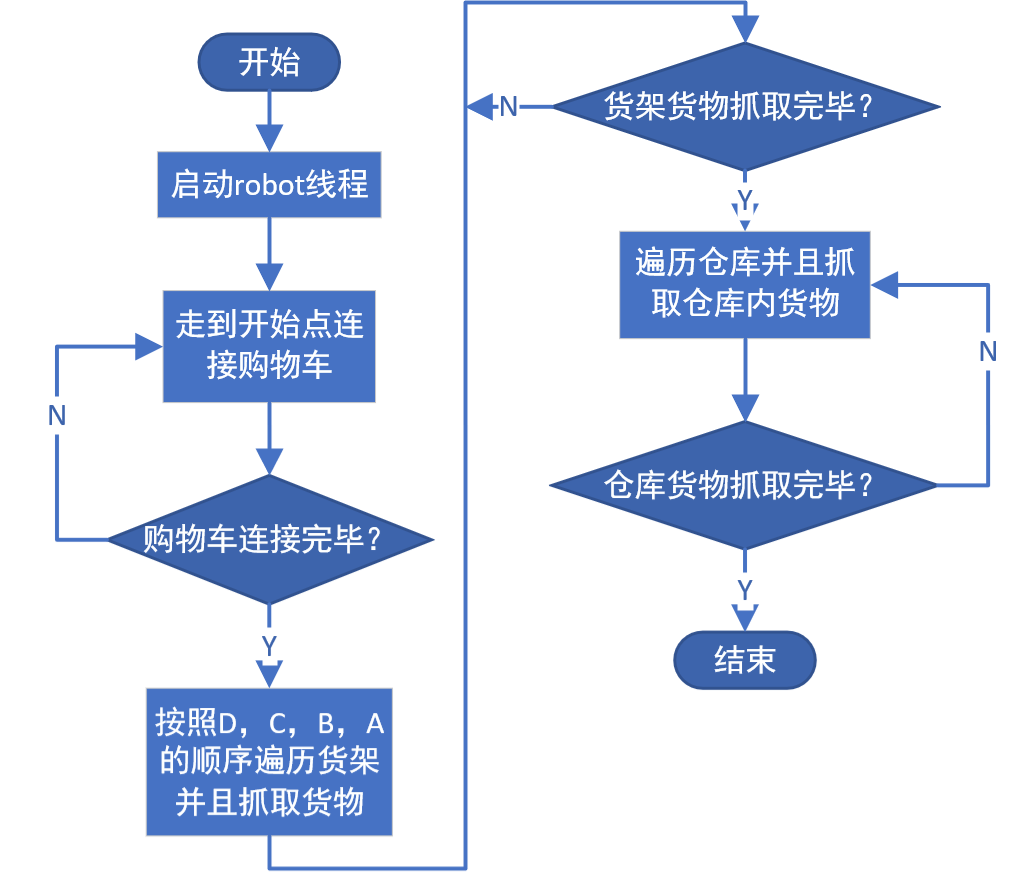
Our objective is to follow the flowchart below. Specifically, how the chassis moves, such as the specific actions of the gripping mechanism to pick up goods, and the specific tracking methods of the chassis are all completed by the chassis master control chip (chassis subsystem).
According to the principle of upward abstraction, all actions at the bottom level are abstracted upward into a command for Python to call. Ultimately, in the master control Raspberry Pi, Python dynamically calls the functions of the lower-level subsystem based on the task logic requirements to complete the corresponding actions.

Natural Language
Describing the above process in natural language, we first need to start from the starting point, then connect to the shopping cart. After the shopping cart is connected, the shopping robot will traverse in the order of D, C, B, A shelves, and I will determine the shopping robot’s route using coordinate points. During traversal, the shopping robot will walk on the second line outside the shelves and rely on the camera to identify items inside the shelves. If it is an item to be picked, the shopping robot will go inside to take the item, then back out to return to the predetermined trajectory. After traversing the shelves, it will then traverse the warehouse. The plan for traversing the warehouse is similar to that of the shelves. If the camera captures goods, it will go inside to take things; if not, it will continue traversing. Once the warehouse is fully traversed, the entire task is completed, and finally, it will return to the starting point to drop off the shopping cart.
Program Implementation
Starting Threads
Since the entire shopping cart system needs to perform recognition and control, two threads are opened: one thread for image recognition and one thread for control. The image recognition thread will be shared in a future blog, and now I will focus on explaining the control thread. As we can see, rob is an object of the Robot class, and the entire system’s control begins with the rob object’s gogo() method. So what exactly does this gogo() do? Let’s dive in and take a look.
q1 = Queue()q2 = Queue()def robot(q1, q2): rob = Robot(q1, q2) rob.gogo() if __name__ == '__main__': p1 = Process(target=robot, args=(q1, q2)) p2 = Process(target=tf, args=(q1, q2)) p1.start() p2.start() p1.join() p2.join()In the Robot class, there is a gogo() function that executes three actions:
1. Go to the starting position (connect to the shopping cart)
2. Traverse the shelves
3. Traverse the warehouse
For simplicity, let’s focus on the logic inside run_to_start() (the methods for traversing the shelves (task_shelf()) and traversing the warehouse (task_store()) are similar to the starting position (run_to_start()), but due to the complexity of some details, I won’t elaborate here; I will write a dedicated blog on this later).
class Robot(Control, Capture): def __init__(self, q1=None, q2=None): Control.__init__(self) Capture.__init__(self) self.location = (0, 2) self.q1 = q1 self.q2 = q2 self.tiers = [False, False] # Shopping cart assembly def start_init(self): self.run_to_start() self.location = (1, 1) print("shopping_car connect over") def set_location(self, location): self.location = location def get_location(self): print(self.location) def gogo(self): self.start_init() self.task_shelf() self.task_store()Motion Control
The run_to_start() function performs a simple task: it breaks down the actions of the shopping robot into specific movements defined by specific numbers of grid movements. The shopping robot’s route from the starting point to the connection point of the shopping cart is decomposed into specific movements of a defined number of grids, which are achieved through the move_by_grid() function. Let’s take a look at what this function does.
def move_by_grid(self, direction, distance=''): # print('move by grid') self.port_chassis.write((direction + str(distance)).encode()) self.time1 = time.time() print(direction + str(distance)) self.wait_for_act_end_signal_chassis(direction, distance)Oh, so that’s how it works! Do these two functions look familiar? If you don’t remember, please check this blog: Duplex Communication between STM32F427IIH6 Chip and Raspberry Pi via DMA+USART
(*https://www.guyuehome.com/33264)
At this point, everyone should understand that once the grid to move and how to move is calculated, Python will send commands to the chassis master control chip (chassis subsystem) through the serial port, allowing the chassis subsystem to complete the corresponding actions, thus ultimately achieving Python’s control of the shopping robot to complete the predetermined trajectory.
def run_to_start(self): self.move_by_grid(dir_up, 1) # self.move_by_grid(dir_back, 1) self.action_chassis(dir_left, 1) self.move_by_grid(dir_back, 1) self.action_chassis(dir_right, 1) self.move_by_grid(dir_up, 1) self.action_chassis(dir_left, 1) def wait_for_act_end_signal_chassis(self, ret=None, distance=0): print('waiting chassis...') while True: sig = self.port_chassis.readline().decode() # print(self.time2 - self.time1) sig = sig[0:2] print(sig) # if sig == 'HI': self.time2 = time.time() print(self.time2 - self.time1) if self.time2 - self.time1 < 1.0 and self.flag == False and distance == 1: print('1 step deal error') self.flag = True if (ret == dir_up or ret == dir_back): self.move_by_grid(ret, 1) else: # left or right self.move_by_grid(ret, 1) if self.time2 - self.time1 < 2.8 and self.flag == False and distance == 3: print('3 step deal error') self.flag = True self.move_by_grid(ret, 1) print('chassis finished ^_^') self.flag = False breakHere, I will also analyze the command data frame. For example, sending ‘dir_up’ indicates that the chassis subsystem should move forward in mode A (the related content of mode A will be introduced in future blogs; the second number 0 represents mode A, while the number 1 represents mode B). However, how many grids to move depends on the actual situation. Therefore, in the def move_by_grid() function, there is a statement: self.port_chassis.write((direction + str(distance)).encode()), which adds the specific number of grids to move after dir_up.
dir_up = '@cmd 1 0 'dir_left = '@cmd 2 0 'dir_right = '@cmd 3 0 'dir_back = '@cmd 4 0 'The course “Joint Robots – Spatial Description and Transformation” will guide everyone to learn the basics of robotics – spatial description and transformation. To define and use mathematical quantities that express posture, we must define coordinate systems to provide the rules for expression. All issues are discussed with reference to the world coordinate system, defining the posture in reference to the world coordinate system or the Cartesian coordinate system defined by the world coordinate system.

 Click “Read the original text” to see course details