My requirements: Raspberry Pi 3B+, operating system Raspbian-stretch, with both Python 2.7.13 and Python 3.5.3 versions.
-
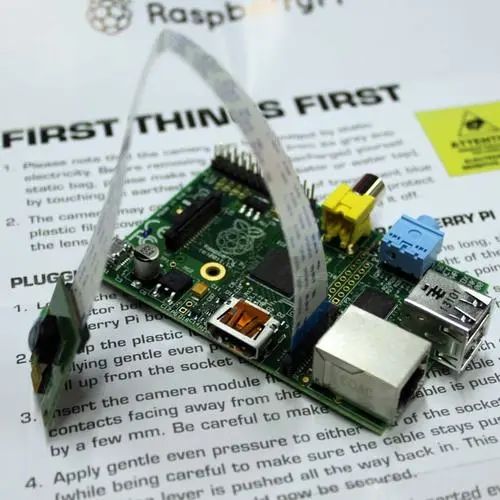
Prepare the Hardware: First, ensure you have obtained a CSI interface camera module compatible with the Raspberry Pi. Common models include the official Raspberry Pi camera module and other third-party camera modules.
-
Turn Off the Raspberry Pi Power: Before operating the Raspberry Pi, make sure to turn it off to avoid any circuit damage or accidents.
-
Connect the Camera: The CSI interface camera is connected to the Camera interface of the Raspberry Pi. Pay attention to the direction between the camera module and the interface, ensuring correct insertion. Typical CSI interface cameras have a ribbon cable with a metal latch, which needs to be released and carefully pushed in until it reaches the bottom.
-
Power On the Raspberry Pi: After connecting the camera, power the Raspberry Pi back on and wait for the system to boot up.
-
Enable Camera Support: Open the Raspberry Pi terminal or log in remotely via SSH, and use the following command to enable camera support:
sudo raspi-configIn the configuration interface, select “Interfacing Options” and then select “Camera”, following the prompts to enable the camera.
Advanced Options select Expand Filesystem to extend the root directory to this SD card, making full use of the SD card’s storage space. If this step is not performed, subsequent commands may hang. Exit the settings interface and restart the Raspberry Pi.
-
Enter the following command in the command line:This command means to open the modules file with the nano editor:
sudo nano /etc/modulesAdd a line at the end of this file:
bcm2835-v4l27. Enter the command:
vcgencmd get_cameraUse the following command to take a picture and save it as image.jpg:
raspistill -o image.jpgsudo apt-get install libopencv-devsudo apt-get install python-opencvAfter installation, enterpython or python2, and press enter
import cv2cv2.__version__9. Install OpenCV running on Python 3 on the Raspberry Pi
Check pip and python versions
# If the pip version is too low, it may not install, need to upgrade, enter in the terminal pip install -U pipInstall the dynamic link libraries that OpenCV depends on
# Enter in the terminal sudo apt install libqt4-testsudo apt install libqtgui4Install OpenCV
# Enter in the terminal sudo pip install opencv-pythonThis step may produce the following error:
THESE PACKAGES DO NOT MATCH THE HASHES FROM THE REQUIREMENTS FILE. If you have updated the package versions, please update the hashes. Otherwise, examine the package contents carefully; someone may have tampered with them. opencv-contrib-python-headless from https://www.piwheels.org/simple/opencv-contrib-python-headless/opencv_contrib_python_headless-3.4.3.18-cp35-cp35m-linux_armv6l.whl#sha256=ff894c0cc7c98b05b7b260a1dc462e7ad0a4220b042072fc0134a2b7a92bc4a5: Expected sha256 ff894c0cc7c98b05b7b260a1dc462e7ad0a4220b042072fc0134a2b7a92bc4a5 Got 4119d8c56d19ef044c1faca317dd10f2bb3b50cbee77426a22feca9b641c5637
Cause Analysis:
The error translates to a mismatch between the hash value and the package
It is likely that the pip source address is abroad, and the download speed is very slow in China, causing download errors due to network issues, leading to a mismatch of the hash value used.
My solution:
Change pip to a domestic source, and use the command below to install third-party packages
sudo pip install opencv-python -i https://pypi.tuna.tsinghua.edu.cn/simpleTest
# Enter in the terminal python3# Import import cv2 as cvprint(cv.__version__)
Want to know more
Quickly scan the code to follow