Introduction
The Raspberry Pi, as a classic microcomputer, is a star product in the Internet of Things and embedded development due to its powerful GPIO and rich expansion interfaces. Among various peripherals, the OV5647 camera module, with its 5-megapixel resolution and support for 1080P video recording, has become a popular choice for Raspberry Pi vision projects. This article will guide you step-by-step on how to connect the OV5647 camera to the Raspberry Pi 3B+ via the CSI interface, complete hardware configuration, enable drivers, take photos and videos, and control it using Python.
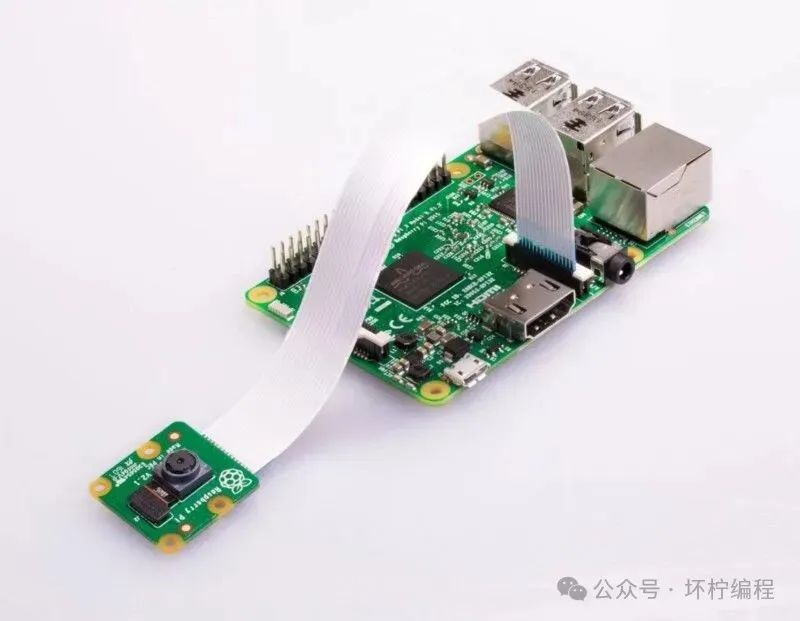
1. Hardware Preparation and Connection
Required Materials
- Raspberry Pi 3B+ (other models like 4B are also applicable)
- OV5647 camera module (with CSI ribbon cable)
- 5V power adapter
- MicroSD card (with Raspberry Pi OS installed)
Steps to Connect the CSI Interface
- Turn off the Raspberry Pi power to avoid damaging the hardware during operation.
- Locate the CSI camera interface on the Raspberry Pi board (between the HDMI and audio interfaces).
- Gently lift the black latch of the CSI interface to a vertical position.
- Insert the OV5647 ribbon cable with the metal contact side facing the HDMI interface into the CSI interface, ensuring it is fully inserted.
- Press down the black latch to secure the ribbon cable, completing the physical connection.
2. System Configuration and Driver Activation
If you are using an older version, you can enable the camera using the following method
1. Enable Camera Interface
Execute the following command via SSH or desktop terminal:
sudo raspi-config
Select<span><span> Interfacing Options → Camera → Yes</span></span> to enable camera support, and reboot to apply changes.
2. Verify Camera Detection
After rebooting, execute:
vcgencmd get_camera
If it returns supported=1 detected=1, it indicates that the camera has been correctly recognized. If it shows supported=1 detected=0, you can try the following operation
ls /dev/video*
Under normal circumstances, our camera device should be at /dev/video0, but if the camera is not recognized, there will be no video0, and supported=1 detected=0 will occur.
3. Basic Function Testing
1. Taking Static Photos
Use the raspistill command to test taking photos:
sudo raspistill -o test.jpg -t 2000 -w 1280 -h 720
-o specifies the output file name-t sets a 2-second delay before taking the photo (to allow for adjustments)-w/-h sets the resolution
The libcamera-hello command is equivalent to the camera’s “hello world” application. It starts the camera and displays a preview window without performing any other operations. For example:
libcamera-hello
This should display a preview window for about 5 seconds. The -t option allows the user to select the duration of the window display, measured in milliseconds. To run the preview indefinitely, use:
libcamera-hello -t 0
You can stop the preview by clicking the close button on the window or using Ctrl-C in the terminal.
2. Recording Video
Use raspivid to record a 10-second video:
raspivid -o test.h264 -t 10000
Convert to MP4 format (requires installing gpac):
MP4Box -add test.h264 test.mp4
4. Python Control of the Camera
Install the Picamera Library
sudo apt install -y python3-picamera2
Example Python script for taking photos
Create capture.py:
import picamera2
from time import sleep

camera = picamera2.Picamera2()
camera.resolution = (1280, 720)
camera.rotation = 180  # Rotate the image (optional)

camera.start()
sleep(2)  # Allow time for sensor exposure
camera.capture_file('python_photo.jpg')
camera.stop()
Video Recording Script
camera.start_preview()
camera.start_recording('video.h264')
sleep(10)
camera.stop_recording()
camera.stop_preview()
5. Advanced Application Scenarios
1. Time-lapse Photography
Take a photo every 10 seconds for 1 hour:
for i in range(360):
    camera.capture(f'timelapse_{i:04d}.jpg')
    sleep(10)
2. Video Stream Transmission
Use OpenCV for real-time image processing:
import cv2
from picamera.array import PiRGBArray

camera.resolution = (640, 480)
raw_capture = PiRGBArray(camera, size=(640,480))

for frame in camera.capture_continuous(
    raw_capture, format="bgr", use_video_port=True):
    image = frame.array
    cv2.imshow("Live Feed", image)
    raw_capture.truncate(0)

    if cv2.waitKey(1) == ord('q'):
        break
6. Common Issues Troubleshooting
1. Camera Not Recognized
Check if the CSI ribbon cable is fully inserted and oriented correctlyEnsure /boot/config.txt or /boot/firmware/config.txt contains:
start_x=1
gpu_mem=128
Update the system:<span><span>sudo apt update && sudo apt full-upgrade</span></span>
2. Blurry/Discolored Images
Remove the camera protective filmAdjust the focus (some OV5647 models have a manual focus ring)Adjust white balance:
camera.awb_mode = 'sunlight' # Optional modes: tungsten, fluorescent, etc.
3. Permission Issues
Add the user to the video group:
sudo usermod -aG video pi
7. Conclusion
With the guidance of this article, you have successfully achieved complete control of the OV5647 camera on the Raspberry Pi 3B+. Whether for simple photo and video capture or complex vision applications combined with AI, this low-cost solution offers endless possibilities for your creativity. Next steps could include:
- Implementing face recognition with TensorFlow Lite
- Building a video surveillance platform based on Flask
- Developing an intelligent security system
Recommended Resources:
Official Picamera documentation: https://picamera.readthedocs.io/en/release-1.13/OpenCV Raspberry Pi Optimization Guide: https://pyimagesearch.com/
Feel free to share your project ideas or issues in the comments! (Original article, please indicate the source when reprinting)
I hope this guide helps you quickly get started with Raspberry Pi vision development! 🎉