 Search on WeChat
 Young Electrician1. Communication between Wecon Touch Screen and Mitsubishi PLC Programming Port
When communicating between the Wecon touch screen and the Mitsubishi 3U PLC programming port, a specific programming cable must be purchased to connect the touch screen and the PLC programming port, and communication parameters must be set. The 3U PLC does not require configuration; just set up the touch screen program, such as selecting the device type, communication protocol, etc., and finally create components for testing.

First, for the hardware part, when buying the touch screen, just tell the seller to help me match a 3U programming port communication cable, and the manufacturer will provide this cable. The pin information of this cable is connected according to the 422 method, where the serial ports 1, 2, 3, and 4 of the touch screen correspond to pins 4, 7, 2, and 1 of the 3U PLC round port, respectively.
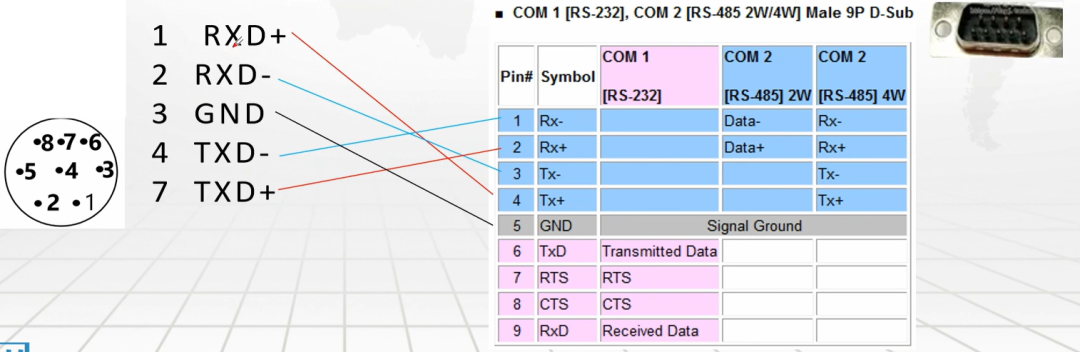
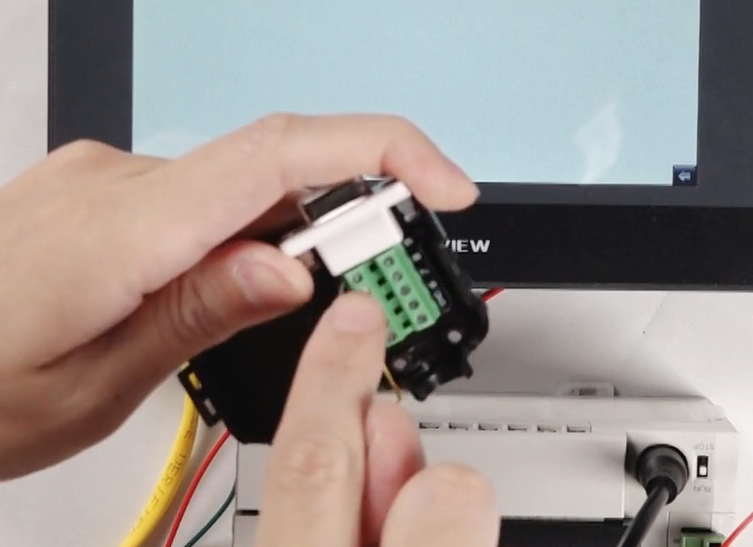
We can use an adapter to connect the pins 1, 2, 3, and 4 of the nine-pin connector to this cable, then connect the other end of the cable to the Mitsubishi programming port, and finally plug this cable into the nine-pin serial port of the touch screen.
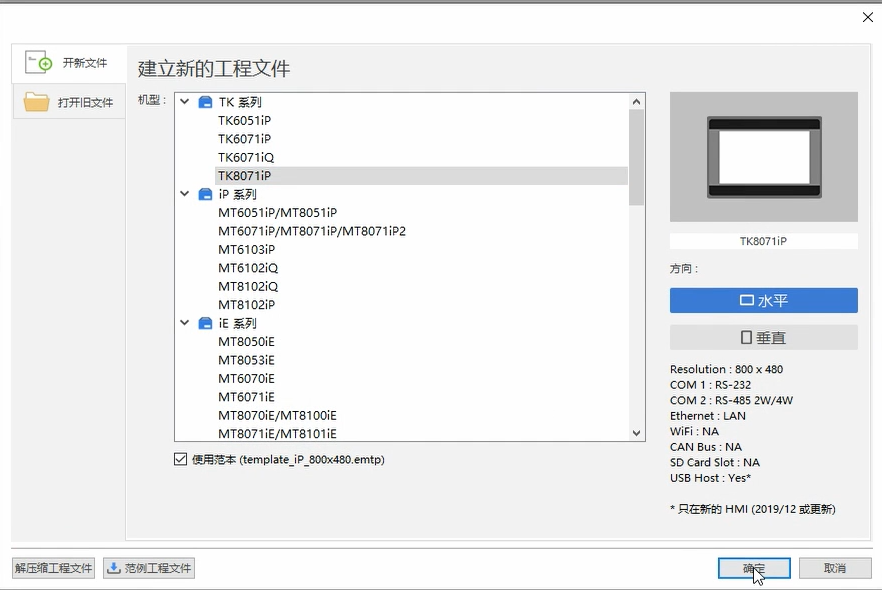
After the hardware is set up, we need to configure the communication parameters. No configuration is needed on the 3U PLC side; we just need to write the touch screen program. Create a new Wecon touch screen program and select the model TK8071.
In the common settings, open the system parameters, and click to add a new device to add our 3U PLC. Enter 3U in the device type, and several corresponding communication protocols will pop up. The programming port corresponds to the second communication protocol below; select it.

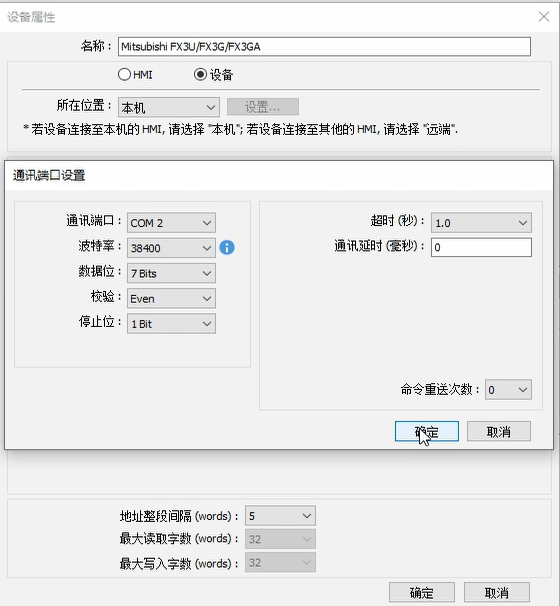
After clicking OK, select COM2, as the wiring pins on the back of the touch screen use the COM2 terminal, which corresponds to our previous wiring. The other communication parameters can be left as default, and no configuration is needed; click OK.
Finally, we can create some components, such as an indicator light to monitor points like X, M, etc., and a button for point Y, selecting the reset type, which will conduct when pressed and disconnect when released. Remember not to select point X, as point X can only be forced through external wiring and cannot be reset controlled like the touch screen; we can only select points Y, M, etc. If we create a button for Y0, we can use a text label to indicate Y0. Write this program into the touch screen.

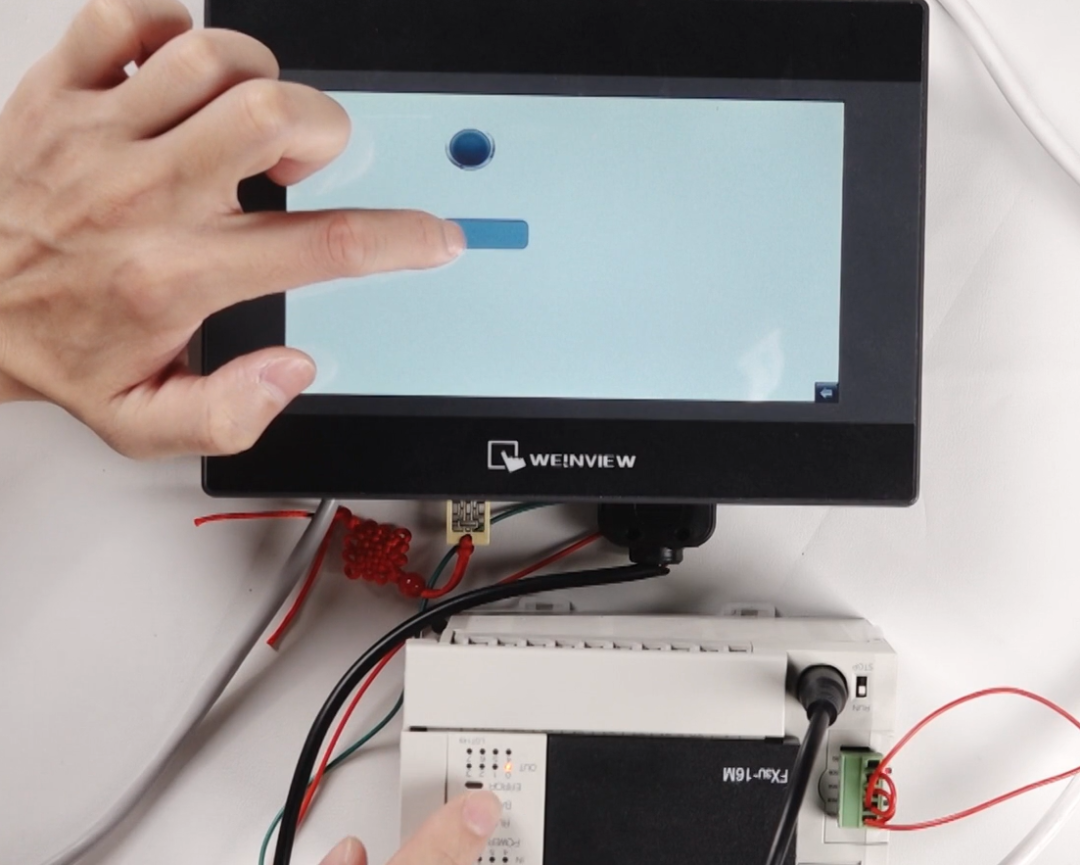
If the touch screen cannot be found, you can directly enter the IP address, such as 192.168.3.251, and press Enter or click download. After the program is downloaded to the touch screen, we can operate it, for example, pressing the Y0 button will light up the Y0 indicator light.
 2. Communication between Wecon Touch Screen and Mitsubishi PLC BD Version
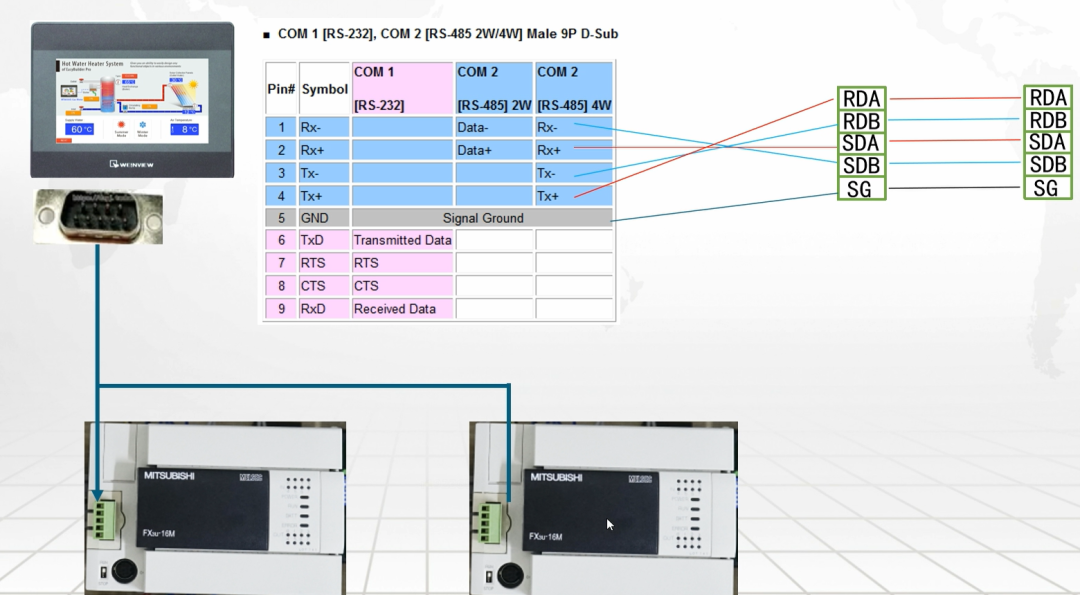
In the communication between the Wecon touch screen and the Mitsubishi PLC BD version, a four-wire connection method is used. Specifically, the pins 1, 2, 3, and 4 of the touch screen correspond to pins 4, 3, 2, and 1 of the PLC, respectively, connected in order. If there is another PLC, it can be connected in parallel, with a maximum of 15 Mitsubishi PLCs controllable, as the station number of Mitsubishi PLC can only be set to a maximum of 15.
Next, set the communication parameters of the PLC. In the PLC system settings, select PLC system settings 2, then check CH1 to set the communication parameters. Choose the dedicated communication protocol, which is specifically for communication with the touch screen. Set the data length to 8 bits, even parity, stop bit to 1 bit, and transmission speed to 9600. At the same time, you can set an account for this device, for example, setting it to 1 means station 1, setting it to 2 means station 2, and so on.

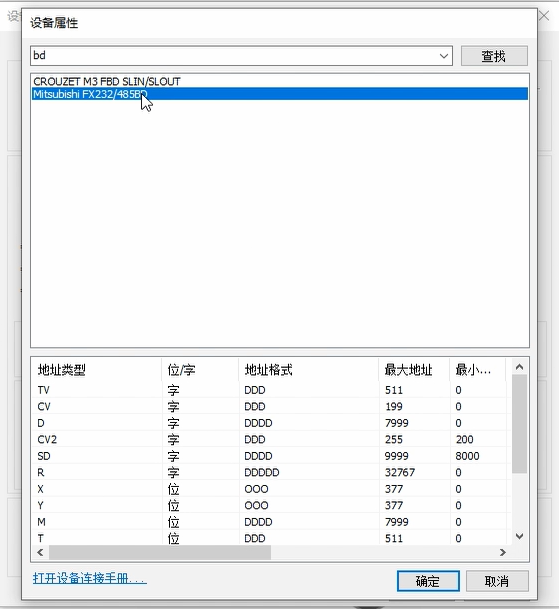
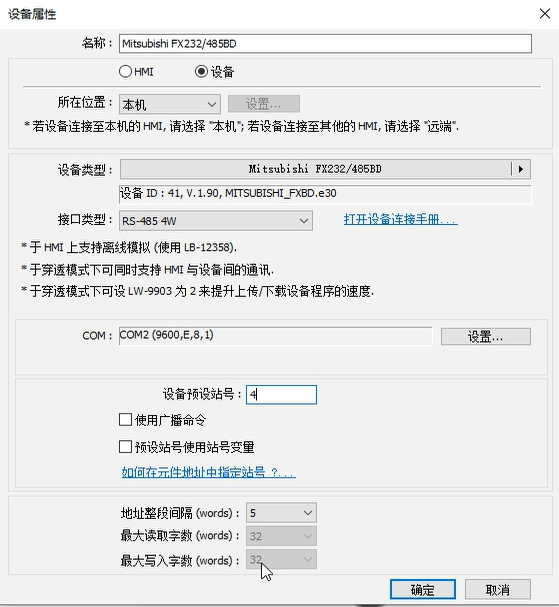
On the touch screen side, add the BD version communication protocol, first delete the original protocol, then re-add it. When adding the communication protocol, enter “BD” to search, and you will find the BD version communication protocol; click OK.
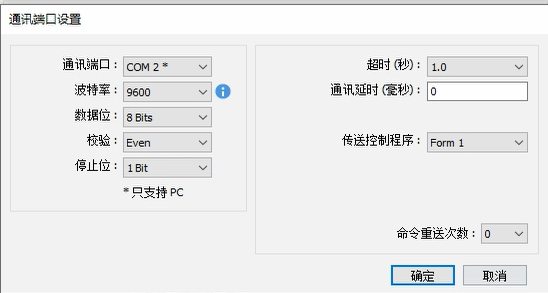
Then set the COM port; here we are connecting to COM2, so select COM2. Set the baud rate to 9600, data bits to 8 bits, even parity, and stop bit to 1 bit.
After clicking OK, select 485 4W, which is the four-wire connection method, as the BD version is best connected using four wires; otherwise, the two-wire method can easily cause problems. You can also set the device preset station number; if communicating with only one PLC, directly set the corresponding station number in the device preset station number in the system parameters, and it will automatically set this station number for us in the future, so we don’t need to add the station number identifier when creating components.
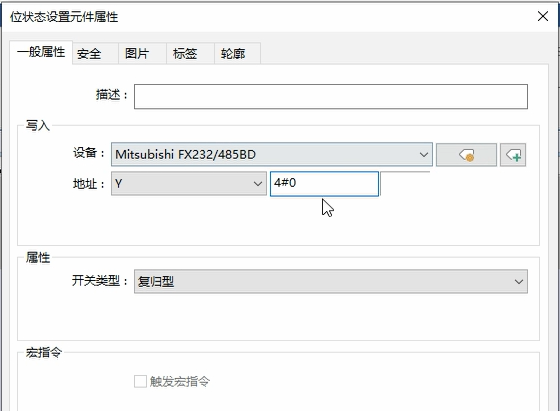
After the settings are complete, you can create a component for testing, such as a Y0 button, selecting the reset type. If you want to configure the station number, add a station number identifier in front, such as 4# indicating the device address of station 4.
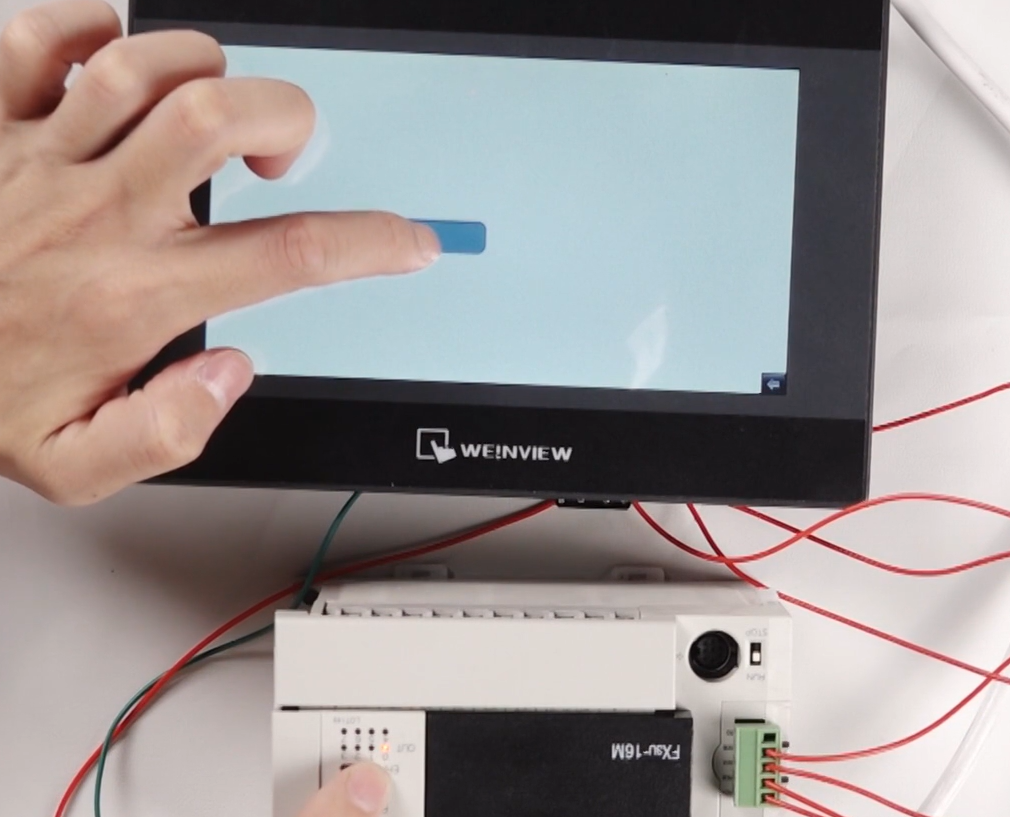
Download the program to the PLC and touch screen, and after connecting the wiring, pressing the Y0 button will light up the Y0 indicator light on the PLC, indicating successful communication.
 3. Questions and Answers
Question1:In the communication between the Wecon touch screen and the Mitsubishi PLC BD version, the wiring uses a four-wire connection method, where the pins 1, 2, 3, and 4 of the touch screen correspond to the PLC’s ( ), ( ), ( ), and ( ).
Answer:In the communication between the Wecon touch screen and the Mitsubishi PLC BD version, the wiring uses a four-wire connection method, where the pins 1, 2, 3, and 4 of the touch screen correspond to the PLC’s RDA, RDB, SDA, and SDB.
Previous Recommendations
Have you encountered the “pits” in using timers in S7-1200?
[Must-Read] Detailed Tutorial on Siemens PLC Communication Connections
What is the UDT data type in SIMATIC S7-1200?
Do you know how to use comments in Siemens TIA Portal?
Implementing V90PN positioning control through SINA_POS (FB284)
Usage of Mitsubishi FX3U PLC High-Speed Counter and its combination with Incremental Encoders
Instructions for using the operation record function of Wecon Touch Screen
Must-Read for Beginners | Complete Guide to Using Mitsubishi GX Works2 Software
(Detailed) Instructions for using macro command conditional assignment in Wecon Touch Screen
Practical tips for TIA Portal touch screens, displaying all IO statuses on one page!
Indirect addressing application in Siemens S7-200 SMART – Analog filtering program
Application of star-delta starting library for S7-200 SMART motors
Learning PLC programming starting from cylinder control cases
S7-1200 CPU and S7-200 SMART S7 communication (S7-1200 as server)
There must be a software you need, take a look quickly
Application of SMART in the environmental protection industry for motor forward and reverse control
Low-voltage electrician re-examination, detailed explanation of those troublesome single-choice questions
Welcome everyone to leave comments and communicate in the comment area! Scan the QR code for systematic learningComplete courses on Electricians, PLCs, and Touch ScreensWeChat ID – p780545316TikTok – @SmartControlElectric
 Scan to get classic PLC casesWeChat ID – p780545316TikTok – @SmartControlElectricDon’t forget to like + view!

 Click“Read the original text”to learn PLC/Electrician courses for free