1. What is CMake?
CMake is a cross-platform project build tool. Other project build tools we are familiar with include Makefile (which builds projects using the make command). Most IDE software integrates make, such as nmake in VS, GNU make in Linux, and qmake in Qt. These Make tools follow different specifications and standards, and the Makefile formats they execute vary widely. This leads to a serious problem: if software wants to be cross-platform, it must ensure that it can be compiled on different platforms. If you use the above Make tools, you have to write a Makefile for each standard, which can be a maddening task. If you try to write a makefile yourself, you will find that makefile usually depends on the current compilation platform, and the workload of writing makefile is relatively large, making it easy to make mistakes when resolving dependencies.
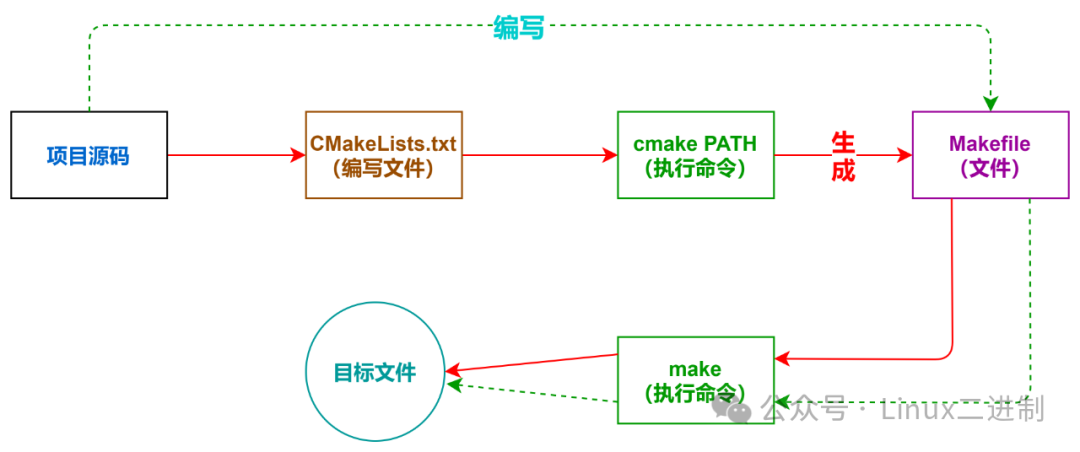
However, CMake is a tool designed to address the above issues. It allows developers to write a platform-independent CMakeLists.txt file to customize the entire project’s compilation process, and then automatically generates localized Makefile and project files based on the compilation platform, achieving the goal of “Write once, run everywhere”. Finally, users only need to run make to compile, so CMake can be seen as a tool that automatically generates Makefile with the following compilation process:
-
The green dashed line indicates the process of building a project using Makefile. -
The red solid line indicates the process of building a project using cmake.
Note: The
cmake PATHcommand’sPATHis the directory whereCMakeLists.txtis located.
After introducing what CMake is and its role, let’s summarize its advantages:
-
Cross-platform -
Ability to manage large projects -
Simplifies the compilation and build process -
Extensible: specific function modules can be written for cmaketo expand its functionality
2. Installing CMake
cmake has now become a component provided by major Linux distributions. For example, Everest includes it directly in the system, and Fedora provides it in the extra repository, so the likelihood of needing to install it yourself is quite low. If the operating system you are using (such as Windows or certain versions of Linux) does not provide cmake or has an outdated version, it is recommended to download and install it directly from the official cmake website.
Download link: https://cmake.org/download
This page provides the source code download and binary downloads for various operating systems, allowing you to choose the version suitable for your operating system. Since the installation methods and package management formats differ across systems, I won’t elaborate further here, but I believe you will be able to install cmake successfully.
3. Using CMake
CMake supports commands in uppercase, lowercase, and mixed case, meaning commands are case-insensitive, while parameters and variables are case-sensitive.
3.1 Comments
3.1.1 Comment Lines
CMake uses # for line comments, which can be placed anywhere.
# This is a CMakeLists.txt file
CMAKE_MINIMUM_REQUIRED(VERSION 3.0.0)
3.1.2 Comment Blocks
CMake uses #[[ ]] format for block comments.
#[[ This is a CMakeLists.txt file.
This is a CMakeLists.txt file
This is a CMakeLists.txt file]]
CMAKE_MINIMUM_REQUIRED(VERSION 3.0.0)
3.2 Practical Demonstration
3.2.1 Single Directory Project Example
First, create a cmake directory in the /backup directory to place all our demonstration examples.
mkdir -p /backup/cmake
Then create the first exercise directory t1 in cmake.
cd /backup/cmake
mkdir t1
cd t1
Create main.c and CMakeLists.txt (note the case of the file names) in the t1 directory:
Contents of main.c:
//main.c
#include <stdio.h>
int main()
{
    printf("Hello World from t1 Main!\n");
    return 0;
}
Contents of CMakeLists.txt:
PROJECT (HELLO)
SET(SRC_LIST main.c)
MESSAGE(STATUS "This is BINARY dir " ${HELLO_BINARY_DIR})
MESSAGE(STATUS "This is SOURCE dir " ${HELLO_SOURCE_DIR})
ADD_EXECUTABLE(hello ${SRC_LIST})
Command explanation:
-
PROJECT command syntax is:
PROJECT(projectname [CXX] [C] [Java])
You can use this command to define the project name and specify the supported languages. By default, it indicates support for all languages. If not needed, these can be ignored, and only the project name needs to be specified. This command implicitly defines two cmake variables:
-
<projectname>_BINARY_DIR -
<projectname>_SOURCE_DIR
Here are HELLO_BINARY_DIR and HELLO_SOURCE_DIR (so the two MESSAGE commands in the CMakeLists.txt can directly use these two variables), as internal compilation is used, both variables currently point to the project path /backup/cmake/t1. Later, we will discuss external compilation, where the contents they refer to will differ.
At the same time, the cmake system also helps us predefine two cmake variables:
-
PROJECT_BINARY_DIR, equal to<projectname>_BINARY_DIR -
PROJECT_SOURCE_DIR, equal to<projectname>_SOURCE_DIR
For consistency, it is recommended to use PROJECT_BINARY_DIR and PROJECT_SOURCE_DIR directly in the future, as even if the project name is modified, these two variables will not be affected. If you use <projectname>_SOURCE_DIR, after modifying the project name, you will need to modify these variables as well.
-
SET command syntax is:
SET(VAR [VALUE] [CACHE TYPE DOCSTRING [FORCE]]) #[] in the parameters are optional, if not needed can be omitted
-
VAR: Variable name -
VALUE: Variable value
At this stage, you only need to understand that the SET command can be used to explicitly define variables.
For example, we use SET(SRC_LIST main.c). If there are multiple source files, it can also be defined as: SET(SRC_LIST main.c t1.c t2.c).
Note: The parameters of the SET command are enclosed in parentheses, and parameters are separated by spaces or semicolons, such as:
SET(SRC_LIST main.c t1.c t2.c)orSET(SRC_LIST main.c t1.c;t2.c)
Extension: The syntax of
cmakeis quite flexible and considers various situations. For example,SET(SRC_LIST main.c)can also be written asSET(SRC_LIST "main.c"), which is not different. However, if a source file’s name isfu nc.c(with a space in the name), you must use double quotes. If you write it asSET(SRC_LIST fu nc.c), it will result in an error, indicating that it cannot findfuandnc.cfiles. In this case, it must be written as:SET(SRC_LIST "fu nc.c")
-
MESSAGE command syntax is:
MESSAGE([SEND_ERROR | STATUS | FATAL_ERROR] "message to display"
...)
This command is used to output user-defined information to the terminal and includes three types:
-
SEND_ERROR, generates an error, and the generation process is skipped
-
STATUS, outputs information prefixed with
-- -
FATAL_ERROR, immediately terminates all
cmakeprocesses
Here we use STATUS to output information, demonstrating the two implicit variables HELLO_BINARY_DIR and HELLO_SOURCE_DIR defined by the PROJECT command.
-
ADD_EXECUTABLE command syntax is:
ADD_EXECUTABLE(executable_file source_file)
-
executable_file, has no relation to the project name in project -
source_file, can be one or multiple, if multiple can be separated by spaces or ;
This defines that this project will generate an executable file named hello, and the related source files are the list defined in SRC_LIST. In this example, you can also directly write as ADD_EXECUTABLE(hello main.c).
Extension: In this example, we used
${}to reference variables; this is how variables are applied incmake. However, there are some exceptions, such as inIFcontrol statements, where variables are referenced directly by their names without${}. If${}is used to apply variables,IFwill check for a variable named${}, which certainly does not exist.
3.2.1.1 In-source Build
Once all files are created, the t1 directory should contain both main.c and CMakeLists.txt. Next, let’s build this project by running the following in this directory:
[root@localhost t1]# cmake .
CMake Warning (dev) at CMakeLists.txt:1 (PROJECT):
  cmake_minimum_required() should be called prior to this top-level project()
  call.  Please see the cmake-commands(7) manual for usage documentation of
  both commands.
This warning is for project developers.  Use -Wno-dev to suppress it.

-- This is BINARY dir /backup/cmake/t1
-- This is SOURCE dir /backup/cmake/t1
-- Configuring done (0.0s)
-- Generating done (0.0s)
-- Build files have been written to: /backup/cmake/t1
Note: The
CMAKE_MINIMUM_REQUIREDcommand is optional, and we can omit it (but there will be a warning). In some cases, if theCMakeLists.txtfile uses some commands specific to higher versions ofcmake, this line needs to be added to remind users to upgrade to that version before executing cmake.
Now let’s check the contents of the directory, and you will find that the system has automatically generated:
CMakeFiles, CMakeCache.txt, cmake_install.cmake and other files, and generated a Makefile. You don’t need to worry about the functions of these files for now; you can ignore them in the future as well. The key point is that it automatically generated a Makefile. Then perform the actual build of the project by entering the make command in this directory, and you should see output like this:
[root@localhost t1]# make
[ 50%] Building C object CMakeFiles/hello.dir/main.c.o
[100%] Linking C executable hello
[100%] Built target hello
If you want to see the detailed process of make building, you can use make VERBOSE=1 or VERBOSE=1 make to build.
At this point, the target file hello has been successfully built and is located in the current directory; try running it:
[root@localhost t1]# ls
CMakeCache.txt  CMakeFiles  cmake_install.cmake  CMakeLists.txt  hello  main.c  Makefile
[root@localhost t1]# ./hello
Hello World from t1 Main!
Congratulations! You have now completely mastered the basic usage of cmake.
3.2.1.2 Out-of-source Build
The example in 3.2.1.1 demonstrates an “in-source build”. You probably don’t want to use in-source builds again after seeing that the generated temporary files outnumber your code files. cmake strongly recommends using out-of-source builds.
For cmake, the internal compilation has already been demonstrated. It generates some intermediate files that cannot be automatically deleted (even make clean cannot clear them), thus leading us to discuss external compilation. The process of out-of-source compilation is as follows:
-
First, clear all intermediate files from the
t1directory, except formain.candCMakeLists.txt, and most importantly, removeCMakeCache.txt. -
Create a
builddirectory in thet1directory. Of course, you can also create thebuilddirectory anywhere; it doesn’t have to be within the project directory. -
Enter the
builddirectory and runcmake ..(note that..refers to the parent directory, as it contains the necessaryCMakeLists.txt; if you create thebuilddirectory elsewhere, you need to runcmakewith the full path to the project). -
Run
maketo build the project, and you will get the target filehelloin the current directory (builddirectory). This way, all files generated bycmakeandmakeare isolated from the project source files, each to their own.
The above process is known as out-of-source compilation. One of the biggest benefits is that it does not affect the original project at all; all actions occur in the build directory. This point alone is sufficient to convince us to adopt the out-of-source build method for constructing projects.
Note: When building the project through out-of-source compilation,
HELLO_SOURCE_DIRstill refers to the project path, i.e.,/backup/cmake/t1, whileHELLO_BINARY_DIRrefers to the build path, i.e.,/backup/cmake/t1/build.
[root@localhost t1]# make clean
[root@localhost t1]# ls
CMakeCache.txt  CMakeFiles  cmake_install.cmake  CMakeLists.txt  main.c  Makefile
[root@localhost t1]# ls
CMakeCache.txt  CMakeFiles  cmake_install.cmake  CMakeLists.txt  main.c  Makefile
[root@localhost t1]# rm -f CMakeCache.txt cmake_install.cmake Makefile
[root@localhost t1]# ls
CMakeFiles  CMakeLists.txt  main.c
[root@localhost t1]# rm -rf CMakeFiles
[root@localhost t1]# ls
CMakeLists.txt  main.c
[root@localhost t1]# mkdir build
[root@localhost t1]# ls
build  CMakeLists.txt  main.c
[root@localhost t1]# cd build/
[root@localhost build]# cmake ..
CMake Warning (dev) at CMakeLists.txt:1 (PROJECT):
  cmake_minimum_required() should be called prior to this top-level project()
  call.  Please see the cmake-commands(7) manual for usage documentation of
  both commands.
This warning is for project developers.  Use -Wno-dev to suppress it.

-- The C compiler identification is GNU 8.5.0
-- The CXX compiler identification is GNU 8.5.0
-- Detecting C compiler ABI info
-- Detecting C compiler ABI info - done
-- Check for working C compiler: /usr/bin/cc - skipped
-- Detecting C compile features
-- Detecting C compile features - done
-- Detecting CXX compiler ABI info
-- Detecting CXX compiler ABI info - done
-- Check for working CXX compiler: /usr/bin/c++ - skipped
-- Detecting CXX compile features
-- Detecting CXX compile features - done
-- This is BINARY dir /backup/cmake/t1/build
-- This is SOURCE dir /backup/cmake/t1
-- Configuring done (0.8s)
-- Generating done (0.0s)
-- Build files have been written to: /backup/cmake/t1/build
[root@localhost build]# ls
CMakeCache.txt  CMakeFiles  cmake_install.cmake  Makefile
[root@localhost build]# ls ../
build  CMakeLists.txt  main.c
[root@localhost build]# make
[ 50%] Building C object world/CMakeFiles/world.dir/src/world.c.o
[ 33%] Linking C static library libworld.a
[ 33%] Built target world
[ 50%] Building C object hello/CMakeFiles/hello.dir/src/hello.c.o
[ 66%] Linking C shared library libhello.so
[ 66%] Built target hello
[ 83%] Building C object CMakeFiles/HelloWorld.dir/app/main.c.o
[100%] Linking C executable HelloWorld
[100%] Built target HelloWorld
[root@localhost build]# tree -L 2
.
├── CMakeCache.txt
├── CMakeFiles
│   ├── 3.26.5
│   ├── cmake.check_cache
│   ├── CMakeConfigureLog.yaml
│   ├── CMakeDirectoryInformation.cmake
│   ├── CMakeScratch
│   ├── HelloWorld.dir
│   ├── Makefile2
│   ├── Makefile.cmake
│   ├── pkgRedirects
│   ├── progress.marks
│   └── TargetDirectories.txt
├── cmake_install.cmake
├── hello
│   ├── CMakeFiles
│   ├── cmake_install.cmake
│   ├── libhello.so
│   └── Makefile
├── HelloWorld
├── Makefile
└── world
    ├── CMakeFiles
    ├── cmake_install.cmake
    ├── libworld.a
    └── Makefile

9 directories, 17 files
[root@localhost build]# ./HelloWorld
hello.
world.
Sometimes the source code we write does not need to be compiled into an executable program but rather into static or dynamic libraries for third-party use, as demonstrated in the above example, which simultaneously generates both static and dynamic libraries for the main program to call, generating the final executable program.
Next, let’s introduce the commands for creating static and dynamic libraries as follows:
-
Creating Static Libraries
In cmake, to create a static library, the command to use is as follows:
add_library(library_name STATIC source_file1 [source_file2] ...)
In Linux, the name of a static library consists of three parts: lib + library name + .a. Here, you only need to specify the name of the library, and the other two parts will be automatically filled in when generating the file.
Note: Although the library name format is different in
Windowsthan inLinux, you still only need to specify the name.
-
Creating Dynamic Libraries
In cmake, to create a dynamic library, the command to use is as follows:
add_library(library_name SHARED source_file1 [source_file2] ...)
In Linux, the name of a dynamic library consists of three parts: lib + library name + .so. Here, you only need to specify the name of the library, and the other two parts will be automatically filled in when generating the file.
Note: Although the library name format is different in
Windowsthan inLinux, you still only need to specify the name.
After creating static or dynamic libraries, they need to be linked to be used. The linking commands are as follows:
-
Linking Static Libraries
In cmake, the command for linking static libraries is as follows:
link_libraries(<static lib> [<static lib>...])
-
Parameter 1: Specifies the name of the static library to link -
Parameter 2-N: Specifies the names of other static libraries to link
Note: The name of the static library is the name
xxxafter removing the prefixliband the suffix.a.
If the static library is not provided by the system (either self-made or provided by a third party), there might be situations where the static library cannot be found. In this case, you can also specify the path to the static library:
link_directories(<lib path>)
Note:
link_directoriesinCMakecan be used to specify the location of static libraries; it can also specify the location of dynamic libraries before generating executable programs.
-
Linking Dynamic Libraries
<target>
<PRIVATE|PUBLIC|INTERFACE> <item>…
[<PRIVATE|PUBLIC|INTERFACE> <item>…]…)
-
target: Specifies the name of the file that will load the dynamic library
-
The file can be a source file -
The file can be a dynamic library file -
The file can be an executable file -
PRIVATE|PUBLIC|INTERFACE: The access permissions of the dynamic library, default is
PUBLIC -
PUBLIC: Libraries after public will be linked to the target, and their symbols will also be exported for third-party use. -
PRIVATE: Libraries after private will only be linked to the target, and will not be visible to third parties. -
INTERFACE: Libraries introduced after interface will not be linked to the target, only their symbols will be exported. -
If there are no dependencies between the dynamic libraries, no settings are needed; generally, you can use the default
PUBLIC. -
Dynamic library linking is transitive. If dynamic library A links to dynamic libraries B and C, and dynamic library D links to dynamic library A, then dynamic library D effectively also links to dynamic libraries B and C and can use the methods defined in dynamic libraries B and C.target_link_libraries(A B C) target_link_libraries(D A)
Extension: The difference between linking dynamic libraries and static libraries:
Static libraries are packed into the executable program during the linking phase of generating the executable program, so when the executable program starts, the static library is loaded into memory. Dynamic libraries are not packed into the executable program during the linking phase of generating the executable program; they are only loaded into memory when the executable program starts and calls functions from the dynamic library. Therefore, when specifying to link dynamic libraries in
cmake, the command should be written after generating the executable file:... # Specify the target to generate add_executable(HelloWorld ${DIR_SRCS}) # Link the dynamically generated library libhello.so from the subdirectory, usually removing the prefix (lib) and suffix (.so) target_link_libraries(HelloWorld hello)In
target_link_libraries(HelloWorld hello):
HelloWorld:corresponds to the name of the executable program generatedhello: This is the dynamic library that the executable program needs to load; this library is a self-made dynamic library, with the full namelibhello.so, and when specifying, you usually remove the prefix (code>lib) and the suffix (.so).
Friendly reminder: The
target_link_librariescommand can link both dynamic and static library files.
Thus far, we have demonstrated the practical compilation of cmake files for both single and multiple directory project files through two examples. If you understand all the above content, you can consider yourself introduced to cmake. Subsequent articles will further refine the usage of cmake.