
 Click the blue text to follow the author
1. Introduction
CMake is a cross-platform open-source build system generator. It does not directly build software but generates a build system for a specific platform based on the descriptions in the <span>CMakeLists.txt</span> file.
The role of CMake is to decouple the build process from the compiler, operating system, and IDE, achieving the goal of “write once, build everywhere”.
The advantages of learning CMake commands include:
- CMake can generate build systems suitable for various platforms, allowing projects to be easily compiled and run on different operating systems.
- CMake can automate the build process, simplifying steps such as compilation, linking, and installation.
- CMake provides rich configuration options, allowing customization of the build process as needed.
- CMake has good support for modern C++ standards, making it easy to use the latest language features.
- CMake allows custom commands and targets to meet specific build requirements.
Traditional build methods rely on platform-specific build scripts like Makefile. CMake uses a platform-independent <span>CMakeLists.txt</span> as input, generating platform-specific build scripts, thus decoupling the build process. For example, the same project can easily generate a Visual Studio project for Windows and a Makefile for Linux using CMake, without manually maintaining two different build scripts.
The workflow of CMake consists of the following steps:
-
Write a
<span>CMakeLists.txt</span>file using CMake commands to describe the project’s source files, dependencies, build options, and other information. This file serves as the project’s “build blueprint”. -
Run
<span>cmake <source_directory></span>in the command line, where<span><source_directory></span>is the directory containing the<span>CMakeLists.txt</span>file. -
CMake generates a platform-specific build system based on the content of
<span>CMakeLists.txt</span>and the user-specified generator. Common generators include:Unix Makefiles, Ninja, Visual Studio, and Xcode. -
Use the generated build system to build the project.
-
(Optional) Install the built program, libraries, header files, etc., to the specified directory according to the installation rules defined in
<span>CMakeLists.txt</span>.
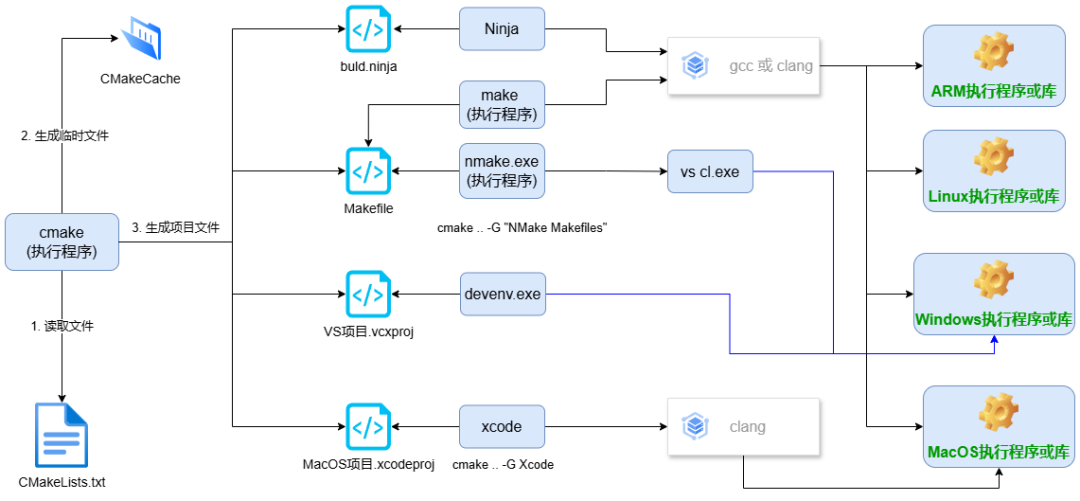
It is important to emphasize that CMake only generates the build system; the actual compilation work is done by the build system (e.g., make, ninja, Visual Studio).
This article aims to provide C/C++ developers with a quick reference and practical examples of commonly used CMake commands. It focuses on the functionalities and commands commonly used in actual project builds, and is part of the 【CMake Easy Learning】 series, not a complete tutorial on CMake, but rather a guide to help quickly get started, solve common build issues, and lay the foundation for deeper learning.
Target Audience:
- CMake beginners with a certain foundation in C/C++.
- Developers who need to quickly find and use CMake commands.
2. Basic CMake Commands
This section introduces the most basic commands in CMake: <span>cmake_minimum_required</span>, <span>project</span>, <span>set</span>, and <span>message</span>. They are the cornerstones of writing a CMakeLists.txt file. Understanding the function and usage of these commands will help grasp the basic principles of CMake.
(1)<span>cmake_minimum_required</span>: Specifies the minimum required version of CMake. Ensures that the CMake version used meets the project requirements. It must be placed at the very beginning of the <span>CMakeLists.txt</span>; if the CMake version is lower than the specified version, an error will be reported and the build will stop.
Syntax:
cmake_minimum_required(VERSION <version_number>)
Why specify the minimum version?
CMake is continuously updated and improved, with new versions introducing new features, commands, and syntax. To ensure that the project can use specific CMake features, a minimum version that meets these requirements needs to be specified in cmake_minimum_required. This prevents errors when a lower version of CMake interprets the CMakeLists.txt, ensuring a smooth build process.
(2)<span>project</span>: Declares the project name and supported languages.
Syntax:
project(<project_name> [LANGUAGES <language_list>] [VERSION <version_number>] [DESCRIPTION <description>])
Example:
project(MyProject LANGUAGES CXX VERSION 1.0 DESCRIPTION "My awesome project")
- It is recommended to specify the project language, commonly used languages include
<span>C</span>,<span>CXX</span>,<span>Fortran</span>,<span>ASM</span>, etc. If the project primarily uses C++, specify<span>CXX</span>.
<span>VERSION</span>and<span>DESCRIPTION</span>are optional, but adding them can better describe the project.
Note: The project name will affect the naming of some CMake variables. CMake will create some predefined variables based on the specified project name, which are very useful during the build process.
(3)<span>set</span>: Sets variables. CMake uses variables to store various information, such as source file lists, compilation options, etc.
Syntax:
set(<variable_name> <value> [CACHE <type> <description> [FORCE]])
-
The CACHE option: Cached variables persist after configuring the build system and can be modified by the user. Common types include
<span>STRING</span>,<span>PATH</span>,<span>FILEPATH</span>,<span>BOOL</span>,<span>INT</span>,<span>FLOAT</span>, etc. -
<span>FORCE</span>: If the variable already exists, using<span>FORCE</span>can force overwrite its value.
Note: CMake variables can be referenced using <span>${variable_name}</span>. The <span>set</span> command can also be used to set environment variables: <span>set(ENV{PATH} "$ENV{PATH}:/new/path")</span>
(4)<span>message</span>: Displays messages for debugging and showing build information.
Syntax:
message([STATUS|WARNING|AUTHOR_WARNING|ERROR|FATAL_ERROR] <message_content>)
Example:
message(STATUS "Building project...")
Usage:
<span>STATUS</span>: Displays normal information.<span>WARNING</span>: Displays warning information, the build process will continue.<span>AUTHOR_WARNING</span>: Displays author warning information, usually used to inform library users.<span>ERROR</span>: Displays error information, but the build process will continue, but usually leads to subsequent build failures.<span>FATAL_ERROR</span>: Displays fatal error information and immediately stops the build process.
Variables can be displayed in messages using <span>${variable_name}</span>. For example: <span>message(STATUS "Source files: ${SOURCE_FILES}")</span>
These commands are the foundation for writing CMakeLists.txt files.
3. Target Management Commands
(1)<span>add_executable</span>: Creates an executable target.
Syntax:
add_executable(<target_name> <source_file_list>)
Example:
add_executable(my_app main.cpp helper.cpp)
(2)<span>add_library</span>: Creates a library target (static library, dynamic library, module library).
Syntax:
add_library(<target_name> [STATIC|SHARED|MODULE] <source_file_list>)
Example:
add_library(my_static_lib STATIC helper.cpp)
add_library(my_shared_lib SHARED helper.cpp)
The differences between STATIC, SHARED, and MODULE:
<span>STATIC</span>: Creates a static library (.a or .lib). Static libraries are fully copied into the executable at link time. The advantage is that no library files are needed at runtime, but the disadvantage is that the executable file size is larger.<span>SHARED</span>: Creates a dynamic library (.so or .dll). Dynamic libraries are loaded into memory at runtime. The advantage is that the executable file size is smaller, and multiple programs can share the same dynamic library, but the disadvantage is that library files are needed at runtime.<span>MODULE</span>: Creates a module library (.so or .dll), usually used for plugin systems. Module libraries are dynamically loaded and unloaded at runtime. They are not directly linked to the main program but interact through specific interfaces.
(3)<span>target_link_libraries</span>: Links libraries to targets. Syntax:
target_link_libraries(<target_name> <library_list>)
Concepts of public, private, and interface linking (PUBLIC, PRIVATE, INTERFACE):
<span>PUBLIC</span>: The library and its linking information (e.g., header file paths, dependent libraries) will be passed to both the current target and other targets that link to the current target. Suitable for cases where the library is part of a public interface, and other targets need to use its header files and dependent libraries.<span>PRIVATE</span>: The library will only be linked to the current target. The library’s linking information will not be passed to other targets that link to the current target. Suitable for cases where the implementation details of the library do not need to be exposed to other targets.<span>INTERFACE</span>: The current target will not directly link to this library, but will pass the linking information (e.g., header file paths, dependent libraries) to other targets that link to the current target. Typically used for header-only libraries or those that only provide interfaces without containing code.
(4)<span>target_include_directories</span>: Adds header file search paths. Syntax:
target_include_directories(<target_name> [SYSTEM] [BEFORE] <directory_list> [PUBLIC|PRIVATE|INTERFACE])
<span>SYSTEM</span>: Indicates that the specified directory is a system directory, and the compiler will search the system directory before searching user directories. This is usually used for standard library header files.<span>BEFORE</span>: Inserts the specified directory at the front of the search path. By default, include directories are added to the end of the search path.
- PUBLIC, PRIVATE, INTERFACE distinctions: Similar to
<span>target_link_libraries</span>.
(5)<span>target_compile_definitions</span>: Adds compile definitions (e.g., <span>#define</span> macros) to targets. Syntax:
target_compile_definitions(<target_name> [PUBLIC|PRIVATE|INTERFACE] <definition>...)
-
Example:
<span>target_compile_definitions(my_app PUBLIC -DDEBUG)</span>. Defines a macro named<span>DEBUG</span>and adds it to the compile options of<span>my_app</span>. Equivalent to using<span>#define DEBUG</span>in the code.<span>-D</span>is the option for defining macros in GCC/Clang. -
PUBLIC, PRIVATE, INTERFACE distinctions: Similar to
<span>target_link_libraries</span>and<span>target_include_directories</span>.
4. File and Directory Operation Commands
4.1 include_directories
<span>include_directories</span>: Globally adds header file search paths (not recommended, it is advised to use <span>target_include_directories</span>).
Syntax
include_directories([SYSTEM] [BEFORE] <directory1> [<directory2> ...])
<span>SYSTEM</span>: Treats the directory as a system path, suppressing warnings for header files in that directory.<span>BEFORE</span>: Inserts the directory at the front of the search list, giving it higher priority.
Example:
include_directories(include)
include_directories(SYSTEM ${CMAKE_SOURCE_DIR}/third_party/foo/include)
Disadvantages: Globally effective, prone to naming conflicts.
Recommended alternative:
target_include_directories(my_target
  PUBLIC    ${CMAKE_SOURCE_DIR}/include
  SYSTEM    ${CMAKE_SOURCE_DIR}/third_party/foo/include
)
4.2 aux_source_directory
Finds all source files in the specified directory and stores the results in a variable.
Syntax:
aux_source_directory(<directory> <variable_name>)
Example:
aux_source_directory(${CMAKE_CURRENT_SOURCE_DIR}/src SRC_FILES)
add_executable(my_app ${SRC_FILES})
Disadvantages: After changing source files, CMake will not automatically rescan, requiring manual <span>cmake .</span>
Alternative:
file(GLOB    SRC_FILES "${CMAKE_CURRENT_SOURCE_DIR}/src/*.cpp")
file(GLOB_RECURSE SRC_FILES "${CMAKE_CURRENT_SOURCE_DIR}/src/*.cpp")
4.3 file
Provides various operations on files and directories: searching, creating, reading, writing, copying, renaming, deleting, etc.
Syntax
file(<OPERATION> <args>...)
Common operations:
| Operation | Description | Example |
|---|---|---|
<span>GLOB</span> |
Finds files matching a pattern | <span>file(GLOB SRC_FILES "${CMAKE_CURRENT_SOURCE_DIR}/src/*.cpp")</span> |
<span>GLOB_RECURSE</span> |
Recursively finds files | <span>file(GLOB_RECURSE ALL_HEADERS "${CMAKE_SOURCE_DIR}/include/*.h")</span> |
<span>MAKE_DIRECTORY</span> |
Creates a directory | <span>file(MAKE_DIRECTORY ${CMAKE_BINARY_DIR}/output)</span> |
<span>WRITE</span> / <span>APPEND</span> |
Writes or appends to a file | <span>file(WRITE ${CMAKE_BINARY_DIR}/version.txt "v1.2.3")</span><span>file(APPEND ${CMAKE_BINARY_DIR}/version.txt "\nBuilt on ${CMAKE_SYSTEM_NAME}")</span> |
<span>COPY</span> |
Copies a file | <span>file(COPY data/config.json DESTINATION ${CMAKE_BINARY_DIR}/config)</span> |
<span>RENAME</span> |
Renames a file/directory | <span>file(RENAME old_name.txt new_name.txt)</span> |
<span>REMOVE</span> |
Deletes a file/directory | <span>file(REMOVE ${CMAKE_BINARY_DIR}/temp.txt)</span> |
4.4 find_package
Finds and loads external libraries or CMake modules, setting related variables for later use.Syntax:
find_package(<package_name> [version] [REQUIRED] [COMPONENTS <component1> <component2> ...])
How it works:
- Searches for
<span>Find<package_name>.cmake</span>in<span>CMAKE_MODULE_PATH</span>. - If found, executes the script: searches for library files, header files, etc., and sets a series of
<span><package_name>_XXX</span>variables. - If the module file is not found, CMake may try to locate it using
<span>pkg-config</span>or<span><package_name>Config.cmake</span>(modern method). - If using
<span>REQUIRED</span>and not found, CMake will report an error and terminate during the configuration phase.
Common output variables (using OpenCV as an example):
<span>OpenCV_FOUND</span>: Whether found<span>OpenCV_VERSION</span>: Version number<span>OpenCV_INCLUDE_DIRS</span>: List of header file paths<span>OpenCV_LIBRARIES</span>: List of library files<span>OpenCV_COMPONENTS</span>: List of actually loaded components
Tip:
- You can specify the OpenCV installation prefix using
<span>-DCMAKE_PREFIX_PATH=/path/to/opencv</span>.- Read the
<span>Find<package_name>.cmake</span>script or<span><package_name>Config.cmake</span>file to learn more about available variables and options.
5. Conditional and Loop Control Commands
<span>if</span> / <span>elseif</span> / <span>else</span> / <span>endif</span>: Conditional judgment.
Syntax:
if(<condition>)
    # ...
elseif(<condition>)
    # ...
else()
    # ...
endif()
Common conditional expressions: string comparison, number comparison, variable existence checks, etc.
<span>foreach</span> / <span>endforeach</span>: Loop iteration.
Syntax:
foreach(<variable_name> IN LISTS <list>)
    # ...
endforeach()
6. Build Options and Configuration Commands
Configure various options during the CMake build process, affecting the behavior of the final generated executable or library.
6.1 option
Defines build options, allowing users to customize configurations during the build. These options will be displayed in the CMake GUI (cmake-gui) or can be set via command line arguments <span>-D<option>=<value></span>.
Syntax:
option(<option_name> "<description>" <default_value>)
Use <span>if(ENABLE_DEBUG)</span> to control build behavior:
if(ENABLE_DEBUG)
  message(STATUS "Debug mode is enabled.") # Display information during build
  add_definitions(-DDEBUG)  # Not recommended, prefer using target_compile_definitions
  # Or better use target_compile_definitions:
  target_compile_definitions(my_target PUBLIC -DDEBUG)
endif()

if(BUILD_SHARED_LIBS)
  message(STATUS "Building shared libraries.")
  set(CMAKE_BUILD_TYPE "Release")  # Ensure Release mode, force overwrite if not wanting to be affected by Debug option
  set(BUILD_SHARED_LIBS ON)
else()
  message(STATUS "Building static libraries.")
  set(BUILD_SHARED_LIBS OFF)
endif()
6.2 add_definitions
Globally adds compile definitions (not recommended, prefer using <span>target_compile_definitions</span>). This command adds compile definitions to the compile command line of all targets, affecting too broadly.
Syntax:
add_definitions(<definition_list>)
<span><definition_list></span>: A list of one or more compile definitions, separated by spaces. Each definition typically starts with <span>-D</span>.
<span>add_definitions</span> has a major drawback in that it affects all targets. It is better to use <span>target_compile_definitions</span> to precisely control which targets are affected. For example:
target_compile_definitions(my_target PUBLIC -DDEBUG)  # All targets linked to my_target will inherit DEBUG definition
target_compile_definitions(my_target PRIVATE -D_CRT_SECURE_NO_WARNINGS) # Only my_target itself will be affected
<span>PUBLIC</span>indicates interface properties that will be passed to other targets that depend on the current library or executable.<span>PRIVATE</span>indicates private properties that are only used for the current target.<span>INTERFACE</span>indicates interface properties that are only used to pass to other targets that depend on the current library or executable, and the current target does not use them.
6.3 *_property series
Sets and gets properties of targets, source files, directories, etc. Can be used to configure compile options, link options, source file features, etc.
Syntax:
set_property(<scope> <name> PROPERTY <property_name> <property_value>...)
get_property(<variable_name> <scope> <name> PROPERTY <property_name>)
<span><scope></span>:<span>TARGET</span>,<span>SOURCE</span>,<span>DIRECTORY</span>,<span>GLOBAL</span>, etc.<span><name></span>: The name of the object within the scope, such as target name, source file name.<span><property_name></span>: The name of the property to set or get, such as<span>CXX_STANDARD</span>,<span>COMPILE_FLAGS</span>,<span>INCLUDE_DIRECTORIES</span>.<span><property_value></span>: The value to set for the property.<span><variable_name></span>: The variable name used to store the retrieved property value.
Example:
# Set the C++ standard for the target
set_property(TARGET my_target PROPERTY CXX_STANDARD 17)
set_property(TARGET my_target PROPERTY CXX_STANDARD_REQUIRED ON) # Force the compiler to support C++17

# Add compile flags
set_property(TARGET my_target APPEND_STRING PROPERTY COMPILE_FLAGS " -Wall -Wextra") # Add compiler warnings

# Set source file properties (e.g., mark it as a header file)
set_property(SOURCE my_source.cpp PROPERTY HEADER_FILE_ONLY TRUE)

# Get the CXX_STANDARD property of the target
get_property(cpp_standard TARGET my_target PROPERTY CXX_STANDARD)
message(STATUS "C++ Standard: ${cpp_standard}")
6.4 configure_file
Copies an input file to another location and replaces variable values. Commonly used to generate configuration files (e.g., <span>config.h</span>) or other files that need to be customized based on the build environment.
Syntax:
configure_file(<input> <output> [COPYONLY] [ESCAPE_QUOTES] [@ONLY])
<span><input></span>: The path of the input file. Usually a template file containing variables to be replaced.<span><output></span>: The path of the output file.<span>COPYONLY</span>: If this option is specified, the file is copied without variable replacement.<span>ESCAPE_QUOTES</span>: Escapes quotes in the replacement strings.<span>@ONLY</span>: Only replaces variables in the form of<span>@VAR@</span>, ignoring variables in the form of<span>${VAR}</span>. If<span>@ONLY</span>is not specified, both forms of variables will be replaced.
7. Custom Commands and Targets
Executes custom scripts or operations during the CMake build process, extending the functionality of the build system.
7.1 add_custom_command
Adds a custom build command. This command allows executing arbitrary commands during the build process, such as code generation, data conversion, file processing, etc. It can be associated with a specific build target or executed independently.
Syntax:
add_custom_command(
  OUTPUT <output_file1> [<output_file2> ...]
  COMMAND <command1> [<parameter1> ...]
  [COMMAND <command2> [<parameter2> ...]]
  [DEPENDS <dependency_file1> [<dependency_file2> ...]]
  [WORKING_DIRECTORY <working_directory>]
  [COMMENT "<description>"]
  [VERBATIM]
  [BYPRODUCTS <generated_product1> [<generated_product2> ...]]
  [IMPLICIT_DEPENDS <language> <dependency_file1> [<dependency_file2> ...]]
  [MAIN_DEPENDENCY <main_dependency_file>]
  [DEPFILE <dependency_file>]
  [COMMAND_EXPAND_LISTS]
  [JOB_POOL <pool_name>]
  [SOURCES <source_file1> [<source_file2> ...]]
  [SYMBOLIC]
  [APPEND]
  [STARTING_OUTPUT_SCRIPT <script_file>]
)
Common parameters:
| Parameter Name | Description |
|---|---|
<span>OUTPUT</span> |
Specifies the output files generated by the command. If there are no output files, this can be omitted, but it is recommended to have at least one output to trigger execution. |
<span>COMMAND</span> |
Specifies the command to execute. Multiple <span>COMMAND</span> can be specified, and they will be executed in order. |
<span>DEPENDS</span> |
Specifies the files that the command depends on. If any dependency file changes, the command will be re-executed. |
<span>WORKING_DIRECTORY</span> |
Specifies the working directory for the command. If not specified, the current source directory is used. |
<span>COMMENT</span> |
Descriptive information displayed during the build process. |
<span>VERBATIM</span> |
Prevents CMake from escaping command parameters. Useful when passing parameters that contain special characters. |
<span>BYPRODUCTS</span> |
Specifies other non-output files generated by the command, such as temporary files. |
Example:
# 1. Run code formatting tool (clang-format)
find_program(CLANG_FORMAT clang-format)
if(CLANG_FORMAT)
  add_custom_command(
    OUTPUT "${CMAKE_CURRENT_SOURCE_DIR}/formatted_file.cpp"  # Output file name
    COMMAND ${CLANG_FORMAT} -i "${CMAKE_CURRENT_SOURCE_DIR}/my_file.cpp" # -i means in-place modification
    DEPENDS "${CMAKE_CURRENT_SOURCE_DIR}/my_file.cpp"
    COMMENT "Formatting my_file.cpp with clang-format"
    VERBATIM # If clang-format command is complex, VERBATIM is needed
  )
else()
  message(WARNING "clang-format not found. Code formatting will be skipped.")
endif()

# 2. Code generation: Generate source files using custom scripts
add_custom_command(
  OUTPUT generated_source.cpp
  COMMAND ${CMAKE_COMMAND} -E echo "int main() { return 0; }" > generated_source.cpp
  COMMENT "Generating source file"
)

#3. Associate the output of the custom command with the target file
add_executable(MyApp main.cpp generated_source.cpp)
add_dependencies(MyApp generated_source.cpp) # Ensure generated_source.cpp is created before compiling MyApp

# 4. Data conversion: Convert data files to another format
add_custom_command(
  OUTPUT data.bin
  COMMAND ${CMAKE_COMMAND} -E copy_if_different data.txt data.bin # Simple copy, actual may be more complex
  DEPENDS data.txt
  COMMENT "Converting data file to binary format"
)
Key Points:
<span>add_custom_command</span>defines a command that does not execute automatically. It needs to be associated with a target (e.g., using<span>add_dependencies</span>) or made a dependency of another custom command to trigger its execution.- Specifying
<span>DEPENDS</span>ensures that the command only re-runs when dependency files change, avoiding unnecessary builds.
7.2 add_custom_target
Adds a custom build target. Unlike <span>add_custom_command</span>, <span>add_custom_target</span> creates a target that can be explicitly built. This target can execute a series of commands and can have dependencies. Users can trigger its execution by using <span>make <target_name></span> or selecting to build the target in an IDE.
Syntax:
add_custom_target(
    <target_name>
    [ALL]
    [COMMAND <command1> [<parameter1> ...]]
    [COMMAND <command2> [<parameter2> ...]]
    [DEPENDS <dependency_file1> [<dependency_file2> ...]]
    [WORKING_DIRECTORY <working_directory>]
    [COMMENT "<description>"]
    [VERBATIM]
    [BYPRODUCTS <generated_product1> [<generated_product2> ...]]
    [IMPLICIT_DEPENDS <language> <dependency_file1> [<dependency_file2> ...]]
    [JOB_POOL <pool_name>]
    [SOURCES <source_file1> [<source_file2> ...]]
)
Common parameters:
| Parameter Name | Description |
|---|---|
<span><target_name></span> |
The name of the custom target. |
<span>ALL</span> |
If this option is specified, the target will become a dependency of the <span>all</span> target, meaning this target will be executed every time the project is built. (Not commonly used, usually only in scenarios where it is indeed necessary to execute every build) |
<span>COMMAND</span> |
Specifies the command to execute. Multiple <span>COMMAND</span> can be specified, and they will be executed in order. |
<span>DEPENDS</span> |
Specifies the files or other targets that the target depends on. If any dependencies change, the target will be rebuilt. |
<span>WORKING_DIRECTORY</span> |
Specifies the working directory for the command. If not specified, the current source directory is used. |
<span>COMMENT</span> |
Descriptive information displayed during the build process. |
<span>VERBATIM</span> |
Prevents CMake from escaping command parameters. Useful when passing parameters that contain special characters. |
Differences from <span>add_custom_command</span>:
<span>add_custom_target</span>defines a target that can be built explicitly. Users can choose to build this target, triggering its execution.<span>add_custom_command</span>defines a command that needs to be triggered by other means, such as being a dependency of another target.
8. Installation and Packaging Commands
8.1 install
Specifies installation rules, installing files, directories, and targets to specified locations. The <span>install</span> command defines how to handle files, directories, and targets during the installation step.
Syntax:
install(<type> DESTINATION <directory> <parameters...>)
Common parameters:
| Parameter Name | Description |
|---|---|
<span>DESTINATION <directory></span> |
Specifies the installation target location. This is usually a path relative to the installation prefix (<span>CMAKE_INSTALL_PREFIX</span> variable). |
<span>CONFIGURATIONS <configuration_type...></span> |
Specifies that the installation should only occur under specific build configurations (e.g., <span>Debug</span>, <span>Release</span>). |
<span>COMPONENT <component_name></span> |
Assigns the installation item to a component. Users can choose to install only specific components. |
<span>RENAME <new_name></span> |
Renames files or targets during installation. |
<span>PERMISSIONS <permissions...></span> |
Sets permissions for installed files (e.g., <span>OWNER_READ</span>, <span>OWNER_WRITE</span>, <span>GROUP_READ</span>, <span>WORLD_READ</span>, <span>EXECUTE</span>). |
<span>USE_SOURCE_PERMISSIONS</span> |
Uses the permissions of the source files. |
<span>FILE_PERMISSIONS <permissions...></span> |
Sets file permissions, overriding default permissions. |
<span>DIRECTORY_PERMISSIONS <permissions...></span> |
Sets directory permissions, overriding default permissions. |
<span>PATTERN <pattern> EXCLUDE</span> |
In directory installations, excludes files or directories matching the specified pattern. |
<span>OPTIONAL</span> |
Ignores installation errors if files or targets do not exist. |
<span>EXCLUDE_FROM_ALL</span> |
Excludes this installation rule from the <span>all</span> target. |
<span>CMAKE_INSTALL_PREFIX</span> variable:
- This is a CMake variable used to specify the installation prefix. By default, it is usually
<span>/usr/local</span>(on Linux/macOS) or<span>C:/Program Files</span>(on Windows). - You can change it during configuration using
<span>-DCMAKE_INSTALL_PREFIX=<path></span>. <span>DESTINATION</span>paths are relative to<span>CMAKE_INSTALL_PREFIX</span>. Therefore,<span>DESTINATION bin</span>will actually install files to<span>${CMAKE_INSTALL_PREFIX}/bin</span>.
8.2 cpack
Packages the project and generates installation packages. <span>cpack</span> is a tool provided by CMake for creating installation packages in various formats, such as:
- ZIP
- TGZ (gzip compressed tar file)
- TBZ2 (bzip2 compressed tar file)
- DEB (Debian package)
- RPM (Red Hat package)
- NSIS (Windows installer)
- DMG (macOS disk image)
The <span>CPackConfig.cmake</span> file needs to be configured separately. The <span>CPackConfig.cmake</span> file defines various options for the packaging process, such as:
- Package name
- Version number
- Author
- Description
- License
- Dependencies
- Included files
- Installer options
Configuring <span>CPackConfig.cmake</span>: Create a file named <span>CPackConfig.cmake</span> and place it in the root directory of the project.
Common <span>CPack</span> variables:
| Variable Name | Description |
|---|---|
<span>CPACK_GENERATOR</span> |
Specifies the packaging format (e.g., “TGZ”, “ZIP”, “DEB”, “RPM”, “NSIS”, “DMG”) |
<span>CPACK_PACKAGE_NAME</span> |
The name of the installation package |
<span>CPACK_PACKAGE_VERSION</span> |
The version number of the installation package |
<span>CPACK_PACKAGE_DESCRIPTION</span> |
The description of the installation package |
<span>CPACK_PACKAGE_VENDOR</span> |
The author or vendor of the installation package |
<span>CPACK_PACKAGE_INSTALL_DIRECTORY</span> |
The installation directory (relative to the installation prefix) |
<span>CPACK_DEBIAN_PACKAGE_DEPENDS</span> |
(DEB package) Other software packages that are dependencies |
<span>CPACK_NSIS_PACKAGE_NAME</span> |
(NSIS package) The name of the installer |
<span>CPACK_RESOURCE_FILES_LICENSE</span> |
License file |
<span>CPACK_COMPONENTS_ALL</span> |
Includes all components |
<span>CPACK_COMPONENTS_GROUPING</span> |
Whether to group components. Used to create component lists |
<span>CPACK_PACKAGE_FILE_NAME</span> |
The filename of the output package, including version and other information. If not specified, CPack will automatically generate the filename. |
9. Conclusion
CMake is a cross-platform build system generator that describes the project build process through the <span>CMakeLists.txt</span> file, achieving the goal of “write once, build everywhere”. This article has distilled commonly used CMake commands for C/C++ developers, covering basic commands, target management, file operations, conditional control, build options, custom commands, installation, and packaging, laying the foundation for deeper learning.
Previous Issues ReviewC++
STL sorting algorithms merge, sort, shuffle, reverse
Build
CMake from scratch: Write your first CMakeLists.txt
Algorithm
Interviewer: Merge two sorted arrays, what are your thoughts? I: …
STL
5 C++ STL arithmetic generation algorithms: It turns out numerical calculations can be this simple!
 Lion RyanWelcome to follow my public account for learning technology or submissions