Yesterday, Tencent’s stock price surged, reaching a historic market value of $300 billion, while Alibaba’s market value stood at $280 billion, and Baidu only at $60 billion. Tencent has now entered the top ten companies in the world by market value, with giants like Apple, Google, Microsoft, Amazon, and Facebook ahead of it.
Good morning, it’s the second day back from the May Day holiday. I believe everyone has returned to work mode. Today, we continue to share valuable content.
This article is contributed by Xanthuim , introducing common usage methods of Bluetooth and sharing a personal project, hoping to be helpful to everyone.
Xanthuim‘s blog address:
http://blog.csdn.net/qq_15003505
Recently, I have been using Bluetooth functionality at work. Of course, the Bluetooth we are using is combined with a Bluetooth chip, not for communication between mobile phones. Essentially, they are quite similar; it’s just the devices that differ. I won’t delve into the complex terminologies of Bluetooth protocols here, as they cannot be clearly explained in just a few sentences. Before we fully understand these technical terms, let’s first grasp the basic usage. If you want to explore further later, we can take the time to learn more. The low energy Bluetooth introduced in this article is supported starting from Android 4.3. For traditional Bluetooth and higher versions, please refer to the official documentation, which has Chinese introductions as well.
Official Bluetooth Documentation
https://developer.android.google.cn/guide/topics/connectivity/bluetooth.html
Official examples of different Bluetooth versions (3 examples):
https://github.com/googlesamples?utf8=%E2%9C%93&q=bluetooth&type=&language=
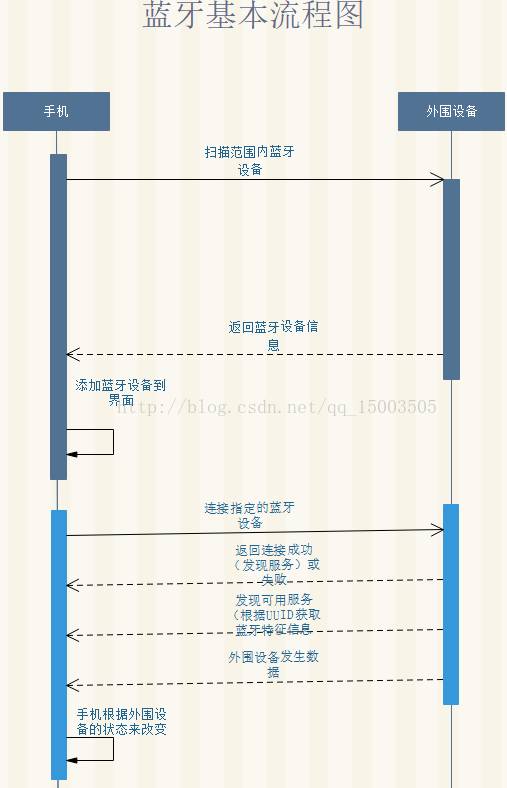
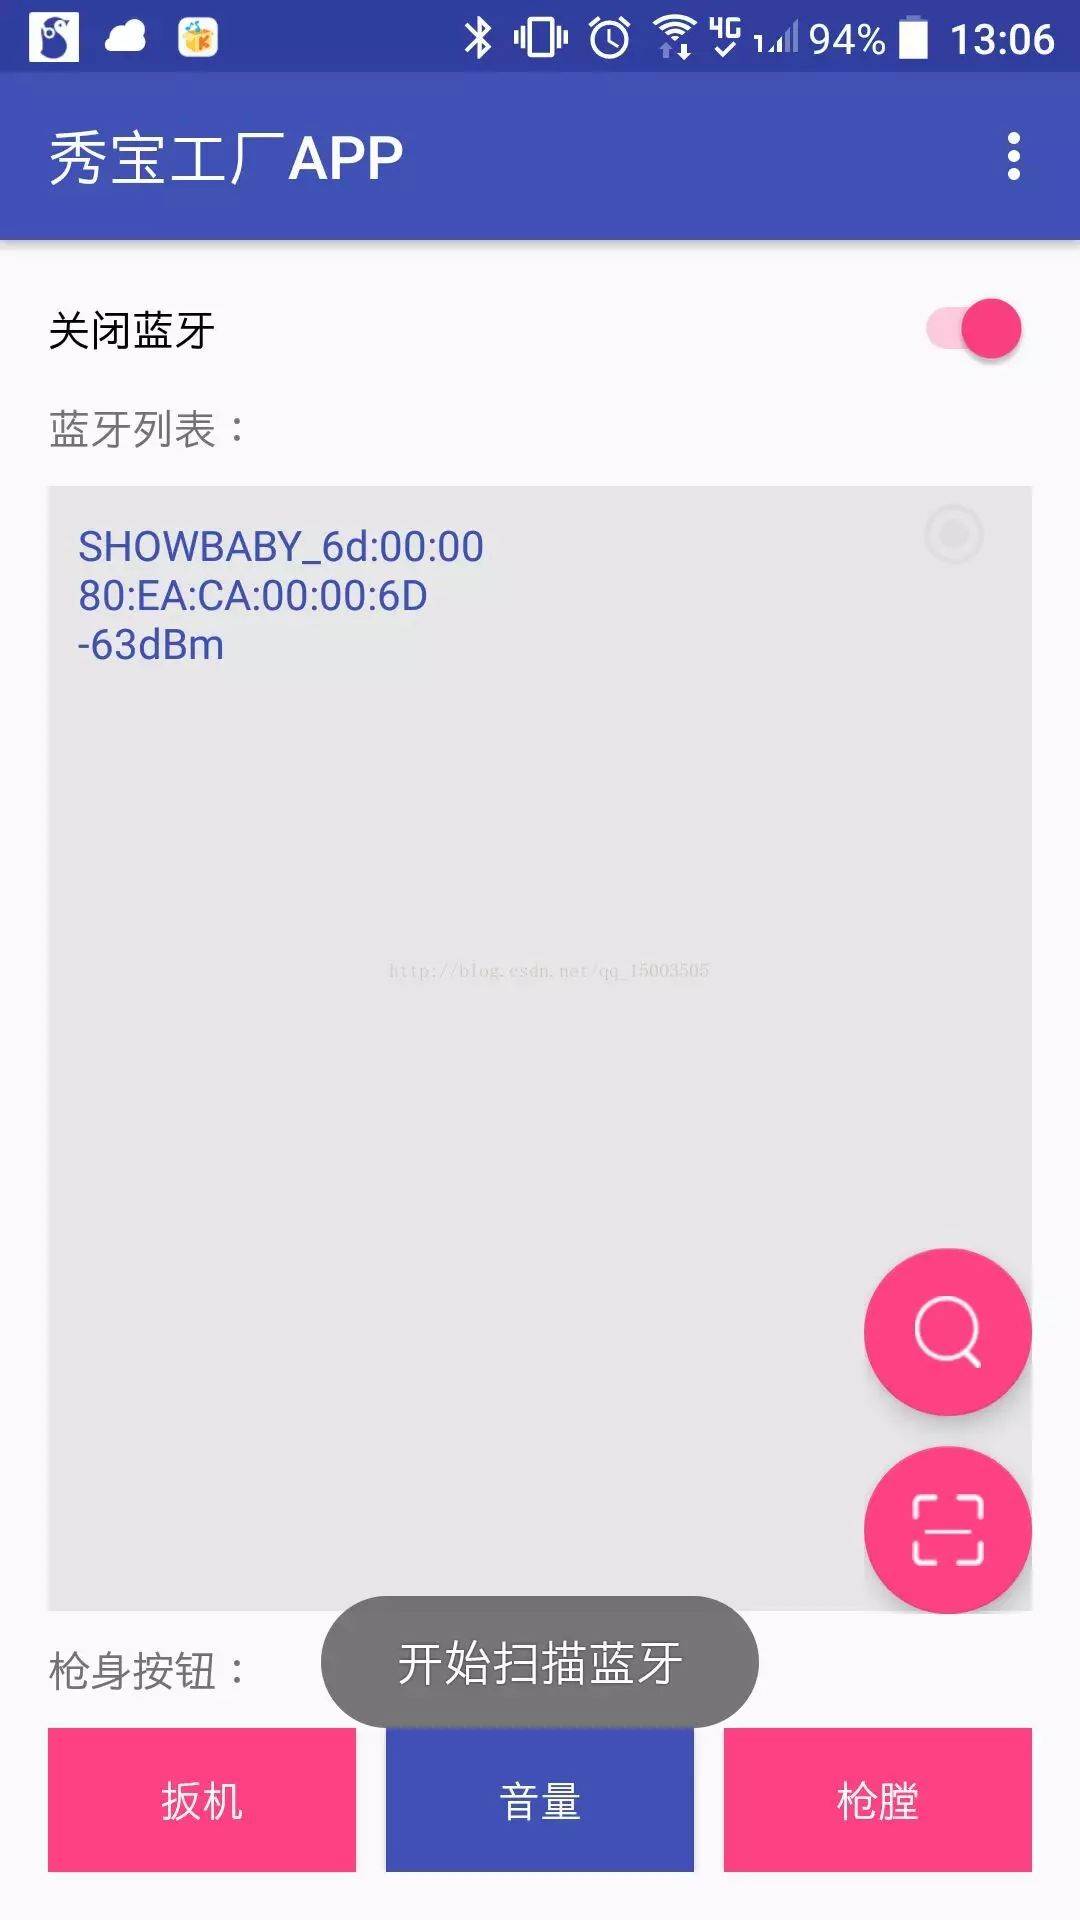
From the image, it can be seen that my example is only one-way communication, where the mobile phone only receives data and does not send data.
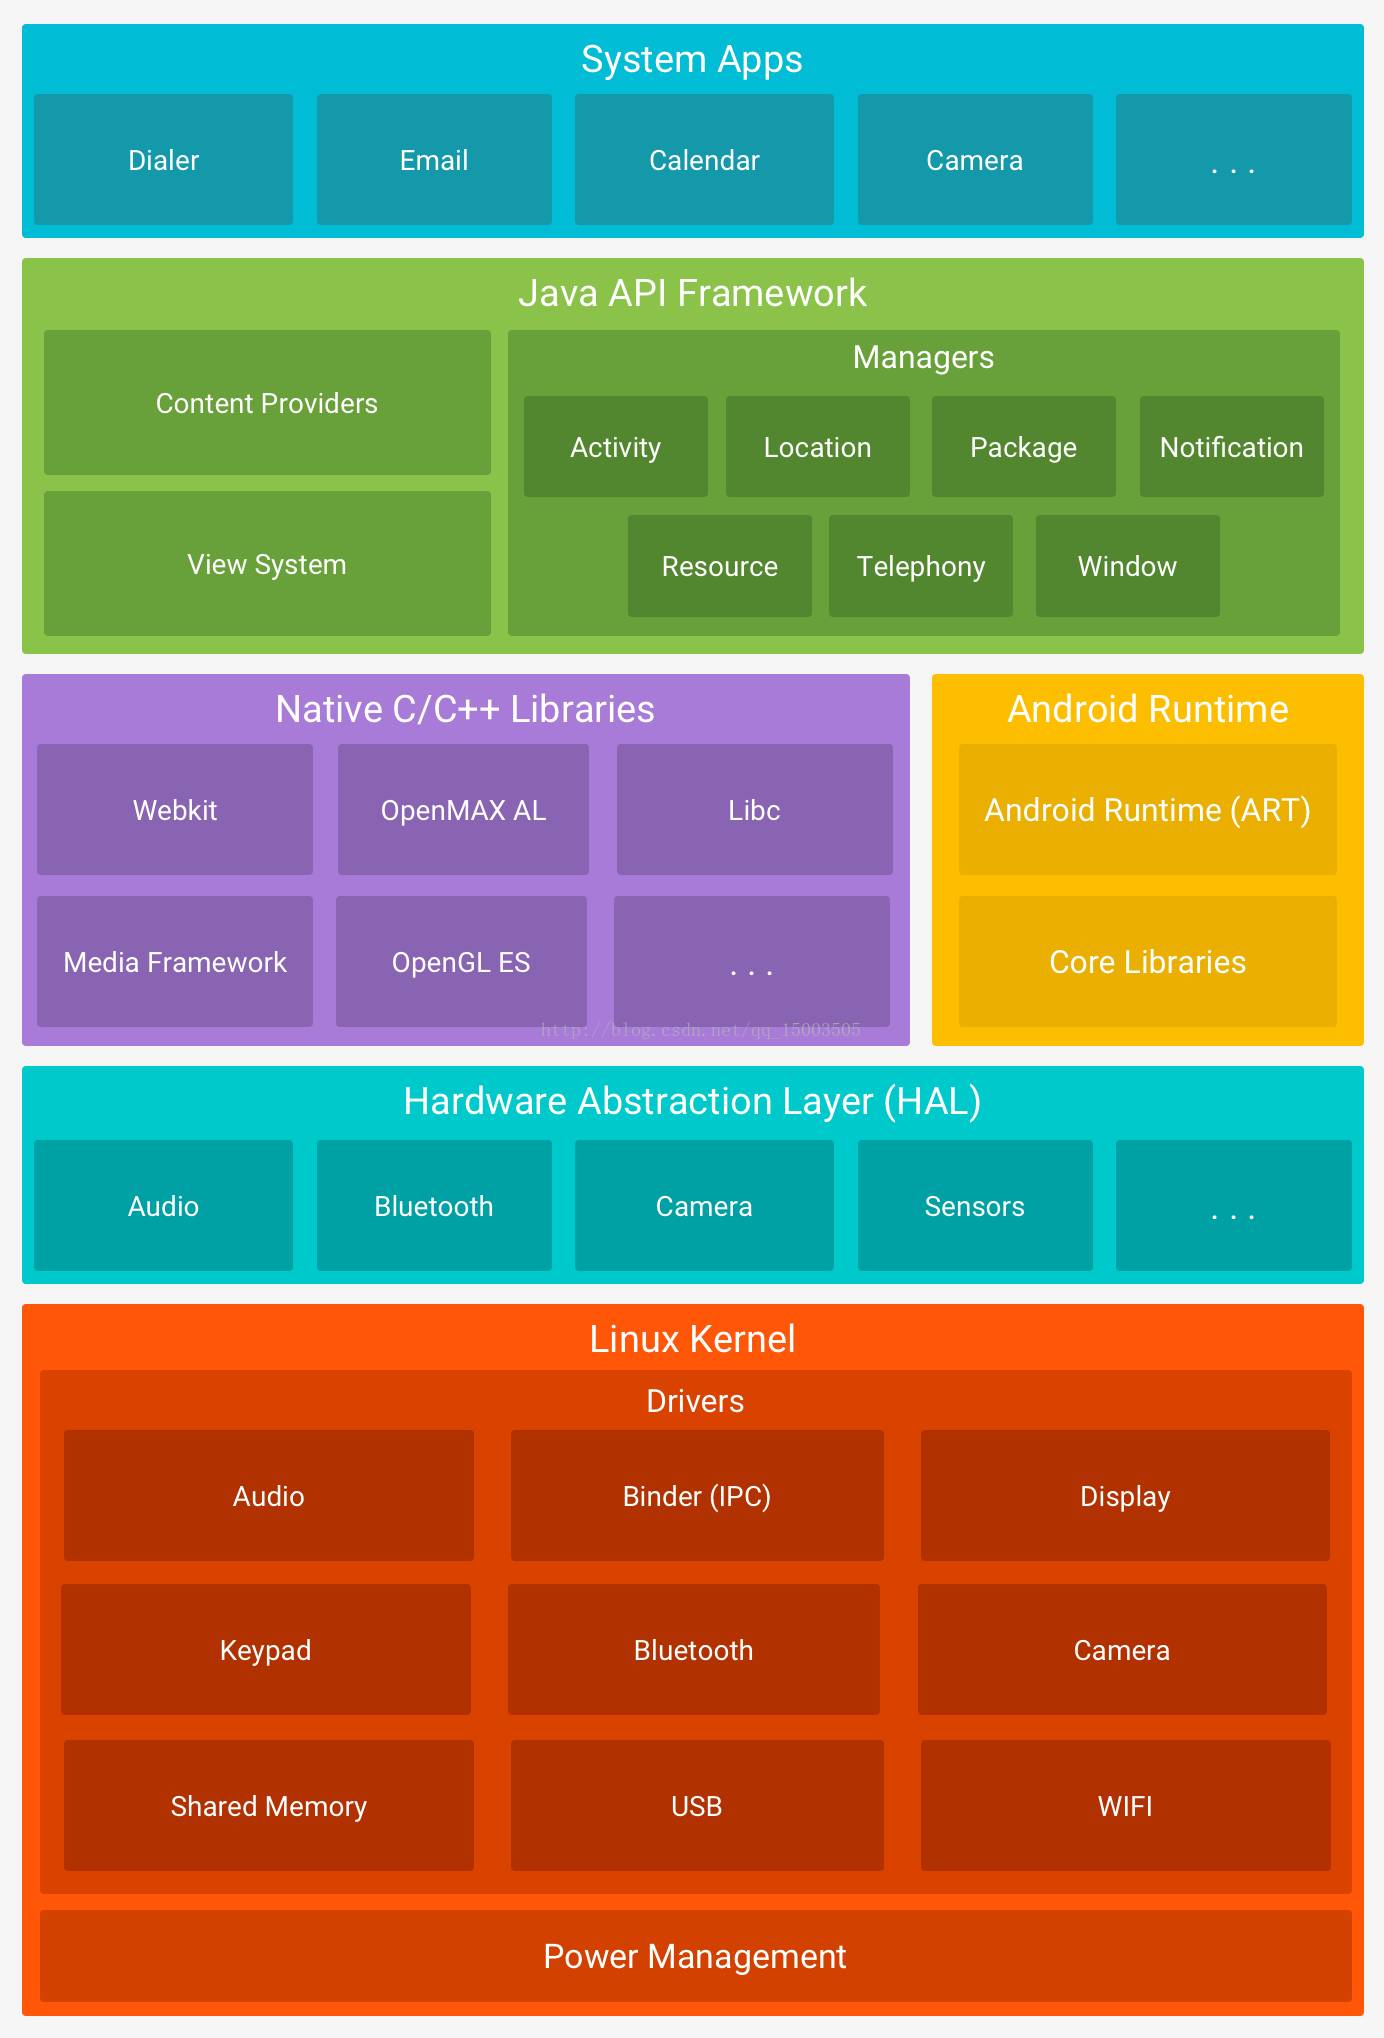
BluetoothManager: The Bluetooth management service. If you are familiar with the basic Android framework, you will find that Bluetooth is also part of the lower-level driver modules. To use Bluetooth, you need to use (BluetoothManager) context.getSystemService(Context.BLUETOOTH_SERVICE) to obtain it. Here’s a visual reference.
BluetoothAdapter: Represents the local device’s Bluetooth adapter. BluetoothAdapter allows you to perform basic Bluetooth tasks such as starting device discovery, querying the list of paired devices, instantiating BluetoothDevice using a known MAC address, and creating a BluetoothServerSocket to listen for connection requests from other devices. This class is key and will be used extensively later.
BluetoothAdapter.LeScanCallback: Provides a callback interface for LE scan results. This class is the callback interface for scanning, but starting from Android 5.0, the abstract class ScanCallback is used.
BluetoothLeScanner: This class provides methods for performing scanning-related operations on Bluetooth LE devices. Applications can use ScanFilter to scan for specific types of Bluetooth LE devices. It can also request different types of callbacks to pass results. However, this class only appears in Android 5.0 (API21) and above. For Android 4.3 and above, we will only use BluetoothAdapter for scanning and other operations. Of course, if it’s above 5.0, this class can be used instead.
ScanCallback: Bluetooth LE scan callback, using these callbacks to report scan results. This is an abstract class used in conjunction with BluetoothLeScanner.
BluetoothDevice: Represents a remote Bluetooth device. BluetoothDevice allows you to create a connection with the corresponding device or query information about it, such as name, address, class, and bonding status.
BluetoothProfile: Profile proxy. Each public profile implements this interface. It has several direct subclasses, each used in different scenarios, such as BluetoothA2dp, BluetoothGatt, BluetoothGattServer, BluetoothHeadset, BluetoothHealth. In the current example, we are using BluetoothGatt.
BluetoothGatt: This class provides Bluetooth GATT functionality for communication with Bluetooth smart or smart-ready devices. This class will be used for connection, disconnection, and closure operations later.
BluetoothGattCallback: The documentation does not provide a direct explanation, only stating that it is used in the callback when connecting to a device. Although the documentation does not elaborate, this callback plays a key role in subsequent connections, disconnections, and communications.
Alright, we have introduced most of the key classes. Next, let’s practice using these classes.
1. Obtain Bluetooth Management Service and Adapter

After obtaining the adapter, we can check if Bluetooth functionality is supported by whether the adapter is null (I believe most current smartphones should support it). Additionally, the adapter provides the following methods:
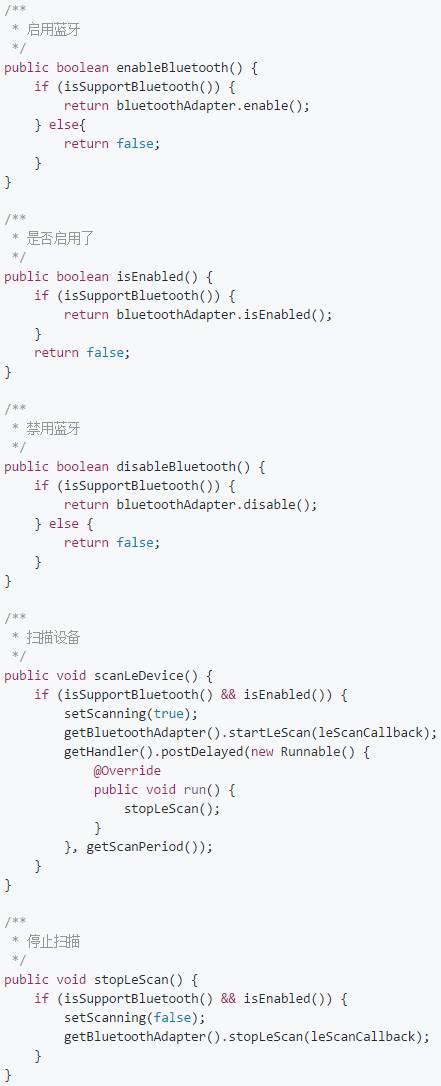
The above methods are for enabling, disabling, scanning, and stopping. It is important to note that when enabling Bluetooth, a dialog may pop up on different phones, such as Meizu. At this point, you need to use the isEnabled method to check if it is enabled. If it is not enabled, use startActivity to enable it, and then handle the remaining operations through the onActivityResult callback method of Activity or Fragment.
startActivityForResult(new Intent(BluetoothAdapter.ACTION_REQUEST_ENABLE), REQUEST_ENABLE);Alright, using the above scanning method, you can scan for Bluetooth devices. Isn’t it simple? Just a reminder, the leScanCallback mentioned above is the BluetoothAdapter.LeScanCallback mentioned earlier; you just need to implement it.
2. Permission Configuration
However, using Bluetooth also requires permission configuration. If you do not configure it in the Manifest, you will encounter errors when using the above methods in Android Studio, requiring you to add permissions. Here are the permissions I used:
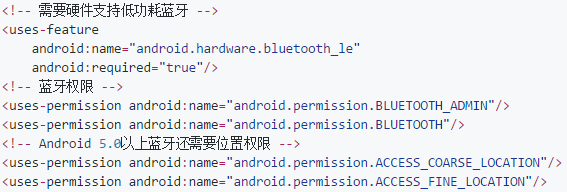
Yes, you will find that using Bluetooth also requires location permissions? I initially thought it was strange that Bluetooth would require location permissions, but later I discovered while reviewing the official documentation that without it, you would not be able to scan for Bluetooth on devices running 5.0 and above! For details, please refer to the official documentation:
https://developer.android.google.cn/guide/topics/connectivity/bluetooth-le.html#user-permission
3. Connect to Device
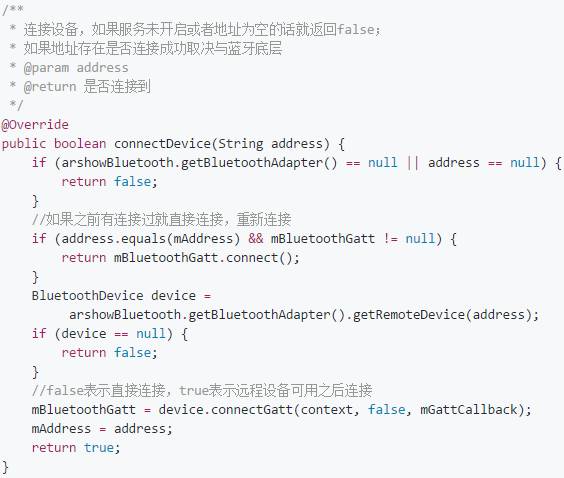
After obtaining the Bluetooth device, the next step is to connect and send data. Connecting to a device is quite simple, just connect using the scanned Bluetooth device object. The Bluetooth device is the BluetoothDevice class mentioned above, which has a method:

The first Context is self-explanatory; the second parameter autoConnect is explained as “whether to connect directly to the remote device (false) or automatically connect once the remote device is available (true)”; the third parameter is the abstract class mentioned above, which plays a key role during the connection process. Finally, the method will return a BluetoothGatt object, which we can use for reconnecting, disconnecting, and closing the device. Here’s the connection method from my example:
Abstract class:
This class has many methods, but they are all implemented by this class, and we rewrite them according to our needs. Let’s explain the listed methods:
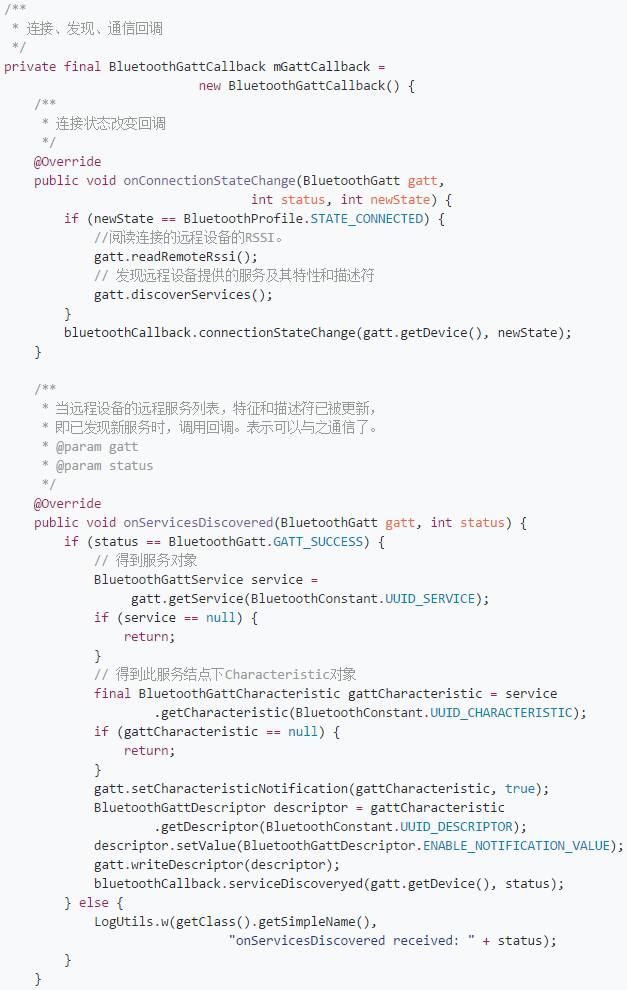
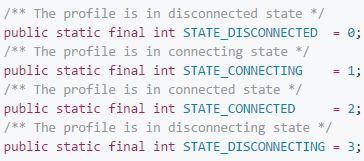
onConnectionStateChange: Monitors the connection and disconnection of the Bluetooth device, reads the device’s signal strength, and discovers services (the translation is a bit awkward). Connection and disconnection can be determined by comparing the newState parameter with the constant values of BluetoothProfile, which is also mentioned above. In fact, this class provides four state values, but during usage, only connection (state value 2) and disconnection (state value 0) are used; the others are not utilized.
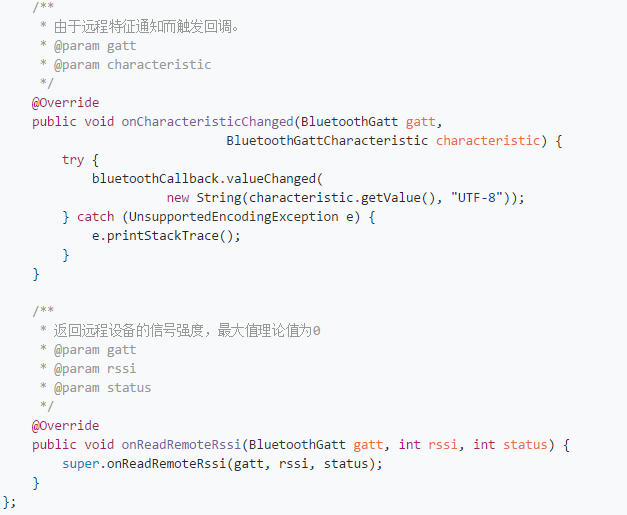
As for the later reading of the device’s signal strength and discovering services, these are used for obtaining signal strength and communication. How to explain this? It is known that Bluetooth is also a wireless transmission, and since it is wireless, it behaves similarly to mobile networks and Wi-Fi, where signal strength varies. Thus, this can be used to obtain it. The signal strength value is negative, and the larger the negative value, the better the signal (the maximum theoretical value is 0), with the unit being dBm. As for discovering services, we call gatt.discoverServices() after successfully connecting to obtain communication with the connected device, and finally, the onServicesDiscovered callback is triggered.
onServicesDiscovered: In this method, we need to use the Bluetooth UUID to obtain services, characteristics, descriptions, etc., and then we can send data to the mobile phone. It is important to note that UUIDs cannot be arbitrary; they must be provided by the device manufacturer or be common UUIDs; otherwise, you cannot use them. Speaking of UUIDs, I find it quite confusing as many articles briefly mention UUIDs without explaining their purpose. I haven’t found a comprehensive document introducing Bluetooth protocols and related topics (if anyone finds it, please leave a link). Actually, regarding the characteristics and descriptions mentioned here, I haven’t detailed them, so please forgive me.
onCharacteristicChanged: Remote characteristic notifications trigger callbacks. This method will be called whenever the connected device triggers certain actions (such as pressing or releasing the button on my Bluetooth chip). We can retrieve the information sent from the remote device in this method.
Alright, I have covered the basic usage in my example. The remaining operations involve disconnecting, connecting, and closing (releasing resources) Bluetooth.

Finally, here are screenshots from my example and the Bluetooth chip I used. Doesn’t it look impressive? Haha~
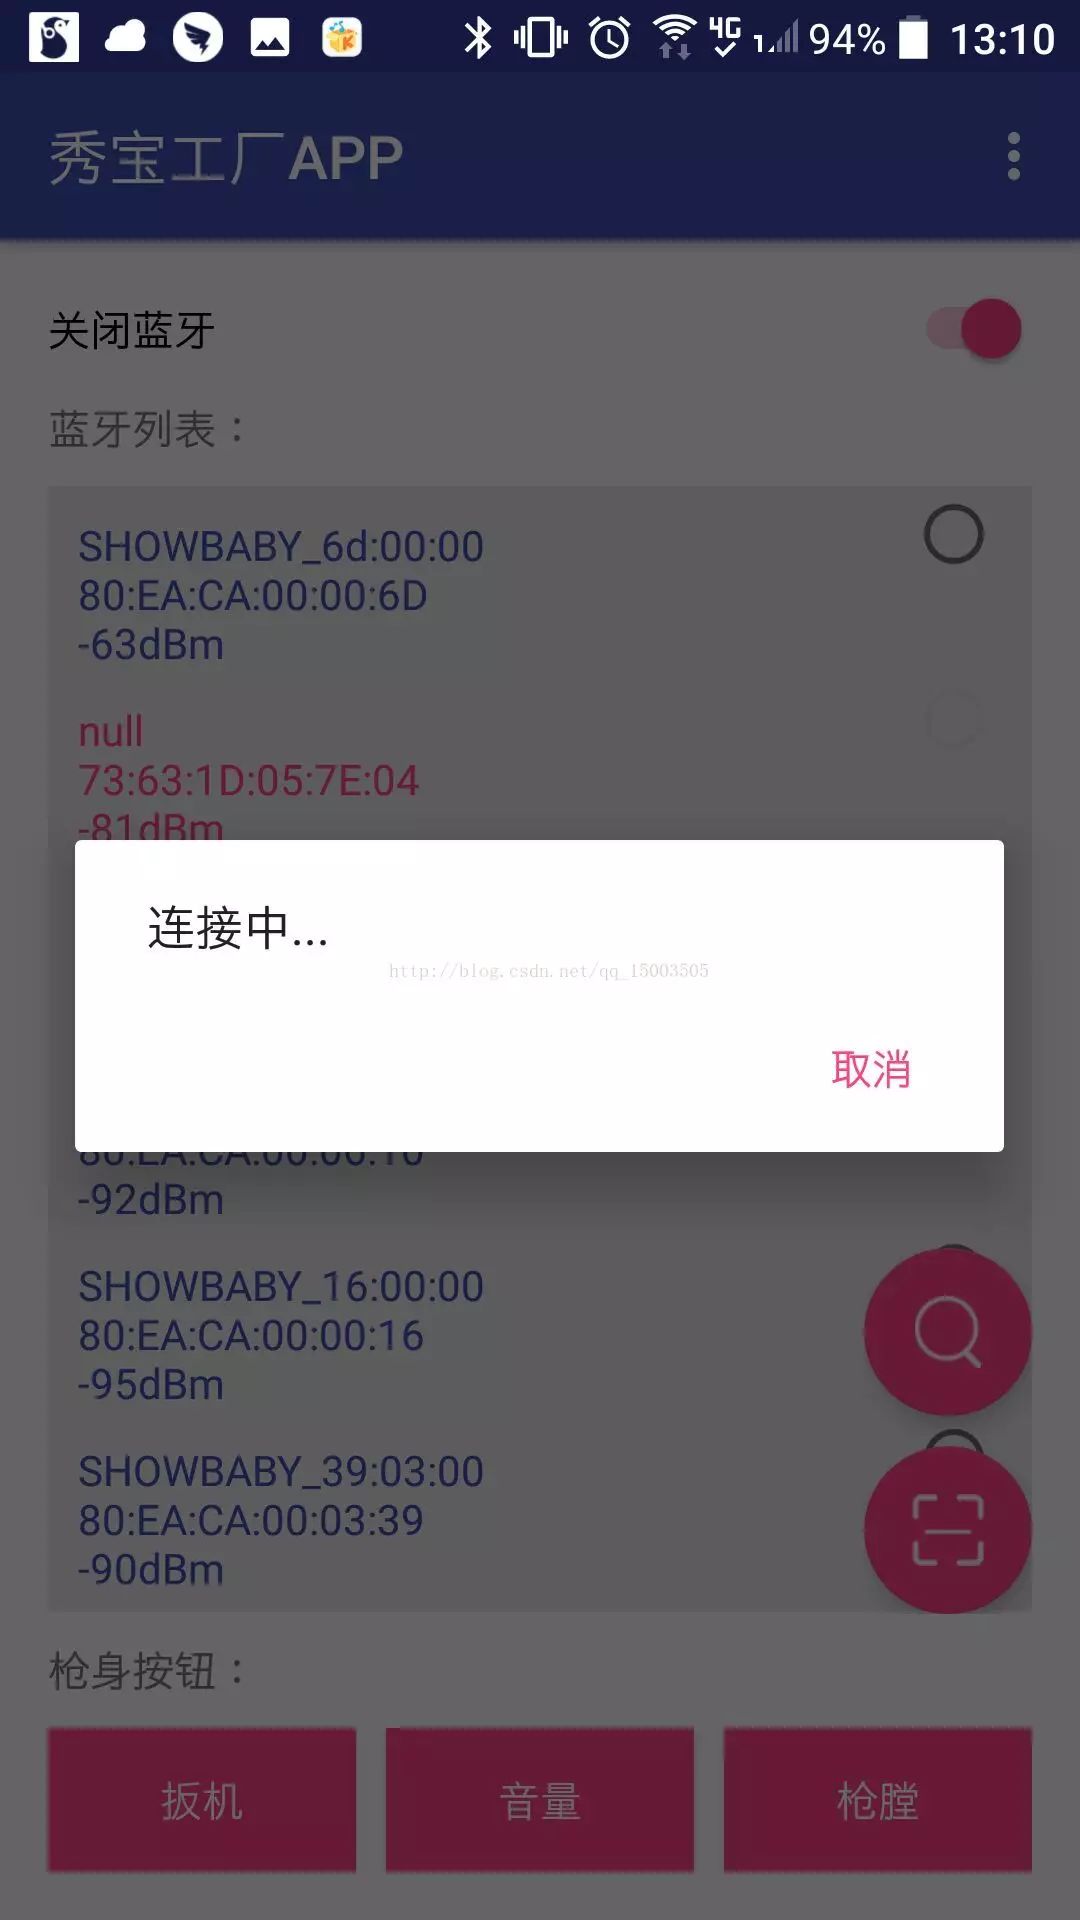
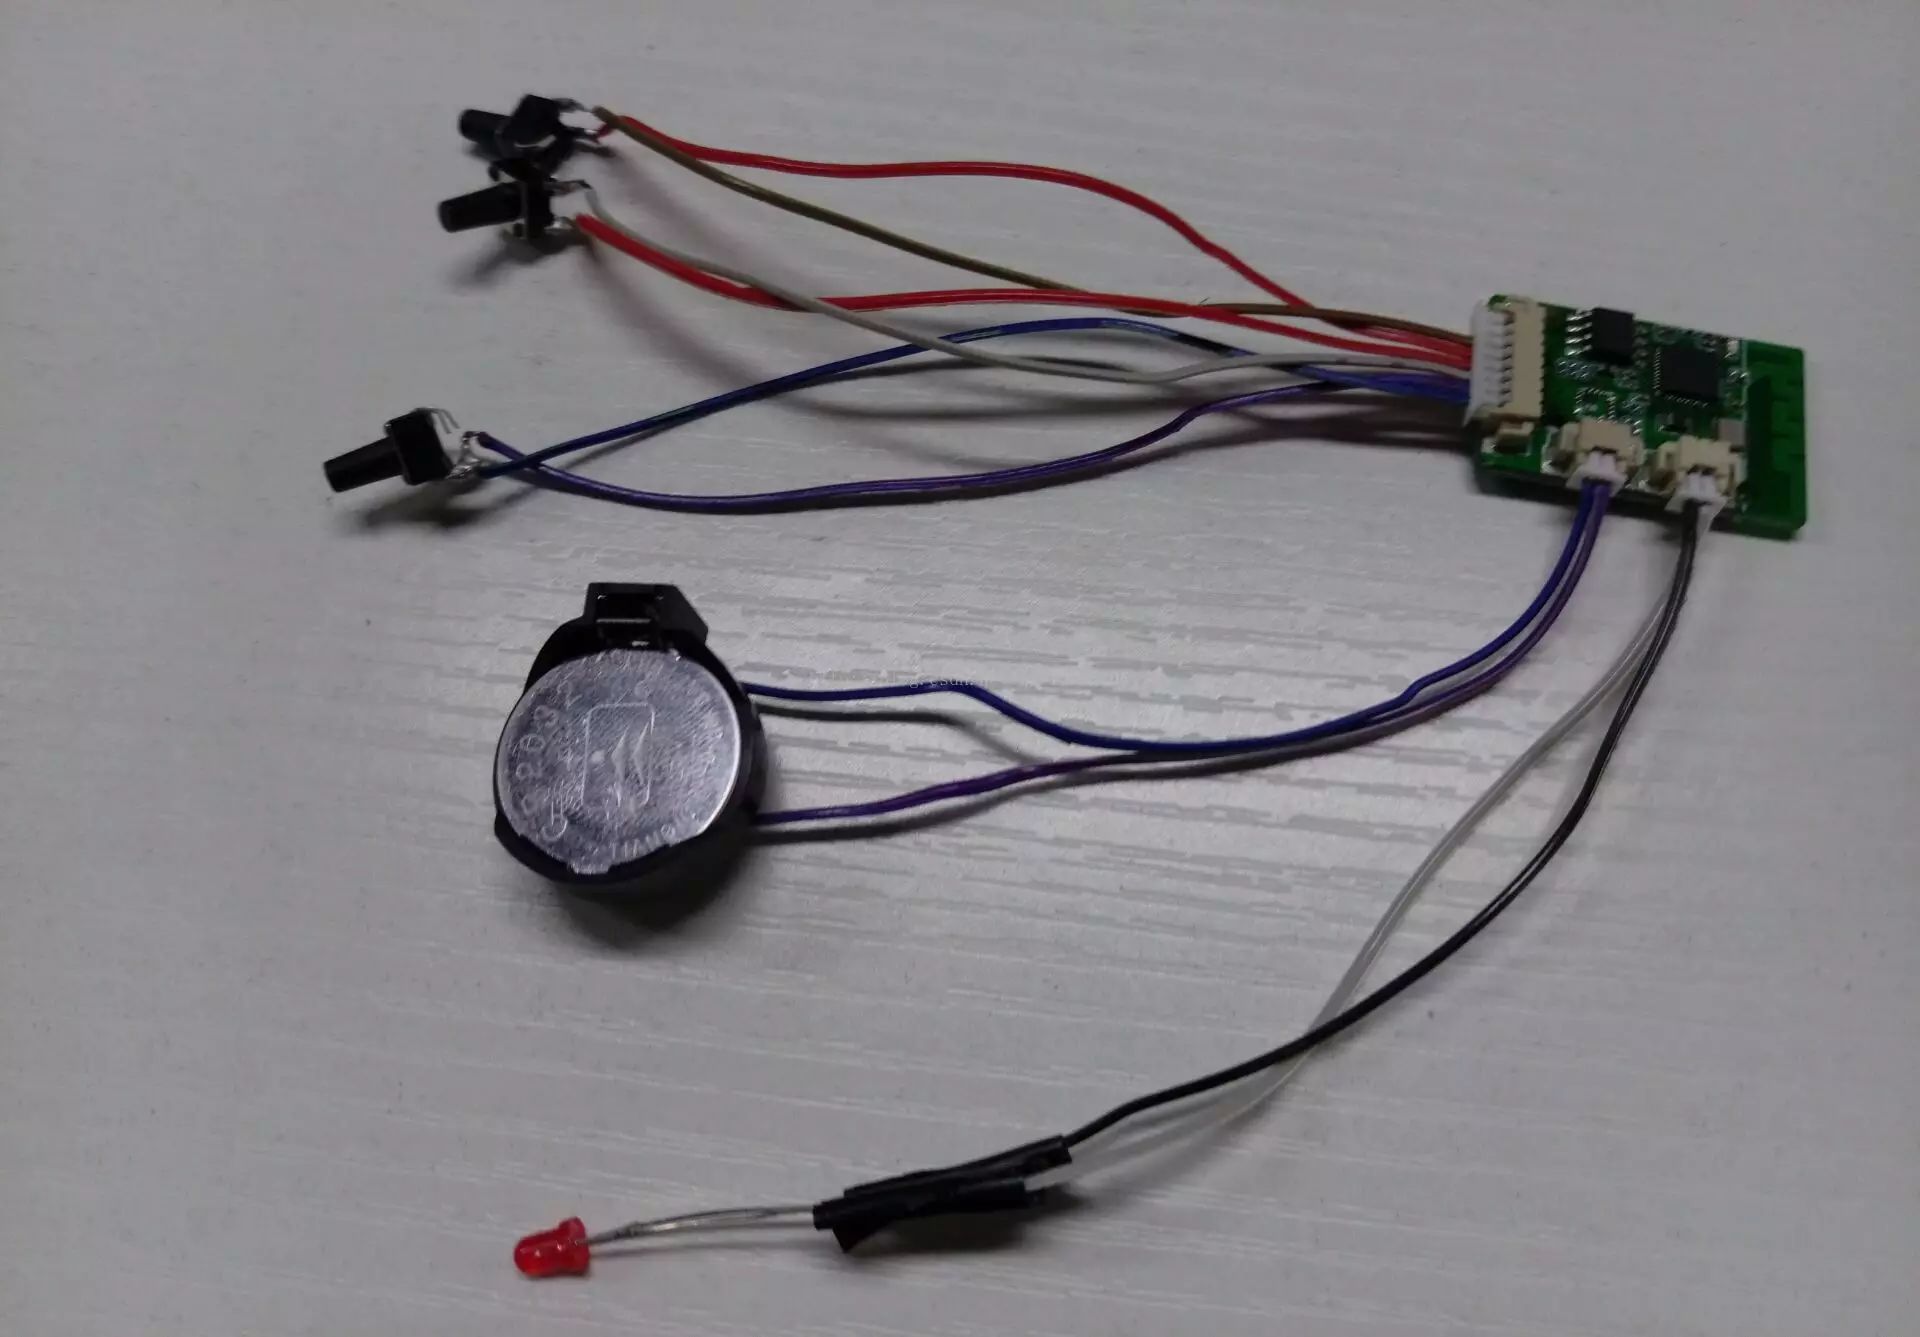
Alright, my Bluetooth chip has an LED indicator that blinks before connecting, and it stays lit after a successful connection. The three buttons in the image correspond to the buttons on the chip. However, for confidentiality reasons, I won’t provide the example related to the Bluetooth chip here; instead, I wrote a simple example separately, but the underlying principles remain unchanged. Additionally, this is one-way communication; how to achieve two-way communication? Since this example only requires one-way communication, I won’t delve into it, but it falls within the scope of the above examples, and everyone can research it themselves. Also, note that the official low-energy example has issues with the “discover services” callback method (data cannot be received after connecting), which differs from the official example.
Furthermore, my Android Studio version is 2.4 preview 3, and the corresponding gradle version is gradle-3.4.1-all; those using lower versions should modify the configuration accordingly.
GitHub address:
https://github.com/Xanthuim/BluetoothSample
After a long day of learning, relax with some funny jokes. Follow the most entertaining public account for a good mood every day.

If you have good technical articles to share, feel free to submit them to my public account. For submission details, please click the “Submit” menu on the public account homepage.
Welcome long press the image -> recognize the QR code in the image or scan the code to follow my public account: