Introduction
Have you ever been caught outside by a sudden downpour, staring helplessly at the dark clouds above? Or have you thought, “How great would it be if I could know in advance that it was going to rain?” Perhaps you want to create a smart rain alert system but don’t know where to start? Don’t worry, the Arduino rainwater sensor is here to help! This tutorial will guide you through the process, from hardware wiring to coding, to achieve rainfall detection and measurement of rainfall intensity, allowing your Arduino to not only control lights and temperature but also “understand” the weather, becoming your weather assistant in daily life.
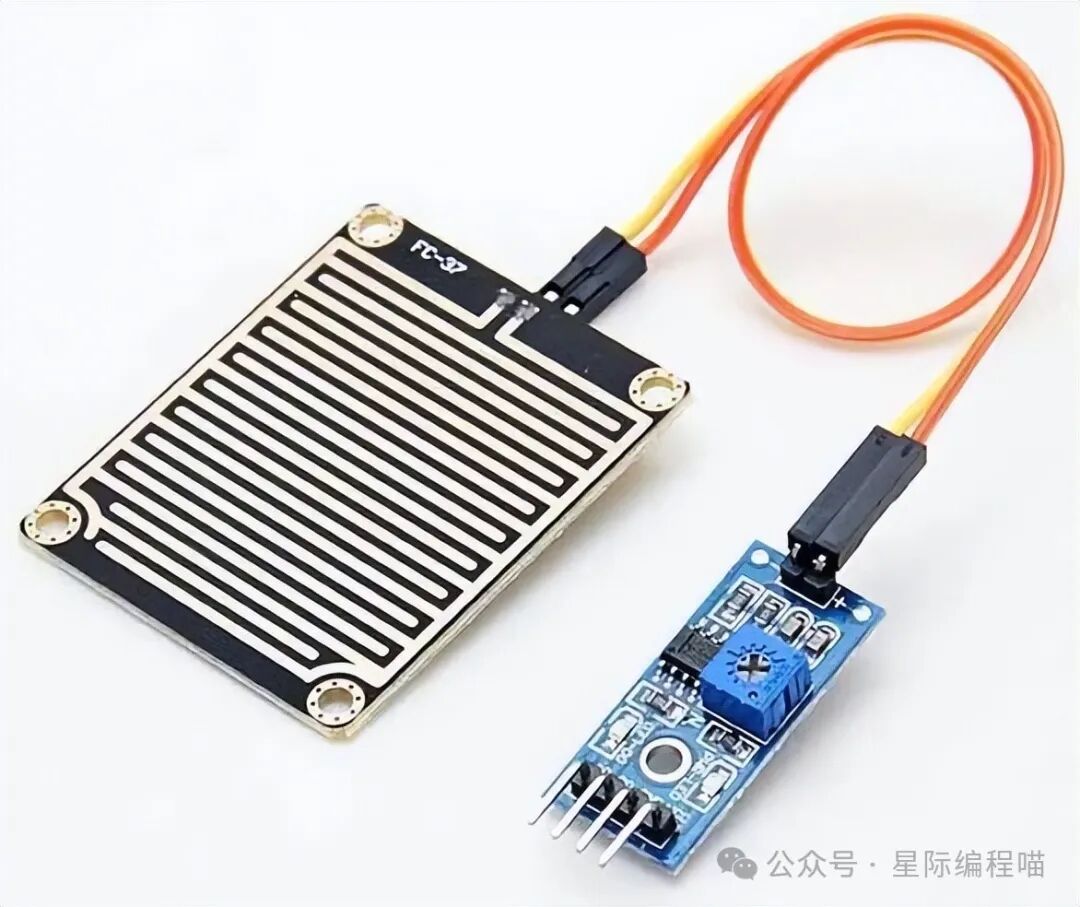
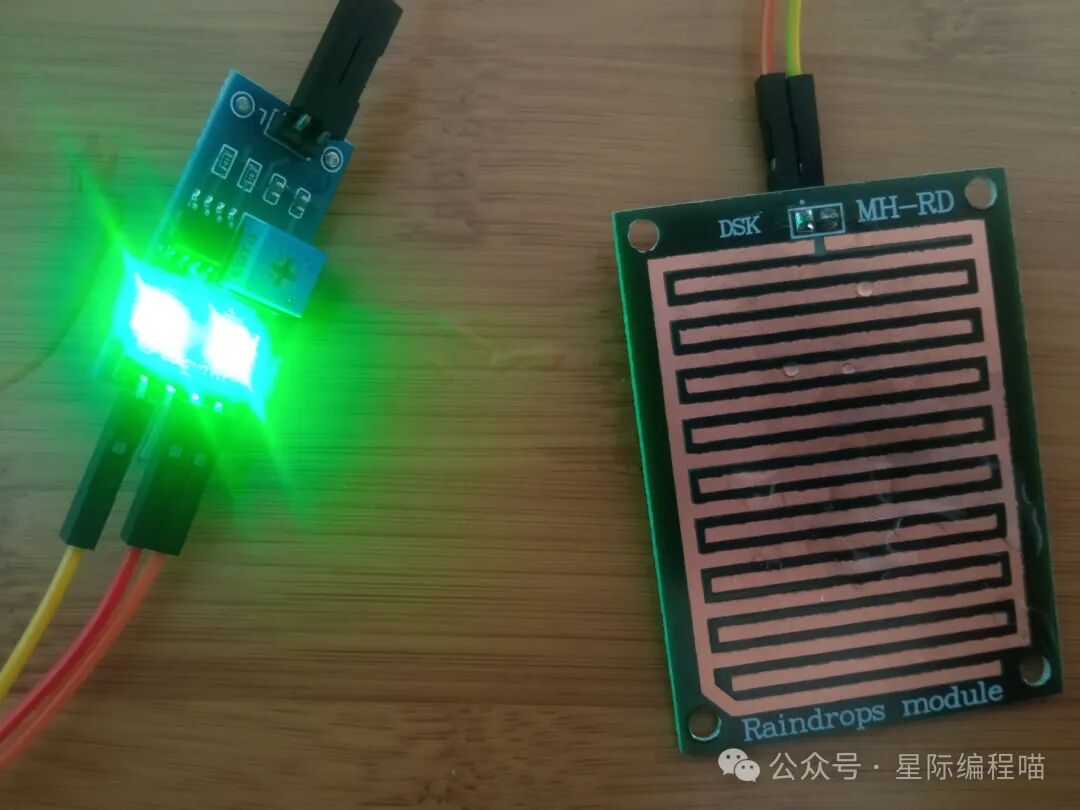
In this article, we will detail how to connect the rainwater sensor to the Arduino. The rainwater sensor module acts like a weather forecaster, providing real-time information on whether it is raining. When raindrops fall on the sensing plate, the sensor detects this phenomenon through circuit changes and can even estimate the intensity of rainfall based on the amount of detected rainwater. This module consists not only of a rainwater sensing plate but also includes a separate control board, which offers more convenience for adjustment and use. You can also adjust the sensitivity of the sensor using a potentiometer to ensure accurate operation under different weather conditions. Additionally, it comes with a power indicator LED, allowing you to monitor the device’s operational status in real-time. Let’s get started and create your own smart rain monitoring system!
Rainwater Sensor Module
The raindrop sensor resembles a circuit board coated with nickel, which presents a striped pattern. Its working principle is based on resistance; simply put, it determines whether raindrops are falling by measuring changes in humidity.
The rainwater sensor module measures humidity through an analog output pin, and when the humidity exceeds a set threshold, the sensor provides a signal through a digital output. These signals can be used to trigger alarms or other smart operations. The core of the module is based on the LM393 operational amplifier, working in conjunction with a printed circuit board, where the nickel lines “collect” raindrops. When raindrops fall on the circuit board, they create a parallel resistance path between the nickel lines, and the change in resistance directly affects the signal output.
This sensor is a resistive dipole; it has low resistance when wet and high resistance when dry. When there are no raindrops on the circuit board, the resistance increases, and according to the formula V=IR, the voltage is higher; once raindrops are present, water, being a conductor, connects the nickel lines, reducing resistance and thus lowering voltage. In simple terms, the sensor measures rainfall intensity through the conductivity of raindrops, helping you understand precipitation in real-time, whether to prevent sudden downpours or to automatically adjust windows in a smart home, the sensor can accurately inform you of changes in the weather outside.
Technical Specifications
- Made of high-quality RF-04 double-sided material.
- Size: 5cm x 4cm, with nickel plating on one side.
- Resistant to oxidation and conductivity, with a long lifespan.
- Comparator output signal waveform is clear, with strong driving capability, exceeding 15mA.
- Sensitivity adjustable via potentiometer.
- Operating voltage: 5V.
- Output format: digital switch output (0 and 1) and analog voltage output AO.
- Includes screw holes for easy installation.
- Compact circuit board size: 3.2cm x 1.4cm.
- Utilizes widely available LM393 comparator.
This compact design of the rainwater sensor module makes it suitable for various projects, providing high-precision rain detection while easily integrating into other systems without taking up too much space. By adjusting the sensitivity with a potentiometer, you can set the appropriate response threshold based on the environment. Whether used in smart homes, automation systems, or agricultural monitoring, the module can accurately reflect external precipitation conditions, allowing your devices to “sense” changes in the weather at all times.
Pin Diagram
Similar to soil moisture sensors, the rain detection sensor module has four pins: VCC, GND, Analog Output, and Digital Output. Through these pins, you can obtain the necessary information from the sensor, with the specific pin functions as follows:
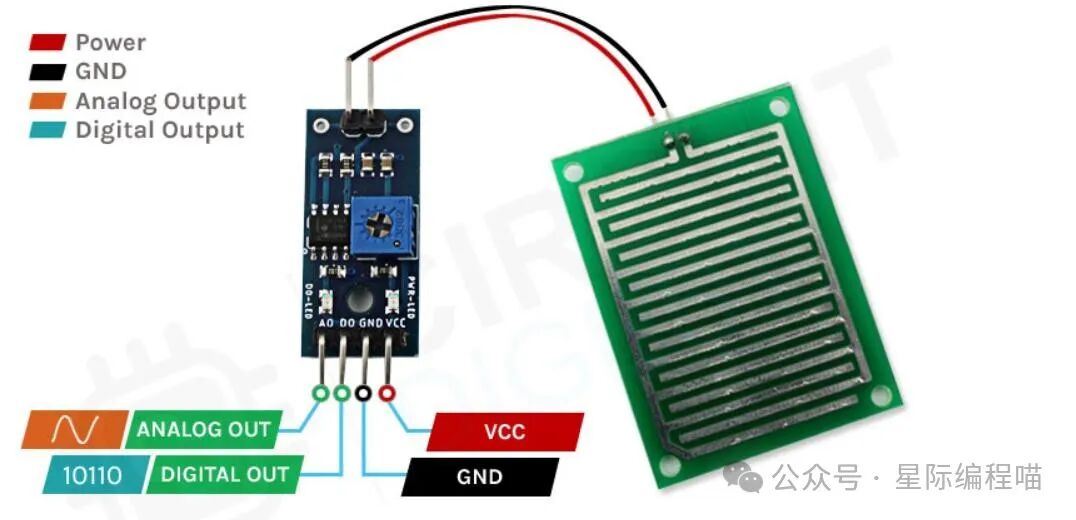
- VCC is the power pin for the rain detection sensor, which can be connected to a 3.3V or 5V power supply. However, note that the analog output voltage will vary based on the supplied power voltage.
- GND is the ground pin of the circuit board, which must be connected to the Arduino’s ground pin.
- Digital Output is the digital output pin, which outputs a low level when rain is detected; it outputs a high level when no rain is detected.
- Analog Output is the analog output pin, which provides an analog signal between VCC and ground; the higher the humidity, the lower the output voltage.
Working Principle of the Rain Detection Sensor
The working principle of the rain detection sensor is quite simple, as shown in the diagram below. The sensor’s PCB consists of multiple exposed conductive plates arranged in a grid. When raindrops fall on the sensor, the resistance of the conductive plates changes, and by measuring this change in resistance, we can determine the intensity of the rainfall. The heavier the rain, the lower the resistance.
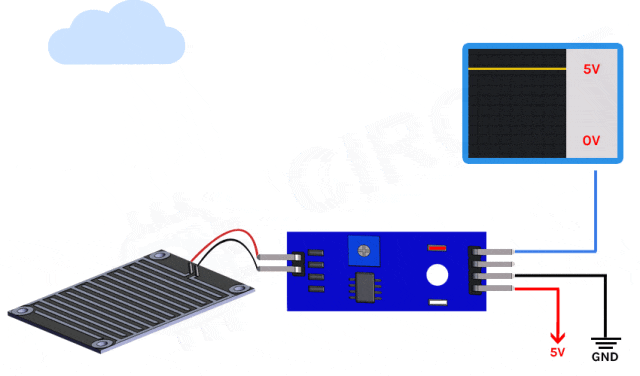
The animation above demonstrates how the analog output of the rain detection sensor changes with the falling raindrops. As you can see, when raindrops begin to fall, the voltage gradually decreases from VCC to 0V. You can also see that when the voltage drops to the set threshold, the trigger LED on the circuit board lights up; this threshold can be adjusted via the potentiometer. To simplify the explanation, the animation does not show how the digital part of the circuit operates, but it is quite simple: when the voltage reaches the set threshold (adjusted via the potentiometer), the output of the rain detection sensor module will drop, and the trigger LED will light up.
In other words, this sensor acts like a “weather detective” that determines rainfall intensity by sensing changes in rainwater. When raindrops begin to fall, the voltage change directly reflects the strength of the precipitation, while the LED light can provide real-time feedback about the weather conditions outside.
Rain Detection Sensor – Components
The entire rain detection sensor module consists of two parts: the rain detection sensor PCB and the signal processing module. The signal processing module is responsible for processing the data coming from the sensor PCB and can output both analog and digital data simultaneously.
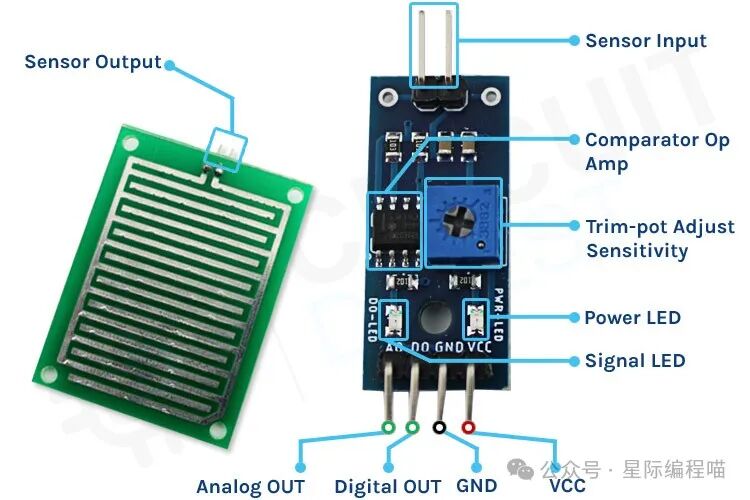
The sensor module has four pins, two of which connect to VCC and GND, while the other two pins can output both analog and digital data simultaneously. As shown in the image above, the module has two LED indicators. The power LED lights up when power is supplied, and the other LED lights up when the threshold set by the potentiometer is reached. This module also includes a comparator operational amplifier (OP-Amp), which is responsible for converting the analog signal received from the photodiode into a digital signal.
Additionally, we can adjust the sensitivity using the potentiometer, making it easy to fine-tune the device’s responsiveness. Ultimately, the rain detection sensor consists of the rain detection PCB and the signal processing module, which work together to monitor precipitation conditions in real-time.
In simple terms, this module acts like a “super-powered assistant” that can receive analog data, convert it into digital signals, and provide clear information about every raindrop’s arrival through LED indicators and sensitivity adjustments.
Rain Detection Sensor Module Circuit Diagram
The following shows the circuit schematic of the rain detection sensor module. This circuit is very simple and only requires some common basic components for construction. If you do not have a ready-made module but still want to test the project, this circuit diagram will be very helpful.
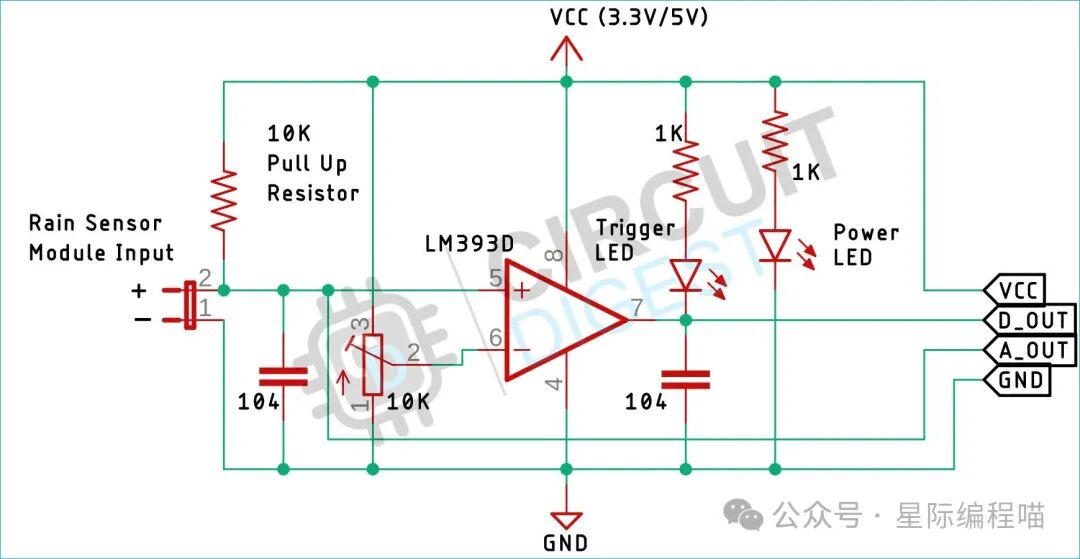
In the circuit diagram, we see an LM393 operational amplifier, which is a low-power, low-offset voltage operational amplifier that can be powered by a 3.3V or 5V supply. It is important to note that the analog output voltage of the device will depend on the supply voltage. The main task of this operational amplifier is to convert the analog signal received from the sensor probe into a digital signal. The circuit also includes a 10K potentiometer, which is used to set the reference voltage for the operational amplifier. If the input voltage of the sensor is below the threshold set by the potentiometer, the output of the operational amplifier will drop.
Additionally, there are two LED indicators. The first is the power LED, which lights up when power is connected; the other is the trigger LED, which lights up when the input signal exceeds the set threshold. This is the working principle of this basic circuit.
In other words, this circuit can sensitively capture the arrival of raindrops by adjusting the potentiometer and the operational amplifier, and it informs you whether it is raining through the LED light. Every detail determines how your “weather assistant” performs!
Mathematical Formula
To make the sensor smarter and accurately measure rainfall intensity, we must use some mathematical tools to “train” the sensor. Here we use a linear normalization formula to convert the analog signal output from the sensor and calculate the rainfall intensity.
Assuming:
- R represents the analog signal output from the sensor, ranging from 0-1023
- I represents the rainfall intensity, ranging from 0%-100%
The formula is:

Understanding the Formula:
- When R = 1023, it indicates no rain, with rainfall intensity I = 0%, in dry conditions;
- When R = 0, it indicates heavy rain, with rainfall intensity I = 100%, in torrential rain.
In simple terms, the larger the R, the drier it is, and the smaller the I; the smaller the R, the heavier the rain, and the larger the I. Through this formula, we can not only determine whether it is raining but also assess the intensity of the precipitation, providing accurate data support for smart homes, agriculture, and other systems!
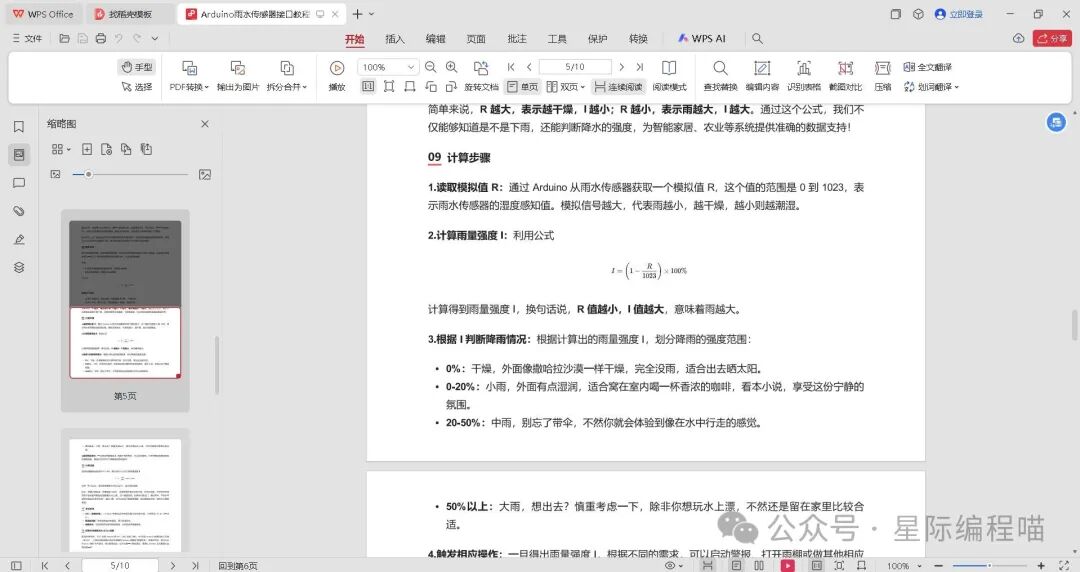
Calculation Steps
1. Read the Analog Value R: Obtain an analog value R from the rainwater sensor through Arduino, with a range of 0 to 1023, representing the humidity perception value of the rainwater sensor. The larger the analog signal, the less rain, and the drier it is; the smaller the value, the more humid it is.
2. Calculate Rainfall Intensity I: Use the formula
to calculate the rainfall intensity I; in other words, the smaller the R value, the larger the I value, indicating heavier rain.
3. Determine Rainfall Conditions Based on I: Based on the calculated rainfall intensity I, classify the intensity of rainfall:
- 0%: Dry, as dry as the Sahara Desert, completely no rain, suitable for sunbathing.
- 0-20%: Light rain, slightly damp outside, perfect for curling up indoors with a cup of coffee and a good book, enjoying the tranquility.
- 20-50%: Moderate rain, don’t forget to bring an umbrella, or you’ll feel like you’re walking in water.
- 50% and above: Heavy rain, thinking of going out? Think twice, unless you want to play in the water; otherwise, it’s better to stay home.
4. Trigger Corresponding Actions: Once the rainfall intensity I is determined, you can trigger alarms, open awnings, or perform other smart controls based on different needs, ensuring you can stay dry in any weather!
Calculation Process
Assuming the output value from the sensor is R = 400, let’s substitute it into the formula to calculate the rainfall intensity I:

Thus, I ≈ 60.9%, indicating that the rainfall intensity is approximately 60.9%, which falls within the heavy rain range.
Conclusion: Based on the calculation result, the rainfall intensity is 60.9%, meaning it is raining heavily outside. Hurry and bring in the laundry, or your hard-dried clothes might turn into a wet “water float”. If you plan to go out in this intensity of rain, it’s advisable to take an umbrella, or you might experience a “luxurious shower”! Through calculations, you can always understand the rainfall intensity and make smart decisions to avoid unnecessary troubles!
Technical Terms
- ADC (Analog to Digital Conversion): The process by which Arduino converts analog signals into digital signals, with a resolution of 10 bits (0-1023).
- Raindrop Detection Board: A circuit board with conductive strips used to detect rainwater.
- Resistance Change: The conductivity of water affects the circuit resistance, thereby changing the sensor output.
Connecting the Rainwater Sensor to Arduino
If you want the source code, please contact me privately, and we can discuss purchasing arrangements.
Example Code
If you want the source code, please contact me privately, and we can discuss purchasing arrangements.
Running Results


Funny Story
Little Meow is a very meticulous scientist, immersed in laboratory work every day, completely ignoring the changes in the weather outside. One day, during a break from experiments, he decided to take advantage of the sunny day to dry his clothes. Due to limited space at home, the clothes rack became an important part of his life. But that day, fate played a big prank on him.
Just as he finished hanging the clothes and returned to the lab with satisfaction, a sudden downpour soaked his clothes, turning them into “drenched chickens.” The raindrops pounded against the window like they had gone “mad,” giving him no time to react. Seeing this scene, Little Meow was completely unprepared and had to rush to collect the clothes, filled with deep regret over his choice.
This experience made Little Meow reflect deeply: if he had a “smart umbrella detector” that could warn him as soon as it started to rain, wouldn’t that help him avoid such an embarrassing situation of being a “drenched chicken”?
So, Little Meow picked up his Arduino and decisively decided to make a “smart umbrella detector” himself. He installed a raindrop sensor, connected it to the Arduino, and when the sensor detected raindrops, it immediately issued a voice warning: “Hurry and collect the clothes, or your hard-dried clothes might turn into a wet ‘water float.’ Otherwise, you’ll be a drenched chicken again!”
Little Meow proudly thought that this little device would become a “good helper” in his future life, and he would no longer fear sudden rainstorms soaking his clothes. However, he never expected that his idea would bring unexpected trouble.
One day, the sun was shining brightly at home, and the blue sky and white clouds outside looked like a carefully painted picture. Little Meow was happily enjoying a leisurely afternoon with his headphones on when suddenly—an alarm blared in his ears: “Hurry and open the umbrella! Heavy rain is coming!”
He was startled and almost fell off his chair, his mind blank. Could it be that it suddenly started to rain outside? He rushed to the window to look, and the sky was clear, not a cloud in sight! He turned back to his Arduino, only to see the raindrop sensor still sending signals.
“I forgot to turn off the alarm!” Little Meow sighed helplessly, thinking that he might be too immersed in the world of technology to remember such a small detail.
At that moment, Little Meow’s family walked in, saw his shocked expression, and couldn’t help but burst into laughter. “Do we need an umbrella on a sunny day?” “Looks like our ‘smart scientist’ really needs a reminder!”
The whole family laughed heartily, filling the room with a joyful atmosphere. Little Meow felt both funny and cute, as who would have thought that the smart umbrella detector he invented could bring such laughter on a sunny day?
From then on, whenever he was doing research at home, his family would jokingly ask, “Little Meow, is it raining outside? Does your magical umbrella detector need to issue a warning?”
This unexpected little episode not only brought laughter to Little Meow’s family but also made him realize that while the power of technology is indeed strong, sometimes its humor and surprises are irreplaceable!
Frequently Asked Questions
1. Why does the data measured by the sensor always appear very high or very low?
It may be that the sensor has not completely dried after getting wet, or there may be wiring errors; ensure that the analog input is connected correctly!
2. How can I make the measurements more accurate?
Increase filtering algorithms, such as averaging multiple measurement values to reduce random errors.
Applicable Scenarios
- Smart Umbrella: Automatically opens the umbrella or reminds you to take one.
- Automatic Window Closure: Automatically closes windows when it rains, protecting home furniture.
- Agricultural Monitoring: Detects rainfall conditions and automatically controls irrigation systems.
- Smart Awning: Automatically extends when it rains and retracts when the rain stops.
Precautions
- The rainwater sensor is prone to corrosion: Prolonged exposure to rainwater may lead to metal corrosion; it is recommended to replace it regularly or use a waterproof coating.
- Do not allow the sensor to short-circuit: Accumulated water may cause a short circuit; ensure proper placement of the sensor.
- Avoid false triggers: High humidity may cause the sensor to falsely report; it is recommended to optimize the algorithm in conjunction with temperature and humidity sensors.
Best Practices
- Data Filtering: Read multiple data points and take the average to improve stability.
- Combine with Weather API: Integrate online weather data to enhance accuracy.
- Low Power Mode: Reduce power consumption to make the device more energy-efficient.
Conclusion
This tutorial provides a detailed explanation of the working principle, calculation methods, code examples, and application scenarios of the Arduino rainwater sensor, helping you easily achieve rainfall detection and measurement. Whether for smart homes, agricultural monitoring, or to prevent yourself from becoming a “drenched chicken” again, this project can be useful! With simple hardware connections and basic code, you can turn your Arduino into a little assistant that “watches the sky,” predicting the weather and preparing in advance. Smart living starts with a small Arduino board.
No matter if it’s pouring rain or a light drizzle outside, the Arduino can accurately tell you the answer. Come and give it a try, and let your Arduino become a “weather forecaster,” so you will no longer fear sudden storms, mastering changes in the weather and traveling with peace of mind at any time!