Scan to FollowLearn Embedded Together, Learn Together, Grow Together

Hello everyone, I previously shared some articles related to makefiles:
Some General Makefile Templates
Today, I am sharing an article about CMake, which can generate local Makefiles without having to write complex Makefiles.
Introduction
CMake is an open-source, cross-platform build tool that allows us to generate local Makefiles by writing simple configuration files. These configuration files are independent of the runtime platform and compiler, so we don’t have to write Makefiles ourselves, and they can be used on other platforms without modification, which is very convenient.
This article mainly discusses how to use CMake to compile our programs on Linux.
1. Environment Setup
I am using Ubuntu 18.04, and to install CMake, use the following command:
sudo apt install cmakeAfter installation, enter the following in the terminal:
cmake -versionto check the CMake version.

Now CMake is installed.
2. Getting Started
Let’s start with the simplest code to experience how CMake works.
2.1 Project Structure

2.2 Example Source Code
Open the terminal and enter:
touch main.c CMakeLists.txtWrite the following in main.c:
#include <stdio.h>

int main(void)
{
	printf("Hello World\n");
	return 0;
}
Then, in the same directory as main.c, write the following in CMakeLists.txt:
cmake_minimum_required (VERSION 2.8)

project (demo)

add_executable(main main.c)
2.3 Running and Checking
Change to the directory where main.c is located in the terminal, then enter the following command to run CMake:
cmake .The output will be as follows:
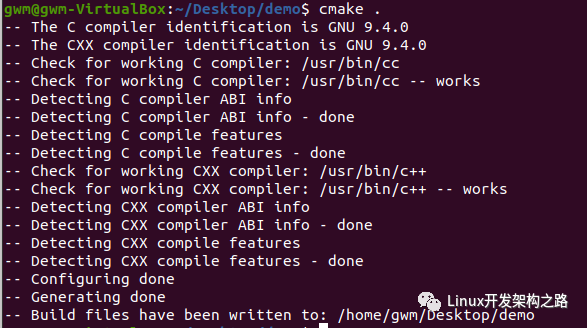
Note: At this point, pay attention to the files generated in this folder.

We can see that a Makefile was successfully generated, along with some files automatically generated by CMake during runtime.
Then enter make in the terminal:
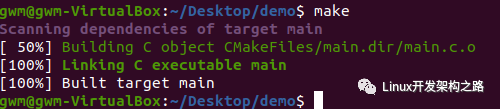
You can see the progress of the Makefile generated by CMake displayed with color. Now let’s check the files in the directory:

We can see that the executable file main has been successfully generated!
Now run main:

Run successful!
PS: If you want to regenerate main, just enter make clean to delete the main file. Then just make again. Please note: I hope you pay special attention to the files generated in this folder at this time.
3. Compiling Multiple Source Files
3.1 Having Multiple Source Files in the Same Directory
3.1.1 Simple Version
Now let’s move on to a slightly more complex example: having multiple source files in the same directory.
3.1.1.1 Project Structure
3.1.1.2 Example Code
First, delete the previous files:
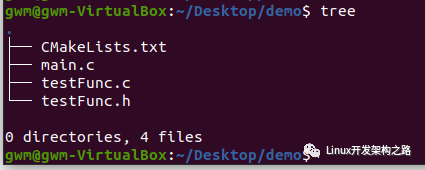
rm -rf CMakeFiles CMakeCache.txt cmake_install.cmake Makefile mainAdd two files, testFunc.c and testFunc.h, in the previous directory:
touch testFunc.c testFunc.hAfter adding, the overall file structure is as follows:

testFunc.c
/*
** testFunc.c
*/

#include <stdio.h>
#include "testFunc.h"

void func(int data)
{
	printf("data is %d\n", data);
}
testFunc.h
/*
** testFunc.h
*/

#ifndef _TEST_FUNC_H_
#define _TEST_FUNC_H_

void func(int data);

#endif
Modify main.c to call the function func() declared in testFunc.h:
main.c
#include <stdio.h>

#include "testFunc.h"

int main(void)
{
	func(100);
	return 0;
}
Modify CMakeLists.txt to add testFunc.c in the parameters of add_executable:
CMakeLists.txt
cmake_minimum_required (VERSION 2.8)

project (demo)

add_executable(main main.c testFunc.c)
3.1.1.3 Running and Checking
cmake .
make
Then run and check:

Run successful!
It can be inferred that if there are multiple source files in the same directory, just add all the source files in add_executable.
However, if there are a hundred source files, doing it this way can be a bit cumbersome and does not reflect the advantages of CMake. Therefore, CMake provides a command to store all source files in a specified directory in a variable, and this command is:
aux_source_directory(dir var)The first parameter dir is the specified directory, and the second parameter var is the variable used to store the source file list.
Next, let’s write an advanced version of the demo using this variable.
3.1.2 Advanced Version
3.1.2.1 Project Structure
3.1.2.2 Example Code
Delete unrelated files
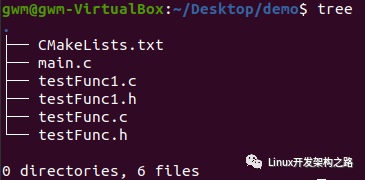
rm -rf CMakeFiles CMakeCache.txt cmake_install.cmake main MakefileCreate files:
touch testFunc1.c testFunc1.htestFunc1.c
/*
** testFunc1.c
*/

#include <stdio.h>
#include "testFunc1.h"

void func1(int data)
{
	printf("data is %d\n", data);
}
testFunc1.h
/*
** testFunc1.h
*/

#ifndef _TEST_FUNC1_H_
#define _TEST_FUNC1_H_

void func1(int data);

#endif
Next, modify main.c to call the function func1() declared in testFunc1.h:
main.c
#include <stdio.h>

#include "testFunc.h"
#include "testFunc1.h"

int main(void)
{
	func(100);
	func1(200);

	return 0;
}
Modify CMakeLists.txt:
CMakeLists.txt
cmake_minimum_required (VERSION 2.8)

project (demo)

aux_source_directory(. SRC_LIST)

add_executable(main ${SRC_LIST})
Use aux_source_directory to store the source files in the current directory into the variable SRC_LIST;
Then call SRC_LIST in add_executable (note the syntax when calling the variable).
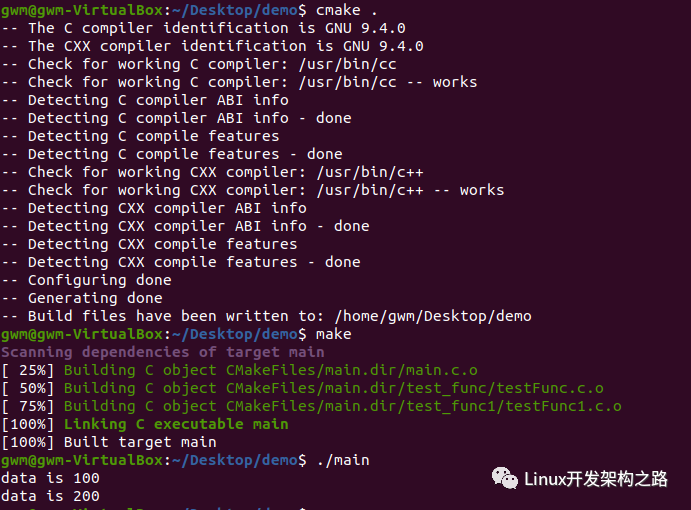
3.1.2.3 Running and Checking
Run cmake and make again, and run main:
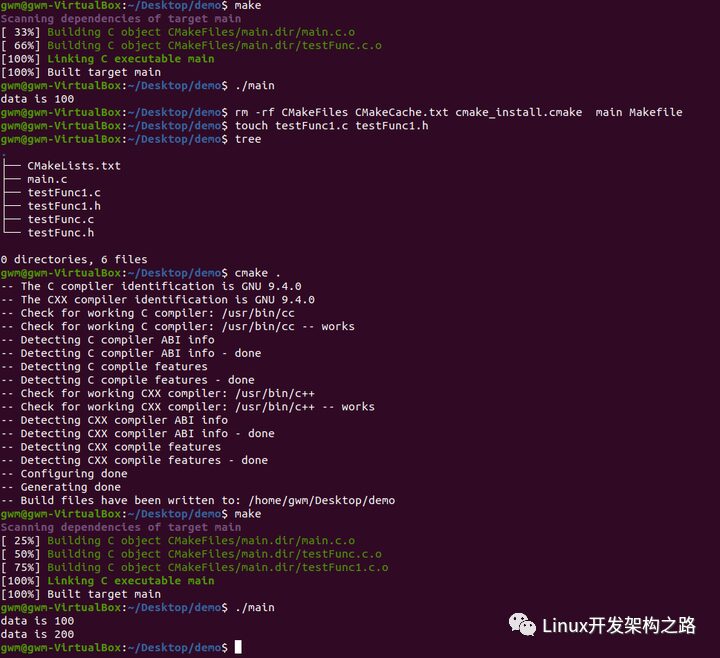
It can be seen that it ran successfully.
aux_source_directory() also has drawbacks; it will add all source files in the specified directory, which may include some files we don’t need. In this case, we can use the set command to create a variable to store the required source files, as follows:
cmake_minimum_required (VERSION 2.8)

project (demo)

set( SRC_LIST
	 ./main.c
	 ./testFunc1.c
	 ./testFunc.c)

add_executable(main ${SRC_LIST})
3.2 Having Multiple Source Files in Different Directories
Generally speaking, when there are many program files, we will manage them categorically, placing code in different directories based on functionality for easier searching. So how do we write CMakeLists.txt in this case?
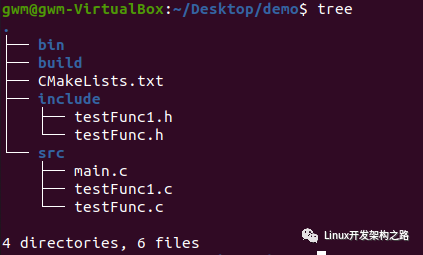
3.2.1 Project Structure
We will organize the previous source files (create two new directories test_func and test_func1):
rm -rf CMakeFiles CMakeCache.txt cmake_install.cmake main MakefileAfter organizing, the overall file structure is as follows:

Move the previous testFunc.c and testFunc.h into the test_func directory, and testFunc1.c and testFunc1.h into the test_func1 directory.
3.2.2 Example Code
Here, CMakeLists.txt and main.c are in the same directory, and the content is modified as follows:
cmake_minimum_required (VERSION 2.8)

project (demo)

include_directories (test_func test_func1)

aux_source_directory (test_func SRC_LIST)
aux_source_directory (test_func1 SRC_LIST1)

add_executable (main main.c ${SRC_LIST} ${SRC_LIST1})
A new command appears here: include_directories.
This command is used to add multiple specified header file search paths to the project, with paths separated by spaces.
Since main.c includes testFunc.h and testFunc1.h, if this command is not used to specify the location of the header files, it will not compile. Of course, you can also specify the path in main.c like this:
#include "test_func/testFunc.h"
#include "test_func1/testFunc1.h"
This way of writing is not very elegant. Additionally, we used aux_source_directory twice because the source files are distributed in two directories, so we added it twice.
3.2.2 Running and Checking
4. Project-Level Organizational Structure
Generally speaking, we usually place source files in the src directory, header files in the include directory, generated object files in the build directory, and the final output executable program files in the bin directory, making the entire structure clearer.
4.1 Project Structure
Let’s reorganize the previous files:
4.2 Example Code
Modify CMakeLists.txt:
CMakeLists.txt
cmake_minimum_required (VERSION 2.8)

project (demo)

add_subdirectory (src)
add_subdirectory: This statement adds a subdirectory for compilation. Its basic syntax is:
add_subdirectory(source_dir [binary_dir] [EXCLUDE_FROM_ALL])There are three parameters in total, with the latter two being optional.
-
source_dir: Source code directory
Specifies a directory containing CMakeLists.txt and code files, which can be an absolute or relative path. For the latter, the starting point of the relative path is CMAKE_CURRENT_SOURCE_DIR. Additionally, if the subdirectory contains its own CMakeLists.txt, it will continue processing the inner CMakeLists.txt rather than continuing with the current source code.
-
binary_dir: Binary code directory
This directory is optional; if specified, the output files after executing the cmake command will be stored here. If not specified, the default is the path of source_dir before relative path calculation, which is CMAKE_BINARY_DIR.
-
EXCLUDE_FROM_ALL flag
This flag is optional; if this parameter is passed, the newly added subdirectory will be excluded from the ALL directory (possibly from make all in the make system?), indicating that this directory will be excluded from the IDE project. Users must explicitly compile this target in the subdirectory (manually cmake, etc.). Specifying this folder indicates that it is independent of the source project; these functions are useful but not necessary, such as a series of examples.
add_subdirectory is used to add source file subdirectories, and it can also specify intermediate binary and target binary generation paths. EXCLUDE_FROM_ALL will exclude this directory from compilation, as examples in the project need to wait for other compilations to complete before being compiled separately. Typically, subdirectories should contain their own project() command so that the entire compilation command generates its own target files. If we compare CMakeLists.txt with VS IDE, the top-level CMakeLists.txt is equivalent to a solution, while the sub-CMakeLists.txt is equivalent to a project file under that solution. Another point to note is that if the parent CMakeLists depends on source files in the sub-CMakeLists when compiling, this flag will be overridden (i.e., it will also be processed) to satisfy the compilation task.
Here, we specify that the source files are stored in the src directory. When executing cmake, it will go into the src directory to find the CMakeLists.txt there, so also create a CMakeLists.txt in the src directory with the following content:
src/CMakeLists.txt
aux_source_directory (. SRC_LIST)

include_directories (../include)

add_executable (main ${SRC_LIST})

set (EXECUTABLE_OUTPUT_PATH ${PROJECT_SOURCE_DIR}/bin)
Here, set is actually the same as before; EXECUTABLE_OUTPUT_PATH is a system-defined predefined variable with the following meaning:
-
EXECUTABLE_OUTPUT_PATH: The storage location of the target binary executable file
-
PROJECT_SOURCE_DIR: The root directory of the project
So here, the set means to set the location for storing ELF files to the bin directory under the project root directory. (CMake has many predefined variables; detailed information can be searched online)
After adding these two CMakeLists.txt files, the overall file structure is as follows:

4.3 Running and Checking
Now let’s run cmake, but this time let’s change to the build directory first:
cd build
cmake ..
make
This way, the Makefile will be generated in the build directory, and the binary program will be generated in the bin directory. Then run the executable program:
cd ../bin
./main
Here, let me explain why we run cmake in the build directory. Remember in the first example I asked you to pay special attention to what files are generated after running cmake and make? Many files will be generated in this process, but unfortunately, they have nothing to do with our execution. Therefore, if we can isolate the compilation in a specific folder, all intermediate files generated during this cmake process will be created in that directory, making it very convenient to delete them later. If we do not do this, the auxiliary files generated during the cmake run will be mixed with the source files, which will pollute the directory structure of the program. Another way of writing: the previous project used two CMakeLists.txt files; the outer CMakeLists.txt is used to control the global settings, using add_subdirectory to control the execution of other CMakeLists.txt in different directories.
The above example can also use only one CMakeLists.txt; just change the content of the outer CMakeLists.txt to the following:
CMakeLists.txt
cmake_minimum_required (VERSION 2.8)

project (demo)

set (EXECUTABLE_OUTPUT_PATH ${PROJECT_SOURCE_DIR}/bin)

aux_source_directory (src SRC_LIST)

include_directories (include)

add_executable (main ${SRC_LIST})
At the same time, the CMakeLists.txt in the src directory should be deleted.
Then you can compile and run normally.
5. Compilation Control of Dynamic and Static Libraries
Sometimes we only need to compile dynamic and static libraries and wait for other programs to use them. Let’s see how to use CMake in this situation.
5.1 Generating Library Files
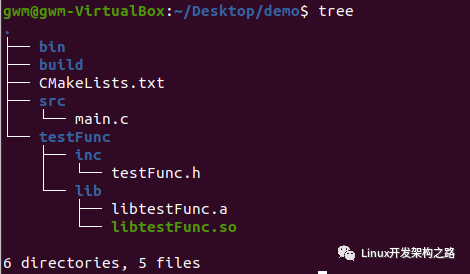
5.1.1 Project Structure
First, reorganize the files as follows, keeping only testFunc.h and TestFunc.c:

We will run cmake in the build directory and store the generated library files in the lib directory.
5.1.2 Example Code
CMakeLists.txt
cmake_minimum_required (VERSION 3.5)

project (demo)

set (SRC_LIST ${PROJECT_SOURCE_DIR}/testFunc/testFunc.c)

add_library (testFunc_shared SHARED ${SRC_LIST})
add_library (testFunc_static STATIC ${SRC_LIST})

set_target_properties (testFunc_shared PROPERTIES OUTPUT_NAME "testFunc")
set_target_properties (testFunc_static PROPERTIES OUTPUT_NAME "testFunc")

set (LIBRARY_OUTPUT_PATH ${PROJECT_SOURCE_DIR}/lib)
Here, new commands and predefined variables appear:
-
add_library: Generates dynamic or static libraries (the first parameter specifies the library name; the second parameter determines whether it is dynamic or static, defaulting to static if not specified; the third parameter specifies the source files for generating the library)
-
set_target_properties: Sets the final generated library name and other features, such as setting library version numbers, etc.
-
LIBRARY_OUTPUT_PATH: The default output path for library files, set here to the lib directory under the project directory
PS: Previously, we used set_target_properties to redefine the output name of the library. If set_target_properties is not used, the library name will be the name defined in add_library; however, when specifying the library name using add_library twice (the first parameter), the names cannot be the same. Using set_target_properties allows the name to be the same, but the final generated library file will have different suffixes (one will be .so, the other will be .a), which looks better in comparison.
5.1.3 Running and Checking
cd build/
cmake ..
make
cd ../lib/
ls
5.2 Linking Library Files
Since we have generated the library, let’s perform a linking test.
5.2.1 Project Structure
Recreate a project directory, copy the generated library over, and create src and bin directories in the project directory. Add a main.c file in the src directory, resulting in the following structure:
5.2.2 Example Code
main.c
#include <stdio.h>

#include "testFunc.h"

int main(void)
{
	func(100);

	return 0;
}
CMakeLists.txt
cmake_minimum_required (VERSION 3.5)

project (demo)

set (EXECUTABLE_OUTPUT_PATH ${PROJECT_SOURCE_DIR}/bin)

set (SRC_LIST ${PROJECT_SOURCE_DIR}/src/main.c)

# find testFunc.h
include_directories (${PROJECT_SOURCE_DIR}/testFunc/inc)

find_library(TESTFUNC_LIB testFunc HINTS ${PROJECT_SOURCE_DIR}/testFunc/lib)

add_executable (main ${SRC_LIST})

target_link_libraries (main ${TESTFUNC_LIB})
Two new commands appear here:
-
find_library: Searches for the specified library in the specified directory and stores the absolute path of the library in a variable. The first parameter is the variable name, the second parameter is the library name, and the third parameter is HINTS, with other usages available in the CMake documentation.
-
target_link_libraries: Links the target file with the library file
The benefit of using find_library is that it will check whether the library exists during the execution of cmake…, allowing for early error detection instead of waiting until the linking stage.
5.2.3 Running and Checking
Change to the build directory, then run cmake… && make. Finally, go to the bin directory and check that main has been generated, then run it:
cd build/
cmake ..
make
cd ../bin/
./main

PS: In the lib directory, there are static and dynamic libraries of testFunc. find_library(TESTFUNC_LIB testFunc… defaults to searching for dynamic libraries. If you want to specify directly whether to use a dynamic or static library, you can write find_library(TESTFUNC_LIB libtestFunc.so… or find_library(TESTFUNC_LIB libtestFunc.a…
PS: To check which libraries the ELF file uses, you can use readelf -d ./xx, for example: readelf -d ./main
6. Conditional Compilation
Sometimes when compiling a program, you want to add some compilation options, such as -Wall, -std=c++11, etc., which can be done using add_compile_options. Here’s a simple program to demonstrate.
6.1 Simple Program
6.1.1 Project Structure

6.1.2 Example Code
main.cpp
#include <iostream>

int main(void)
{
	auto data = 100;
	std::cout << "data: " << data << "\n";
	return 0;
}
CMakeLists.txt
cmake_minimum_required (VERSION 2.8)

project (demo)

set (EXECUTABLE_OUTPUT_PATH ${PROJECT_SOURCE_DIR}/bin)

add_compile_options(-std=c++11 -Wall)

add_executable(main main.cpp)
6.1.3 Running and Checking
Then cd to the build directory and execute cmake… && make to obtain the executable file main in the bin directory.
6.2 Adding Compilation Options
Sometimes you may wish to compile only specific source files during compilation. You can use the option command in CMake. The main situations encountered can be divided into two types:
-
Originally generating multiple bin or library files, now only wanting to generate a portion of specified bin or library files
-
For the same bin file, only wanting to compile part of the code (using macros to control)
6.2.1 Generating Partially Specified Bin or Library Files
6.2.1.1 Project Structure
Suppose our project will generate two bin files, main1 and main2, with the following project structure:

6.2.1.2 Example Code
CMakeLists.txt
cmake_minimum_required(VERSION 3.5)

project(demo)

option(MYDEBUG "enable debug compilation" OFF)

set (EXECUTABLE_OUTPUT_PATH ${PROJECT_SOURCE_DIR}/bin)

add_subdirectory(src)
Here, the option command is used. The first parameter is the name of this option, the second parameter is a string describing what this option does, and the third is the value of the option, ON or OFF. If not written, it defaults to OFF.
Then write the CMakeLists.txt in the src directory as follows:
src/CMakeLists.txt
cmake_minimum_required (VERSION 3.5)

add_executable(main1 main1.c)

if (MYDEBUG)
    add_executable(main2 main2.c)
else()
    message(STATUS "Currently is not in debug mode")
endif()
Note that here we use if-else to decide whether to compile main2.c based on the option, where the contents of main1.c and main2.c are as follows:
main1.c
// main1.c
#include <stdio.h>

int main(void)
{
	printf("hello, this main1\n");

	return 0;
}
main2.c
// main2.c
#include <stdio.h>

int main(void)
{
	printf("hello, this main2\n");

	return 0;
}
6.2.1.3 Running and Checking
Then cd to the build directory and enter cmake… && make to compile only main1. If you want to compile main2, set MYDEBUG to ON and re-enter cmake… && make to recompile.
Each time you want to change MYDEBUG, you need to modify CMakeLists.txt, which can be a bit cumbersome. In fact, you can operate through the command line of cmake, for example, if we want to set MYDEBUG to OFF, first cd to the build directory and then enter cmake… -DMYDEBUG=ON, then you can compile both main1 and main2 (in the bin directory).
6.2.2 Compiling Part of the Code
Suppose we have a main.c file with the following content:
main.c
#include <stdio.h>

int main(void)
{
#ifdef WWW1
	printf("hello world1\n");
#endif

#ifdef WWW2
	printf("hello world2\n");
#endif

	return 0;
}
You can control the printed information through macro definitions. The content of our CMakeLists.txt is as follows:
cmake_minimum_required(VERSION 3.5)

project(demo)

set (EXECUTABLE_OUTPUT_PATH ${PROJECT_SOURCE_DIR}/bin)

option(WWW1 "print one message" OFF)
option(WWW2 "print another message" OFF)

if (WWW1)
    add_definitions(-DWWW1)
endif()

if (WWW2)
    add_definitions(-DWWW2)
endif()

add_executable(main main.c)
Here, the names of the options are kept consistent with the macro names in main.c, making it more intuitive, though different names can also be chosen. By combining with add_definitions(), you can control the output of a single bin file.
The overall project structure is as follows:

cd to the build directory, execute cmake… && make, and then execute ./main in the bin directory, you will find the print output is empty.
Next, execute the following commands to see the printing effects:
-
cmake… -DWWW1=ON -DWWW2=OFF && make
-
cmake… -DWWW1=OFF -DWWW2=ON && make
-
cmake… -DWWW1=ON -DWWW2=ON && make
There is a small pitfall to note: suppose there are two options named A and B. If you first call cmake to set A, and then call cmake to set B without deleting the cache file generated from the previous cmake execution, this time, even though B is not set, it will still default to the last value of A.
So if the options change, you either need to delete the cache files generated from the previous cmake execution or explicitly specify the values for all options.
Conclusion
The above is a record of my learning CMake, providing a simple example to help everyone get started with CMake. While learning, I also read many blogs from other netizens. There are many more knowledge points related to CMake; specific details can be searched online.
In short, CMake allows us to avoid writing complex Makefiles and is cross-platform, making it a powerful tool worth learning.
This article is sourced from the internet, and the copyright belongs to the original author. If there is any infringement, please contact us for deletion.


If you think this article is good, click “Share“, “Like“, or “View“!