Source丨https://blog.csdn.net/zhanghm1995/article/details/80902807
Editor丨3D Vision Workshop
CMake requires that a CMakeLists.txt file be created in the main project directory and all subdirectories containing source code. Pay attention to case sensitivity (CM is uppercase, Lists has an uppercase L and do not omit the s).
CMake variables are accessed using the ${} syntax, but in IF control statements, the variable name is used directly.
Environment variables are accessed using the $ENV{} syntax and can be set using SET(ENV{VAR} VALUE).
Command(Argument1 Argument2…)
Arguments are enclosed in parentheses, separated by spaces or semicolons.
Taking the ADD_EXECUTABLE command as an example:
ADD_EXECUTABLE(hello main.c func.c)
ADD_EXECUTABLE(hello main.c;func.c)
Note: Commands are case insensitive, while parameters and variables are case sensitive. I generally prefer to use lowercase.
Common CMakeLists.txt Command Analysis
·cmake_minimum_required(VERSION 2.6) Command
This command specifies the minimum version of CMake required. This line is optional, and it can be omitted, but in some cases, if the CMakeLists.txt file uses commands that are specific to a higher version of CMake, this line needs to be added to remind users to upgrade to that version before executing CMake.
·project(<projectname>) Command
Syntax: project(projectname [cxx] [c] [java])
This command can specify the languages used in the project, where the options represent: C++, C, Java. If not specified, it defaults to supporting all languages.
The project name is specified, which indicates the file name of the generated .sln project under Visual Studio. The executable file ultimately generated by the project is not necessarily the same as the project name, but is specified by another command (add_executable).
By using the project command, a management structure is defined for the entire code project, which can be understood by establishing the project structure hierarchy in Visual Studio. All projects in Visual Studio are managed under a solution (.sln file), and a solution can contain multiple projects. The project command in CMake defines the name of the solution, and both add_executable and add_library commands will generate a project. CMake will automatically create corresponding folders for each project (including those generating executable files and those generating link libraries) to store compilation intermediate files.
However, this project name is still necessary, as there are two predefined variables in CMake: <projectname>_BINARY_DIR and <projectname>_SOURCE_DIR. Once a project name is specified using the project command, these two predefined variables are implicitly defined. In the case of internal compilation, the meanings of these two variables are the same, while in the case of external compilation, they refer to different contents. To understand the meanings of these two variables, we first need to understand what an out-of-source build is, which will be introduced below.
At the same time, CMake also predefines the PROJECT_BINARY_DIR and PROJECT_SOURCE_DIR variables, where PROJECT_BINARY_DIR is equivalent to <projectname>_BINARY_DIR, and PROJECT_SOURCE_DIR is equivalent to <projectname>_SOURCE_DIR. Therefore, in practical applications, it is strongly recommended to use PROJECT_BINARY_DIR and PROJECT_SOURCE_DIR variables, so that even if the project name changes, it will not affect the CMakeLists.txt file.
Meaning of Out-of-Source Builds:
The biggest difference between out-of-source builds and in-source builds is the working path when executing CMake. When we use CMake to build a project, we first need to specify **”Where is the source code”, then specify “Where to build the binaries”. If these two paths are the same, then all intermediate files and executable files generated by CMake will be stored in the project directory (the so-called root directory). However, if we first create a build folder under the project directory and then specify the path for “Where to build the binaries” to be that build folder, then intermediate files and executable files will be stored in the build directory. The advantages of the second method are obvious; it keeps the code directory tidy and since the generation, compilation, and installation occur in a directory different from the project directory, this method is called an “out-of-source build”.
Returning to the issue under the project command, in the case of out-of-source builds, the PROJECT_SOURCE_DIR points to the project directory just like in-source builds, while PROJECT_BINARY_DIR points to <project directory>/build. CMake strongly recommends using the out-of-source build method.
·ADD_SUBDIRECTORY Command
Syntax: ADD_SUBDIRECTORY(source_dir [binary_dir] [EXCLUDE_FROM_ALL])
This command tells CMake to look in the subdirectory for available CMakeLists.txt files.
This command is used to add a subdirectory that contains source files to the current project and can specify where to store intermediate binaries and target binaries. The EXCLUDE_FROM_ALL parameter means to exclude this directory from the compilation process. For example, the example project may require building the example directory separately after the project is completed.
In our project, we added the src directory to the project and stored the corresponding intermediate files and target files generated for the src directory in the bin directory. In the previous example of the “out-of-source build” method, intermediate files and target files will be stored in the build/srcobj directory.
This command tells the project to generate an executable file. It defines the file name of the executable file generated by the project and the header files and cpp files involved in the compilation.
If you want to specify the storage path for the generated executable file, you can set the value of the predefined variable EXECUTABLE_OUTPUT_PATH in CMake. For example, to place the generated executable file in the bin folder of the CMake compilation path, you can use: SET(EXECUTABLE_OUTPUT_PATH ${PROJECT_BINARY_DIR}/bin).
Syntax: ADD_LIBRARY(libname [SHARED|STATIC])
This command tells the project to generate a library file.
Finds the directory where the library is located. The syntax is as follows:
find_library ( <VAR> name | NAMES name1 [name2 ...] [NAMES_PER_DIR] [HINTS path1 [path2 ... ENV var]] [PATHS path1 [path2 ... ENV var]] [PATH_SUFFIXES suffix1 [suffix2 ...]] [DOC "cache documentation string"] [NO_DEFAULT_PATH] [NO_CMAKE_ENVIRONMENT_PATH] [NO_CMAKE_PATH] [NO_SYSTEM_ENVIRONMENT_PATH] [NO_CMAKE_SYSTEM_PATH] [CMAKE_FIND_ROOT_PATH_BOTH | ONLY_CMAKE_FIND_ROOT_PATH | NO_CMAKE_FIND_ROOT_PATH] )
FIND_LIBRARY(RUNTIME_LIB rt /usr/lib /usr/local/lib NO_DEFAULT_PATH)
CMake will search the directories, and if none of the directories contain the library, the value of RUNTIME_LIB will be set to NO_DEFAULT_PATH.
·SET Command – Used to Set Variables, Equivalent to Aliasing Variables
SET(CMAKE_BUILD_TYPE DEBUG) sets the compilation type to debug or release. The debug version will generate relevant debugging information, which can be debugged using GDB; the release version will not generate debugging information. When debugging is not possible, check whether this is set to debug.
SET(CMAKE_C_FLAGS_DEBUG “-g -Wall”) sets the compiler type.
CMAKE_C_FLAGS_DEBUG —- C Compiler
CMAKE_CXX_FLAGS_DEBUG —- C++ Compiler
·CMAKE_MODULE_PATH Variable – Defines the Path to CMake Modules
If your project is relatively complex, you may need to write some CMake modules (so-called CMake modules refer to files that internally define some variables indicating useful information such as header file paths and library file paths). These CMake modules are distributed with your project, and to allow CMake to find these modules when processing CMakeLists.txt, you need to set your CMake module path using the SET command.
SET(CMAKE_MODULE_PATH ${PROJECT_SOURCE_DIR}/cmake)
At this point, you can call your modules using the INCLUDE command.
·EXECUTABLE_OUTPUT_PATH and LIBRARY_OUTPUT_PATH Variables
We can redefine the EXECUTABLE_OUTPUT_PATH and LIBRARY_OUTPUT_PATH variables using the SET command to specify the final target binary location (the final generated CRNode executable file or the final shared library, excluding intermediate files generated during compilation).
The commands are as follows:
SET(EXECUTABLE_OUTPUT_PATH ${PROJECT_BINARY_DIR}/bin)
SET(LIBRARY_OUTPUT_PATH ${PROJECT_BINARY_DIR}/lib)
Note that where you ADD_EXECUTABLE or ADD_LIBRARY, if you need to change the target storage path, you should add the above definitions at that location.
Understanding CMakeLists Content from VS Project Configuration Process
Since I have been learning C++ programming in Visual Studio, I have dealt with many configurations related to header files, link libraries, and many compilation option settings. CMake configures the entire project with its own syntax rules, controlling the compilation process. Therefore, we can learn what some basic syntax in CMake is doing by comparing it with the configuration process in Visual Studio.
When using out-of-source builds, the CMakeLists.txt written is:
1. Create a CMakeLists.txt in the project folder
Also create a folder named build, and run cmake … in this folder to build the project; (provided that the source files are prepared in the project folder).
set(TARGET_NAME rimeserver); set the variable name for the project;
cmake_minimum_required(VERSION 2.8.12)
2. Set up dependencies and files in the CMakeLists.txt file
1) include_directories(${CMAKE_CURRENT_SOURCE_DIR}/include)
This includes the include folder at the same level as the CMakeLists.txt file, equivalent to setting include files in Visual Studio;
2) add_executable(${TARGET_NAME} ${SOURCES})
${TARGET_NAME} represents the project name variable you set;
${SOURCES} represents your source file variable;
add_executable indicates that the project generates an executable file;
This is equivalent to filling in project names step by step when creating a new project in Visual Studio.
3) add_dependencies(${TARGET_NAME} deploy)
deploy represents the project that your project depends on, ensuring that the deploy target is built before other targets;
4) target_link_libraries(${TARGET_NAME})
This specifies the lib files that the project depends on, equivalent to setting link libraries under the linker in Visual Studio;
5) set_target_properties(${TARGET_NAME} PROPERTIES LINK_FLAGS “/SUBSYSTEM:WINDOWS”)
This sets project properties, equivalent to various entries in the project properties settings page in Visual Studio.
CMake variable query website: https://gitlab.kitware.com/cmake/community/wikis/doc/cmake/Useful-Variables
Note: Thanks to the WeChat public account “3D Vision Workshop” for organizing this article.
Variable content needs to be referenced using the format ${variable_name}
You can use the message command to view the specific content of the variable
message(STATUS "The CMAKE_VERSION is ${CMAKE_VERSION}")message(STATUS "The CMAKE_SOURCE_DIR is ${CMAKE_SOURCE_DIR}")
You can set certain variable values in the CMakeLists.txt file using the set command
For example, set(CMAKE_BUILD_TYPE “Release”)
You can set variable values through CMake command line parameters
For example, cmake -DCMAKE_BUILD_TYPE=Release, this method will be overridden by the variable values set by the set command in the CMakeLists.txt file.
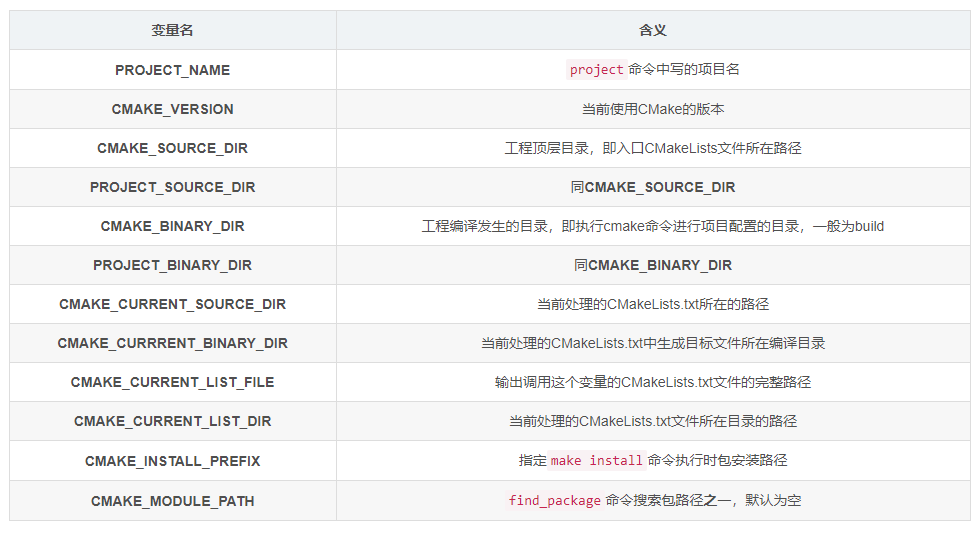
Compilation Configuration Related Variables:

Common CMakeLists File Templates
## This is a standard CMakeLists.txt template, including## how to enable C++11 compiler option and how to set 'Release'## target compile optioncmake_minimum_required(VERSION 2.8)project(cmake_template)############# Use message function to print information ############message(STATUS "CMake version: ${CMAKE_VERSION}")############ enable C++11 compiler################# Method 1include(CheckCXXCompilerFlag)CHECK_CXX_COMPILER_FLAG("-std=c++11" COMPILER_SUPPORTS_CXX11)CHECK_CXX_COMPILER_FLAG("-std=c++0x" COMPILER_SUPPORTS_CXX0X)if(COMPILER_SUPPORTS_CXX11) set(CMAKE_CXX_FLAGS "${CMAKE_CXX_FLAGS} -std=c++11")elseif(COMPILER_SUPPORTS_CXX0X) set(CMAKE_CXX_FLAGS "${CMAKE_CXX_FLAGS} -std=c++0x")else() message(WARNING "The compiler ${CMAKE_CXX_COMPILER} has no C++11 support.") message(STATUS "Please use a different C++ compiler.")endif()## Method 2set(CMAKE_CXX_STANDARD 11)############ #enable warnings##################set(CMAKE_CXX_FLAGS "${CMAKE_CXX_FLAGS} -fPIC -Wall")#############Set cmake compiler options################ Method 1set(CMAKE_BUILD_TYPE "Release")## Method 2IF(NOT CMAKE_BUILD_TYPE) SET(CMAKE_BUILD_TYPE RelWithDebInfo CACHE STRING "Choose the type of build, options are: None Debug Release RelWithDebInfo MinSizeRel." FORCE)ENDIF(NOT CMAKE_BUILD_TYPE)################## Some useful arguments ##########################set(CMAKE_INCLUDE_CURRENT_DIR ON)############Build#############add_library(lib hello.cpp)add_executable(main main.cpp)target_link_libraries(main ${LINK_LIBRARIES})
Using OpenCV Library CMakeLists File Template
cmake_minimum_required(VERSION 2.8.12)project(OpenCV_test)#find packagesfind_package(OpenCV REQUIRED)#include headersinclude_directories(${OpenCV_INCLUDE_DIRS})#target generationadd_executable(OpenCV_test main.cpp)#link librariestarget_link_libraries(OpenCV_test ${OpenCV_LIBS})
Using PCL Library CMakeLists File Template
cmake_minimum_required(VERSION 2.8.12)project(PCL_test)#find packagesfind_package(PCL 1.7 REQUIRED)add_definitions(${PCL_DEFINITIONS})#include headersinclude_directories(${PCL_INCLUDE_DIRS})#target generationadd_executable(PCL_test main.cpp)#link librariestarget_link_libraries(PCL_test ${PCL_LIBRARIES})
Using Eigen Library CMakeLists File Template
cmake_minimum_required(VERSION 2.8.12)project(Eigen_test)#find packagesfind_package(Eigen3 REQUIRED)#include headersinclude_directories(${EIGEN3_INCLUDE_DIR})#target generationadd_executable(Eigen_test main.cpp)
The points discussed in this article match with the official knowledge archives and can further enhance related knowledge.
Copyright Statement: This article is an original work by CSDN blogger “zhanghm1995”, following the CC 4.0 BY-SA copyright agreement. Please attach the original source link and this statement when reprinting.
Original link: https://blog.csdn.net/zhanghm1995/article/details/80902807
This article is for academic sharing only. If there is any infringement, please contact to delete the article.
Recommended Courses on 3D Vision:
1. Multi-sensor data fusion technology for autonomous driving
2. Full-stack learning route for 3D point cloud object detection in autonomous driving! (Single-mode + multi-mode/data + code) 3. Thoroughly understand visual 3D reconstruction: principle analysis, code explanation, and optimization improvement 4. The first industrial-grade practical course on point cloud processing in China 5. Laser-vision-IMU-GPS fusion SLAM algorithm sorting and code explanation 6. Thoroughly understand visual-inertial SLAM: based on VINS-Fusion officially launched 7. Thoroughly understand 3D laser SLAM based on LOAM framework: from source code analysis to algorithm optimization 8. Thoroughly analyze key algorithm principles, code, and practical applications of indoor and outdoor laser SLAM (cartographer + LOAM + LIO-SAM)
9. Build a structured light 3D reconstruction system from scratch [theory + source code + practice]
10. Monocular depth estimation methods: algorithm sorting and code implementation
11. Practical deployment of deep learning models in autonomous driving
12. Camera models and calibration (monocular + binocular + fisheye)
13.Heavy! Quadrotor: Algorithms and Practice
14.ROS2 from beginner to expert: theory and practice
Heavy! 3DCVer-Academic Paper Writing Submission WeChat Group Established
Scan the code to add the assistant on WeChat, you can apply to join the 3D Vision Workshop – Academic Paper Writing and Submission WeChat Group, aimed at exchanging writing and submission matters for top conferences, top journals, SCI, EI, etc.
At the same time, you can also apply to join our segmented direction group chats, currently mainly including3D Vision、CV & Deep Learning、SLAM、3D Reconstruction、Point Cloud Post-processing、Autonomous Driving, Multi-sensor Fusion, CV Introduction, 3D Measurement, VR/AR, 3D Face Recognition, Medical Imaging, Defect Detection, Pedestrian Re-identification, Object Tracking, Visual Product Implementation, Visual Competitions, License Plate Recognition, Hardware Selection, Academic Exchange, Job Exchange, ORB-SLAM Series Source Code Exchange, Depth Estimation and other WeChat groups.
You must note: Research Direction + School/Company + Nickname, for example: “3D Vision + Shanghai Jiao Tong University + Jingjing”. Please follow the format for a quick pass and invitation into the group. Original submissions are also welcome to contact.

▲ Long press to add WeChat group or submit

▲ Long press to follow the public account
3D Vision Knowledge Planet from Beginner to Expert: Focusing on the video courses in the 3D vision field (3D reconstruction series, 3D point cloud series, structured light series, hand-eye calibration, camera calibration, Laser/Vision SLAM, Autonomous Driving etc.), Knowledge point summary, beginner to advanced learning routes, latest paper sharing, and Q&A are deeply cultivated in five aspects, with various algorithm engineers from large companies providing technical guidance. Meanwhile, the planet will cooperate with well-known companies to release 3D vision-related algorithm development positions and project docking information, creating a fan gathering area that integrates technology and employment, with nearly 4000 planet members working together to create a better AI world.
Learn core technologies of 3D vision, scan to view the introduction, unconditional refund within 3 days
There are high-quality tutorial materials, Q&A, helping you solve problems efficiently
If you find it useful, please give a like and a look~
