 This article is a highlight from the Kanxue ForumAuthor from Kanxue ForumID: SSH Landscape Painting
1
Creating a Driver Project
Creating the Project
Reference article for WDK and VS installation: X86 Kernel Notes 0 Configuring Dual Machine Debugging Environment Open VS2017, create a new project, select Visual C++ -> Windows Drivers -> Legacy -> Empty WDM Driver 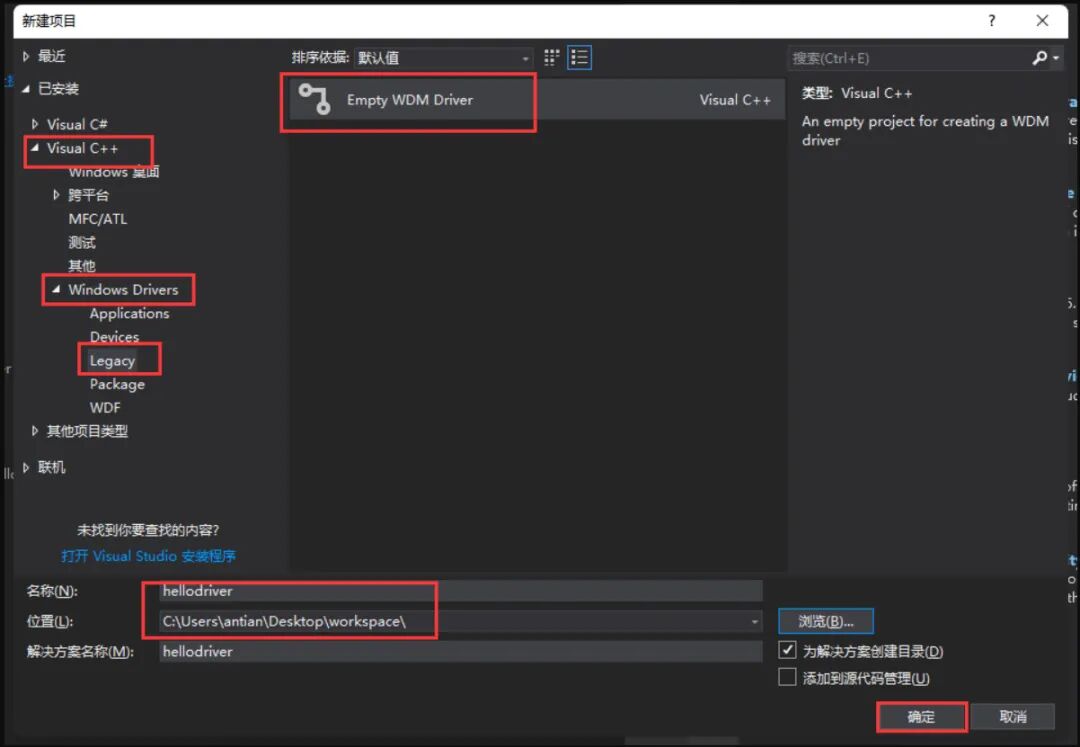 Right-click on the SourceFiles directory, create a new item. Create a C++ file with a .c extension (do not use .cpp). The filename can be arbitrary and does not have to match the project name.
 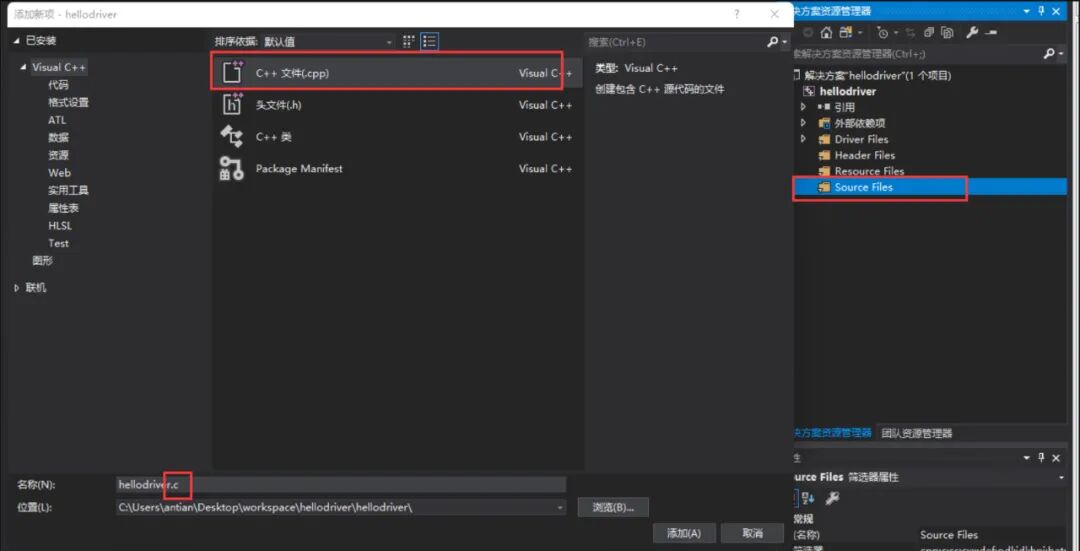 In the .c file, first include the header file ntifs.h, and delete the INF file:
#include <ntifs.h> // This header file includes a large number of driver-related header files, saving time and effort by including them all at once.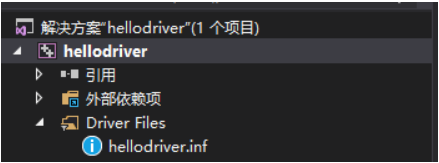 If there is an issue with finding the header file, set the SDK version as shown in the figure below.
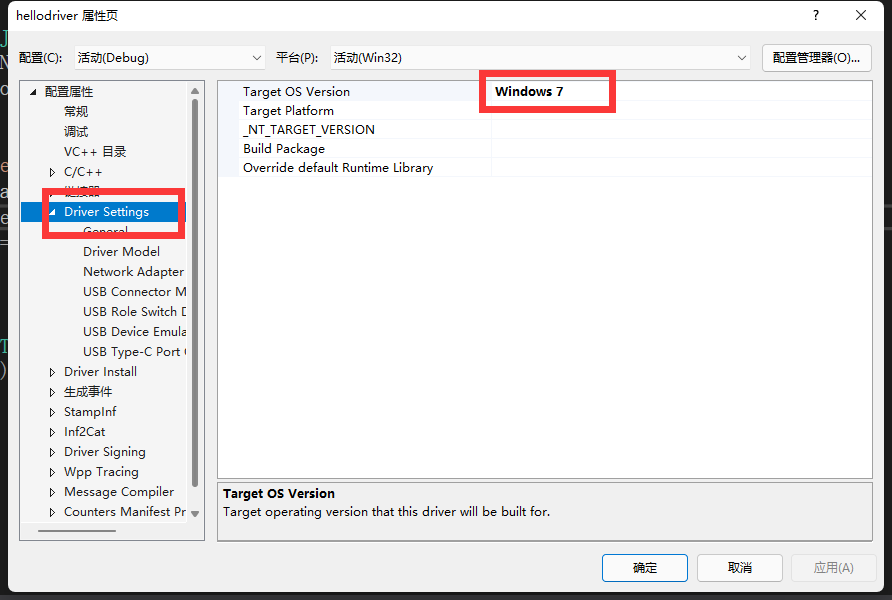
 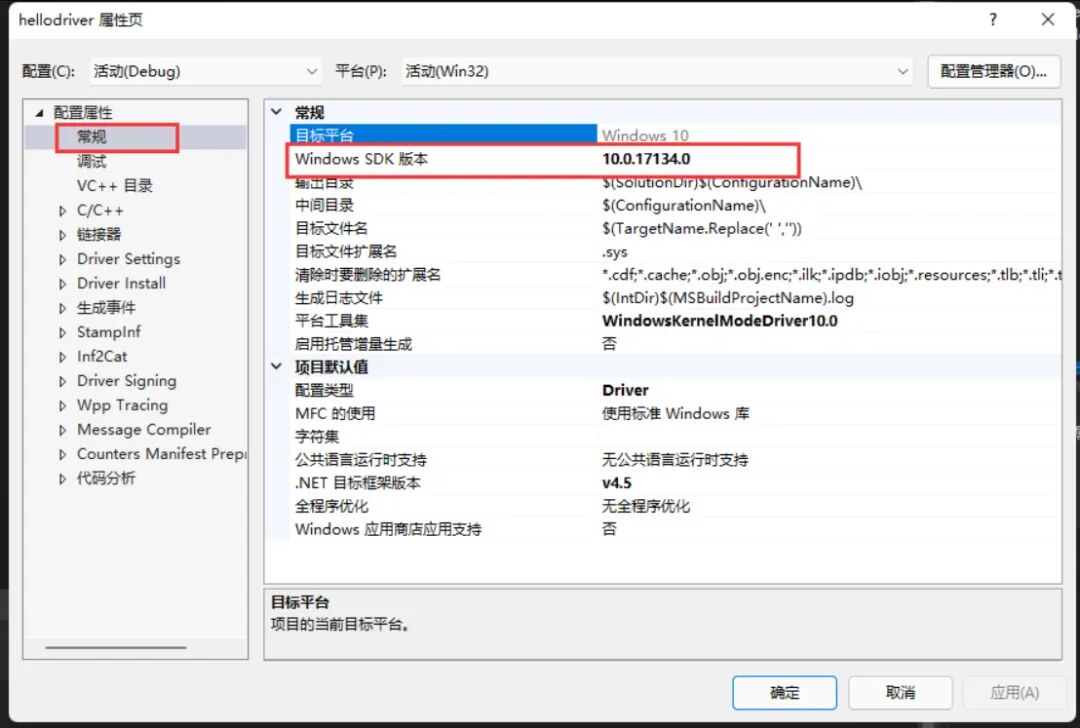 Then set some project properties:1. Treat warnings as errors disabled.
 2. In DriverSetting, change the driver platform to Win7 (we will experiment on Win7)
Overview of Driver Types
Drivers can be broadly classified into three types: NT-style drivers, WDM drivers, and WDF drivers (KWDF kernel drivers, UWDF user drivers).
NT-style Driver:
NT virtual drivers, old-style drivers, used since WIN95. If the developed driver does not interact with hardware, it is recommended to use NT-style or WDM drivers. If an NT-style driver binds to a device, it cannot be uninstalled. It can only be uninstalled by rebooting the system, which is detrimental for servers.
WDM Driver:
Compared to NT-style drivers, WDM drivers support unloading (hot-plugging). They can be unloaded without rebooting. WDM drivers encapsulate and optimize some aspects of NT-style drivers. The essential difference is not significant.
WDF Driver:
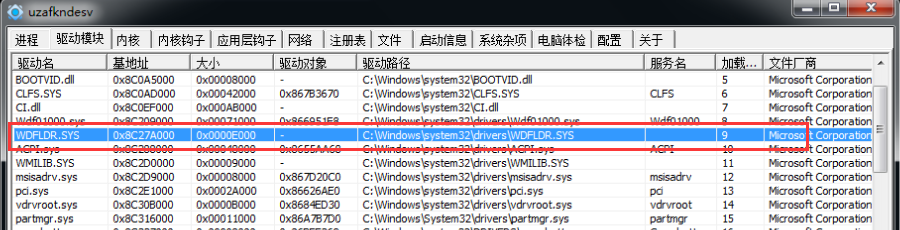
WDF drivers, compared to the previous two types, are significant for simplifying development. Unlike NT and WDM drivers, they are not as low-level. WDF drivers encapsulate WDM drivers into a framework, making driver development simpler. However, the downside is that it lacks control over the low-level aspects. Due to ease of development and lower chances of blue screens, companies generally choose WDF drivers for development. To learn WDF drivers, one needs to understand COM-related knowledge. Only when the WDFLDR.sys driver exists in the system can the WDF driver we write run. Additionally, a .inf file is required in the project, while NT/WDM drivers do not require this .inf file.
2
Writing the Driver Program
Driver Entry Function (DriverEntry)
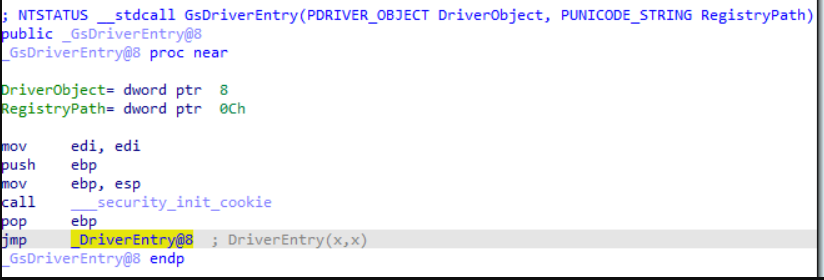
#include "ntifs.h"NTSTATUS DriverEntry(PDRIVER_OBJECT DriverObject,PUNICODE_STRING RegistryPath){ // Code return STATUS_UNSUCCESSFUL;}DriverEntry is the entry function when we write code. The actual entry point of the compiled .sys file is not DriverEntry. In IDA, you can see that the actual entry point function of the driver is GsDriverEntry, which internally calls our DriverEntry function.
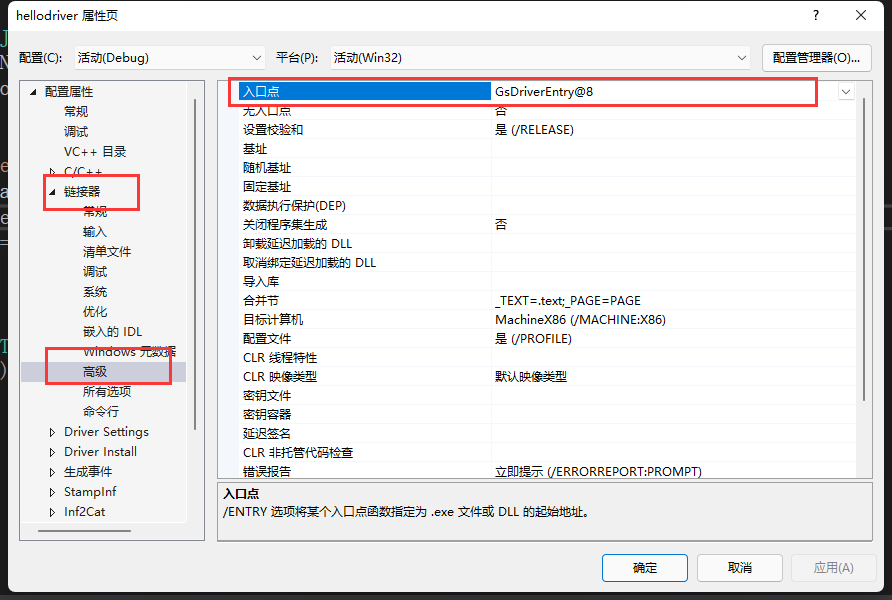
Specifying the Entry Function:
If you do not want the compiler to generate GsDriverEntry but instead directly set the entry function to DriverEntry, you can set it as shown in the figure below.
Writing Code
#include "ntddk.h" void UnloadDriver(PDRIVER_OBJECT driver); NTSTATUS DriverEntry(PDRIVER_OBJECT DriverObject, PUNICODE_STRING RegistryPath) { DbgBreakPoint(); // Equivalent to __asm{int 3} DbgPrint("Driver loaded.\r\n"); // Driver's print function, equivalent to printf in ring 3 DriverObject->DriverUnload = UnloadDriver; // Specify the unload function for the driver return STATUS_SUCCESS;}// Driver unload functionvoid UnloadDriver(PDRIVER_OBJECT driver) { DbgPrint("Driver stopped.\r\n");}Printing String Objects
If you want to print the string from a string object, you can use the following format:
NTSTATUS DriverEntry(PDRIVER_OBJECT DriverObject, PUNICODE_STRING pReg) { DbgPrint("-------%wZ--------",pReg);// Pass in the string object pointer. return STATUS_SUCCESS;}Building the Driver
Click Build Solution. If there are format errors, delete some special characters.
Loading the Driver (Deploying – Starting – Stopping – Unloading)
Use InstDrv.exe to load the driver. Use DbgView.exe to view the output (make sure to select monitor kernel, otherwise you cannot monitor driver layer output).
Debugging the Driver
By calling the function DbgBreakPoint, a breakpoint is added to the driver. This function is equivalent to the int 3 instruction.Thus, we can break in windbg, and Windbg will automatically recognize the PDB path in the PE structure, automatically loading the PDB file to recognize our source code. 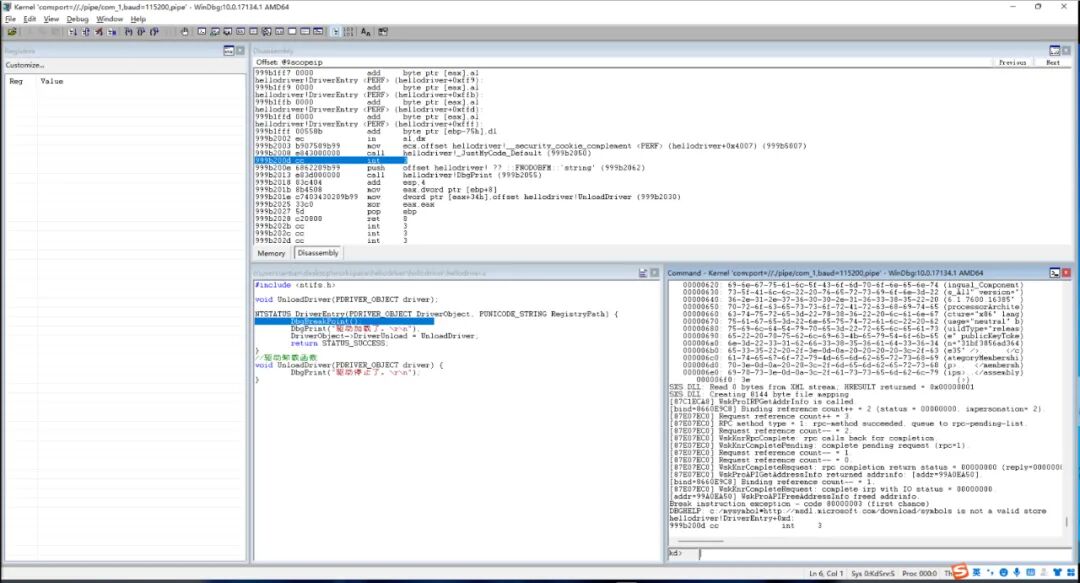
Resolving Screen Flooding
If during windbg debugging, screen flooding occurs, executing the following command can turn off the flooding.
kd> ed nt!Kd_SXS_Mask 0;ed nt!Kd_FUSION_Mask 03
Introduction to Driver Object PDRIVER_OBJECTAfter successfully breaking into our code, check the driver object structure in Windbg.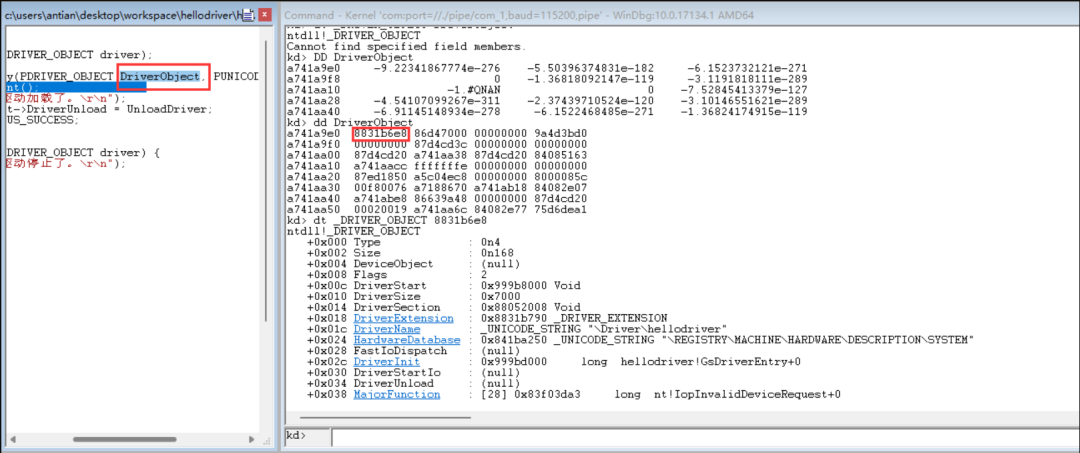
Type: Driver object type.
Size: Driver object size
DeviceObject: Device object, which is null here as we did not add a device.
DriverStart: Base address of the driver file, which is the ImageBase in the PE format. You can see 4D 5A using the db command.
DriverSize: Size of the driver module, which is the SizeOfImage in the PE format.
DriverExtension: Driver extension object. Use the dt command to view this object.
kd> dt _DRIVER_EXTENSION 0x8831b790ntdll!_DRIVER_EXTENSION +0x000 DriverObject : 0x8831b6e8 _DRIVER_OBJECT +0x004 AddDevice : (null) +0x008 Count : 0 +0x00c ServiceKeyName : _UNICODE_STRING "hellodriver" +0x014 ClientDriverExtension : (null) +0x018 FsFilterCallbacks : (null)- DriverObject: Points to the start address of the current driver object.
- ServiceKeyName: Driver service registry folder name.
DriverName: Driver name, which is the filename of the driver prefixed with \Driver\. This name is a string structure. View this string structure:
kd> dt _UNICODE_STRING 8831b6e8 +1cntdll!_UNICODE_STRING "\Driver\hellodriver" +0x000 Length : 0x26 // String length +0x002 MaximumLength : 0x26 // Maximum string length +0x004 Buffer : 0x87fc36c8 "\Driver\hellodriver" // String contentHardwareDatabase: Driver service registry path. Check this path in the registry, and you will find a folder named “hellodriver”, which is our driver.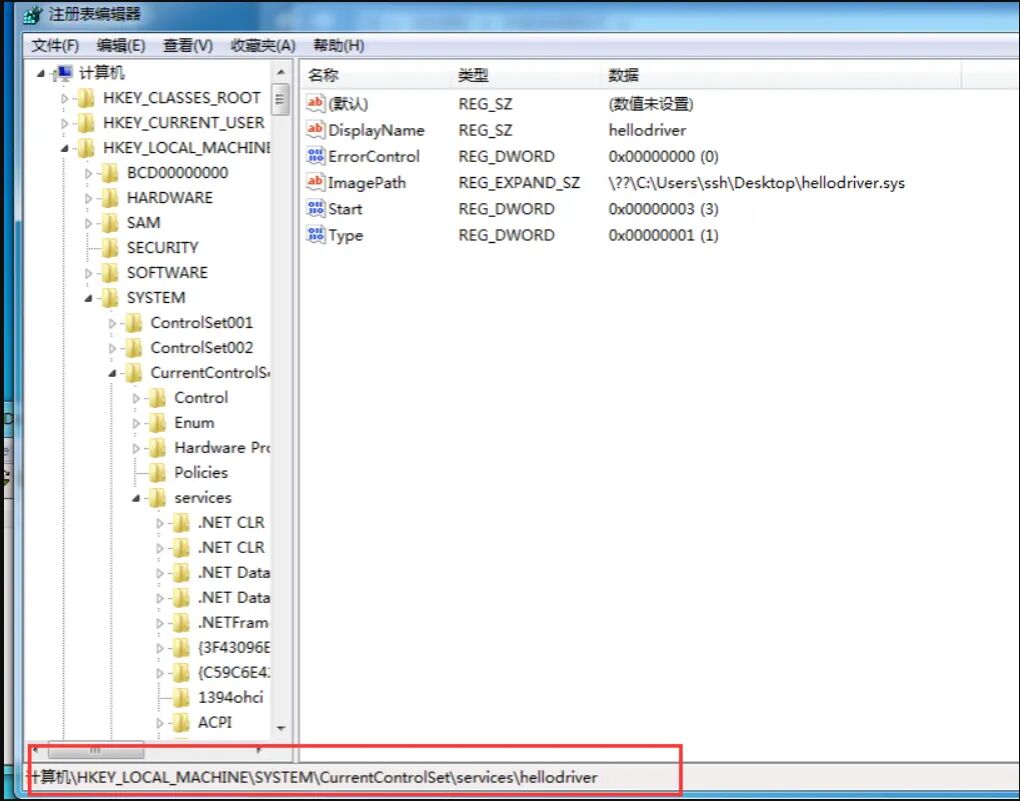
- DisplayName: Driver name
- ErrorControl: This value is set when the driver fails to load.
- ImagePath: Driver file path. \??\ is the device path, which we actually access various folders with, but Windows’ underlying system helps us supplement it.
- Start: Driver load type. Manual start is 3, auto start at boot is 2, BIOS auto start is 1.
- Type: Service type. 1 is for drivers.
DriverInit: Driver entry point, which is the AddressOfEntryPoint in the PE file.
DriverUnload: Address of the driver unload function.
4
Driver Loading MethodsDriver loading can be broadly divided into two types: service loading and direct loading. In practical applications, both methods can be utilized.
Service Loading
1. Call OpenSCManager to open the service control.2. Call CreateService to create the service. This actually creates the relevant registry keys. After executing this API, the driver is registered as a service. At this point, we can also load our driver by executing net start XXXX in CMD.3. Call OpenService to open the existing service.4. Call StartService to start the service.This method actually loads the driver process, not the process that calls the API. Instead, it notifies the system process that we want to load a driver, and the system process receives the notification and adds it to a queue in the system, loading the driver at some point. This method notifies the system process to perform the loading.
Direct Loading
Call ZwLoadDriver or NtLoadDriver to load a correctly registered driver. This method requires us to manually register the relevant information of the driver in the registry so that the driver can be loaded. The direct loading method will directly load the driver after calling the API, so the process loading the driver is the process that calls the API. Compared to service loading, it leaves traces.
5
First ExerciseWrite two drivers A and B, define a global variable with a value of 100 in A, and print the address pA of A. In B, print the data of pA and observe if it matches the definition in A. A code:
#include <ntifs.h> void UnloadDriver(PDRIVER_OBJECT driver); UINT32 i = 100; NTSTATUS DriverEntry(PDRIVER_OBJECT DriverObject, PUNICODE_STRING RegistryPath) { DbgPrint("i addr = %08x\r\n", &i); DriverObject->DriverUnload = UnloadDriver; return STATUS_SUCCESS;}// Driver unload functionvoid UnloadDriver(PDRIVER_OBJECT driver) { DbgPrint("Driver stopped.\r\n");}B code:
#include <ntifs.h> void UnloadDriver(PDRIVER_OBJECT driver); NTSTATUS DriverEntry(PDRIVER_OBJECT DriverObject, PUNICODE_STRING RegistryPath) { PUINT32 p = (PUINT32)0x8e315000; DbgPrint("i value = %d\r\n", *p); DriverObject->DriverUnload = UnloadDriver; return STATUS_SUCCESS;}// Driver unload functionvoid UnloadDriver(PDRIVER_OBJECT driver) { DbgPrint("Driver stopped.\r\n");}6
Common Driver Types and APIsWriting code in drivers is different from ring 3; some data types and commonly used APIs are best to use the driver development-specific versions. This is a form of coding standard.
Basic Data Types
In drivers, primitive data types like int and char are encapsulated and redefined. In driver development, the following data types should be used:
UINT8,PUINT8 -> unsigned charUINT16,PUINT16 -> unsigned short UINT32,PUINT32 -> unsigned intUINT64,PUINT64 -> unsigned __int64INT8,PINT8 -> charINT16,PINT16 -> shortINT32,PINT32 -> intINT64,PINT64 -> __int64LONG32,PLONG32 -> intULONG32,PULONG32 -> unsigned intDWORD32,PDWRD32 -> intError Code Return Values
Most kernel functions will have a return value of type NTSTATUS. This type is essentially a LONG. For example, functions like GetLastError return an error code that is actually the NTSTATUS converted error code. Common NTSTATUS macros are as follows; negative values (greater than 0X80000000) indicate errors, while values greater than or equal to 0 indicate success.
STATUS_SEVERITY_SUCCESS 0x0STATUS_SEVERITY_INFORMATIONAL 0x1STATUS_SEVERITY_WARNING 0x2STATUS_SEVERITY_ERROR 0x3STATUS_UNSUCCESSFUL 0xC0000001There is also a macro to determine whether the return value is successful or failed:
NT_SUCCESS(NTSATUS type parameter) //#define NT_SUCCESS(Status) (((NTSTATUS)(Status)) >= 0String Related
In kernel development, strings should not be defined as char* x = “xx”; WDK provides us with some string-related APIs.
Defining Strings:
UNICODE_STRING uStr = {0}; // Define a unicode string, type is UNICODE_STRINGSTRING aStr = {0}; // Define an ascii string, type is STRINGANSI_STRING aStr = {0}; // All ANSI and direct STRING have the same effectInitializing Strings:
RtlInitUnicodeString(&uStr,L"unicode string");// Initialize unicode string, assigning a value. No memory allocation. RtlInitString(&aStr,"ascii string"); // Initialize ascii string, assigning a value, no memory allocation. RtlInitAnsiString(&aStr,"ascii string"); // Initialize ascii string, assigning a value, no memory allocation.String Conversion:
RtlAnsiStringToUnicodeString(&uStr,&aStr,true);// Convert ascii string to unicode string, no need to initialize the unicode string, the third parameter true means to automatically allocate memory. If false, it does not allocate, only modifies the existing space of unicode. If true, you need to manually free the string memory. RtlUnicodeStringToAnsiString(); // Convert unicode string to ascii string, usage is the same as above.Releasing Strings:
RtlFreeUnicodeString();// Free unicode string memory, when memory was allocated during initialization, it needs to be freed. RtlFreeAnsiString(); // Free ascii string memory, when memory was allocated during initialization, it needs to be freed.String Formatting:
#include <ntstrsafe.h> // This header file is needed to use formatting APIschar aStr[0x1000]= {0};RtlStringCbPrintfA(aStr, 0x1000, "%d---%s", 123, "test");// Parameter 1: Ascii string pointerwchar uStr[0x1000] = {0};RtlStringCbPrintfW(uStr, 0x1000, L"%d---%s", 123, L"test");// Parameter 1: Unicode string pointerString Comparison:
RtlCompareUnicodeString(&uStr1,&uStr2,TRUE);// Compare if two unicode strings are equal, true ignores caseRtlCompareString // Compare if two ascii strings are equalMemory Related
Allocating Memory:
ExAllocatePool(type,size);// type: memory type, PagePool and NonPagePool, representing paged and non-paged memory.// Paged memory: to be detailed in later chapters, temporarily understand as non-executable memory// Non-paged memory: to be detailed in later chapters, temporarily understand as executable memory. Typically fill NonPagePool, corresponding attribute is the XD/NX bit of PTE. ExAllocatePoolWithTag(type,size,tag);// tag: memory tag, up to four bytes, like 'test', gives a name to the allocated memory. Enclosed in single quotes, ultimately converted to hexadecimal data.Copying, Setting, Comparing Memory:
RtlFillMemory(pointer,length,value);// Equivalent to memsetRtlEqualMemory(pointer,Source,Length)// Equivalent to memcmp, result negatedRtlMoveMemory(pointer,Source,Length) // Equivalent to memmoveRtlCopyMemory(pointer,Source,Length) // Equivalent to memcpyRtlZeroMemory(pointer,Length) // Equivalent to memset, second parameter is 0.Freeing Memory:
ExFreePool(pointer);// Free memoryDelays
// Delays in driver code cannot use Sleep, but rather KeDelayExecutionThreadLARGE_INTEGER li = { 0 }; // Duration structure. li.QuadPart = -10000 * 5000; // Time unit negative means relative time, positive means absolute time. 5000 means 5 seconds. KeDelayExecutionThread(KernelMode,FALSE,&li);// First parameter: delay mode, we choose kernel mode here// Second parameter: force wakeup. If FALSE, it will not be woken up until the sleep time is over.// Third parameter: delay duration.Creating Threads
// Thread functionVOID myThreadFun(_In_ PVOID StartContext) { // Thread function code} HANDLE tHandle = NULL;NTSTATUS tRet = PsCreateSystemThread(&tHandle,THREAD_ALL_ACCESS,NULL,NULL,NULL, myThreadFun,NULL);// The last parameter is the thread function startup parameter.if(NT_SUCCESS(tRet)){ ZwClose(tHandle);// Equivalent to CloseHandle}Kernel Linked List API
Windows developers like to use linked lists, and you can see the LIST_ENTRY member in many kernel structures. This is the linked list node structure, and it is also an official linked list structure provided by WDK. LIST_ENTRY is a doubly linked list.
typedef struct _Monster { // Define a structure, members include node structure. This structure can also serve as a node. UINT32 ID; LIST_ENTRY node; UINT32 hp; UINT32 level; UNICODE_STRING name;}Monster,*PMonster; Monster m1 = { 0 };InitializeListHead(&m1.node); // Initialize the linked list to prevent garbage data from appearing as pointers. IsListEmpty(&m1.node); // Check if the entire linked list is empty, pass in any node from the linked list. Monster m2 = { 0 };InsertHeadList(&m1.node, &m2.node);// Insert m2 node at the head of the linked list. Monster m3 = { 0 };InsertTailList(&m1.node, &m3.node);// Insert m3 node at the tail of the linked list. RemoveHeadList(&m2.node);// Remove the head node of the entire linked list, pass in any node. RemoveTailList(&m2.node);// Remove the tail node of the entire linked list, pass in any node. RemoveEntryList(&m3.node);// Remove the specified node, breaking the link. // Find Monster through FLINK, set to find the next node of m2PMonster pm = (PMonster)((UCHAR)m2.node.Flink - ((UCHAR)(&m2.node) - (UCHAR)&m2));// Calculate the offset of the ListEntry structure relative to the Monster structure, subtracting the offset from Flink to get the address of m3.Kernel Binary Tree API
typedef struct _Monster { UINT32 id; UINT32 hp; UINT32 level; UNICODE_STRING name;}Monster,*PMonster;// Tree node comparison functionRTL_GENERIC_COMPARE_RESULTS NTAPI myCmpFunc(_In_ struct _RTL_GENERIC_TABLE *Table,_In_ PVOID FirstStruct,_In_ PVOID SecondStruct) { PMonster m1 = (PMonster)FirstStruct; // Internally cast to the required structure PMonster m2 = (PMonster)SecondStruct; if (m1->id == m2->id) { // Comparison method specified by yourself, here I compare the size relationship of two nodes by ID return GenericEqual; } return m1->id > m2->id ? GenericGreaterThan : GenericLessThan;}// Node creation functionVOID NTAPI myAllocFunc( _In_ struct _RTL_GENERIC_TABLE *Table, _In_ CLONG ByteSize ) { ExAllocatePool(NonPagedPool,ByteSize);// Allocate memory}// Node deletion functionVOID NTAPI myFreeFunc( _In_ struct _RTL_GENERIC_TABLE *Table, _In_ __drv_freesMem(Mem) _Post_invalid_ PVOID Buffer ) { ExFreePool(Buffer);// Free the memory allocated for this node} Monster m1 = {0,100,10,L"monster 1"};Monster m2 = {1,100,10,L"monster 2"};Monster m3 = {2,100,10,L"monster 3"}; RTL_GENERIC_TABLE table = {0}; // Initialize binary treeRtlInitializeGenericTable(&table, myCmpFunc, myAllocFunc, myFreeFunc,NULL);BOOLEAN isNewEle = FALSE; // Insert/update node, cast node to void*, isNewEle receives whether the node is new or already exists. Use myCmpFunc to determine if two nodes are the same. When inserting a node, myAllocFunc will be called to reallocate memory for the node and copy the data. RtlInsertElementGenericTable(&table, (PVOID)&m1,sizeof(m1),&isNewEle);RtlInsertElementGenericTable(&table, (PVOID)&m2,sizeof(m1),&isNewEle);RtlInsertElementGenericTable(&table, (PVOID)&m3,sizeof(m1),&isNewEle); // Find node, lookupM only needs to assign the id attribute, the search will compare based on this id. Return the pointer to the found nodeMonster lookupM = { 0,0,0,0 };PMonster lookupResult = (PMonster)RtlLookupElementGenericTable(&table,&lookupM); // Delete node, also based on id. After deletion, myFreeFunc will be automatically called to free memory. RtlDeleteElementGenericTable(&table, &lookupM); // Get the number of nodesULONG nodeNum = RtlNumberGenericTableElements(&table);ULONG nodeNum = RtlNumberGenericTableElementsAvl(&table);// Safe function, prevents reading nodes while adding nodes // Traverse nodes, key is used to get the next node, key is null to get the first node. The return value is the next node, and key is automatically updated to point to the returned node. A return value of null indicates the end of traversal.PVOID key = NULL;PMonster pm = (PMonster)RtlEnumerateGenericTableWithoutSplaying(&table, &key);while (pm!=NULL) { DbgPrint(pm->name.Buffer); pm = (PMonster)RtlEnumerateGenericTableWithoutSplaying(&table, &key);} // After using the binary tree (e.g., driver unload), all nodes in the binary tree must be destroyed to prevent memory leaks.7
Driver Object – DriverSectionIn the driver object, there is a member named DriverSection, which is a pointer to an undisclosed type _KLDR_DATA_TABLE_ENTRY structure. The information of this structure can be found in the WRK source code. The members are as follows:
typedef struct _KLDR_DATA_TABLE_ENTRY { LIST_ENTRY InLoadOrderLinks; ULONG __Undefined1; ULONG __Undefined2; ULONG __Undefined3; ULONG NonPagedDebugInfo; ULONG DllBase; ULONG EntryPoint; ULONG SizeOfImage; UNICODE_STRING FullDllName; UNICODE_STRING BaseDllName; ULONG Flags; USHORT LoadCount; USHORT __Undefined5; ULONG __Undefined6; ULONG CheckSum; ULONG TimeDateStamp;} KLDR_DATA_TABLE_ENTRY, *PKLDR_DATA_TABLE_ENTRY;The first member InLoadOrderLinks is a linked list node structure. Thus, _KLDR_DATA_TABLE_ENTRY is a doubly linked list.
Manual Traversal of Driver Modules
Write the following code to load the driver:
typedef struct _KLDR_DATA_TABLE_ENTRY { LIST_ENTRY InLoadOrderLinks; ULONG __Undefined1; ULONG __Undefined2; ULONG __Undefined3; ULONG NonPagedDebugInfo; ULONG DllBase; ULONG EntryPoint; ULONG SizeOfImage; UNICODE_STRING FullDllName; UNICODE_STRING BaseDllName; ULONG Flags; USHORT LoadCount; USHORT __Undefined5; ULONG __Undefined6; ULONG CheckSum; ULONG TimeDateStamp;} KLDR_DATA_TABLE_ENTRY, *PKLDR_DATA_TABLE_ENTRY; NTSTATUS DriverEntry(PDRIVER_OBJECT DriverObject, PUNICODE_STRING RegistryPath) { DbgBreakPoint(); KLDR_DATA_TABLE_ENTRY * ldr = DriverObject->DriverSection; DriverObject->DriverUnload = UnloadDriver; return STATUS_SUCCESS;}After breaking in windbg, enter the command dt ldr to view its node structure: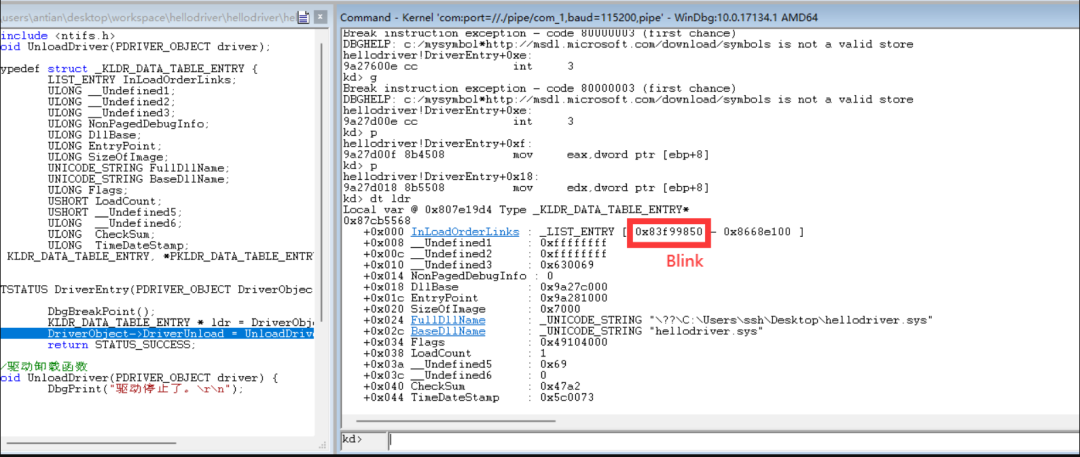 Enter the command dt _KLDR_DATA_TABLE_ENTRY 0x83f99850 to view the structure of the next node.
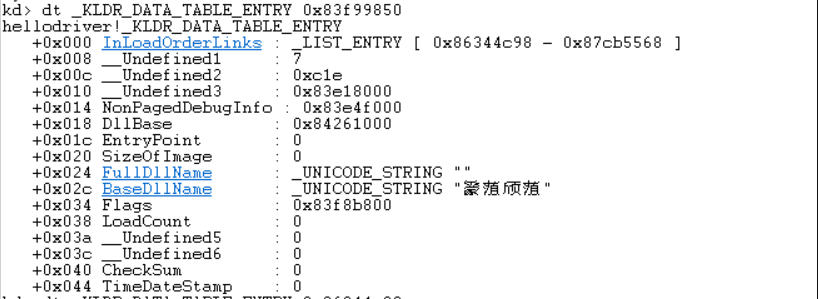
Many attributes are found to be 0.Here we need to know a common sense: many linked lists in Windows like to set the head node members to null, and only the second node onwards contains valid data. Continue executing the command dt _KLDR_DATA_TABLE_ENTRY 0x86344c98 to view the next node.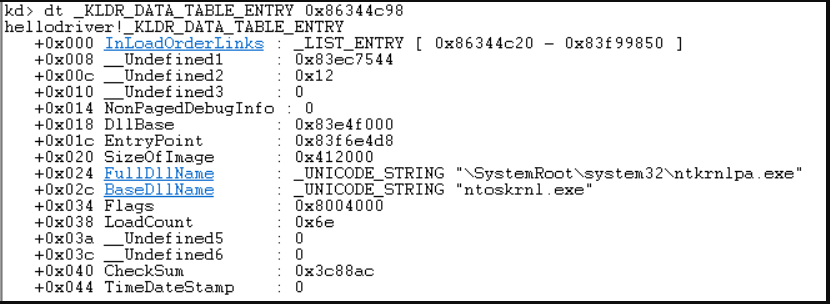 It can be found that the ntoskrnl module has been located. After repeated searches, it can be found that this linked list is a doubly circular linked list.
Code for Traversing Driver Modules
Write the manual traversal method into code:
NTSTATUS DriverEntry(PDRIVER_OBJECT DriverObject, PUNICODE_STRING RegistryPath) { PKLDR_DATA_TABLE_ENTRY selfNode = DriverObject->DriverSection; PKLDR_DATA_TABLE_ENTRY preNode = selfNode; UINT32 index = 1; do { DbgPrint("[db] %d driver name = %wZ \r\n", index++,&preNode->BaseDllName); preNode = preNode->InLoadOrderLinks.Flink; } while (preNode != selfNode); DriverObject->DriverUnload = UnloadDriver; return STATUS_SUCCESS;}Load the driver and observe the output content. Compare it with PCHUNTER to find that all drivers have been traversed (one extra because the empty node string was also printed, which should be filtered out). 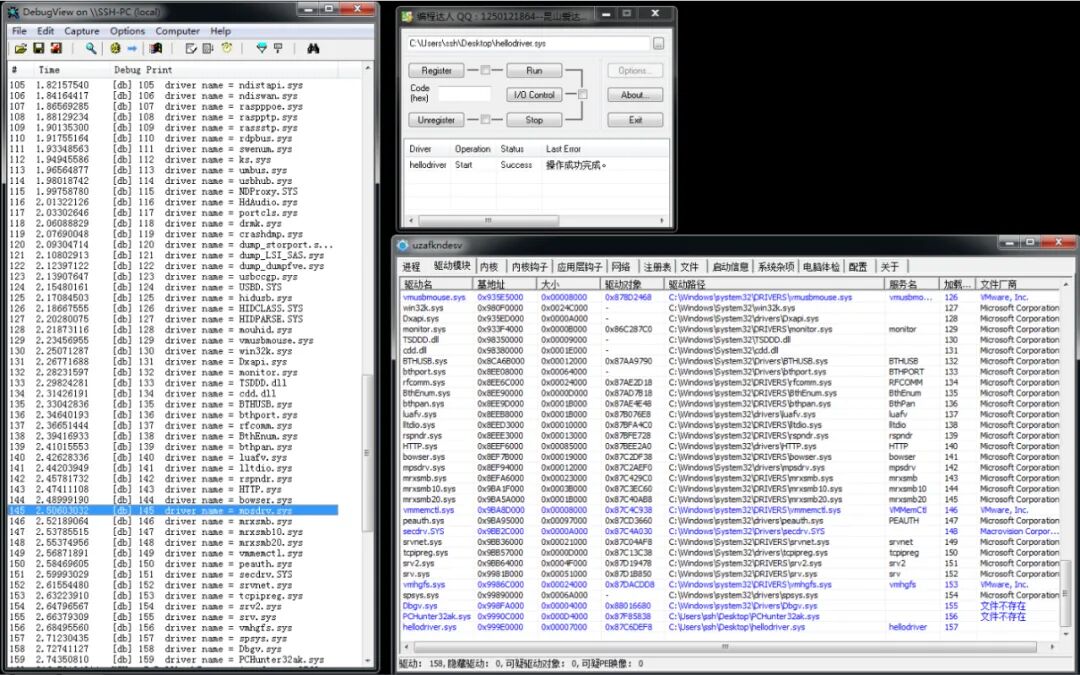
8
Driver Module Hiding – Breaking the LinkAfter completing the traversal of driver modules, we will start to do something. In actual offensive and defensive confrontations, whether it is external developers or kernel trojan developers, to allow their driver to run quietly, they will perform some hiding operations on their driver module to make it undetectable.Breaking the link is an old but effective method. Regardless of whether you will engage in offense or defense in the future, understanding some old techniques is essential.
Breaking the Link 1 – HTTP.sys
Do not randomly find a driver to break the link, as it may affect the system. Here we take HTTP.sys for the link-breaking exercise. Theoretically, if the link-breaking is successful, HTTP.sys should not be visible in PCHUNTER. The code is as follows:
NTSTATUS DriverEntry(PDRIVER_OBJECT DriverObject, PUNICODE_STRING RegistryPath) { PKLDR_DATA_TABLE_ENTRY selfNode = DriverObject->DriverSection; PKLDR_DATA_TABLE_ENTRY preNode = selfNode; UNICODE_STRING httpName = { 0 }; RtlInitUnicodeString(&httpName,L"HTTP.sys"); do { if (preNode->BaseDllName.Length != 0 // Filter out empty strings && RtlCompareUnicodeString(&preNode->BaseDllName,&httpName,TRUE) == 0) { DbgPrint("%wZ\r\n", &preNode->BaseDllName); RemoveEntryList(preNode); break; } preNode = preNode->InLoadOrderLinks.Flink; } while (preNode != selfNode); DriverObject->DriverUnload = UnloadDriver; return STATUS_SUCCESS;}After loading the driver, dbgview successfully prints, indicating that the link has been successfully broken. Check the effect in PCHUNTER: 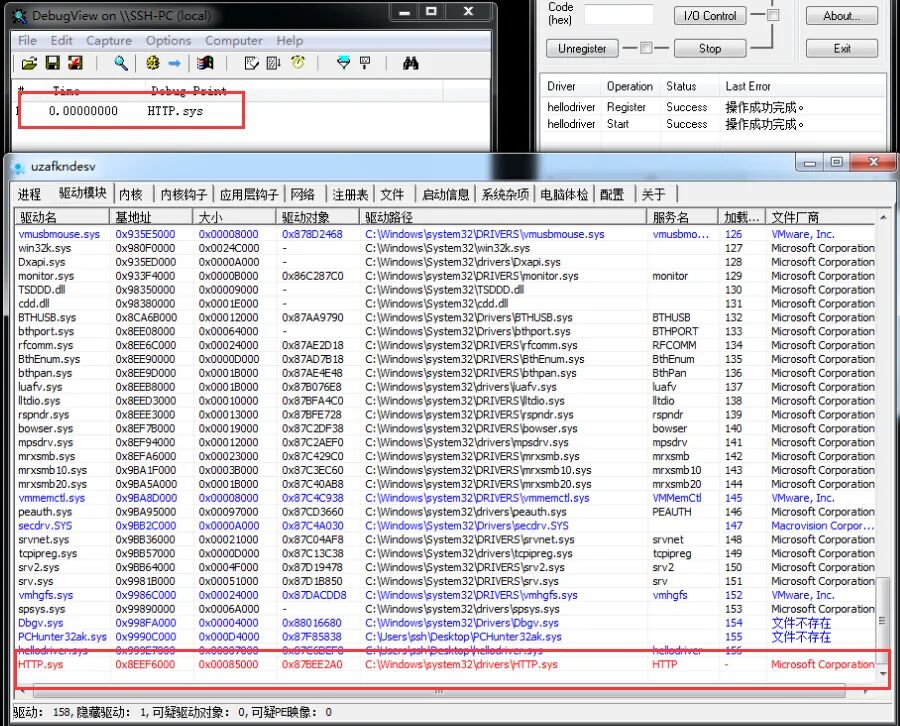 It can be seen that HTTP.sys is still in the list, but it has turned red. This is because PCHUNTER’s traversal method is more robust, not solely relying on linked list traversal. It also involves features, files, etc. If you have the energy, you can reverse PCHUNTER. Therefore, to achieve perfect hiding, we need to improve our code to erase some features in the driver object. Before that, we need to understand how to obtain the driver object pointer by driver name.
Obtaining Driver Object Pointer
Microsoft has an undocumented export function ObReferenceObjectByName, which can obtain the driver object pointer based on the driver name. You can find this function in the WRK source code.
// NTKERNELAPI is a macro used to specify exported functions in kernel modules.NTKERNELAPI NTSTATUS ObReferenceObjectByName( __in PUNICODE_STRING ObjectName, // Driver object name, e.g., the driver object name for HTTP.sys is \Driver\HTTP __in ULONG Attributes, // Permissions, give a FILE_ALL_ACCESS __in_opt PACCESS_STATE AccessState, // Optional parameter, directly write NULL __in_opt ACCESS_MASK DesiredAccess,// Optional parameter, directly write NULL __in POBJECT_TYPE ObjectType, // Object type __in KPROCESSOR_MODE AccessMode, // Access mode, there is an enum _MODE, which has a value KernelMode, fill it in. __inout_opt PVOID ParseContext, // Optional parameter, directly write NULL __out PVOID *Object // Driver object secondary pointer);Among them, the ObjectType object type, we could not find what values this type has through F12. These types are undocumented. Similarly, you can find them in WRK. Here we use an exported variable named IoDriverObjectType.
extern POBJECT_TYPE * IoDriverObjectType;Breaking the Link 2 – Enhanced HTTP.sys
extern POBJECT_TYPE * IoDriverObjectType;NTSTATUS DriverEntry(PDRIVER_OBJECT DriverObject, PUNICODE_STRING RegistryPath) { PKLDR_DATA_TABLE_ENTRY selfNode = DriverObject->DriverSection; PKLDR_DATA_TABLE_ENTRY preNode = selfNode; UNICODE_STRING httpName = { 0 }; RtlInitUnicodeString(&httpName,L"HTTP.sys"); UNICODE_STRING httpObjName = { 0 }; RtlInitUnicodeString(&httpObjName, L"\Driver\HTTP"); do { if (preNode->BaseDllName.Length != 0 && RtlCompareUnicodeString(&preNode->BaseDllName,&httpName,TRUE) == 0) { DbgPrint("%wZ\r\n", &preNode->BaseDllName); PDRIVER_OBJECT pHttpObj = NULL; ObReferenceObjectByName(&httpObjName,FILE_ALL_ACCESS,NULL,NULL, *IoDriverObjectType, KernelMode,NULL, &pHttpObj); // Get driver object pointer pHttpObj->Flags = 0; // Clear several attributes to prevent being searched. pHttpObj->DriverSection = 0; pHttpObj->DriverInit = 0; RemoveEntryList(preNode); break; } preNode = preNode->InLoadOrderLinks.Flink; } while (preNode != selfNode); DriverObject->DriverUnload = UnloadDriver; return STATUS_SUCCESS;}Load the driver and observe the effect (remember to restart, as the link has already been broken for HTTP):
It can be seen that HTTP has completely disappeared from PCHUNTER, and there are no red records of HTTP. Our link-breaking operation was successful.
Breaking the Link 3 – Self Driver
Performing link-breaking on the self driver module simplifies the process by eliminating the need for traversal and obtaining the driver object. Theoretically, it is simpler, so let’s try it.
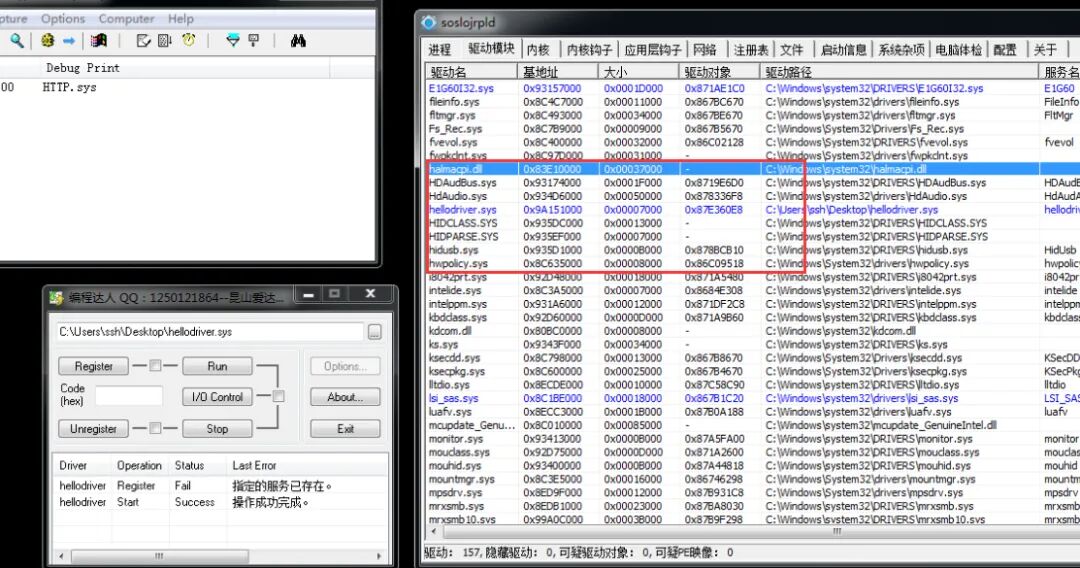
NTSTATUS DriverEntry(PDRIVER_OBJECT DriverObject, PUNICODE_STRING RegistryPath) { PKLDR_DATA_TABLE_ENTRY selfNode = DriverObject->DriverSection; DriverObject->Flags = 0; DriverObject->DriverSection = 0; DriverObject->DriverInit = 0; RemoveEntryList(selfNode); DriverObject->DriverUnload = UnloadDriver; return STATUS_SUCCESS;}Load the driver and observe the effect:
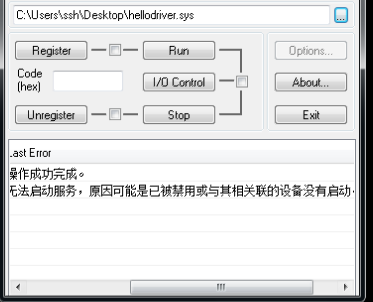
It is found that the driver cannot be loaded. This is because after the system calls DriverEntry, it still needs to perform some processing. However, we have hidden our driver, causing the system to be unable to find our driver and thus failing to perform subsequent processing, resulting in driver loading failure. To fix this bug, we need to restore our driver before unloading, rejoining the node into the linked list and restoring the cleared attributes.
9
Driver Communication – GeneralIn practical use, a driver cannot simply execute from the entry point to the end. The driver is divided into modules by function, and it is necessary to call them when needed.Through communication between the user layer and the kernel layer, user programs can call specific functions of the driver when needed. Whether for attackers or defenders, driver communication is a key battlefield. The general communication here uses device interaction, which is similar to a combination of WIN32 messages and callback functions. In the kernel, messages are encapsulated as a structure IRP (I/O Request Packet). Device objects can receive IRP data to achieve communication.
0 Ring Code – Creating Devices
For user applications to initiate communication with the driver, it essentially initiates communication with the device bound to the driver, which then dispatches downwards. Therefore, we first need to create a device:
UNICODE_STRING deviceName = { 0 };RtlInitUnicodeString(&deviceName,L"\Device\MyDevice");DEVICE_OBJECT devObj = {0};NTSTATUS retStatus = IoCreateDevice(pDriverObj,NULL,&deviceName,FILE_DEVICE_UNKNOWN,FILE_DEVICE_SECURE_OPEN,FALSE,&devObj);// Parameter 1: Driver object pointer, used to bind the created device to a certain driver// Parameter 2: Device extension size, we can write NULL. No extension needed.// Parameter 3: Device name, UNICODE string. Fixed name format: \Device\name // Parameter 4: Device type, many type macros can be seen by pressing F12, such as mouse, keyboard, etc. Here we choose unknown device.// Parameter 5: Device permission, to allow ring 3 to open our device for communication, we choose FILE_DEVICE_SECURE_OPEN permission. Other permissions can be found on MSDN.// Parameter 6: Whether to be exclusive, fill in FALSE. If exclusive, ring 3 cannot open the device.// Parameter 7: Device object pointer, output the created device object.0 Ring Code – Setting Data Interaction Method
pDeviceObj->Flags |= DO_BUFFERED_IO;// Buffered read/write (DO_BUFFERED_IO): Copies the data in the ring 3 buffer to the ring 0 buffer. Convenient, but performance is poor.// Direct read/write (DO_DIRECT_IO): First locks the ring 3 buffer, then maps the corresponding physical address to a linear address in ring 0. Suitable for large data transfers. Two linear addresses correspond to the same physical address.// Other read/write methods (not setting values): Ring 0 directly reads the linear address of ring 3, not recommended. When process switching occurs, CR3 changes, and it will read the memory data of other processes.pDeviceObj->Flags &= DO_DEVICE_INITIALIZING;// Clear the DO_DEVICE_INITIALIZING initialization flag. If this flag is not cleared, ring 3 may not be able to open the device.0 Ring Code – Creating Symbolic Links
Ring 3 cannot directly use device names like \Device\XXX to open our device; we need to specify a symbolic link (alias) for ring 3 access.
UNICODE_STRING symName = { 0 };RtlInitUnicodeString(&symName, L"\??\MyDeviceSymbol"); retStatus = IoCreateSymbolicLink(&symName,&deviceName);// Parameter 1: Symbolic link name. Fixed format: \??\name// Parameter 2: The device name to bind.IRP Messages
In the user layer, every time we call CreateFile, OpenFile, DeleteFile, CloseHandle, etc., we send a message to ring 0, which is called an IRP data packet. These APIs are referred to as device operation APIs.For example, when calling CreateFile, an IRP message named IRP_MJ_CREATE to open the device is sent to the kernel layer. Other common IRP types are as follows:
CreateFile -》 IRP_MJ_CREATEReadFile -》 IRP_MJ_READWriteFile -》 IRP_MJ_WRITECloseHandle -》 IRP_MJ_CLOSEDeviceControl -》 IRP_MJ_DEVICE_CONTROL // This API is more flexible and convenient than the above APIs, so it is often used in kernel programming for message passing.Dispatch Functions
In the user layer, we handle window messages through callback functions when developing GUI with WIN32. In the kernel layer, we handle IRP messages through dispatch functions. It’s just a name change; the essence is the same. In the driver object, there is a property named MajorFunction, which is an array where each element is a function pointer corresponding to various types of IRP dispatch functions. The dispatch function format is as follows:
NTSTATUS MyDispatchFunction(PDEVICE_OBJECT pDevObj,PIRP pIrp){ // Business code ... // Set return status pIrp->IoStatus.Status = STATUS_SUCCESS; // The value obtained by GetLastError in ring 3 is this value pIrp->IoStatus.Information = 0; // Number of bytes of returned data, if not set to 0 IoCompleteRequest(pIrp,IO_NO_INCREMENT); // Current processing is complete, continue to pass the IRP message down return STATUS_SUCCESS;}0 Ring Code – Handling IRP Messages 1
NTSTATUS NullFunc(DEVICE_OBJECT *DeviceObject, IRP *Irp) { Irp->IoStatus.Status = STATUS_SUCCESS; Irp->IoStatus.Information = 0; IoCompleteRequest(Irp, IO_NO_INCREMENT); return STATUS_SUCCESS;}NTSTATUS DeviceControlFunc(DEVICE_OBJECT *DeviceObject, IRP *Irp) { // Communication logic, to be supplemented later. Irp->IoStatus.Status = STATUS_SUCCESS; Irp->IoStatus.Information = 0; IoCompleteRequest(Irp, IO_NO_INCREMENT); return STATUS_SUCCESS;}// If you do not want to process Create and Close, just give an empty function and return success directly. If these two dispatch functions are not set, ring 3 cannot open our device at all.NTSTATUS DriverEntry(PDRIVER_OBJECT pDriverObj,PUNICODE_STRING pReg) { //... pDriverObj->MajorFunction[IRP_MJ_DEVICE_CONTROL] = DeviceControlFunc; pDriverObj->MajorFunction[IRP_MJ_CREATE] = NullFunc; pDriverObj->MajorFunction[IRP_MJ_CLOSE] = NullFunc; //....}3 Ring Code – Sending IRP Messages
The driver can now receive IRP messages, so we can send an IRP message in ring 3. Use the DeviceIoControl function to send an IRP_MJ_DEVICE_CONTROL type IRP message to the device (CreateFile can also be used for communication, but will not be demonstrated here).
#include <iostream>#include <Windows.h>#include <winioctl.h> // Prevent the following macros from being unrecognized // This macro is used to assemble the IRP control code, where user-defined control codes start from 0x800.#define code1 CTL_CODE(FILE_DEVICE_UNKNOWN,0x800,METHOD_BUFFERED,FILE_ANY_ACCESS)#define code2 CTL_CODE(FILE_DEVICE_UNKNOWN,0x900,METHOD_BUFFERED,FILE_ANY_ACCESS)int main(){ CHAR* devName = (CHAR*)"\\.\MyDeviceSymbol"; HANDLE devHandle = CreateFileA(devName,GENERIC_READ|GENERIC_WRITE, FILE_SHARE_READ| FILE_SHARE_WRITE,NULL, OPEN_EXISTING, FILE_ATTRIBUTE_NORMAL,NULL); DWORD str = 100; DWORD back = 0; DWORD backLen = 0; // Actual returned data length, if not received, it will crash DeviceIoControl(devHandle, code1, &str,0x4,&back,0x4,&backLen,NULL); printf("back = %d\r\n", back); str = 200; DeviceIoControl(devHandle, code2, &str, 0x4, &back, 0x4, &backLen, NULL); printf("back = %d\r\n", back); getchar(); CloseHandle(devHandle); return 0;}0 Ring Code – Handling IRP Messages – Extension
The code in ring 3 has been completed, and we need to further branch process the control code in the IRP:
#define code1 CTL_CODE(FILE_DEVICE_UNKNOWN,0x800,METHOD_BUFFERED,FILE_ANY_ACCESS)#define code2 CTL_CODE(FILE_DEVICE_UNKNOWN,0x900,METHOD_BUFFERED,FILE_ANY_ACCESS)// Since ring 3 uses DeviceIoControl to send IRP, we will supplement the logic in DeviceControlFunc.NTSTATUS DeviceControlFunc(DEVICE_OBJECT *DeviceObject, IRP *Irp) { // Get device stack, control code is in the device stack. PIO_STACK_LOCATION ioStack = IoGetCurrentIrpStackLocation(Irp); // Get control code, Parameters structure has many unions, we use the DeviceIoControl member for communication, so we use DeviceIoControl here to get the control code. ULONG code = ioStack->Parameters.DeviceIoControl.IoControlCode; // Get parameters passed from ring 3. PVOID buffer = Irp->AssociatedIrp.SystemBuffer; // Execute different branches for different control codes using switch case statements. switch (code) { case code1: // Print the value passed from ring 3 DbgPrint("param = %d\r\n",*(PUINT32)buffer); // Return the value to ring 3, just write it into the buffer. *(PUINT32)buffer = 800; // Set how much data to return, since our data interaction method is METHOD_BUFFERED, it will copy the data in the buffer to the ring 3 address. If Information is not specified, data cannot be copied, and ring 3 will receive empty data. Irp->IoStatus.Information = 4; break; case code2: DbgPrint("param = %d\r\n", *(PUINT32)buffer); *(PUINT32)buffer = 900; Irp->IoStatus.Information = 4; break; default: break; } Irp->IoStatus.Status = STATUS_SUCCESS; IoCompleteRequest(Irp, IO_NO_INCREMENT); return STATUS_SUCCESS;}0 Ring Code – Unloading Device and Symbolic Links
When unloading the driver, it is necessary to delete the device and symbolic link; otherwise, they will remain in kernel space and prevent the creation of devices with the same name. First create the device, then create the symbolic link. Therefore, when deleting, delete the symbolic link first, then unload the device.
VOID UnloadDriver( DRIVER_OBJECT *DriverObject ) { IoDeleteSymbolicLink(&symName); IoDeleteDevice(DriverObject->DeviceObject);}Execution Effect
If the code is correct, the execution effect is as follows: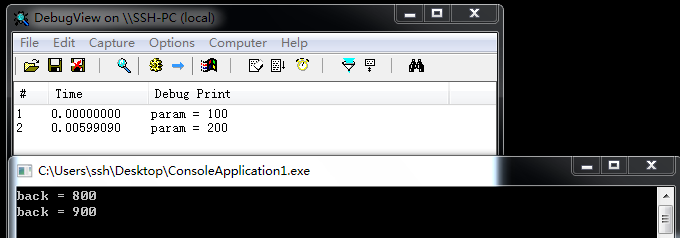

Kanxue ID: SSH Landscape Painting
https://bbs.pediy.com/user-home-867232.htm
*This article is original by SSH Landscape Painting from Kanxue Forum, please indicate the source when reprinting from Kanxue Community


# Previous Recommendations
1. New Vulnerability Analysis Experience: CVE-2010-3333 RTF Stack Buffer Overflow Vulnerability
2. A Goose Security Competition Early 2020 Ring 0 Problem Solution
3. Analysis of Authorization for a Certain Goose Note Server Docker Image
4. Learning angr (III) A Simple Problem I Imitated and a Problem Related to angr-ctf Symbolic Input
5. Analysis of a Word Macro Downloader Sample
6. XX’s NTDLL Randomization “Reverse” (XP System)
 Public Account ID: ikanxueOfficial Weibo: Kanxue SecurityBusiness Cooperation: [email protected]
Share the Ball
Like the Ball
Watch the Ball
Click “Read the Original” to learn more!