If you don’t want to miss my updates, remember to check the public account in the upper right corner and mark it as a star, take down the star and give it to me!
QEMU is familiar to anyone involved in embedded development. Recently, it has been wildly discussed in various groups, and saying it’s a Linux tool is not an exaggeration. It is a well-known and open-source emulator (official website: https://www.qemu.org/), capable of running on an X86 PC(actually, it can also run on your Arm development board, but we won’t discuss that scenario today), simulating various CPU architectures like Arm, MIPS, RISC-V, and development boards, as well as various peripherals like network cards, sound cards, keyboards, sdcard, emmc, usb and more.
You can think of it as a development board that can be summoned at will, running U-Boot, Linux Kernel, or even various software and operating systems like Ubuntu.
Sometimes we want to experience the latest U-Boot or Linux Kernel on the mainline, but find we don’t have the right board at hand, or the board we have is running a lower version of U-Boot and Linux Kernel. At this time, QEMU can help you quickly realize this wish.
I am Andy, a Linux kernel developer. Currently engaged in the porting and optimization of Linux systems on Arm chips, and have contributed numerous patches to the U-Boot and Linux kernel open-source community. From Cortex-M3 to Arm64, RT-Thread to Linux kernel, the fun of hacking is endless. Invited by Dalwen to share this excellent article with embedded development enthusiasts, for more of my articles, follow my public account: HackforFun
Next, I will guide everyone to experience the power and fun of QEMU: a step-by-step tutorial on running an Arm CPU-based Linux system through QEMU on an Ubuntu system.
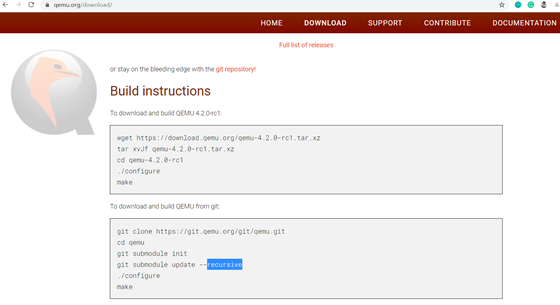
We are installing the Arm version of QEMU. If you directly use the command sudo apt install qemu-system-arm on Ubuntu, the version of QEMU obtained will be relatively old; it’s better to compile it directly from source.
I found that the default installed QEMU on Ubuntu 18.04 cannot start in graphical mode (without the -nographic parameter).
After successfully compiling according to the steps above, you will get: qemu-system-arm and qemu-system-aarch64.
The former is used to simulate 32-bit Arm CPUs like Arm9 /Arm11, Cortex-A7/A9/A15.
The latter is used to simulate 64-bit Arm CPUs like Arm Cortex A53, A57.
You can use the command qemu-system-arm -machine help to see the supported development boards:
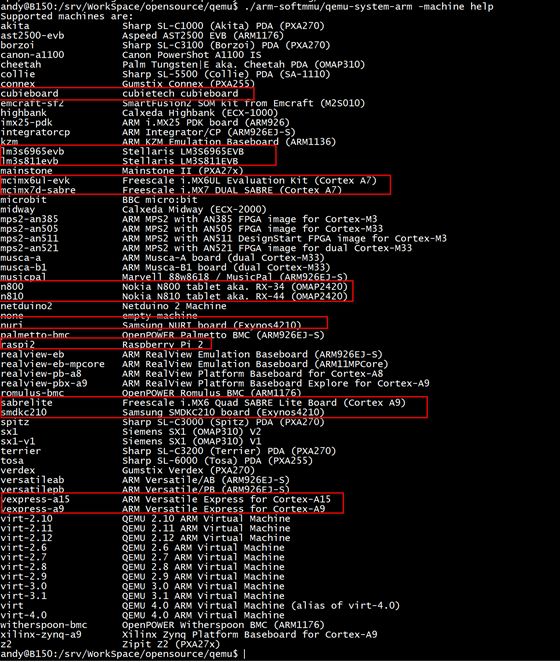
Are there many familiar development boards in there? Well-known chips like i.MX and EXYNOS are included.
Here we will use the vexpress-a9 development board. The vexpress-a9 is a 4-core Cortex-A9 development board designed by Arm itself, and U-Boot, Linux Kernel, and QEMU all provide complete support for this board.
Step 1: Download U-Boot code:
git clone https://gitlab.denx.de/u-boot/u-boot.git
After downloading, you can see the configuration files for this development board in the configs directory:

Step 2: Compile
make vexpress_ca9x4_defconfig make CROSS_COMPILE=arm-linux-gnueabihf- all
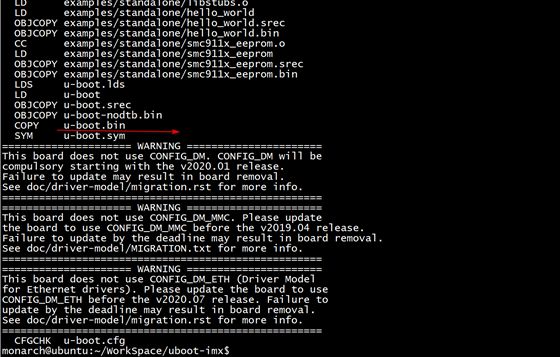
The final compilation generates an elf format executable file u-boot and a pure binary file u-boot.bin, where the executable file u-boot in elf format can be started by QEMU.
To start an Arm Linux system, you generally need three essential components: Bootloader, Linux Kernel, rootfs (root file system).
A long time ago, creating rootfs was a troublesome task: cross-compiling busybox, then manually establishing a standard Linux system directory, and copying various files and libraries generated by compiling busybox. If other modules are needed, cross-compiling would be required again. If a certain module has dependencies on other libraries, there would be complications in resolving those dependencies. Finally, device nodes would need to be manually created, and corresponding permissions set. Each step must be performed correctly; otherwise, unknown issues may arise during startup.
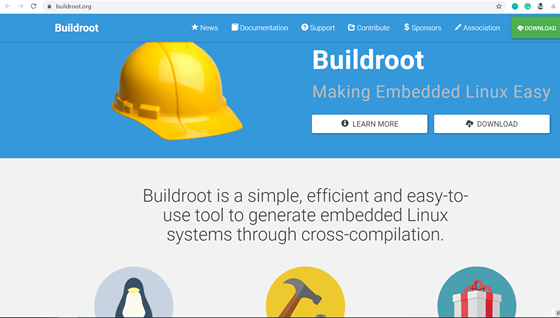
Since the emergence of the Buildroot project, it has become much easier to build rootfs, as its slogan suggests: Making Embedded Linux Easy. As one of my group friends said:
“Since I started using Buildroot, I’ve bid farewell to the barbaric life of primitive file system customization. The era of needing to download source code for any tool, cross-compile it, and be overwhelmed by various library issues is gone. ”
git clone git://git.buildroot.net/buildroot
The Buildroot code repository only contains a compilation framework by default, so the code size is small and it downloads quickly. The various code packages needed to build rootfs will only start downloading during compilation based on your configuration options.
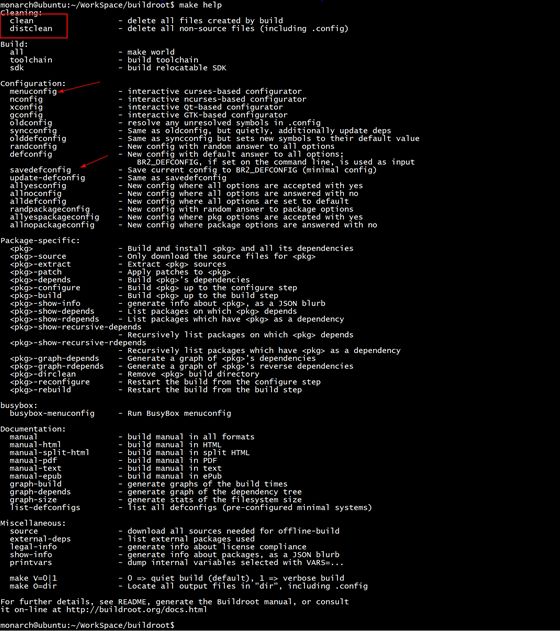
Buildroot provides a menuconfig interface similar to U-Boot and Linux Kernel, and you can check the supported commands by executing make help:
The developer just needs to execute the command make menuconfig to select the various components needed and customize their rootfs through this familiar interface:
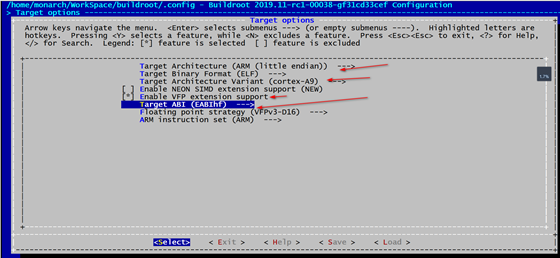
The first configuration should be the Target options:
Most Arm architectures are little-endian, so select little endian.
The CPU of this development board is cortex-A9. We will use Linaro GCC for compilation, and Linaro’s GCC has hardfloat support enabled by default, so select VFP extension and EABIhf.
For the installation of the cross-compilation tool Linaro GCC, you can refer to the previous article: Once and for all Arm Linux cross-compilation.
The first option sets the path where the final generated configuration file will be saved. Buildroot can generate specific defconfig files for different boards, which are saved in the configs directory by default.
After modifying the configurations, executing the command make savedefconfig will generate a new defconfig file:
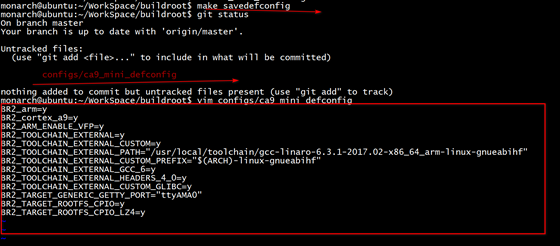
Before the next compilation, you can directly execute the command make ca9_mini_defconfig to load the existing configuration.
The second option sets the storage path for various third-party packages downloaded by Buildroot, which is defaulted to the dl directory:


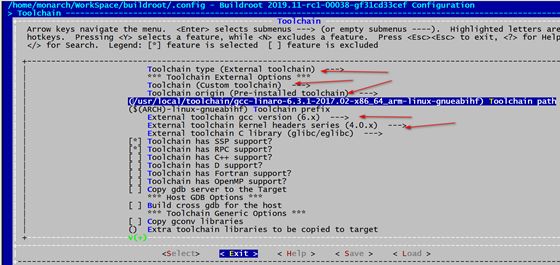
Since we are using the toolchain installed on our computer, we select External toolchain and Custom toolchain
Then fill in the Toolchain path with the location where the toolchain is installed on the computer. If you’re unsure of the exact location, use the which command to check:

Also, be careful not to write the wrong prefix for Toolchain prefix.
Set the version of the toolchain and the version of the kernel headers used to compile this toolchain:
The version of the toolchain can be found from the toolchain name or by using the command arm-linux-gnueabihf-gcc -v.
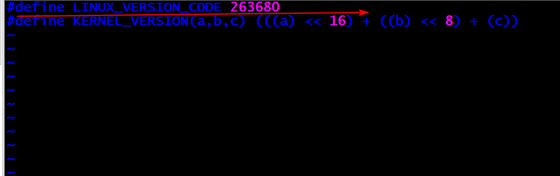
What is the version of the kernel headers corresponding to the toolchain? You can press the h key on this option to see helpful information:
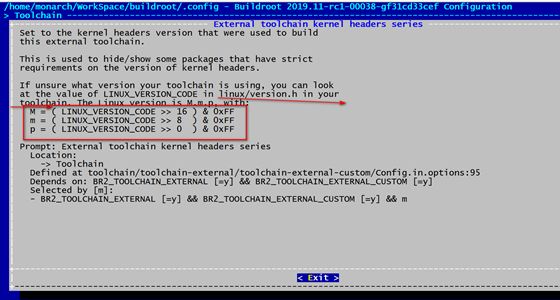
It turns out that this version can be found in the version.h file inside the toolchain:
arm-linux-gnueabihf/libc/usr/include/linux/version.h
263680 corresponds to the hexadecimal value 0x40600, right-shifting 16 bits gives a version number of 4. This is the origin of the above 4.0.x.
Here’s a little tip for everyone: When configuring in make menuconfig, if you encounter options you don’t understand, just press the h key on that option to see useful help information explaining that option further.
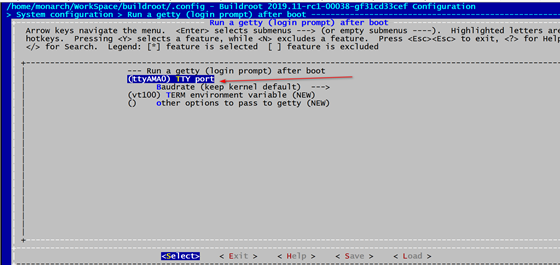
Since the console name for the vexpress_a9 kernel startup is ttyAMA0, we also need to configure the TTY Port in the System configuration->Run a getty(login prompt) after boot option to ttyAMA0. Otherwise, you won’t be able to access the console after mounting the file system.
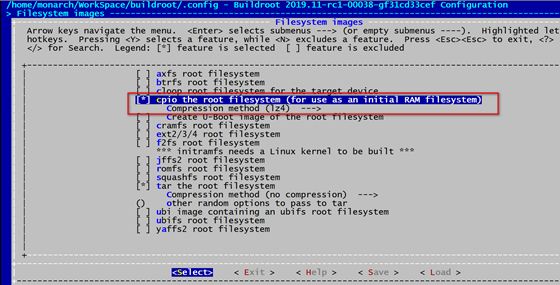
We link the compiled rootfs in the form of initramfs with the Linux Kernel. To keep the root file system image as small as possible, we can use lz4 compression, so the Filesystem images also need the following configuration:
At this point, the most streamlined Buildroot has been configured.
If you need other commands or tools, you can enable them under Target Packages:
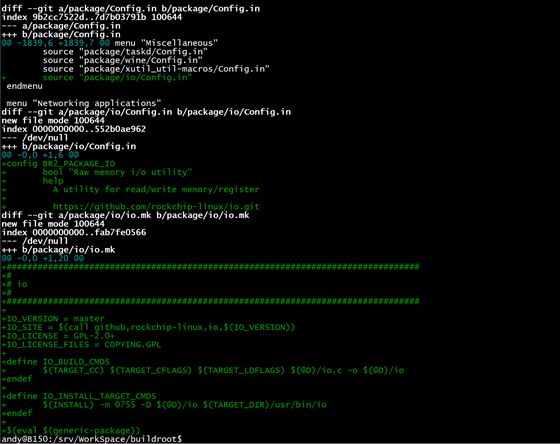
If a certain module you need is not in Buildroot, you can add it yourself:
For example, adding the patch above will allow Buildroot to automatically download https://github.com/rockchip-linux/io.git during compilation.
Exit and execute the make command to start the compilation.
During the Buildroot compilation process, various packages needed will be automatically downloaded via the internet, so ensure your network is stable.
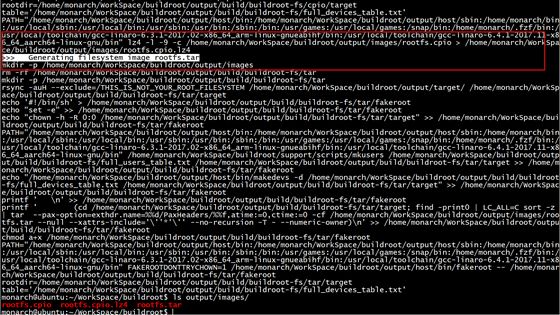
After compilation is complete, the output will be as shown in the following image:
git clone https://git.kernel.org/pub/scm/linux/kernel/git/stable/linux.git
The Linux mainline already supports the vexpress_a9 board:

The ca in here is an abbreviation for Cortex-a, so ca9 corresponds to Cortex-A9, and ca15 corresponds to Cortex-A15.
Copy the previously compiled rootfs.cpio.lz4 from Buildroot to the Linux kernel root directory:
cp ../buildroot/output/images/rootfs.cpio.lz4 . make ARCH=arm vexpress_defconfig
Execute the command make ARCH=arm menuconfig to modify some basic configurations:
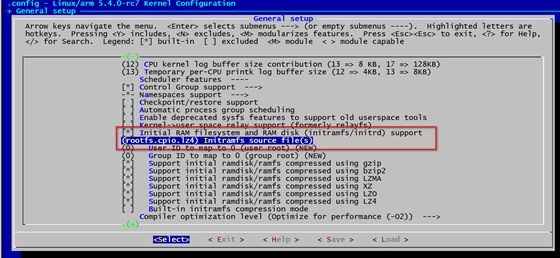
In the General setup->Initramfs source file option, fill in rootfs.cpio.lz4, which is the rootfs we copied from Buildroot, and we will compile it together with the kernel. Of course, the rootfs can also be loaded separately as a file on a separate partition, which we can try later.
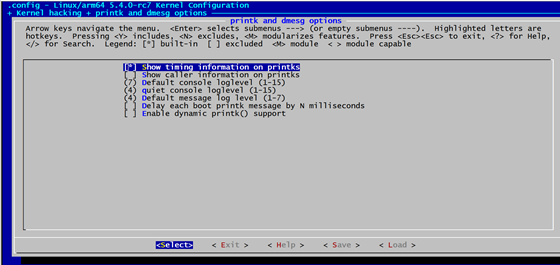
In the Kernel hacking->printk and dmesg options, select the first option so that the printed kernel log will have timestamp information, making it look better.
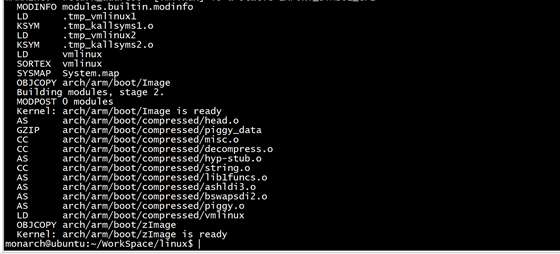
Exit, save, and then compile:
make ARCH=arm CROSS_COMPILE=arm-linux-gnueabihf- -j8
If you encounter any errors during the compilation of the Linux kernel or U-Boot, you can refer to my previous article: Things about Linux Kernel and U-Boot Compilation.
As mentioned earlier, QEMU can simulate peripherals like sd cards. We will place the compiled firmware on a simulated sd card module and let QEMU start the Linux system from this sd card:
◆ Create an sd card image and format it to fat format:
dd if=/dev/zero of=sd.img bs=4096 count=4096 mkfs.vfat sd.img
◆ Copy the compiled kernel zImage and dtb files to sd.img
sudo mount sd.img /mnt/ -o loop,rw sudo cp arch/arm/boot/zImage /mnt/ sudo cp arch/arm/boot/dts/vexpress-v2p-ca9.dtb /mnt/ sudo umount /mnt
sudo qemu-system-arm -M vexpress-a9 -m 512M -kernel ../uboot-imx/u-boot-nographic -sd sd.img
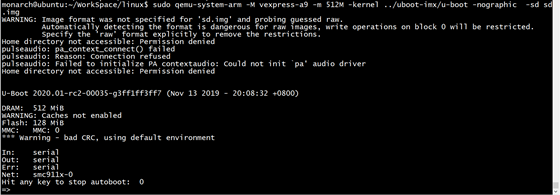
-M parameter specifies the board to start as vexpress-a9.
-m specifies the memory of this board as 512MB.
-kernel specifies the program to be executed first when QEMU starts, in this case, we specify the previously compiled u-boot executable file.
-sd parameter specifies the previously created sd.img.
Since we are starting from the command line, we added the nographic parameter.
You can see that U-Boot has successfully started and entered the command line. Next, we will start the Linux Kernel.
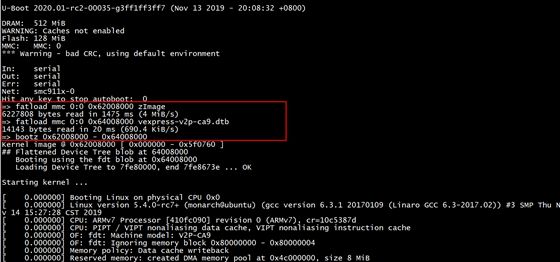
◆ First, use the fatload command to read the zImage and dtb files from sd.img into the board’s memory:
fatload mmc 0:0 0x62008000 zImage fatload mmc 0:0 0x64008000 vexpress-v2p-ca9.dtb
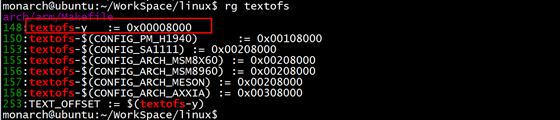
Here, 0x62008000 and 0x64008000 correspond to the loading addresses of zImage and dtb files in memory. How are these two addresses derived?
In the Linux Kernel, there is the following definition:
This textofs defines the memory offset address corresponding to the execution address of the Linux kernel zImage, with a default offset of 0x8000.
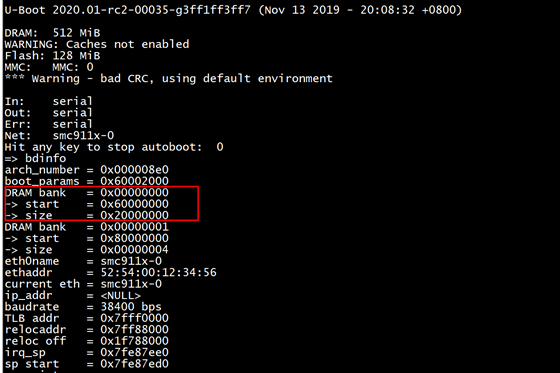
In the U-Boot command line, you can enter the bdinfo command to find out the starting address of the memory for this development board:
You can see that the memory address of this development board is actually 0x60000000, so the starting address for the kernel is 0x62008000.
The loading address for the dtb file has no special requirements, just avoid overlapping with the Linux Kernel Image.
◆ Use the bootz command to start the Linux Kernel:
bootz 0x62008000 - 0x64008000
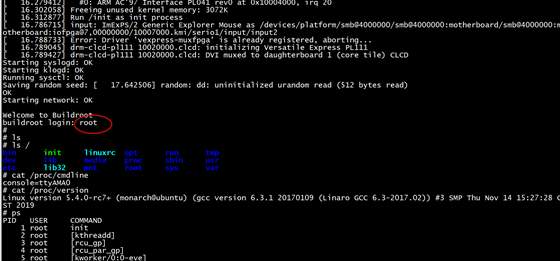
After starting, input root to access the command line console.
At this point, we have successfully run Arm Linux on QEMU.
Can QEMU Completely Replace Development Boards?
QEMU is an emulator, it has certain differences from real development boards:
It cannot fully simulate real hardware behavior, and it is difficult to simulate a GPIO for you to pull high or low or to light an LED, or to simulate DRAM, an LCD interface for you to connect a display… It seems there are too many things it cannot simulate, so what is its use?
Its strengths lie in simulating scenarios that do not involve specific hardware peripherals, such as:
If you want to quickly experience the latest U-Boot and Linux Kernel, it can run them right away.
If you want to run trendy Linux distributions like Ubuntu or Debian on Arm, you can use it.
If you want to study the boot process of U-Boot or Linux Kernel, it is also very suitable. Sometimes when I port the Linux kernel on a specific development board and find that a certain process behaves abnormally, I directly use QEMU to run it for comparison.
If you want to understand the file system mounting process, it is very suitable.
If you want to learn Arm assembly, you can run it on QEMU, and with GDB, you can step-debug!
If you want to learn about the Linux device tree, it can be used for experiments…
Or if you want to compile a certain open-source project to run on an Arm development board, and cross-compilation is quite challenging, you can consider running an Arm Ubuntu directly on QEMU to compile, which may be much simpler.
If you have previously worked with microcontrollers and hardware and want to experience Arm Linux development, trying QEMU is perfect. In the right scenarios, QEMU is a powerful tool that can be summoned at will!
Collection | Summary of Linux Articles
Collection | Programmer’s Life

Scan the QR code to follow my public account