
0x01. Camera SD Card Flashing Experience
Recently, I researched the SD card flashing function of a camera I have, which only supports FAT32 formatted SD cards. Therefore, I needed to format the SD card to FAT32 first. Additionally, Microsoft limits FAT32 to a maximum capacity of 32GB, so I could only use an SD card of 32GB or less for flashing.
Here I used a 32GB SD card for flashing.

Win10 format SD card command, X is the disk name of the SD card.
format /FS:FAT32 X:Ready, place the firmware FIRMWARE.bin in the root directory of the SD card, and long press the reset button to flash.
However, I later found that it did not succeed; after flashing, it became a brick, and the camera did not start normally. The firmware flashed was still the normal firmware, and no modifications had been made, yet it directly became a brick. It was indeed a bit of a bad start, and I was unsure which link went wrong.
0x02. Rescue Operation for the Brick

T
IPL xxx
D-15
HW Reset
SPI 54M
IPL_CUST xxxx
MXP found at 0x0000f000
offset:00010000
XZ decomp_size=0x0004a19c
U-Boot 2015.01
WARNING: Caches not enabled
MMC:   MStar SD/MMC: 0
SF: Detected nor0 with total size 8 MiB
gpio debug MHal_GPIO_Pad_Set:603
gpio debug MHal_GPIO_Pad_Set:603
In:    serial
Out:   serial
Err:   serial
Net:   MAC Address E0:EF:02:88:AD:26
Auto-Negotiation...
Link Status Speed:100 Full-duplex:1
sstar_emac
gpio debug MHal_GPIO_Pad_Set:603
ddrsize 64
mtd_num 5, flash_size 0x00800000(8M)
To run up...
Using sstar_emac device
TFTP from server 192.168.1.99;
 our IP address is 192.168.1.10
Filename 'update.bin'.
Load address: 0x21000000
Loading: T T T T T T T T T T
Retry count exceeded; starting again
Using sstar_emac device
TFTP from server 192.168.1.99;
our IP address is 192.168.1.10
Filename 'update.bin'.
Load address: 0x21000000
Loading: T T T T T T T T T T
T
IPL xxx
D-15
HW Reset
SPI 54M
IPL_CUST xxxx
U-Boot 2015.01
WARNING: Caches not enabled
MMC:   MStar SD/MMC: 0
SF: Detected nor0 with total
size 8 MiB
gpio debug MHal_GPIO_Pad_Set:603
In:    serial
Out:   serial
Err:   serial
Auto-Negotiation...
sstar_emac
SF: Detected nor0 with total
size 8 MiB
Erasing SPI flash..._spi_flash_erase:
 addr 0x30000,
len 0x10000 100%(cost 248 ms)
Writing to
SPI flash..._spi_flash_write
to 0x30000,
len 0x10000 from
 0x23b01870 100%(cost 169 ms)
done
ddrsize 64
mtd_num 5,
flash_size 0x00800000(8M)
To run up...
Using sstar_emac device
TFTP from server 192.168.1.99;
our IP address is 192.168.1.10
Filename 'update.bin'.
Load address: 0x21000000
Loading:


T #################################################
###################################################
#######################################################
#######################################################
#######################################################
#######################################################
#######################################################
#######################################################
#######################################################
##############

         237.3 KiB/s
doneBytes transferred =
7114336 (6c8e60 hex)
head_crc32 9ba634e1
 crc32 9ba634e1
MXIC REMS: 0xC2,0x16
SF: Detected nor0 with
total size 8 MiB
...
...
SF:
1507328 bytes @ 0x40000
Written: OK
head_crc32 4d5121d7 crc32 4d5121d7
...
...
Erasing SPI flash..._spi_flash_erase:
 addr 0x30000,
 len 0x10000 100%(cost 255 ms)
Writing to
SPI flash..._spi_flash_write
to 0x30000,
len 0x10000
from 0x23b018d0 100%(cost 175 ms)
done
resetting ...
##  Booting kernel
 from Legacy Image at 21000000 ...
Image Name:MVX4##I6B0xxxxxxxx
Image Type:
ARM Linux Kernel
 Image (lzma compressed)
   Data Size:1494344 Bytes = 1.4 MiB
   Load Address: 20008000
   Entry Point:  20008000
   Verifying Checksum ... OK
   Uncompressing Kernel Image ...
[XZ] !!!reserved 0x21000000
 length=0x 1000000 for xz!!
   XZ: uncompressed size=0x2e2000,
ret=7
OK

Starting kernel ...
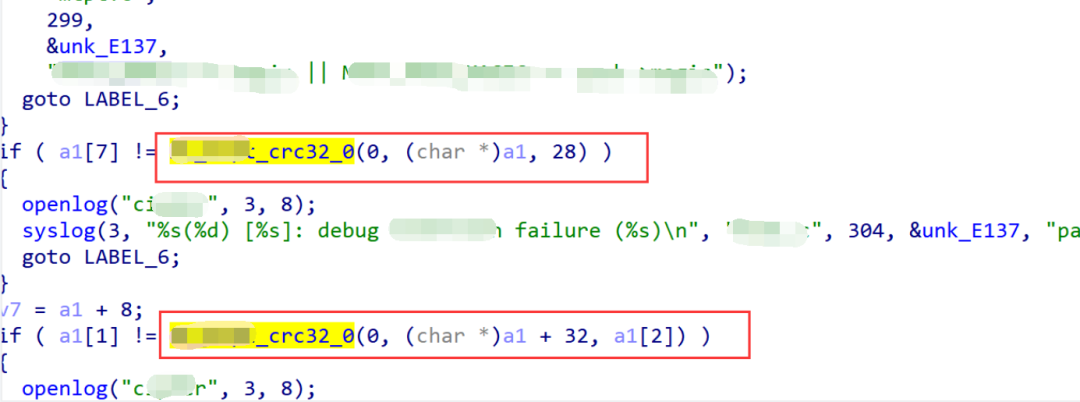
0x03. Analyzing Card Flash Firmware Verification


0x04. Custom File System
make menuconfig

make busybox-menuconfig
<span>make</span> to compile. After compilation, an output folder is generated in the current directory, and the generated telnetd is linked to busybox, so here we directly copy the generated busybox to the camera’s file system. The compiled busybox is copied to the firmware file system’s /bin directory and named busybox_hack.
sudo mksquashfs ./squashfs-root/ out.fs -comp xz -b 64K -noappend<span>./squashfs-root</span> is the directory to be packed, <span>out.fs</span> is the desired name of the repacked file. <span>-comp xz</span> tells mksquashfs to use the xz compression algorithm, <span>-b 64K</span> tells mksquashfs to use a block size of 64K. <span>-noappend</span> tells mksquashfs not to append new files to existing files.dd if=out.fs of=target.bin conv=notrunc bs=1 seek=1494600if=out.fs indicates that the input file is out.fs.
of=target.bin indicates that the output file is target.bin.
conv=notrunc indicates not to truncate the output file, i.e., to keep the original content in the output file.
bs=1 indicates that one byte is read and written at a time.
seek=1494600 indicates to start writing at offset 1494600 in the output file, which is equivalent to appending the input file to the output file at offset 1494600.
Source: Security Guest
The technologies, ideas, and tools involved in the articles published and reprinted by Heibai Road are for learning and communication purposes only, and no one may use them for illegal purposes or profit-making, otherwise, the consequences will be borne by themselves!
If there is any infringement, please private message us to delete the article.
END