
In this tutorial, you will learn how to combine OpenCV’s Deep Neural Network (DNN) module with NVIDIA GPU, CUDA, and cuDNN to boost inference speed by 211-1549%.
Back in August 2017, I published my first tutorial on image classification using OpenCV’s DNN module.
Readers of PyImageSearch loved the convenience and ease of use of OpenCV’s DNN module, which led me to publish several tutorials on the DNN module.
These tutorials utilize OpenCV’s DNN module to perform the following operations:
(1) Load a pretrained network from disk;
(2) Make predictions on input images;
(3) Display results, allowing you to build your own custom computer vision/deep learning pipeline for your specific projects.
However, the biggest issue with OpenCV’s DNN module is the lack of NVIDIA GPU/CUDA support—these models cannot easily leverage the GPU to increase the frames per second (FPS) processing rate of the pipeline.
This is not a major problem for the Single Shot Detector (SSD) tutorial, as it can run easily on the CPU at 25-30+ FPS, but it is a huge issue for YOLO and Mask R-CNN, which struggle to achieve more than 1-3 FPS on the CPU.
Everything changed during the Google Summer of Code (GSoC) in 2019.
Under the leadership of Davis King from dlib, and implemented by Yashas Samaga, OpenCV 4.2 now supports inference on NVIDIA GPUs using OpenCV’s DNN module, boosting inference speed by 1549%!
In today’s tutorial, I will show you how to compile and install OpenCV to leverage your NVIDIA GPU for deep neural network inference.
Then in next week’s tutorial, I will provide you with code for Single Shot Detector, YOLO, and Mask R-CNN, which can be used with OpenCV to utilize your GPU. We will then benchmark the results and compare them with inference using only the CPU, so you can understand which models benefit the most from GPU usage.
To learn how to compile and install OpenCV’s DNN module with NVIDIA GPU, CUDA, and cuDNN support, keep reading!
How to Use OpenCV’s DNN Module with NVIDIA GPU, CUDA, and cuDNN
In the remainder of this tutorial, I will show you how to compile OpenCV from source so that you can leverage NVIDIA GPU acceleration for inference on pretrained deep neural networks.
Assumptions for Compiling OpenCV with NVIDIA GPU Support
To compile and install OpenCV’s Deep Neural Network module with NVIDIA GPU support, I will make the following assumptions:
1. You have an NVIDIA GPU. This should be an obvious assumption. If you do not have an NVIDIA GPU, you cannot compile the OpenCV DNN module with NVIDIA GPU support.
2. You are using Ubuntu 18.04 (or another Debian-based distribution). When it comes to deep learning, I strongly recommend using a Unix-based machine rather than Windows (in fact, I do not support Windows on my PyImageSearch blog). If you plan to use a GPU for deep learning, use Ubuntu on macOS or Windows—it is easier to configure.
3. You know how to use the command line. We will be using the command line in this tutorial. If you are not familiar with the command line, I recommend reading this introduction to the command line and spending a few hours (or even days) practicing. Again, this tutorial is not suitable for those completely new to the command line.
4. You are able to read terminal output and diagnose problems. If you have never done this before, compiling OpenCV from source can be challenging—there are many things that can confuse you, including missing packages, incorrect library paths, etc. Even with my detailed guide, you may make mistakes along the way. Do not get discouraged! Take some time to understand the commands you are executing, what they do, and most importantly, read the output of the commands! Do not blindly copy and paste; you will only encounter errors.
That said, let’s get started configuring OpenCV’s DNN module for NVIDIA GPU inference.
Step 1: Install NVIDIA CUDA Drivers, CUDA Toolkit, and cuDNN
This tutorial assumes you already have:
An NVIDIA GPU installed with the CUDA driver for that specific GPUCUDA Toolkit and cuDNN configured and installedIf you have an NVIDIA GPU on your system but have not yet installed the CUDA drivers, CUDA Toolkit, and cuDNN, you will need to configure your machine first—I will not cover CUDA configuration and installation in this guide. Once you have installed the correct NVIDIA drivers and toolkit, you can return to this tutorial.
Step 2: Install OpenCV and DNN GPU Dependencies
The first step in configuring OpenCV’s DNN module for NVIDIA GPU inference is to install the appropriate dependencies:
$ sudo apt-get update$ sudo apt-get upgrade$ sudo apt-get install build-essential cmake unzip pkg-config$ sudo apt-get install libjpeg-dev libpng-dev libtiff-dev$ sudo apt-get install libavcodec-dev libavformat-dev libswscale-dev$ sudo apt-get install libv4l-dev libxvidcore-dev libx264-dev$ sudo apt-get install libgtk-3-dev$ sudo apt-get install libatlas-base-dev gfortran$ sudo apt-get install python3-devIf you followed my Ubuntu 18.04 deep learning configuration guide, you should have most of these packages installed, but for safety, I recommend running the above commands.
Step 3: Download OpenCV Source Code
There is no “pip-installable” version of OpenCV with NVIDIA GPU support—instead, we need to compile OpenCV from scratch using the correct NVIDIA GPU configuration set.
The first step in doing this is to download the source code for OpenCV v4.2:
$ cd ~$ wget -O opencv.zip https://github.com/opencv/opencv/archive/4.2.0.zip$ wget -O opencv_contrib.zip https://github.com/opencv/opencv_contrib/archive/4.2.0.zip$ unzip opencv.zip$ unzip opencv_contrib.zip$ mv opencv-4.2.0 opencv$ mv opencv_contrib-4.2.0 opencv_contribWe can now proceed to configure our build.
Step 4: Configure Python Virtual Environment
If you followed my Ubuntu 18.04, TensorFlow, and Keras deep learning configuration guide, you should have already installed virtualenv and virtualenvwrapper:
If your machine is set up, skip to the mkvirtualenv command in this section.
Otherwise, follow each step below to set up your machine.
Python virtual environments are best practices for Python development. They allow you to test different versions of Python libraries in isolated, independent development and production environments. Python virtual environments are considered best practices in the Python world—I use them daily, and you should too.
If you haven’t installed pip, Python’s package manager, you can install it using the following command:
$ wget https://bootstrap.pypa.io/get-pip.py$ sudo python3 get-pip.pyAfter installing pip, you can install both virtualenv and virtualenvwrapper:
$ sudo pip install virtualenv virtualenvwrapper$ sudo rm -rf ~/get-pip.py ~/.cache/pipNext, you need to open the ~/.bashrc file and update it to automatically load virtualenv/virtualenvwrapper when opening a terminal. I prefer to use the nano text editor, but you can use whichever editor you prefer:
$ nano ~/.bashrcAfter opening the ~/.bashrc file, scroll to the bottom and insert the following:
# virtualenv and virtualenvwrapperexport WORKON_HOME=$HOME/.virtualenvsexport VIRTUALENVWRAPPER_PYTHON=/usr/bin/python3source /usr/local/bin/virtualenvwrapper.shFrom there, save and exit your terminal (ctrl + x, y, enter). Then, you can reload the ~/.bashrc file in your terminal session:
$ source ~/.bashrcYou only need to run the above commands once—because you updated your ~/.bashrc file, when you open a new terminal window, the virtualenv/virtualenvwrapper environment variables will be set automatically.
The final step is to create your Python virtual environment:
$ mkvirtualenv opencv_cuda -p python3The mkvirtualenv command creates a new Python virtual environment named opencv_cuda using Python 3. You should then install NumPy into the opencv_cuda environment:
$ pip install numpyIf you ever close the terminal or deactivate the Python virtual environment, you can access it again using the workon command:
$ workon opencv_cudaIf you are not familiar with Python virtual environments, I recommend spending some time reading about how they work—they are best practices in the Python world. If you choose not to use them, that’s perfectly fine, but remember that your choice does not exempt you from learning the proper Python best practices. Invest time in your knowledge now.
Step 5: Determine Your CUDA Architecture Version
When compiling OpenCV’s DNN module with NVIDIA GPU support, we need to determine our NVIDIA GPU architecture version:
1. This version number will be required when we set the CUDA_ARCH_BIN variable in the cmake command in the next section.2. The NVIDIA GPU architecture version depends on the GPU you are using, so make sure to find out your GPU model ahead of time.3. Failing to set the CUDA_ARCH_BIN variable correctly may result in OpenCV compiling but not being able to use the GPU for inference (making diagnosis and debugging troublesome).One of the easiest ways to determine your NVIDIA GPU architecture version is simply to use the nvidia-smi command:
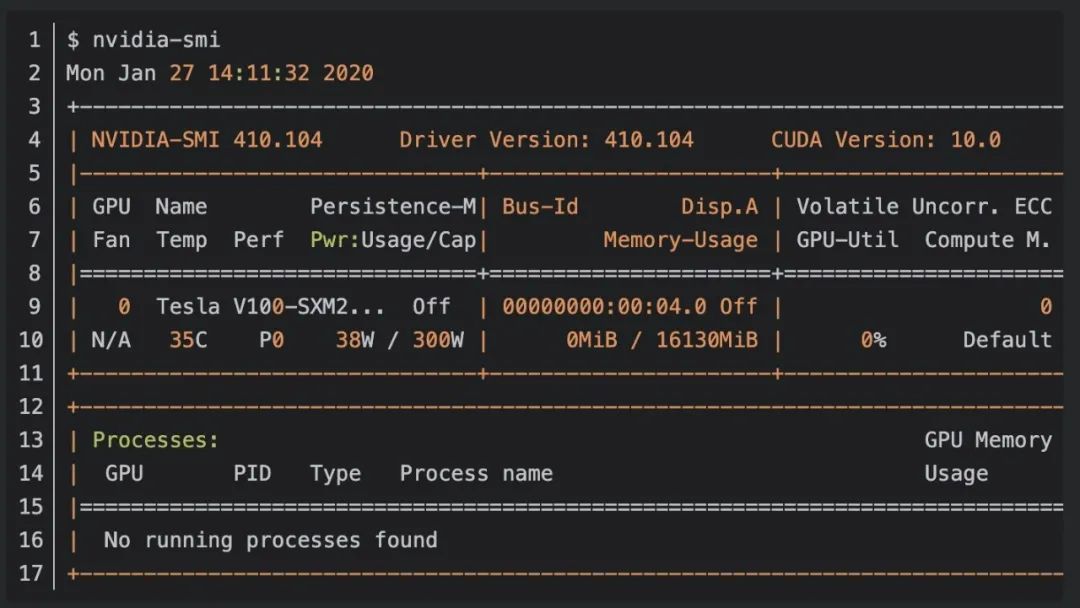
Check the output, and you can see I am using an NVIDIA Tesla V100 GPU. Before proceeding, make sure to run the nvidia-smi command yourself to verify your GPU model.
Now that I have my NVIDIA GPU model, I can proceed to determine the architecture version.
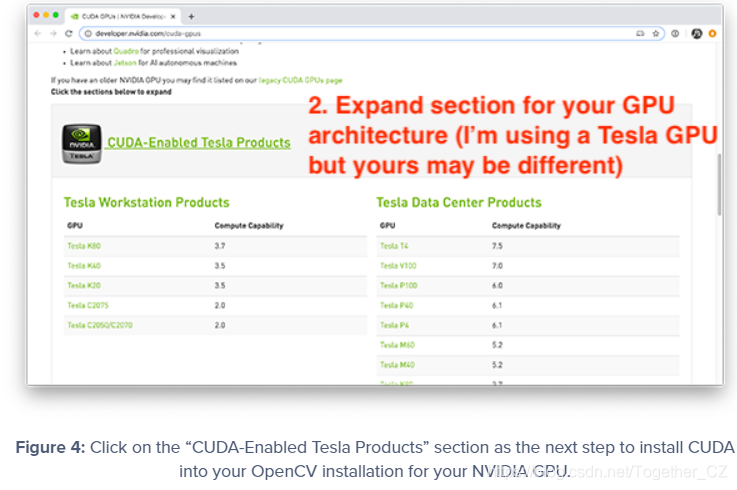
You can find the NVIDIA GPU architecture version for your specific GPU on this page:
https://developer.nvidia.com/cuda-gpusScroll down to the list of Tesla, Quadro, NVS, GeForce/Titan, and Jetson products that support CUDA:
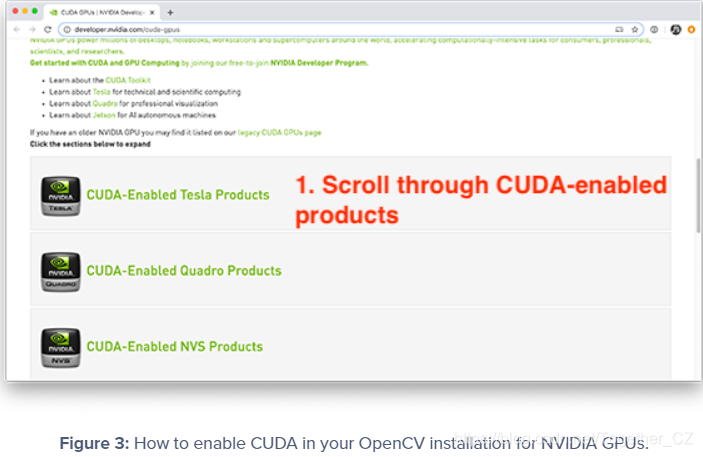
Since I am using the V100, I will click on the section for “Tesla Products with CUDA Enabled”:
Scroll down, and I can see my V100 GPU:
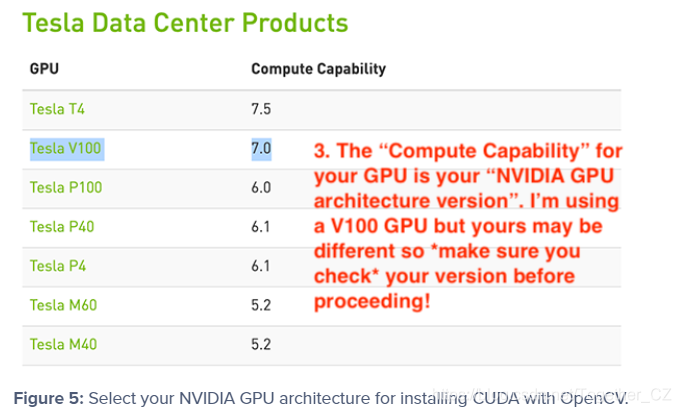
As you can see, my NVIDIA GPU architecture version is 7.0—you should perform the same process for your GPU model. Once you have determined your NVIDIA GPU architecture version, take note of it and proceed to the next part.
Step 6: Configure OpenCV with NVIDIA GPU Support
At this point, we are ready to configure our build using the cmake command. The cmake command scans dependencies, configures the build, and generates the files needed for make to actually compile OpenCV. To configure the build, first ensure you are in the Python virtual environment for compiling OpenCV with NVIDIA GPU support:
$ workon opencv_cudaNext, change the directory to where you downloaded the OpenCV source code, then create a build directory:
$ cd ~/opencv$ mkdir build$ cd buildThen, you can run the following cmake command, ensuring to set the CUDA_ARCH_BIN variable according to the NVIDIA GPU architecture version you found in the previous section:
$ cmake -D CMAKE_BUILD_TYPE=RELEASE \ -D CMAKE_INSTALL_PREFIX=/usr/local \ -D INSTALL_PYTHON_EXAMPLES=ON \ -D INSTALL_C_EXAMPLES=OFF \ -D OPENCV_ENABLE_NONFREE=ON \ -D WITH_CUDA=ON \ -D WITH_CUDNN=ON \ -D OPENCV_DNN_CUDA=ON \ -D ENABLE_FAST_MATH=1 \ -D CUDA_FAST_MATH=1 \ -D CUDA_ARCH_BIN=7.0 \ -D WITH_CUBLAS=1 \ -D OPENCV_EXTRA_MODULES_PATH=~/opencv_contrib/modules \ -D HAVE_opencv_python3=ON \ -D PYTHON_EXECUTABLE=~/.virtualenvs/opencv_cuda/bin/python \ -D BUILD_EXAMPLES=ON ..Here you can see that we are compiling OpenCV while enabling CUDA and cuDNN support (with WITH_CUDA and WITH_CUDNN, respectively).
We also instruct OpenCV to build the DNN module with CUDA support (OPENCV_DNN_CUDA). We also optimize with ENABLE_FAST_MATH, CUDA_FAST_MATH, and WITH_CUBLAS.
The most important and error-prone configuration is your CUDA_ARCH_BIN—make sure it is set correctly!
The CUDA_ARCH_BIN variable must map to the NVIDIA GPU architecture version you found in the previous section.
If you set this value incorrectly, OpenCV may still compile, but when you try to perform inference using the DNN module, you will receive the following error message:
File "ssd_object_detection.py", line 74, in detections = net.forward()cv2.error: OpenCV(4.2.0) /home/a_rosebrock/opencv/modules/dnn/src/cuda/execution.hpp:52: error: (-217:Gpu API call) invalid device function in function 'make_policy'If you encounter this error, you will know that your CUDA_ARCH_BIN setting is incorrect. You can verify that your cmake command executed correctly by looking at the output:
...-- NVIDIA CUDA: YES (ver 10.0, CUFFT CUBLAS FAST_MATH)-- NVIDIA GPU arch: 70-- NVIDIA PTX archs:-- -- cuDNN: YES (ver 7.6.0)...Here you can see that OpenCV and cmake have correctly identified my CUDA-enabled GPU, NVIDIA GPU architecture version, and cuDNN version.
I also like to look at the OpenCV modules section, particularly the To be built section:
-- OpenCV modules:-- To be built: aruco bgsegm bioinspired calib3d ccalib core cudaarithm cudabgsegm cudacodec cudafeatures2d cudafilters cudaimgproc cudalegacy cudaobjdetect cudaoptflow cudastereo cudawarping cudev datasets dnn dnn_objdetect dnn_superres dpm face features2d flann fuzzy gapi hdf hfs highgui img_hash imgcodecs imgproc line_descriptor ml objdetect optflow phase_unwrapping photo plot python3 quality reg rgbd saliency shape stereo stitching structured_light superres surface_matching text tracking ts video videoio videostab xfeatures2d ximgproc xobjdetect xphoto-- Disabled: world-- Disabled by dependency: --- Unavailable: cnn_3dobj cvv freetype java js matlab ovis python2 sfm viz-- Applications: tests perf_tests examples apps-- Documentation: NO-- Non-free algorithms: YESHere you can see there are many cuda* modules, indicating that cmake is instructing OpenCV to build the CUDA-enabled modules (including OpenCV’s DNN module).
You can also check the Python 3 section to verify that your Interpreter and numpy are both pointing to your Python virtual environment:
-- Python 3:-- Interpreter: /home/a_rosebrock/.virtualenvs/opencv_cuda/bin/python3 (ver 3.5.3)-- Libraries: /usr/lib/x86_64-linux-gnu/libpython3.5m.so (ver 3.5.3)-- numpy: /home/a_rosebrock/.virtualenvs/opencv_cuda/lib/python3.5/site-packages/numpy/core/include (ver 1.18.1)-- install path: lib/python3.5/site-packages/cv2/python-3.5Make sure to also note the install path! When we finish the OpenCV installation, you will need that path.
Step 7: Compile OpenCV with DNN GPU Support
If cmake exits without errors, you can compile OpenCV with NVIDIA GPU support using the following command:
$ make -j8You can replace 8 with the number of cores available on your processor. Since my processor has 8 cores, I provide 8. If your processor only has 4 cores, replace 8 with 4.
As you can see, my compilation completed without errors:
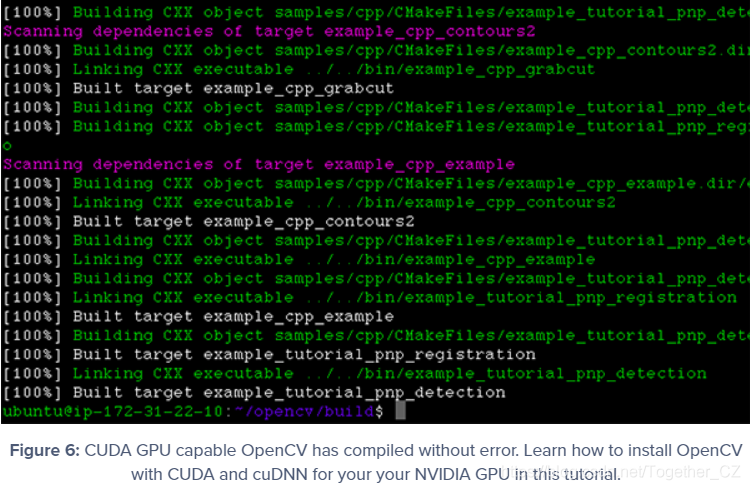
One common error you might see is the following:
$ makemake: * No targets specified and no makefile found. Stop.If this happens, you should go back to Step 6 and check your cmake output—if the cmake command exited with an error, it would not have generated the build files for make, so the make command reports that there are no build files to compile. If this happens, go back to your cmake output and look for errors.
Step 8: Install OpenCV with DNN GPU Support
If the make command in Step #7 completed successfully, you can now install OpenCV with the following:
$ sudo make install$ sudo ldconfigThe final step is to symlink the OpenCV library to your Python virtual environment.
To do this, you need to know the location where the OpenCV bindings were installed—you can determine this path from the install path configuration in Step #6.
In my case, the install path is lib/python3.5/site-packages/cv2/python-3.5. This means my OpenCV bindings should be located at /usr/local/lib/python3.5/site-packages/cv2/python-3.5.
I can confirm the location using the ls command:
$ ls -l /usr/local/lib/python3.5/site-packages/cv2/python-3.5total 7168-rw-r--r-1 root staff 7339240 Jan 17 18:59 cv2.cpython-35m-x86_64-linux-gnu.soHere you can see my OpenCV bindings are named cv2.cpython-35m-x86_64-linux-gnu.so—your name should be similar to yours based on your Python version and CPU architecture.
Now that I know the location of the OpenCV bindings, I need to use the ln command to symlink them to my Python virtual environment:
$ cd ~/.virtualenvs/opencv_cuda/lib/python3.5/site-packages/$ ln -s /usr/local/lib/python3.5/site-packages/cv2/python-3.5/cv2.cpython-35m-x86_64-linux-gnu.so cv2.soTake some time to verify your file paths first—if the path to the OpenCV bindings is incorrect, the ln command will “fail silently.”
Again, do not blindly copy and paste the commands above! Double-check your file paths!
Step 9: Verify OpenCV is Using GPU with DNN Module
The final step is to verify:
OpenCV can be imported into your terminalOpenCV can access your NVIDIA GPU for inference through the DNN moduleFirst, let’s verify we can import the cv2 library:
$ workon opencv_cuda$ pythonPython 3.5.3 (default, Sep 27 2018, 17:25:39)[GCC 6.3.0 20170516] on linuxType "help", "copyright", "credits" or "license" for more information.>>> import cv2>>> cv2.__version__'4.2.0'>>>Note that I accessed my Python virtual environment first using the workon command—if you are using a virtual environment, you should do this.
From there, I imported the cv2 library and displayed the version.
Indeed, the reported OpenCV version is v4.2, which is the version we compiled.
Next, let’s verify that OpenCV’s DNN module can access our GPU. The key to ensuring that OpenCV’s DNN module uses the GPU can be done by immediately adding the following two lines after loading the model and before executing inference:
net.setPreferableBackend(cv2.dnn.DNN_BACKEND_CUDA)net.setPreferableTarget(cv2.dnn.DNN_TARGET_CUDA)The two lines above instruct OpenCV to use our NVIDIA GPU for inference.
To see an example of OpenCV + GPU model in action, first download our example source code and pretrained SSD object detector from the “Downloads” section of this tutorial.
From there, open a terminal and execute the following command:
$ python ssd_object_detection.py --prototxt MobileNetSSD_deploy.prototxt \ --model MobileNetSSD_deploy.caffemodel \ --input guitar.mp4 --output output.avi \ --display 0 --use-gpu 1[INFO] setting preferable backend and target to CUDA...[INFO] accessing video stream...[INFO] elapsed time: 3.75[INFO] approx. FPS: 65.90The –use-gpu 1 flag indicates to OpenCV to use our NVIDIA GPU for inference through OpenCV’s DNN module.
As you can see, I achieved approximately 65.90 FPS using the NVIDIA Tesla V100 GPU.
Then I can compare my output with inference using only the CPU (i.e., without using the GPU):
$ python ssd_object_detection.py --prototxt MobileNetSSD_deploy.prototxt \ --model MobileNetSSD_deploy.caffemodel --input guitar.mp4 \ --output output.avi --display 0[INFO] accessing video stream...[INFO] elapsed time: 11.69[INFO] approx. FPS: 21.13Here I only achieved approximately 21.13 FPS, meaning I gained a 3x performance boost by using the GPU!
“make_policy” Error
It is very, very important to check, double-check, and triple-check the CUDA_ARCH_BIN variable. If set incorrectly, you may encounter the following error when running the ssd_object_detection.py script from the previous section:
File "real_time_object_detection.py", line 74, in detections = net.forward()cv2.error: OpenCV(4.2.0) /home/a_rosebrock/opencv/modules/dnn/src/cuda/execution.hpp:52: error: (-217:Gpu API call) invalid device function in function 'make_policy'This error indicates that your CUDA_ARCH_BIN value was set incorrectly when running cmake.
You need to return to Step 5 (where you determine your NVIDIA CUDA architecture version) and rerun cmake and make.
I also recommend deleting the build directory and recreating it before running cmake and make:
$ cd ~/opencv$ rm -rf build$ mkdir build$ cd buildFrom there, you can rerun cmake and make—in a new build directory to ensure you have a clean build and that any previous (incorrect) configurations are gone.
Summary
In this tutorial, you learned how to compile and install OpenCV’s Deep Neural Network (DNN) module with NVIDIA GPU, CUDA, and cuDNN support, giving you 211-1549% faster inference and prediction speeds.
Using OpenCV’s DNN module requires you to compile from source—you cannot “pip install” OpenCV with GPU support. In next week’s tutorial, I will benchmark popular deep learning models for CPU and GPU inference speeds, including: SSD, YOLO, Mask R-CNN. With this information, you will understand which models benefit the most from using a GPU, ensuring you can make an informed decision about whether a GPU is right for your specific project.
Author: Yishui Hancheng, CSDN Blog Expert, personal research interests: machine learning, deep learning, NLP, CV
Blog: http://yishuihancheng.blog.csdn.net
Support the Author





Click below to read the original text and joincommunity membership