Yesterday, Toshiba Corporation announced the development of a new generation of lithium batteries specifically for electric vehicles, which can be quickly charged in just 6 minutes. Traditional electric vehicle lithium batteries take 30 minutes to charge to about 80%, while the new generation lithium battery can charge to 90% in just 6 minutes. The electric vehicle tested by Toshiba managed to run approximately 320 kilometers after a 6-minute charge. Currently, Toshiba plans to refine this technology and aims to launch a formal product in 2019.
Android NDK development may not be commonly used in regular project development, but that does not mean it is unimportant.
On the contrary, NDK development is a skill that Android developers must master during their advanced learning process.
The Android NDK is a set of tools that allows embedding C or C++ (native code) into Android applications.
Using NDK development is particularly useful when developers need to:
-
Port their applications across platforms
-
Achieve superior performance for compute-intensive applications, such as games or physics simulations.
-
Reuse existing libraries or provide their own libraries for reuse.
Moreover, learning NDK also helps deepen developers’ understanding of reading the source code of frameworks.
There are two compilation methods for NDK development: one is to build using ndk-build;
the other is to build native libraries using CMake. Building native libraries with CMake is a new method proposed by Google, which is more convenient and powerful.
To develop with NDK using CMake, the requirement is that the version of Android Studio must be 2.2 or higher (including 2.2), and the version of Gradle must be upgraded to 2.2.0 or higher.
Once the above conditions are met, we need to download the NDK and build tools, as shown in the image below:
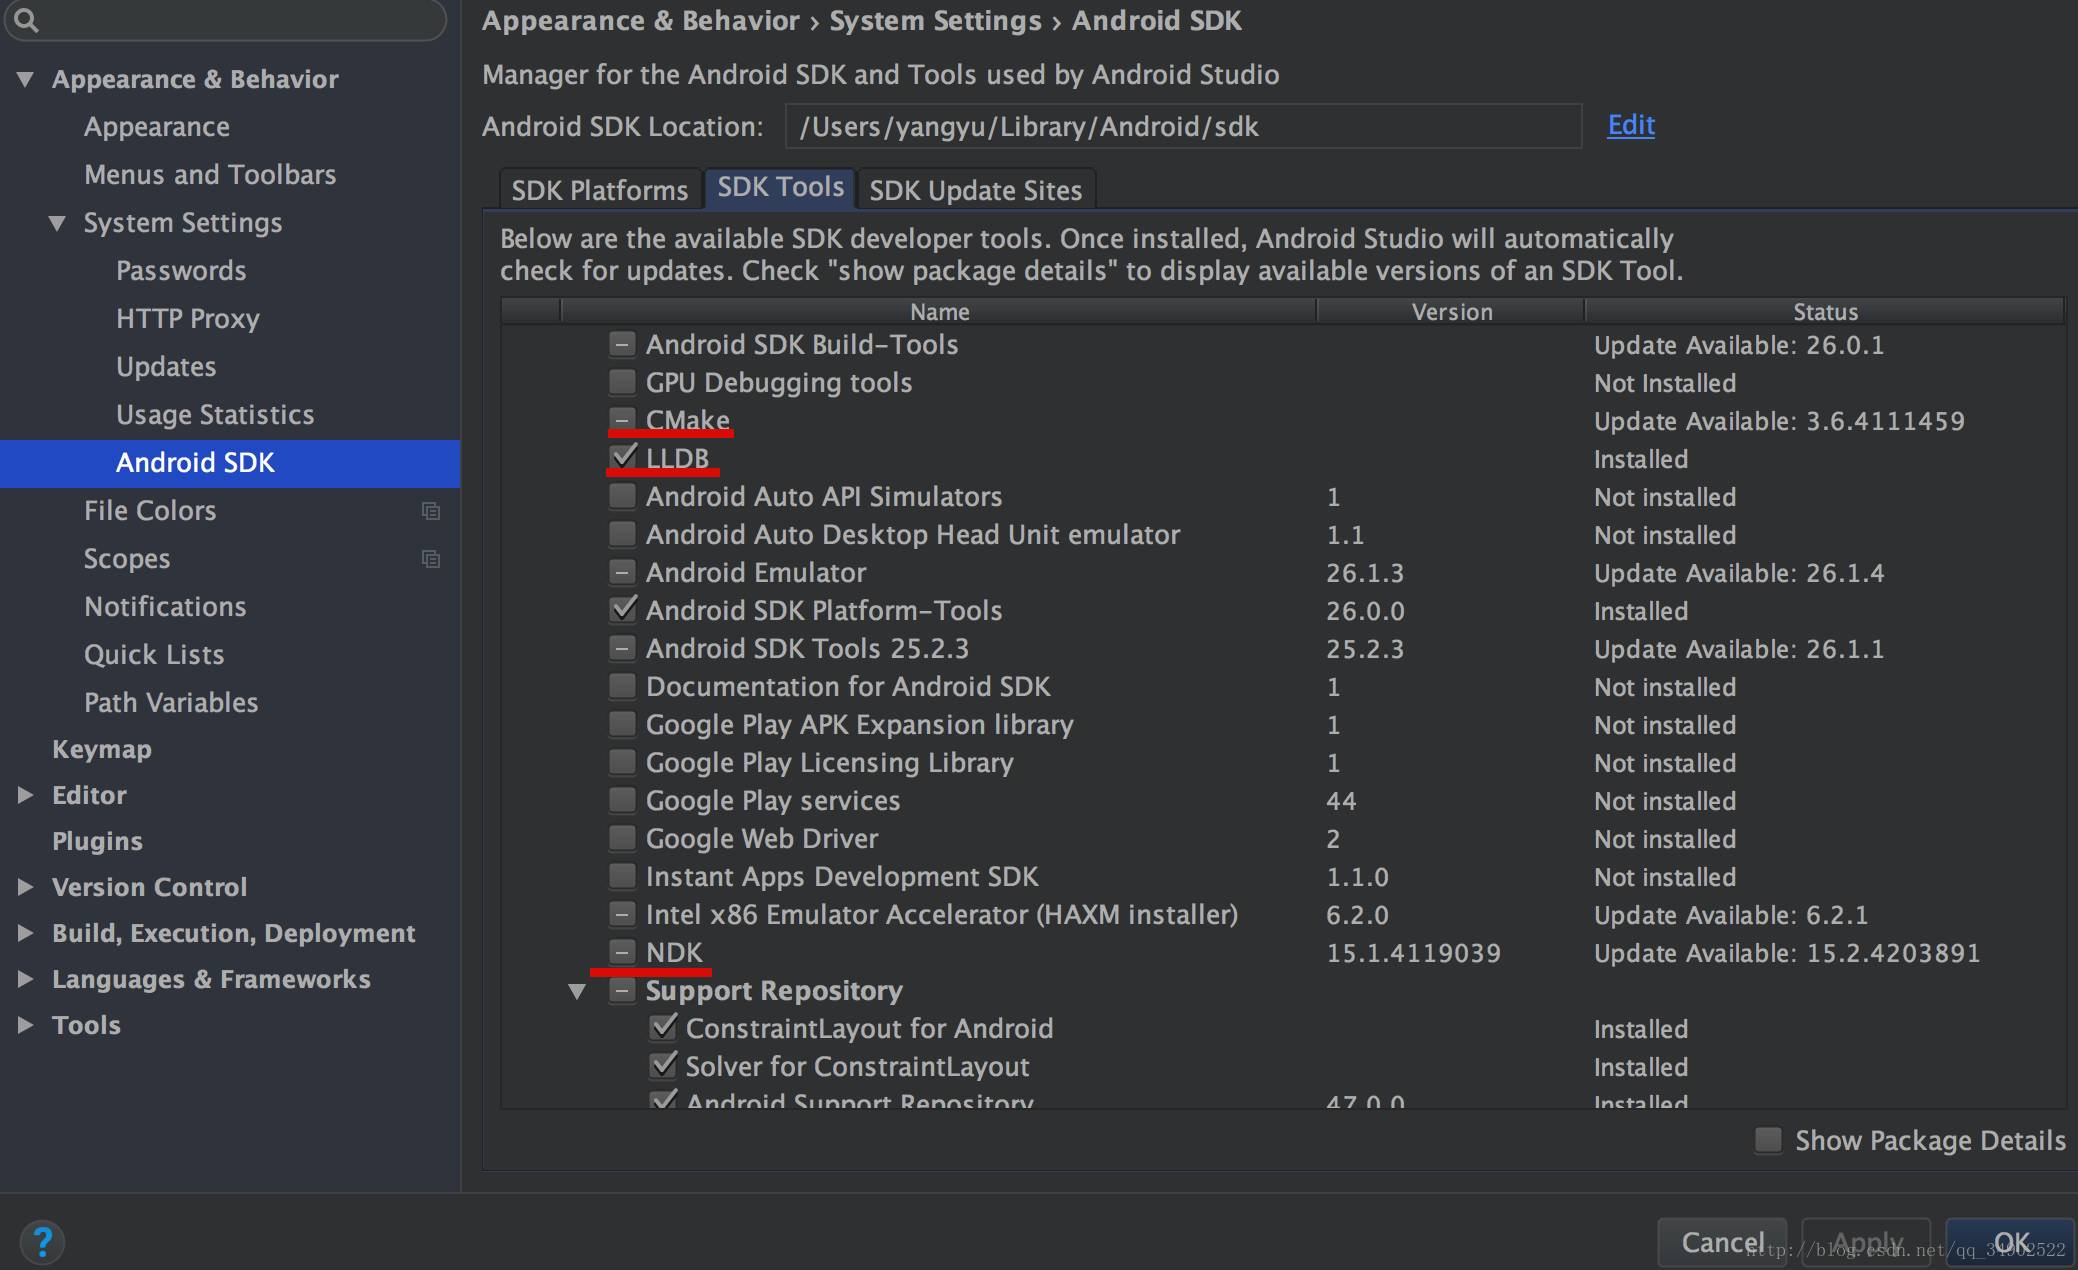
The three tools marked by the red line can be downloaded. CMake and NDK are straightforward, while LLDB is a debugging program used to debug native code.
After completing the preparation work, you can add native code to the project and build native libraries for NDK development.
There are two scenarios for adding native code to the project:
-
Create a new project that supports C/C++;
-
Add native code to an existing project.
So, there are also two corresponding methods for this. Let’s discuss the first method first.
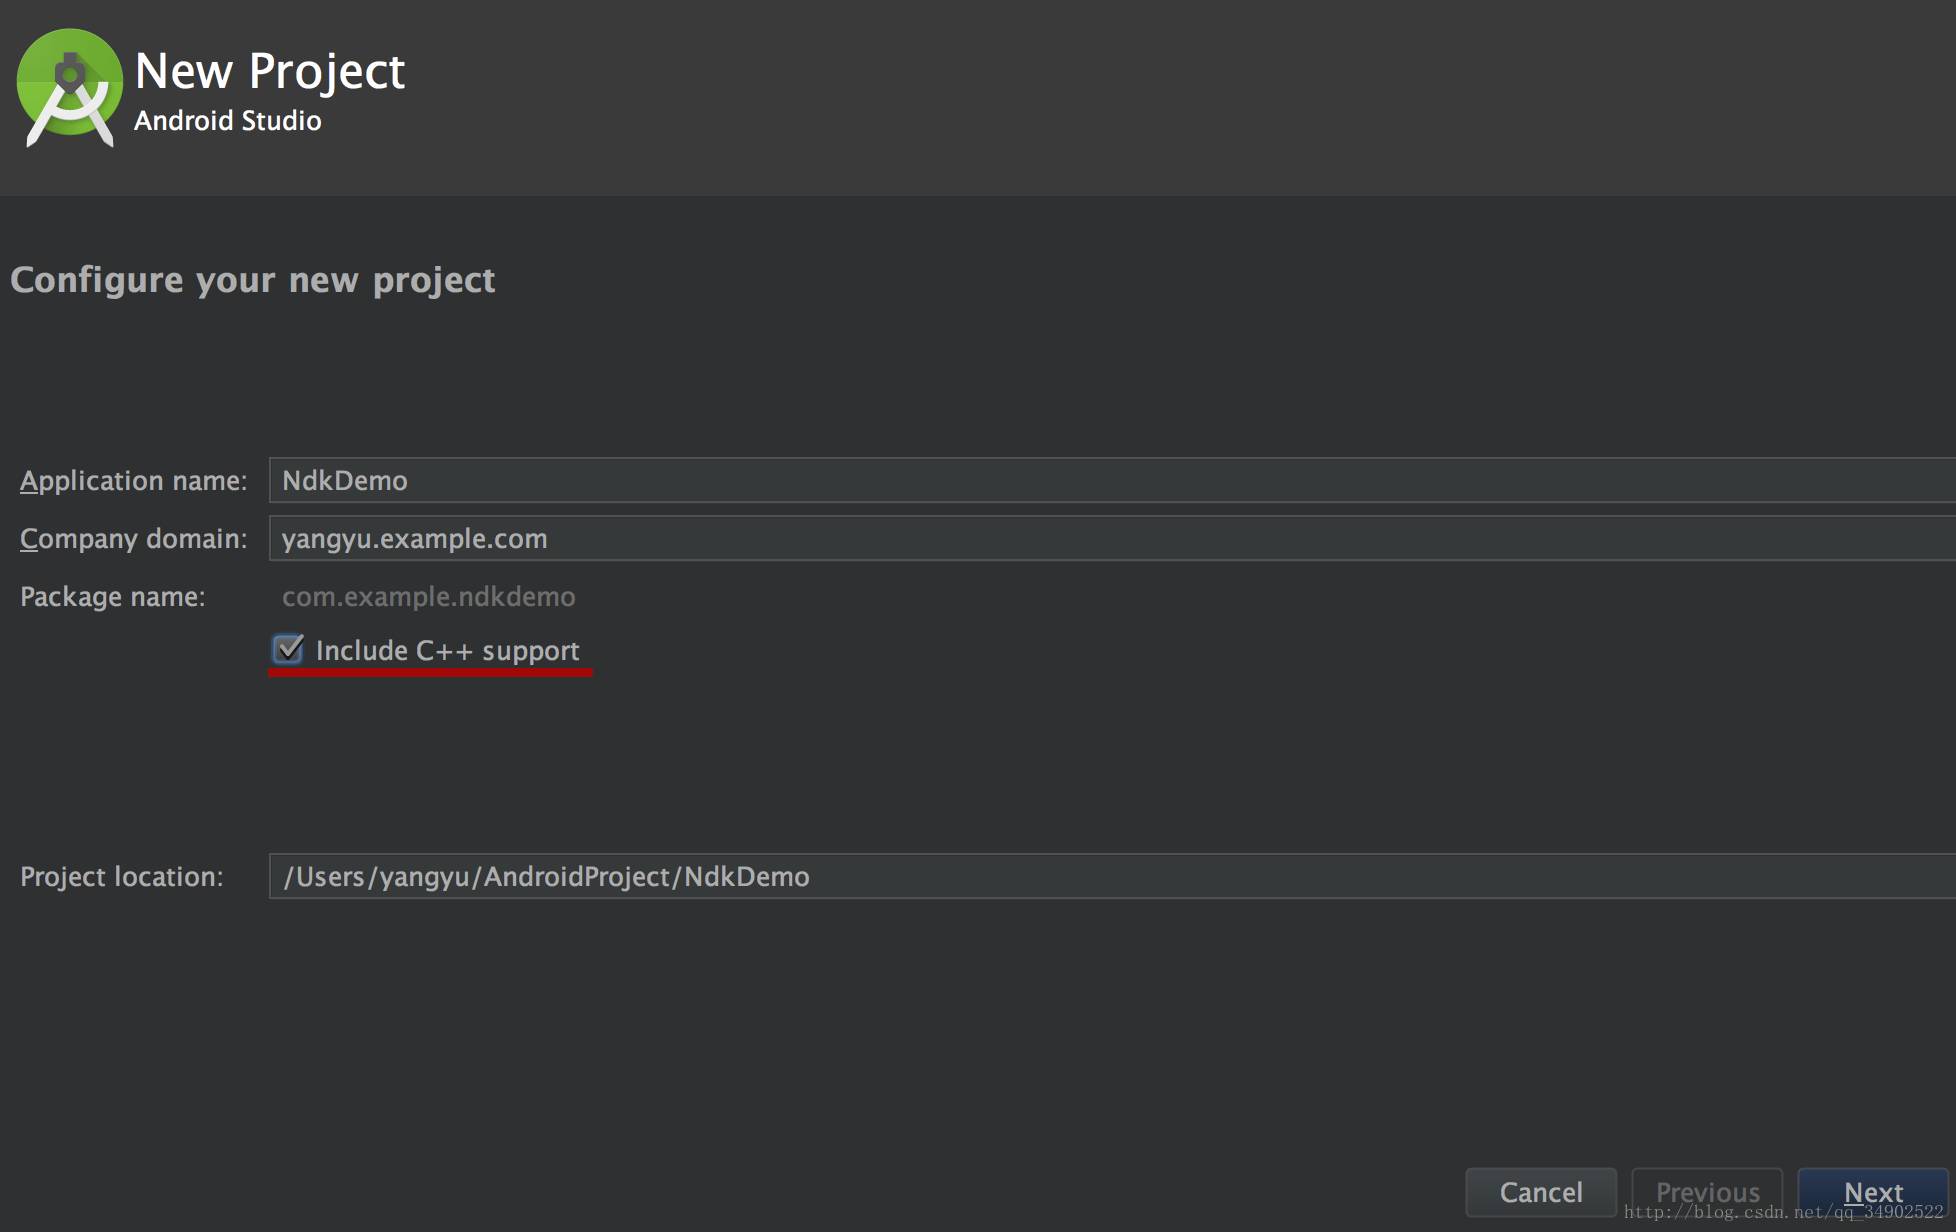
Creating a New Project that Supports C/C++
Creating a new project that supports native code is not much different from creating a new project in regular development, but there are some differences.
-
In the wizard’s “Config your new project” interface, you need to check the “Include C++ Support” checkbox. As shown in Figure 1:
-
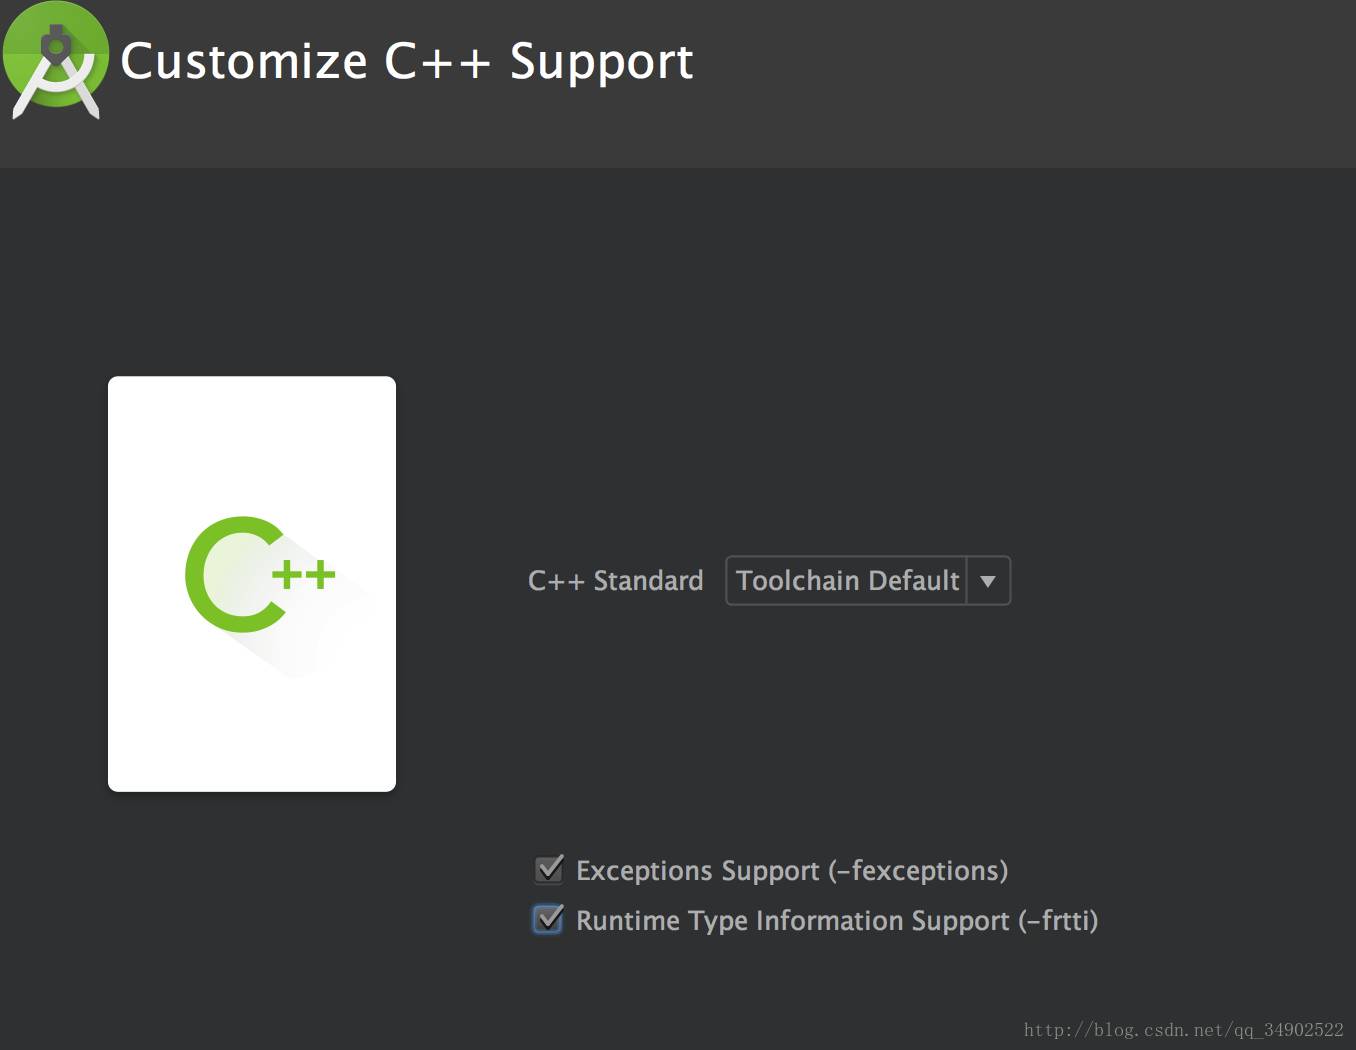
In the wizard’s “Customize C++ Support” interface, there will be an option for “C++ Standard”, which indicates which C++ standard you wish to use. Selecting “ToolchainDefault” will use the default CMake settings. Here we choose the default.
Exceptions Support: If you want to enable support for C++ exception handling, please check this checkbox.
If this checkbox is enabled, Android Studio will add the -fexceptions flag to the cppFlags in the module-level build.gradle file, and Gradle will pass it to CMake.
Runtime Type Information Support: If you want to enable RTTI, please check this checkbox. If this checkbox is enabled, Android Studio will add the -frtti flag to the cppFlags in the module-level build.gradle file, and Gradle will pass it to CMake. Here, you can decide whether to check it based on your needs; in the demo shown here, it is checked. As shown in Figure 2:
After creating the project, you can see the cpp folder in the app module of the project structure directory on the left side of Android Studio, which contains all the native source files, headers, and prebuilt libraries for the project. For new projects, Android Studio creates a sample C++ source file named native-lib.cpp. Besides the cpp folder, we also look at a file called CMakeLists.txt. This file is the CMake build script, which will be detailed later; for now, we will not discuss it. As mentioned earlier, creating a project that supports C/C++ provides a sample C++ source file named native-lib.cpp, which is stored in the cpp folder. Let’s take a look at its content:
#include <jni.h>
#include <string>

extern "C" JNIEXPORT jstring JNICALL
Java_com_example_ndkdemo_MainActivity_stringFromJNI(
        JNIEnv *env,
        jobject /* this */) {
    std::string hello = "Hello from C++";
    return env->NewStringUTF(hello.c_str());
}
Yes, it is a method written in C++ that returns “Hello from C++”. Let’s track this method and see where it is called.
public class MainActivity extends AppCompatActivity {

    // Used to load the 'native-lib' library on application startup.
    static {
        System.loadLibrary("native-lib");
    }

    @Override
    protected void onCreate(Bundle savedInstanceState) {
        super.onCreate(savedInstanceState);
        setContentView(R.layout.activity_main);

        // Example of a call to a native method
        TextView tv = (TextView) findViewById(R.id.sample_text);
        tv.setText(stringFromJNI());
    }

    /**
     * A native method that is implemented by the 'native-lib' native library,
     * which is packaged with this application.
     */
    public native String stringFromJNI();
}
We find that this native method is called in MainActivity, and the returned string is set to the TextView.
From these two pieces of code, we see that the native method is indicated by the native keyword, and before using the native library, it needs to be loaded using System.loadLibrary(“library name”). The naming conventions for native methods and other common points are briefly mentioned. Since this article focuses on building native libraries with CMake, some basic knowledge about NDK and JNI will not be elaborated on. This article assumes that readers are familiar with these concepts. After creating a new project that supports native code, which also comes with a demo, developers can conveniently proceed with their development. Suppose we now want to create a native library for NDK development. We can create a new C/C++ source file in the cpp folder, write your C/C++ code logic in the newly created file, and then make slight configurations in the CMakeLists.txt file. The configuration of CMakeLists.txt will be detailed below.
Adding Native Code to an Existing Project
To add native code to an existing project for NDK development, I will choose one of my projects, an app I wrote in my spare time, a news app that mimics today’s headlines (please star) –
PalmRead
https://github.com/MRYangY/PalmRead
There are mainly three major steps. Step one: Create a new native source file; Step two: Create a CMake build script; Step three: Link Gradle to the native library. Now let’s look at the first step, creating a new native source file. First, we need to create a cpp folder under the application module src/main directory to store native source files, etc. Then create a C/C++ source file in the cpp folder by selecting New > C/C++ Source File. As shown:
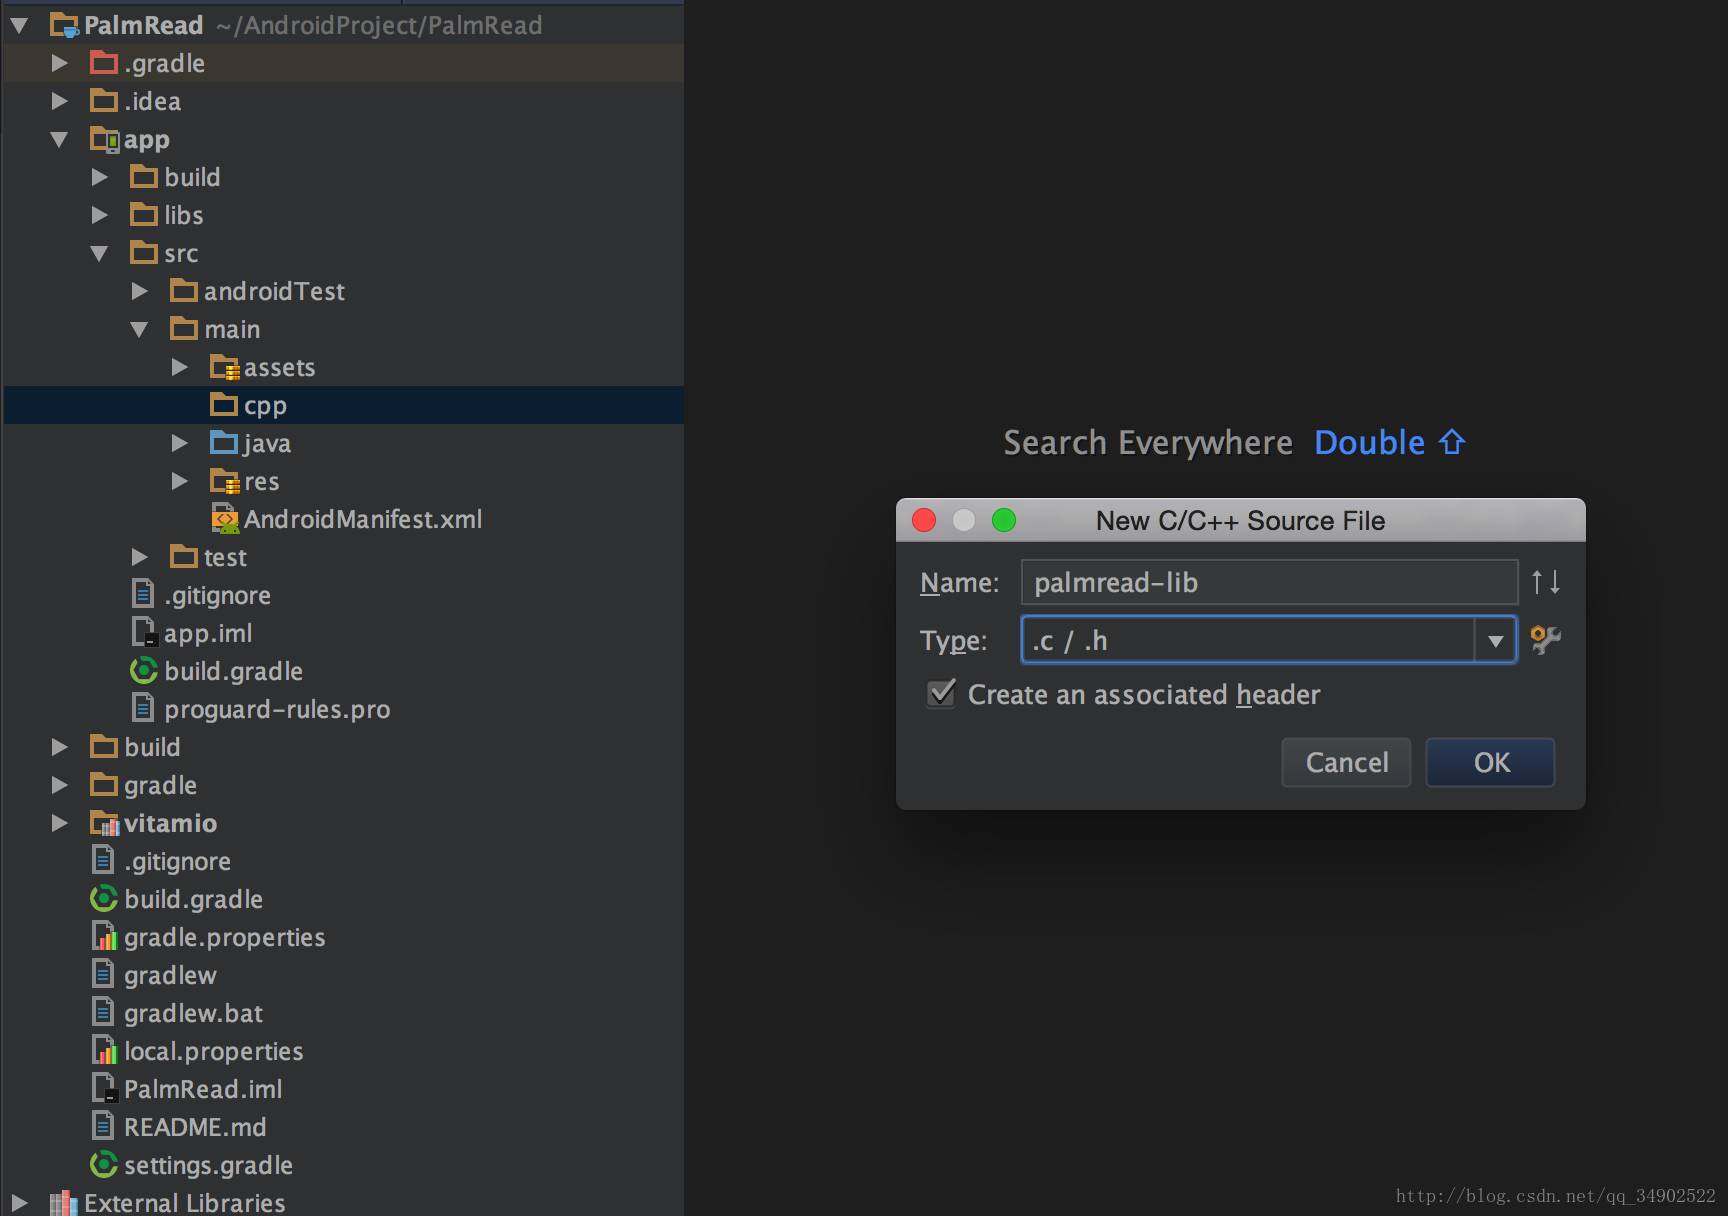
A file named palmread-lib has been created. The second step is to create the CMake build script, which is the CMakeLists.txt file. In the application module, create a new file named CMakeLists.txt; note that the name of this file must not be mistaken. After creating the CMakeLists.txt file, you will find that it contains no content, which is correct. We need to configure it ourselves. Unlike the first method of creating a project that supports native code, which provides default content, we can refer to the content of the CMakeLists.txt file generated by the system in the first method. Let’s take a look at what the default content of the CMakeLists.txt file generated by the system looks like:
# Sets the minimum version of CMake required to build the native library.

cmake_minimum_required(VERSION 3.4.1)

# Creates and names a library, sets it as either STATIC
# or SHARED, and provides the relative paths to its source code.
# You can define multiple libraries, and CMake builds them for you.
# Gradle automatically packages shared libraries with your APK.

add_library( # Sets the name of the library.
             native-lib

             # Sets the library as a shared library.
             SHARED

             # Provides a relative path to your source file(s).
             src/main/cpp/native-lib.cpp )

# Searches for a specified prebuilt library and stores the path as a
# variable. Because CMake includes system libraries in the search path by
# default, you only need to specify the name of the public NDK library
# you want to add. CMake verifies that the library exists before
# completing its build.

find_library( # Sets the name of the path variable.
              log-lib

              # Specifies the name of the NDK library that
              # you want CMake to locate.
              log ) # Specifies libraries CMake should link to your target library. You
# can link multiple libraries, such as libraries you define in this
# build script, prebuilt third-party libraries, or system libraries.

target_link_libraries( # Specifies the target library.
                       native-lib

                       # Links the target library to the log library
                       # included in the NDK.
                       ${log-lib} )
From the image, we see that the content is not complicated. It mainly consists of cmake_minimum_required(), add_library(), find_library(), and target_link_libraries(). Each CMake command has a clear English description that is easy to understand. For example, add_library creates and names a library; here we will name it palmread-lib, and the type can be either static or shared. The specific differences can be found at:
The Difference Between Static and Shared Libraries
https://stackoverflow.com/questions/2649334/difference-between-static-and-shared-libraries
Here we choose SHARED, and then provide a relative path to the library. Only by configuring this command in the CMakeLists.txt file can we find and compile this library. Other CMake commands can be searched and understood independently; they are not very difficult and are easy to understand. Due to space limitations, I will not elaborate further. Now we can write a CMakeLists.txt file based on the template provided by the system, as follows:
cmake_minimum_required(VERSION 3.4.1)

add_library(
             palmread-lib
             SHARED
             src/main/cpp/palmread-lib.c )

find_library( # Sets the name of the path variable.
              log-lib
              # Specifies the name of the NDK library that
              # you want CMake to locate.
              log )

target_link_libraries( # Specifies the target library.
                       palmread-lib
                       # Links the target library to the log library
                       # included in the NDK.
                       ${log-lib} )
Next, load the palmread-lib library in the Java class. Here I created a NdkHelper class specifically to define the native methods:
public class NdkHelper {

    static {
        System.loadLibrary("palmread-lib");
    }

    public static native String GetStringFromC(String str);
}
After this step, the second step is also completed. Now let’s look at the third step: linking Gradle to your native library. There are two ways to link Gradle to the native library; here I will first explain the simpler of the two methods. The first method is to use the shortcut in Android Studio, right-click the module you want to link to the native library (for example, the app module), and select “Link C++ Project with Gradle” from the menu. Choose CMake for Build System, and the project path is the path to the CMakeLists.txt file. Click OK to complete.
You will find the following in the build.gradle file of the application module:
externalNativeBuild {
        cmake {
            path 'CMakeLists.txt'
        }
    }
This statement relates to the second method we mentioned earlier, which will not be discussed here; it will be covered in a future blog post.
After syncing the project, I suddenly remembered that the newly created palmread-lib.c file seems to have no C code written in it yet. Oh dear, what a mess! Let’s write some code now. What should we write? How about we implement a function in C that takes a string parameter, modifies it, and returns a new string?
Here is the code:
#include "jni.h" #include <stdlib.h>
#include <string.h>

JNIEXPORT jstring JNICALL
Java_com_example_yangyu_palmread_Logic_NdkHelper_GetStringFromC(JNIEnv *env, jclass type,
                                                                jstring str_) {
    const char *a = (*env)->GetStringUTFChars(env, str_, 0);
    // TODO
    char * b = " from c" ;
    char *result = malloc(strlen(a)+strlen(b)+1);
    strcpy(result, a);
    strcat(result, b);

    (*env)->ReleaseStringUTFChars(env, str_, a);

    return (*env)->NewStringUTF(env, result);
}
After writing the code, we need to call it. For convenience in testing, we will choose to call this native method in the main activity of the application and display the returned value using a toast.
As shown in the image:
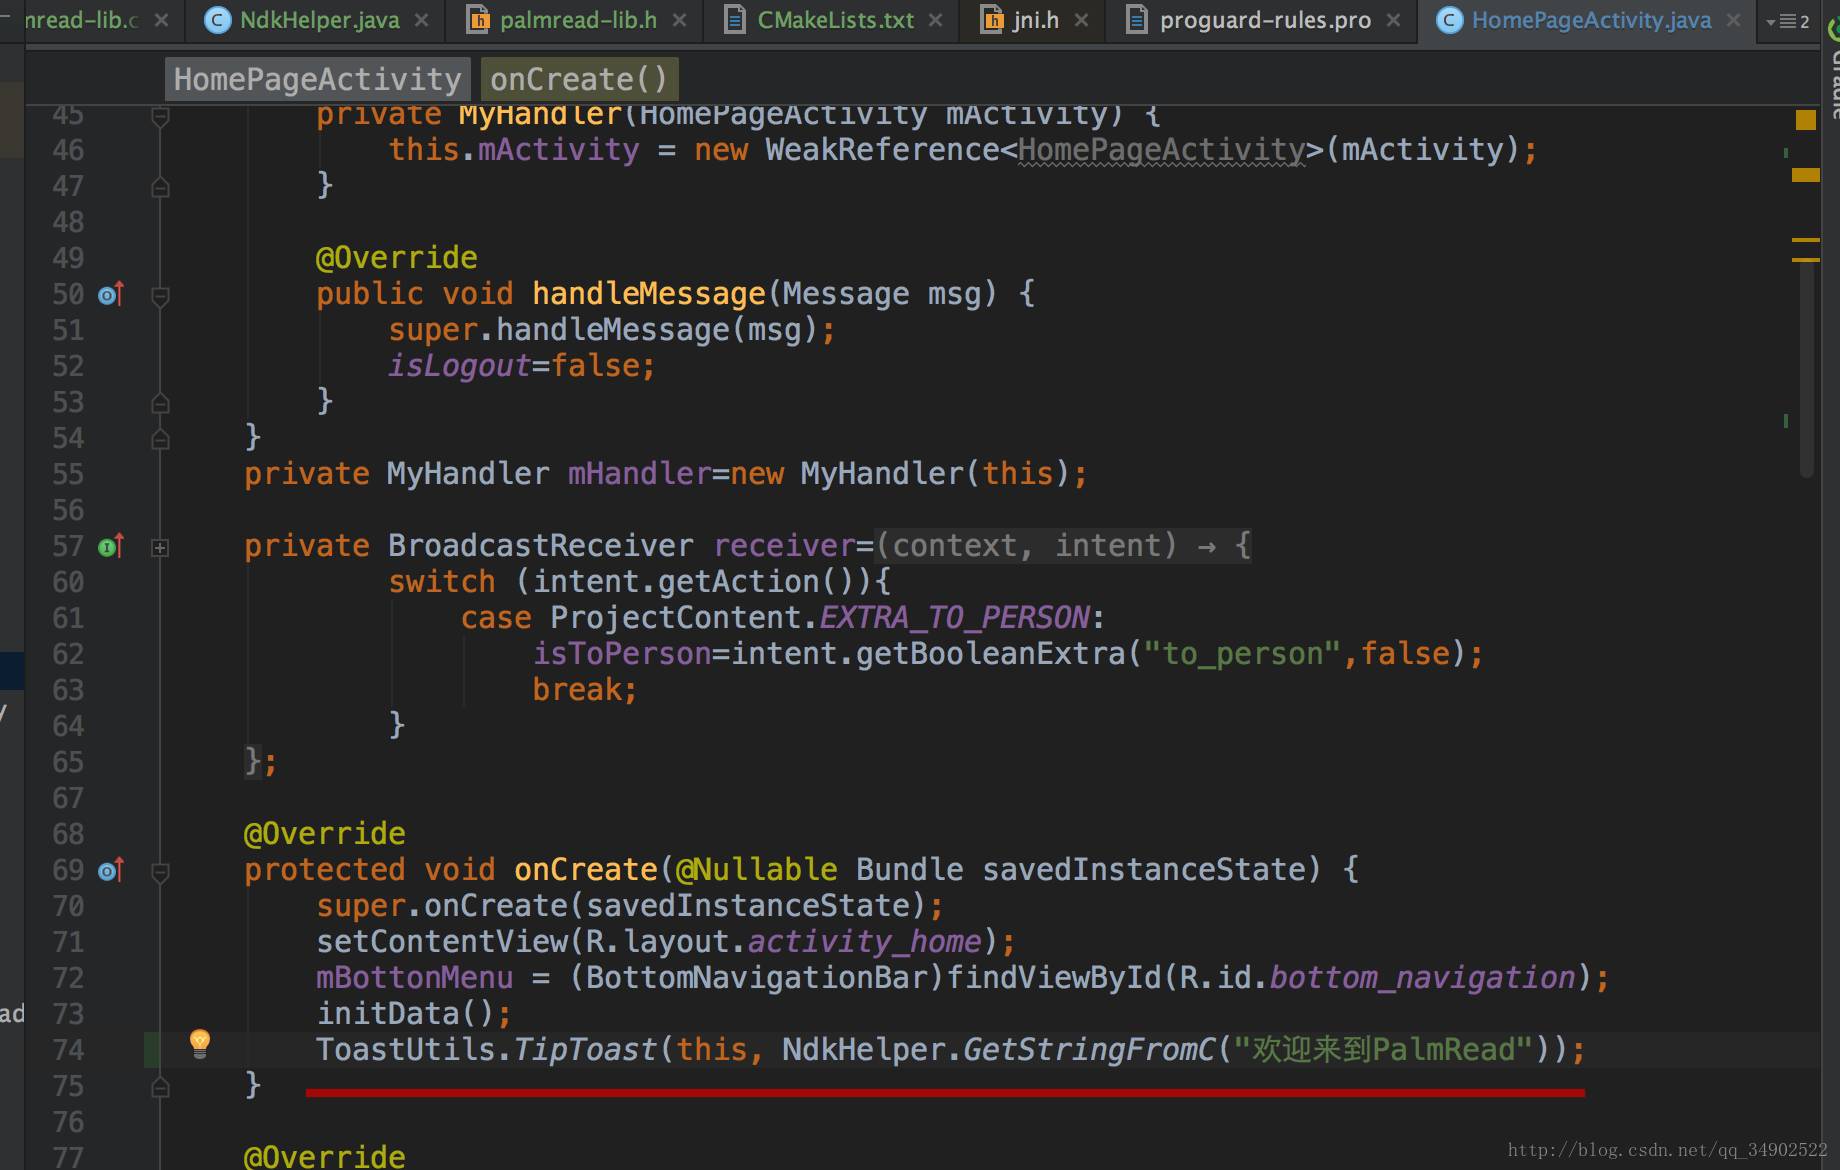
From the code, we can see that we called the NdkHelper.GetStringFromC() native method, passing in the string “Welcome to PalmRead” as a parameter. According to the previous C logic, it should return a new string, “Welcome to PalmRead from c”. Let’s run the program and see the effect.

O(∩_∩)O Ha! We find that the toast displays the value we expected as the return value. Thus, we have established a bridge between Java and native code.
Now we can go to the build/outputs/apk directory of the application module and open our apk; we will find that our created native file has been compiled into the native library “libpalmread-lib.so” and packaged into the apk file, as shown:

Alright, the general process of using CMake for Android NDK development is like this. The commands in CMakeLists and the second method of linking the native library with Gradle through editing the build.gradle file will be discussed in a supplementary article on NDK development with CMake.
http://blog.csdn.net/qq_34902522/article/details/78144127
This article provides detailed explanations.
Finally, I recommend a new website developed by Hong Yang that is a must-see for Android developers, with the domain http://wanandroid.com. It contains many valuable articles, so feel free to check it out if you’re interested.
Welcome to long press the image below -> recognize the QR code in the image
Or scan the code to follow my public account