1. Introduction
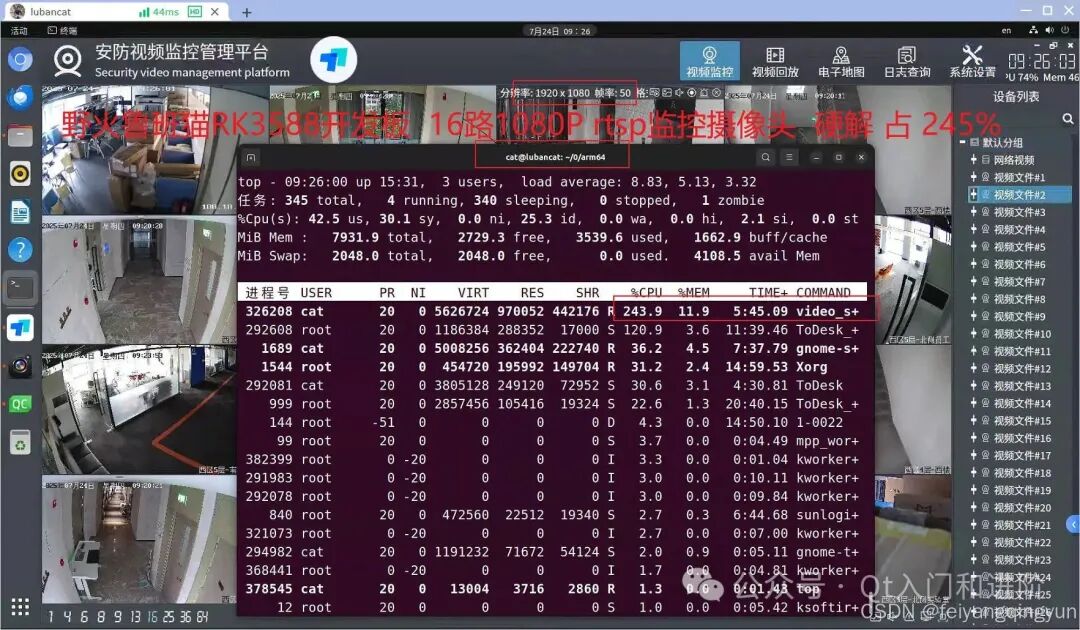
Recently, I have become addicted to embedded board development, testing various video-related projects on more than a dozen development boards remotely, such as video integration applications, video surveillance systems, and streaming. The results have been quite satisfactory, with models like RK3568, RK3576, and RK3588 from at least four or five manufacturers, all performing similarly since they are based on the same Rockchip architecture. There may be some version issues, as some boards use older MPP hardware decoding while others use newer versions, necessitating the use of the corresponding hardware-accelerated FFmpeg library for decoding, which is not interchangeable. This is because the FFmpeg compilation links to the specific libraries, and differing versions can lead to compilation failures. Among these boards, the RK3588 is the most powerful, and it is rumored that a new RK3588S will soon be released, which will create quite a stir.
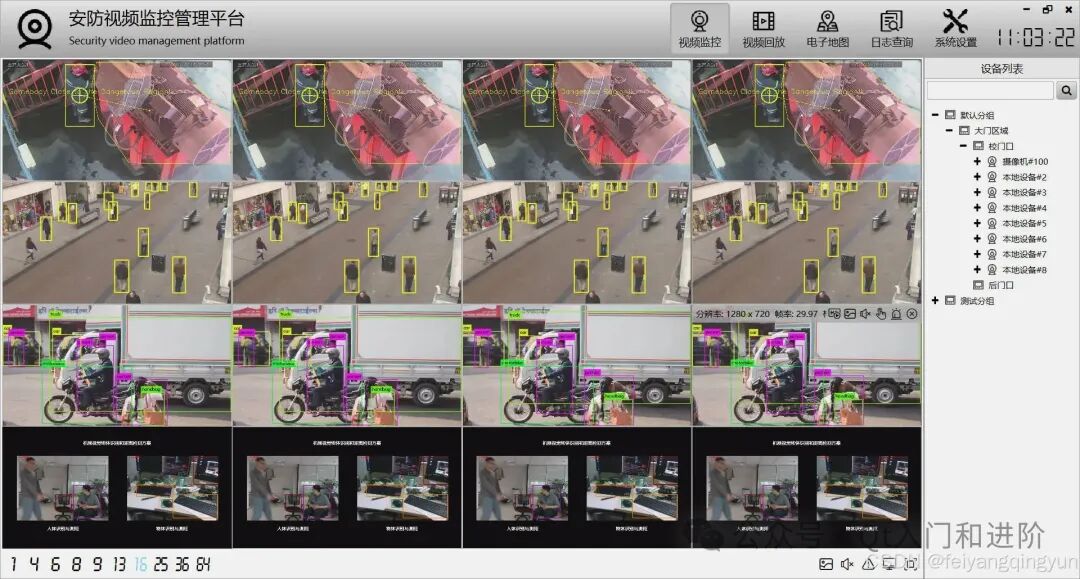
Many of these boards are now used to create smart AI boxes, especially for behavior analysis, primarily using YOLO and similar algorithms. My video surveillance system integrates YOLO processing, displaying the corresponding result rectangles on the video. It runs in multi-threaded mode and also provides the ability to capture a frame from the video stream for YOLO analysis, making the combination very effective.In the future, I may define a private protocol in JSON format for receiving data via TCP/UDP/HTTP/MQTT, which will be used for logging, displaying graphical alerts, and showing AI results (including object areas like face boxes and text descriptions). This way, third parties (such as users who only know Python) will only need to follow the private protocol, eliminating the need to be familiar with the software source code; they just need to know how to use it simply.
- This software currently does not have AI algorithms built-in and requires users to add their own AI algorithms.
- The various event subscriptions built into this software are based on the ONVIF protocol, allowing any device that supports ONVIF to connect normally. For example, cameras and NVRs from Hikvision and Dahua support AI algorithm recognition on the front end, sending the recognition results to the software via ONVIF.
- This software includes various result displays, including alarm text records, alarm image displays, alarm video recordings, and alarm video playback. These are all provided through general API function interfaces, meaning you can directly call global static API functions in the Qt program to handle them.
- This software currently provides related classes such as DeviceThreadUI and DeviceVideoSmart.
- DeviceThreadUI specifically demonstrates how to insert alarm records and graphical alerts in a thread, how to insert messages at intervals, how to demonstrate device GPS movement, how to show alarm flashing, and how to set video and channel swapping for specified channel numbers.
- DeviceVideoSmart specifically demonstrates how to obtain a stream of video data and perform AI algorithm recognition (such as using YOLO) on it. The recognition results can be a series of rectangular areas, which can then be sent back to the video control for display. This computed area information can also be saved to video files or re-streamed (if streaming, an additional streaming component needs to be purchased).
- In the future, I may define a private protocol in JSON format for receiving data via TCP/UDP/HTTP/MQTT, which will be used for logging, displaying graphical alerts, and showing AI results (including object areas like face boxes and text descriptions). This way, third parties (such as users who only know Python) will only need to follow the private protocol, eliminating the need to be familiar with the software source code; they just need to know how to use it simply.
- It is recommended to create a separate directory for secondary development, creating a new PRI file, and placing all your processing in this directory to isolate it for easier future expansion. This way, if the surveillance system source code is updated, you only need to replace the existing surveillance system source code without major changes.
- If you want to record storage or streaming with various information after AI processing, such as a series of rectangles or text watermarks, you need to select ‘Auto’ in the video parameters section of the system settings. The default is ‘No Processing’, which means saving the raw stream data in H.264/H.265 format. ‘Auto’ means encoding and saving, and various graphics and text watermarks need to be re-encoded to be written into the file.
- If encoding is enabled, it will consume CPU resources, and the higher the resolution, the more resources it will use. H.265 consumes more resources than H.264. Therefore, if encoding is required, it is recommended to use sub-streams, which means lower resolution video.
2. Effect Images
3. Related Links
- Domestic site:https://gitee.com/feiyangqingyun
- International site:https://github.com/feiyangqingyun
- Personal works:https://blog.csdn.net/feiyangqingyun/article/details/97565652
- File link:https://pan.baidu.com/s/1d7TH_GEYl5nOecuNlWJJ7g Extraction code: 01jf File name: bin_video_system.
4. Features
- The main interface uses a docked window mode, with various components added in small modules, allowing any module to be customized.
- Docked modules can be dragged to any position for embedding and floating, supporting maximization to full screen and multi-screen setups.
- Dual layout file storage mechanism, with different layout schemes for normal and full-screen modes, automatically switching and saving. For example, in full-screen mode, several modules can be highlighted and displayed transparently in specified positions, giving a more futuristic and modern feel.
- Original ONVIF protocol mechanism, using low-level protocol parsing (UDP broadcast search + HTTP request execution) for a lighter, easier-to-understand, and extendable solution, without relying on any third-party components like gSOAP.
- Original data import, export, and printing mechanism, cross-platform without relying on any components, allowing instant data export.
- Built-in multiple original components, incredibly valuable and powerful, including data import/export components (export to XLS, PDF, print), database components (database management thread, automatic data cleaning thread, universal pagination, data requests, etc.), map components, video surveillance components, multi-threaded file transfer components, ONVIF communication components, and general browser kernel components.
- Custom information boxes, error boxes, inquiry boxes, and right-bottom prompt boxes (including various formats), etc.
- Beautiful skinning options, with up to 20 skin styles available for easy switching, all styles unified, including menus, etc.
- Selected channel corresponding device tree nodes are highlighted, and selected channel nodes correspond to video controls highlighted, making it easy to view current channel information.
- The video control floating bar can have multiple buttons added, and the bottom toolbar of the monitoring interface can also have buttons added.
- Double-clicking the camera node automatically plays the video, double-clicking the node automatically adds videos sequentially, jumping to the next one, and double-clicking the parent node automatically adds all videos under that node. Main stream and sub-stream options are available.
- Recorder management and camera management allow adding, deleting, modifying, importing, and exporting printing information, immediately applying new device information to generate a tree list without needing a restart.
- Camera search supports one-click search and batch addition, supporting ONVIF NVR one-click addition of sub-devices, and allows manual setting of starting addresses and quantities for one-click generation of camera information.
- Supports multiple kernel options for free switching, including FFmpeg, VLC, MPV, etc., all of which can be set in the pro version. FFmpeg is recommended for its maximum cross-platform compatibility, with pre-compiled libraries provided for Linux and Mac platforms.
- Supports hardware decoding on Windows, Linux, macOS, and also supports embedded Linux RKMPP hardware decoding, allowing the setting of hardware decoding types (DXVA2, D3D11VA, VAAPI, VDPAU, etc.).
- Various modules can be checked for activation, making it easy to combine various combinations based on actual needs, such as hiding the electronic map module or hiding the remote playback module while retaining local playback.
- To the maximum extent possible, commonly used functions are encapsulated as interfaces, with global static function calls that are extremely easy to use, providing various usage examples for user secondary development.
- By default, OpenGL is used to render video, with ultra-low CPU resource usage, supporting YUYV and NV12 formats for rendering, achieving outstanding performance.
- Label and graphic information supports three rendering methods: rendering to a mask layer, rendering to an image, and source rendering (corresponding information can be stored in a file).
- Includes all functions of the video surveillance kernel component, as detailed in the manual [Video Surveillance Kernel](###8.1 Video Surveillance Kernel).
- Highly customizable, users can easily derive their own functions based on this foundation, such as adding custom modules, running modes, robot monitoring, drone monitoring, excavator monitoring, broadcast monitoring, etc.
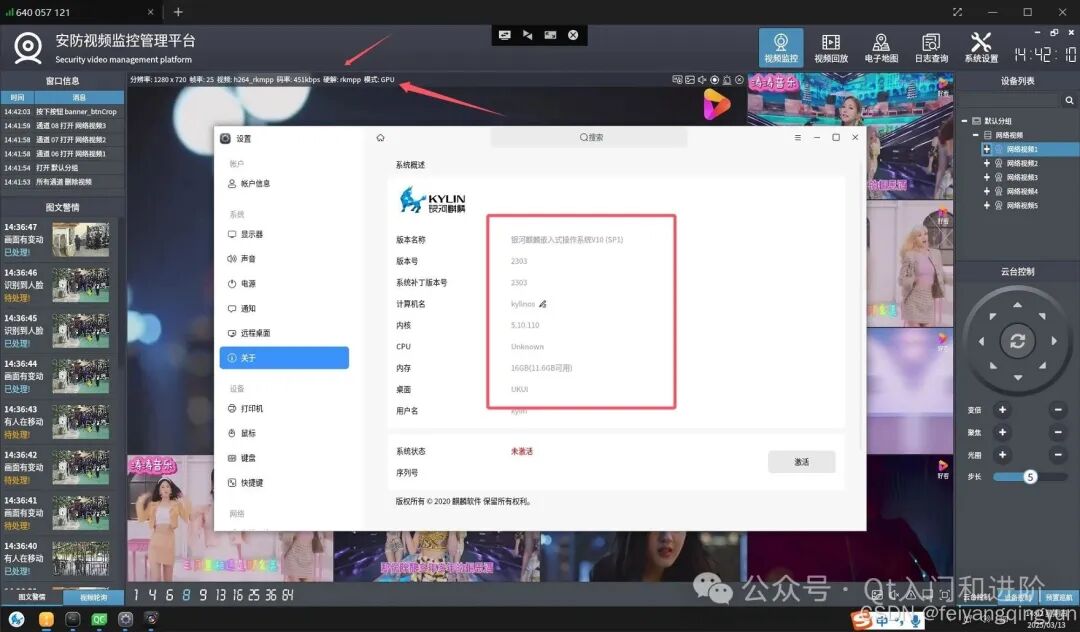
- Supports XP, Win7, Win10, Win11, Linux, Mac, various domestic systems (UOS, Kylin, Galaxy Kylin, etc.), and embedded Linux systems.
- Complete comments, clear project structure, and a super detailed and complete user development manual, with precise function descriptions for each code file, continuously iterating versions.
5. Related Code
//DeviceThreadUI class source code
#include "devicethreadui.h"
#include "devicehelper.h"
#include "dbquery.h"

DeviceThreadUI::DeviceThreadUI(QObject *parent): QThread(parent)
{
    stopped = false;
}

void DeviceThreadUI::run()
{
// Initialize random seed first; otherwise, generated random numbers may be the same
    srand((quint64)currentThreadId());

    while (!stopped) {
// Demonstrate inserting messages at intervals
        QString msg = "Test message";
        QString result = "Processed";
        QString file = QString(":/image/liuyifei%1.jpg").arg(rand() % 3);
// Asynchronously call to add table messages and graphical alerts
        QMetaObject::invokeMethod(this, "addMsg", Q_ARG(QString, msg));
        QMetaObject::invokeMethod(this, "addMsgList", Q_ARG(QString, msg), Q_ARG(QString, result), Q_ARG(QImage, QImage(file)));

// Demonstrate device GPS movement
        AppEvent::Instance()->slot_moveDevice(0, "121.415086", "31.183769");

// Demonstrate alarm flashing
        if (1) {
            static bool isAlarm = true;
            isAlarm = !isAlarm;
            if (!isAlarm) {
                AppEvent::Instance()->slot_startAlarm();
// Demonstrate inserting an alarm record with a video file address for double-click playback
                DbQuery::addUserLog("0", "Device log", "Test alarm", "https://hls01open.ys7.com/openlive/6e0b2be040a943489ef0b9bb344b96b8.hd.m3u8");
            } else {
                AppEvent::Instance()->slot_stopAlarm();
                DbQuery::addUserLog("Stop alarm");
            }
        }

// Demonstrate setting video and channel swapping for specified channel numbers
        if (1) {
            static int index = 0;
            if (index == 0) {
                AppEvent::Instance()->slot_loadVideo(0, "http://vfx.mtime.cn/Video/2023/03/09/mp4/230309152143524121.mp4");
            } else if (index == 1) {
                AppEvent::Instance()->slot_loadVideo(0, "http://vfx.mtime.cn/Video/2023/03/07/mp4/230307085324679124.mp4");
            } else if (index == 2) {
                AppEvent::Instance()->slot_loadVideo(1, "http://vfx.mtime.cn/Video/2022/07/18/mp4/220718132929585151.mp4");
            } else if (index == 3) {
                AppEvent::Instance()->slot_loadVideo(1, "http://vfx.mtime.cn/Video/2022/12/17/mp4/221217153424902164.mp4");
            } else if (index == 4) {
                AppEvent::Instance()->slot_changeVideo(2, 3);
            } else if (index == 5) {
                AppEvent::Instance()->slot_changeVideo(3, 2);
            }

            index++;
            if (index == 6) {
                index = 0;
            }
        }

// Delay for a while
        msleep(5 * 1000);
    }

    stopped = false;
}

void DeviceThreadUI::addMsg(const QString & msg, quint8 type)
{
    DeviceHelper::addMsg(msg, type);
}

void DeviceThreadUI::addMsgList(const QString & msg, const QString & result, const QImage & image)
{
    DeviceHelper::addMsgList(msg, result, image);
}

//DeviceVideoSmart class source code:
#include "devicevideosmart.h"
#include "qthelper.h"
#include "videowidgetx.h"

DeviceVideoSmart::DeviceVideoSmart(QObject *parent): QThread(parent)
{
    stopped = false;
    isPause = false;
    videoWidget = 0;

// Register this type
    qRegisterMetaType<qlist<qrect>>("QList<qrect>");
}

void DeviceVideoSmart::run()
{
// Random delay to start the thread
    msleep(rand() % 500 + 1000);
    while (!stopped) {
        if (isPause || !AppConfig::VideoSmart || !videoWidget || !videoWidget->getIsRunning()) {
            msleep(1);
            continue;
        }

// Define area collection
        QList<qrect> rects;
        if (0) {
// Get an image for AI processing
            QImage image = videoWidget->getImage();
            qDebug() << TIMEMS << videoWidget->getVideoThread()->getFlag() << image.size();

// AI processing algorithm goes here
// yolo->take(image);
        }

// Demonstrate graphical area information
        if (1) {
// Limit the area
            int w = videoWidget->getVideoWidth();
            int h = videoWidget->getVideoHeight();
            int width = w - 100;
            int height = h - 100;
            int wx = w / 50;
            int hx = h / 50;

// Randomly generate rectangles
            for (int i = 0; i < 30; ++i) {
                int x = rand() % width;
                int y = rand() % height;
                int w = wx + rand() % 40;
                int h = hx + rand() % 30;
                rects << QRect(x, y, w, h);
            }

// Asynchronous execution
            QMetaObject::invokeMethod(this, "receiveRects", Q_ARG(QList<qrect>, rects));
            msleep(40);
        }

// Demonstrate text label information
        if (0) {
            int currentCount = rand() % 15;
            int maxCount = rand() % 20 + 15;
// qDebug() << TIMEMS << currentCount << currentThreadId();
            QMetaObject::invokeMethod(this, "receiveData", Q_ARG(QString, "dateTime"), Q_ARG(QVariant, 0));
            QMetaObject::invokeMethod(this, "receiveData", Q_ARG(QString, "currentCount"), Q_ARG(QVariant, currentCount));
            QMetaObject::invokeMethod(this, "receiveData", Q_ARG(QString, "maxCount"), Q_ARG(QVariant, maxCount));
            msleep(100);
        }

// Must have this delay to rest a bit
        msleep(1);
    }

    stopped = false;
    isPause = false;
}

void DeviceVideoSmart::receiveKbps(qreal kbps, int frameRate)
{
    OsdInfo osd;
    osd.name = "kbps";
    osd.color = "#FF0000";
    osd.fontSize = fontSize;
    osd.position = OsdPosition_RightTop;
    osd.text = QString("%1 kbps\n%2 fps").arg((int)kbps).arg(frameRate);
    videoWidget->setOsd(osd);
}

void DeviceVideoSmart::receivePlayStart(int time)
{
// Font size based on video width ratio
    fontSize = videoWidget->getVideoWidth() / 30;
}

void DeviceVideoSmart::receiveRects(const QList<qrect> & rects)
{
    if (!videoWidget || !videoWidget->getIsRunning()) {
        return;
    }

    int borderWidth = videoWidget->getVideoWidth() / 500;
    borderWidth = borderWidth < 1 ? 1 : borderWidth;

// Get random color
    static QStringList colors = QColor::colorNames();
    int count = rects.count();
    for (int i = 0; i < count; ++i) {
        GraphInfo graph;
        graph.name = QString("graph%1").arg(i);
        graph.borderColor = colors.at(rand() % colors.count());
        graph.borderWidth = borderWidth;
        graph.rect = rects.at(i);
        videoWidget->setGraph(graph);
    }
}

void DeviceVideoSmart::receiveData(const QString & type, const QVariant & data)
{
    if (!videoWidget || !videoWidget->getIsRunning()) {
        return;
    }

    OsdInfo osd;
    osd.name = type;
    if (type == "dateTime") {
        osd.fontSize = fontSize;
        osd.color = "#FFFFFF";
        osd.format = OsdFormat_DateTime;
        osd.position = OsdPosition_LeftTop;
        videoWidget->setOsd(osd);
    } else if (type == "currentCount") {
        osd.fontSize = fontSize;
        osd.text = QString("Current count: %1").arg(data.toInt());
        osd.color = "#D64D54";
        osd.format = OsdFormat_Text;
        osd.position = OsdPosition_LeftBottom;
        videoWidget->setOsd(osd);
    } else if (type == "maxCount") {
        osd.fontSize = fontSize;
        osd.text = QString("Limit count: %1").arg(data.toInt());
        osd.color = "#FDCD72";
        osd.format = OsdFormat_Text;
        osd.position = OsdPosition_RightBottom;
        videoWidget->setOsd(osd);
    }
}

void DeviceVideoSmart::setVideoWidget(VideoWidget *videoWidget)
{
    this->videoWidget = videoWidget;
// Connect real-time bitrate signal to overlay the real-time bitrate as a text watermark on the video
    connect(videoWidget, SIGNAL(sig_receiveKbps(qreal, int)), this, SLOT(receiveKbps(qreal, int)));
    connect(videoWidget, SIGNAL(sig_receivePlayStart(int)), this, SLOT(receivePlayStart(int)));
}

void DeviceVideoSmart::stop()
{
    stopped = true;
}

void DeviceVideoSmart::pause()
{
    isPause = true;
}</qrect></qrect></qrect></qrect></qlist<qrect>