
Hello everyone, I am Liang Xu.
This article is the 5th in the embedded series, and I plan to publish two articles per week in the future. The articles will be organized systematically to facilitate learning and communication.
All of Liang Xu’s articles are first published on the website: www.lxlinux.net/e/, feel free to bookmark it.
The table of contents for this article is as follows. The full text is 5000 words, with no fluff, just pure content. Please enjoy reading.
When starting to learn STM32, many friends enthusiastically purchase various devices, but soon encounter the first hurdle—how to program the code into this black chip~
There are various and flexible methods for programming STM32, allowing you to choose the appropriate method based on actual needs to program the code into the chip. This article will introduce several common programming methods for STM32, including serial download, ST-Link V2 download, ST-LINK Utility download, JLink download, and STVP download, providing a comprehensive tutorial for beginners.
Not sure which of the five methods to choose? Just look at the summary.
Too lazy to find driver installation packages or software installation packages? I have provided them for you.
By deeply understanding these programming methods, I believe everyone will be able to better understand the programming process of STM32 and choose the appropriate method for development and debugging.
0. Preliminary Reading
The source code and the installation/firmware packages required for this article have been prepared for you. You can add Liang Xu on WeChat to get them for free (note 1129):

If you don’t know how to set up the STM32 programming environment or how to program STM32 code, you can read this article:
[Quick Start to STM32 Development for Beginners (Step-by-Step Tutorial)]
If you are a complete novice and are not familiar with using MDK, you can first familiarize yourself with using MDK through the following article:
[A Guide to Using MDK Development Tools]
The chip used in this article is STM32F103C8T6, along with a project template. If you need to set up your own project template, you can refer to the following article:
[Step-by-Step Guide to Creating a HAL Version MDK Project Template]
1. Preparing Installation Packages and Drivers
- Preparing Installation Packages
1. MDK5 Installation Package
2. Chip Firmware Package
3. Serial Programming Tool (FlyMcu)
4. ST-Link Utility
5. STVP
- Preparing Drivers
1. CH340 Driver
2. ST-Link Driver
3. JLink Driver
- Example Code
STM32F103C8T6 Template Project
2. Serial Download
Serial download was my common method when I first started learning. Now, it seems less convenient than ST-Link. Using ST-Link can achieve one-click program download, while serial requires repeatedly plugging and unplugging jumpers, and also requires a separate programmer, which is quite cumbersome.
-
Need: CH340 USB to TTL Module
This device is mainly used for debugging or downloading programs. It is also very cheap, generally around 5-8 yuan. The following are two common types:
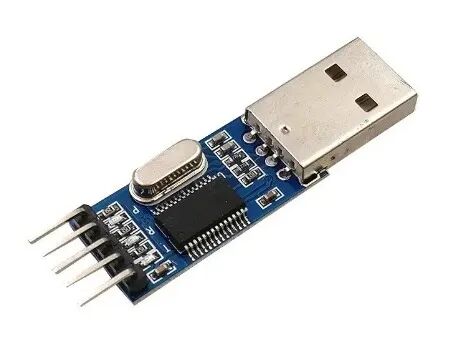
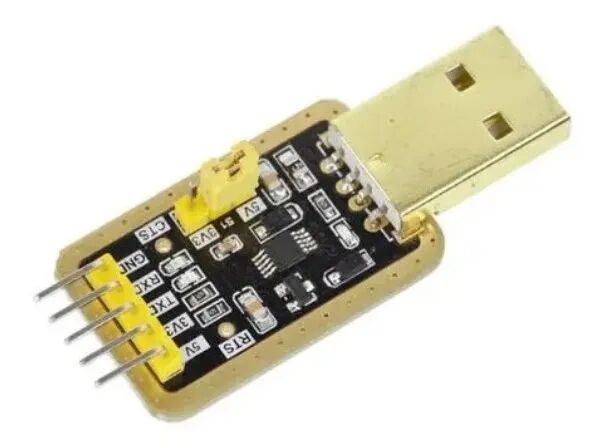
I personally recommend the one below because it can switch the VCC output voltage, which is more convenient for independently testing some sensors. However, since it is not expensive, you can buy several and use them as needed.
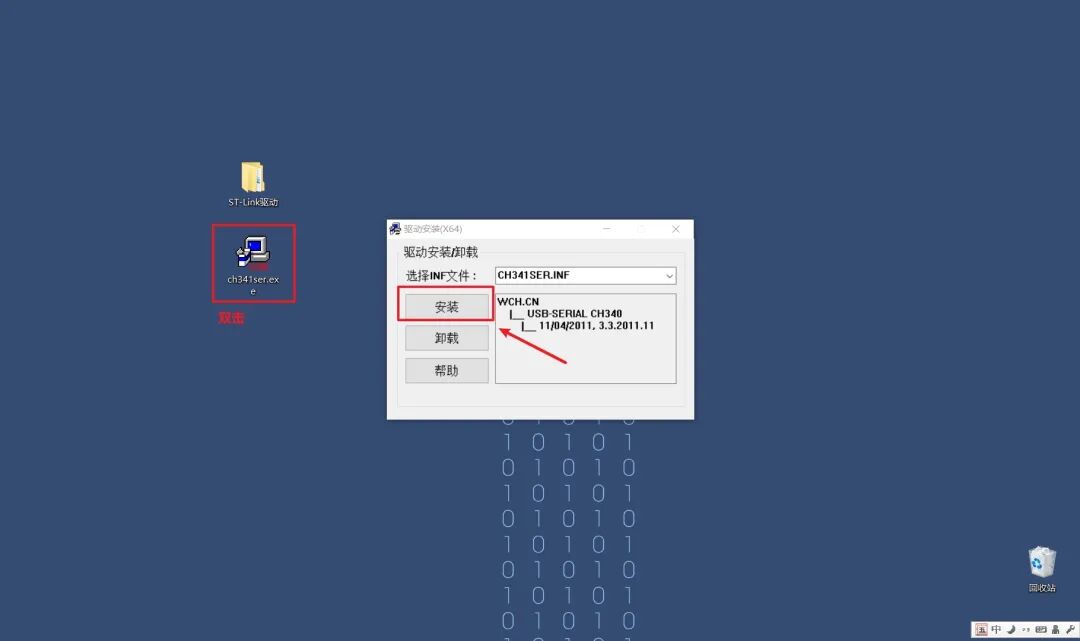
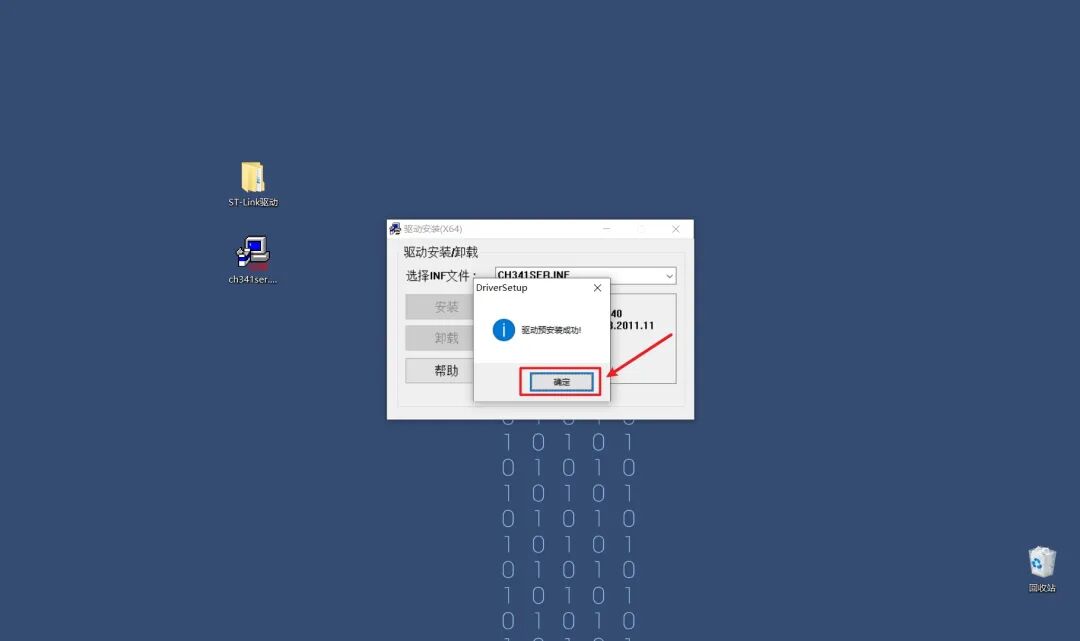
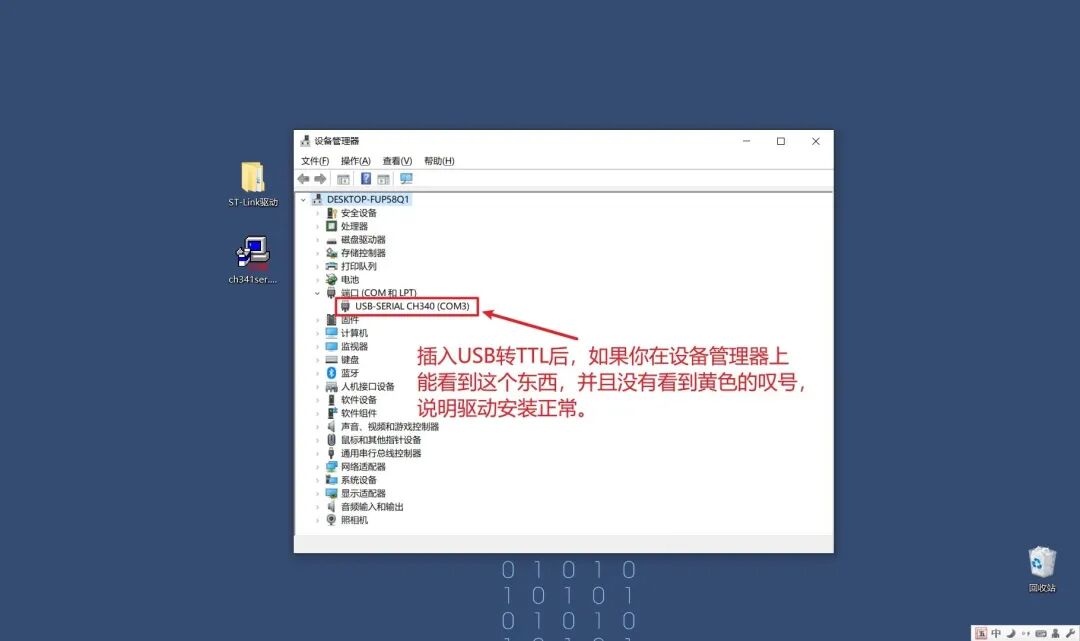
2.1 Installing CH340 Driver
2.2 Installing FlyMcu
There are many serial download tools, and here I recommend FlyMcu.
FlyMcu is a user-friendly STM32 programming software that should be very suitable for professional microcontroller developers. The software can be widely used in circuit programming and application programming, supporting programming, verification, and reading device information.
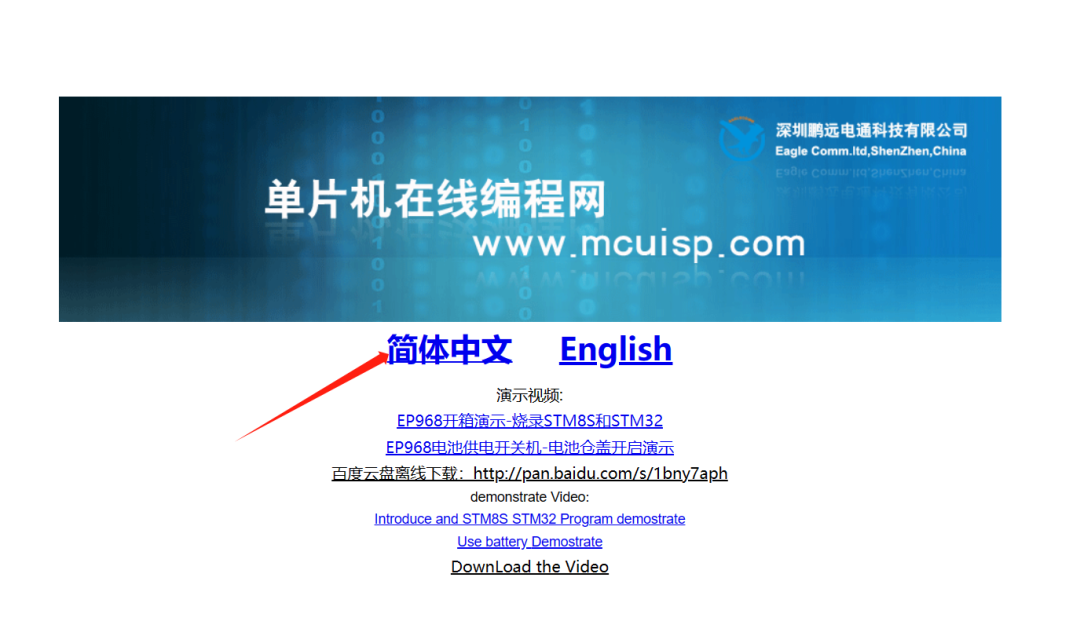
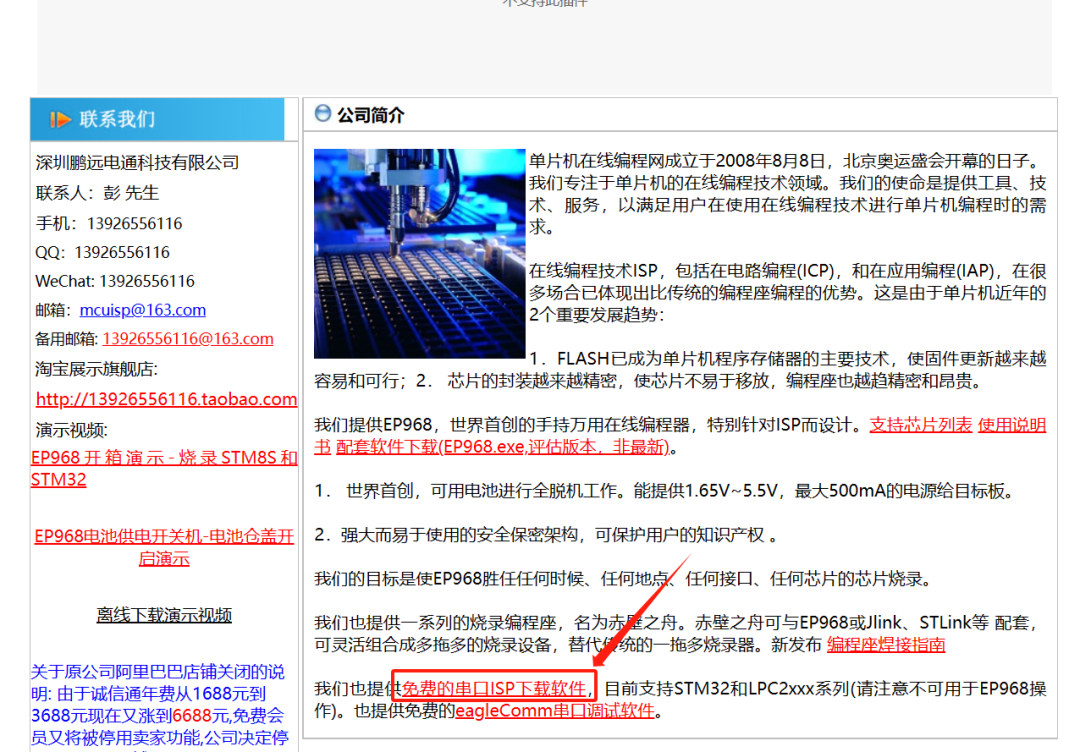
This tool is domestically produced, and if you need the latest version, you can download it from their official website:
http://www.mcuisp.com/
Of course, you can also use the version I provided, as it is also downloaded from their official website.
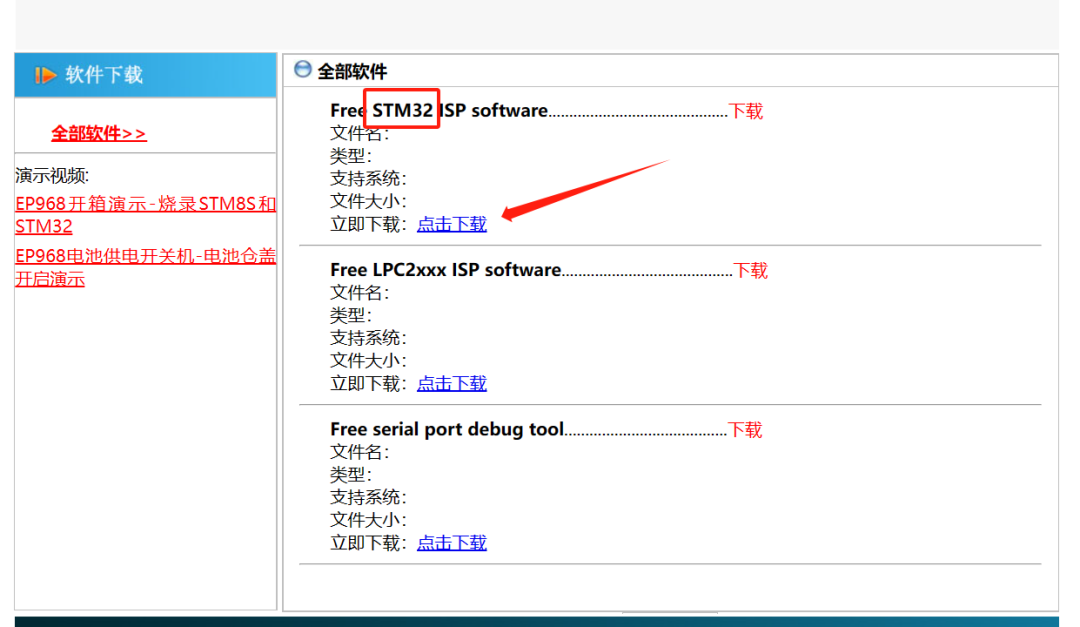
After downloading, unzip it, and double-click the .exe file to open it without installation.
2.3 Hardware Connections
Before downloading the program, please connect the wires properly. The wiring diagram is shown below:
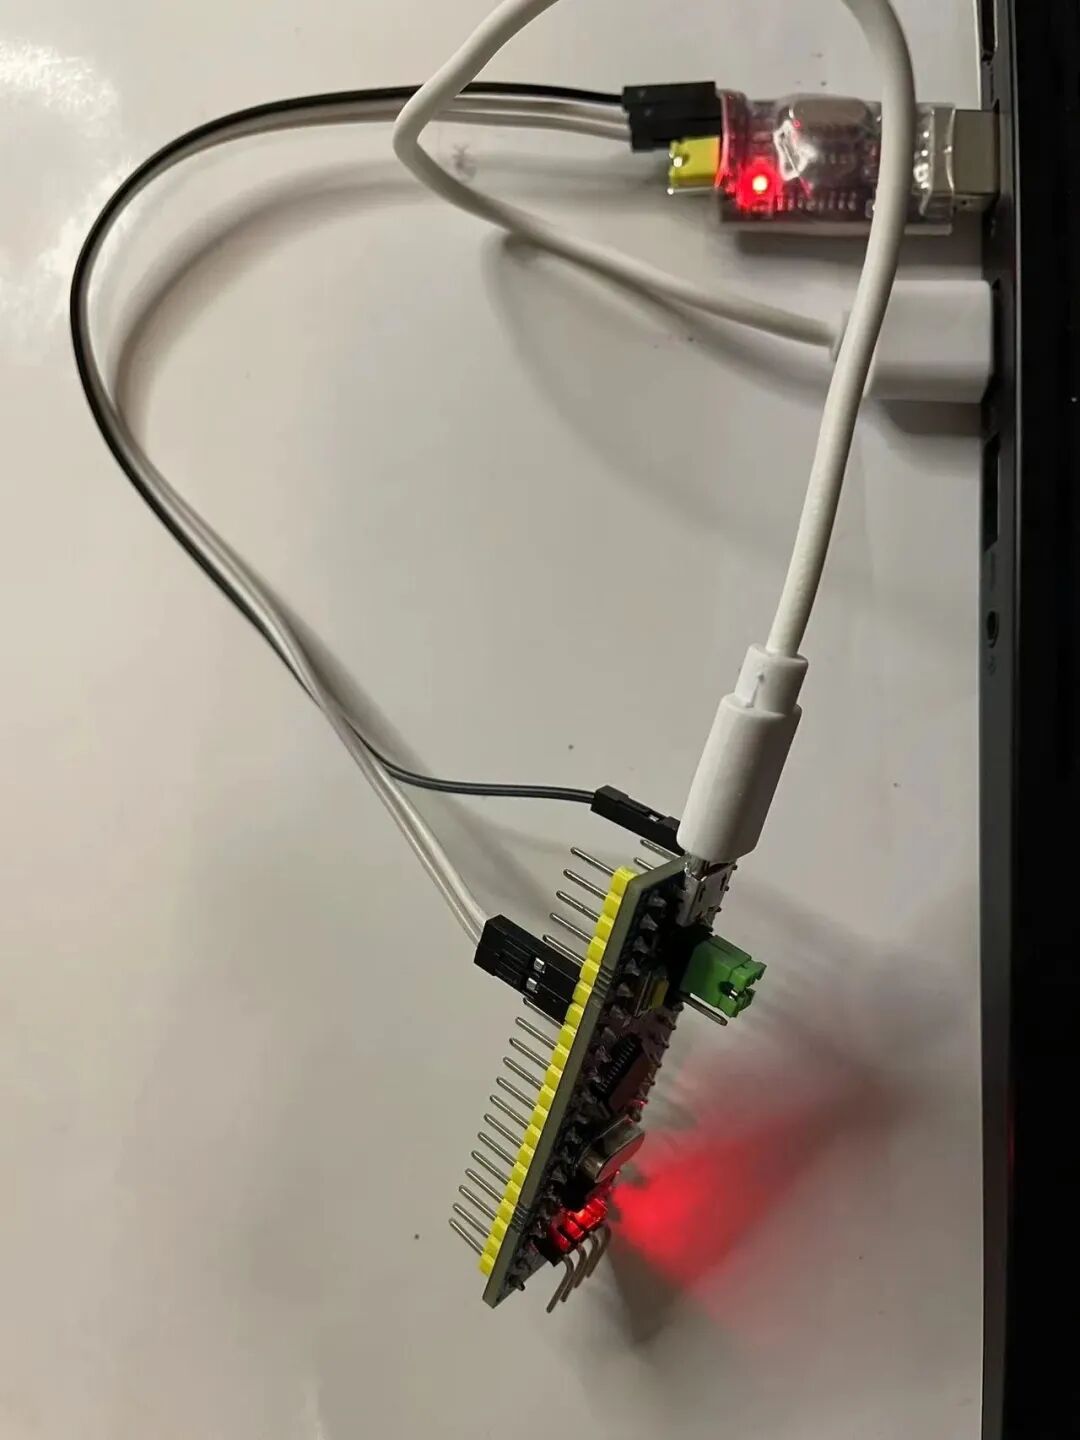
There is not much to say about the power connection, but for the serial side, be sure to pay attention to cross wiring, meaning that the TX of the CH340 to TTL tool should connect to the RX of the board, and the RX of the CH340 to TTL tool should connect to the TX of the board. Be careful not to connect them incorrectly, or it will not program!
On the development board, PA9 is TX, and PA10 is RX. Please connect the wires correctly as mentioned in the previous paragraph.
2.4 Program Download
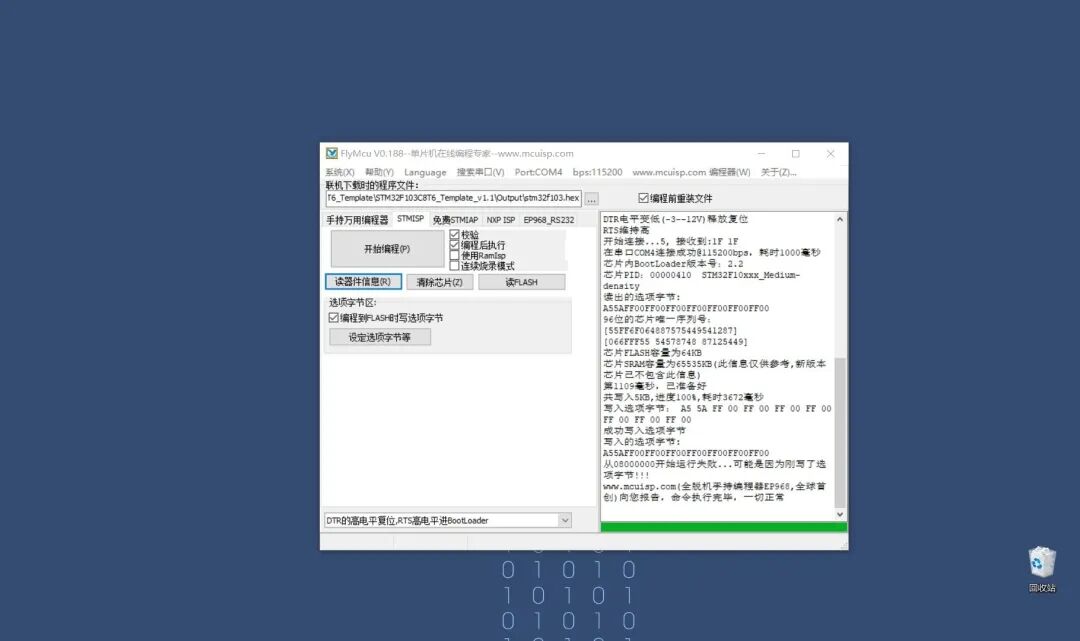
Open FlyMcu. If you are using the STM32F103C8T6 core board I recommended above, please download the template project provided in 1. Preparing Installation Packages and Drivers and follow the steps below:

Next, connect the BOOT0 jumper cap on the board to 1, and keep the BOOT1 jumper cap at 0, as shown in the figure below:
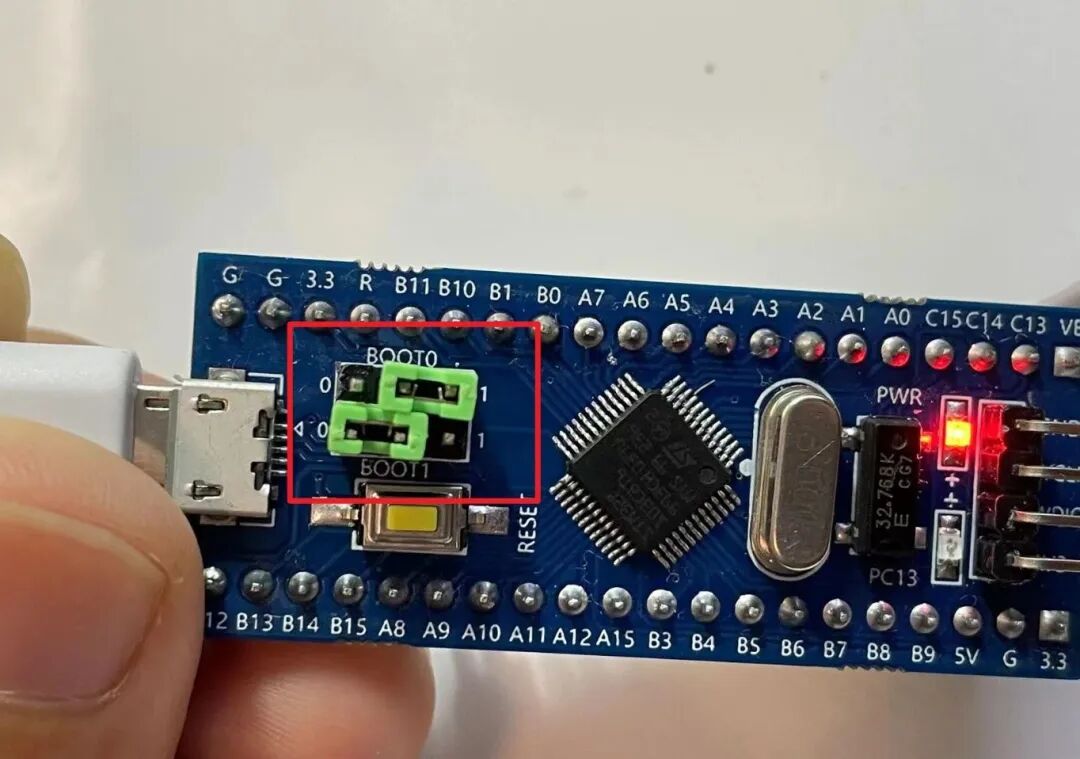
Why do this?
These two jumper caps are used to adjust the states of BOOT0 and BOOT1. Connecting the jumper cap to 1 means high level, and connecting it to 0 means low level.
BOOT0 and BOOT1 are used to set the startup mode of STM32:
| BOOT0 | BOOT1 | Startup Mode | Description |
|---|---|---|---|
| 0 | X | User Flash Memory | User flash memory, which means flash startup |
| 1 | 0 | System Memory | System memory, used for serial download |
| 1 | 1 | SRAM Startup | SRAM startup, used for debugging code in SRAM |
Here we are using USB download, which is serial download, so we choose the second method in the table, which is BOOT0 set to 1, BOOT1 set to 0.
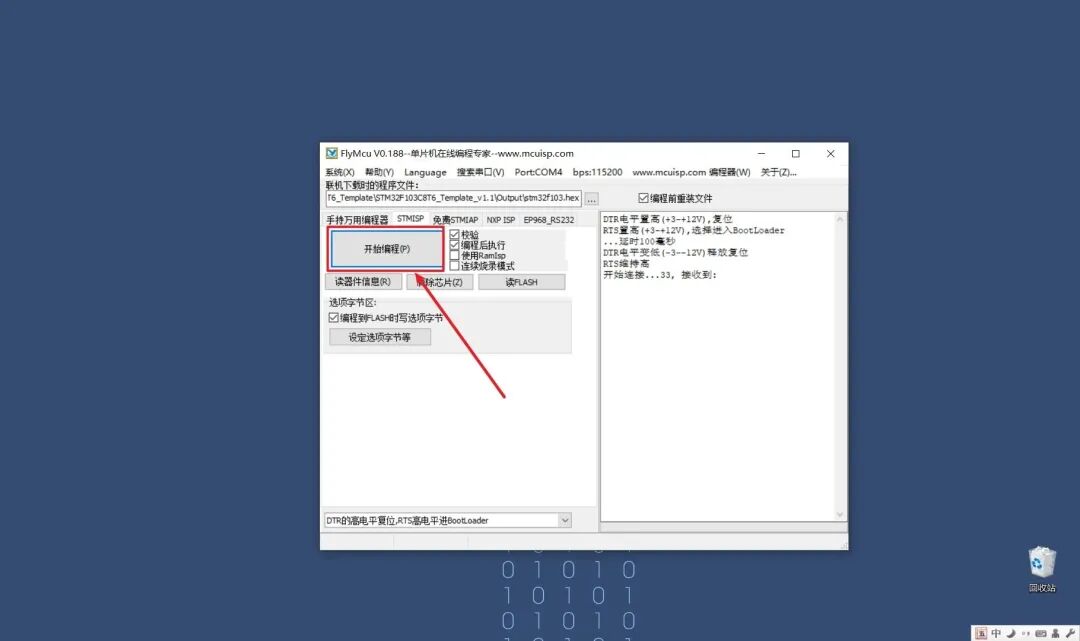
Then you can click the “Start Programming” button on the software, but you will find that the right side remains in the connecting state. At this point, you just need to press the reset button on the board (the only button on the board), and it will start the process.
After downloading, remember to switch the BOOT0 jumper back to the 0 position, with both BOOT0 and BOOT1 set to 0, so that the program starts from the flash area. Press the reset button again, and the board will start running the programmed code.
3. ST-Link V2 Download
ST-Link V2 is my most commonly used download method now, and I highly recommend it. ST-Link V2 is an online emulator and downloader for STM8 and STM32 series microcontrollers. ST-Link comes with two interface modes: SWIM interface mode (for STM8) and SWD interface mode (for STM32).
-
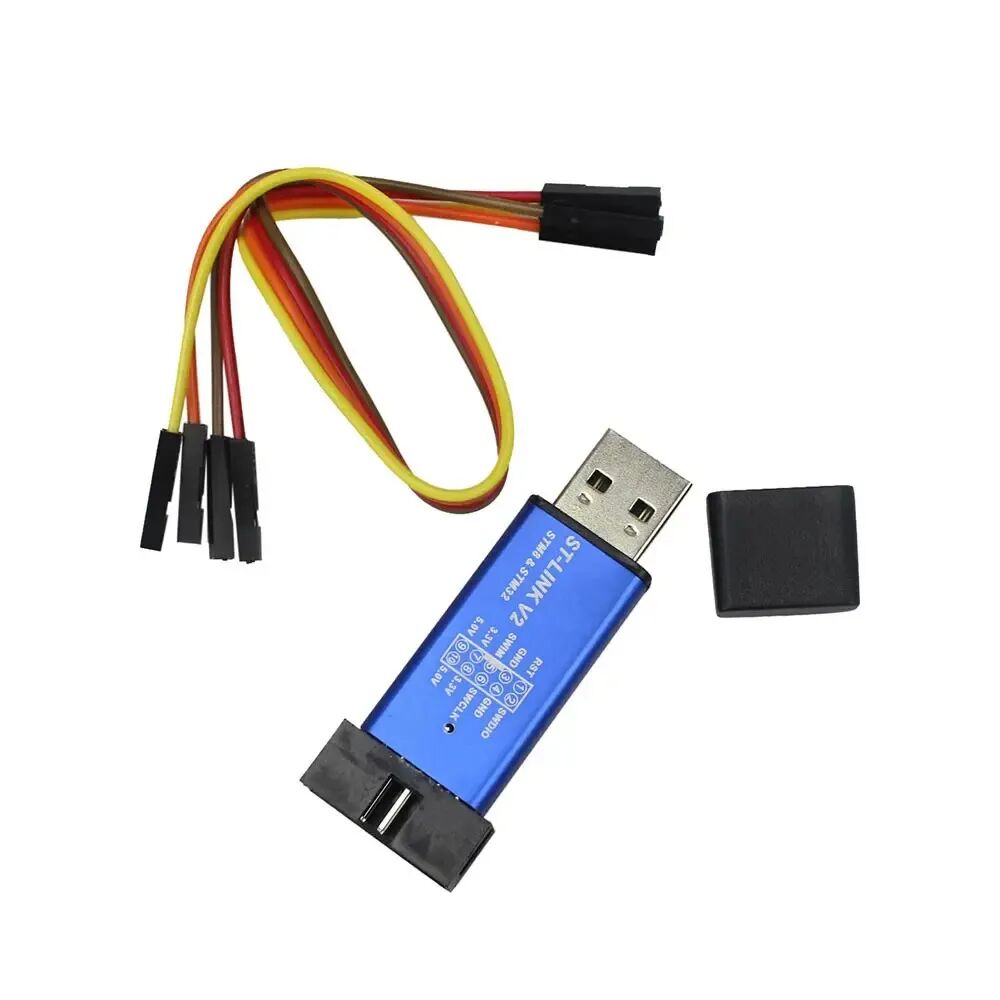
Need: ST-Link V2 Downloader
ST-Link is a debugging and programming tool for STM32 microcontrollers that can communicate with the development board via SWD or JTAG interfaces. It is generally inexpensive, around 7-8 yuan.
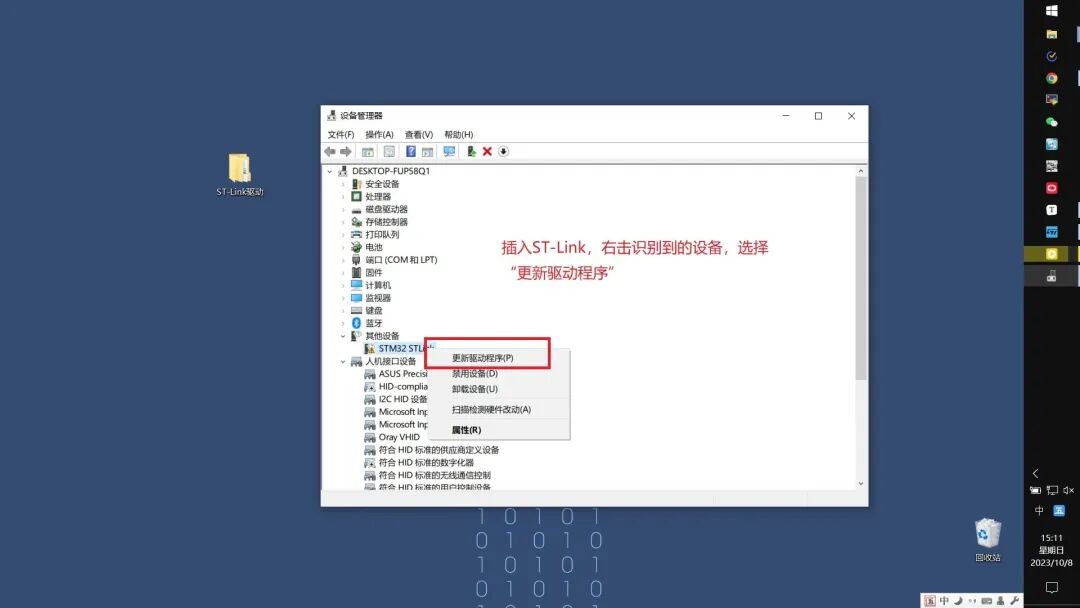
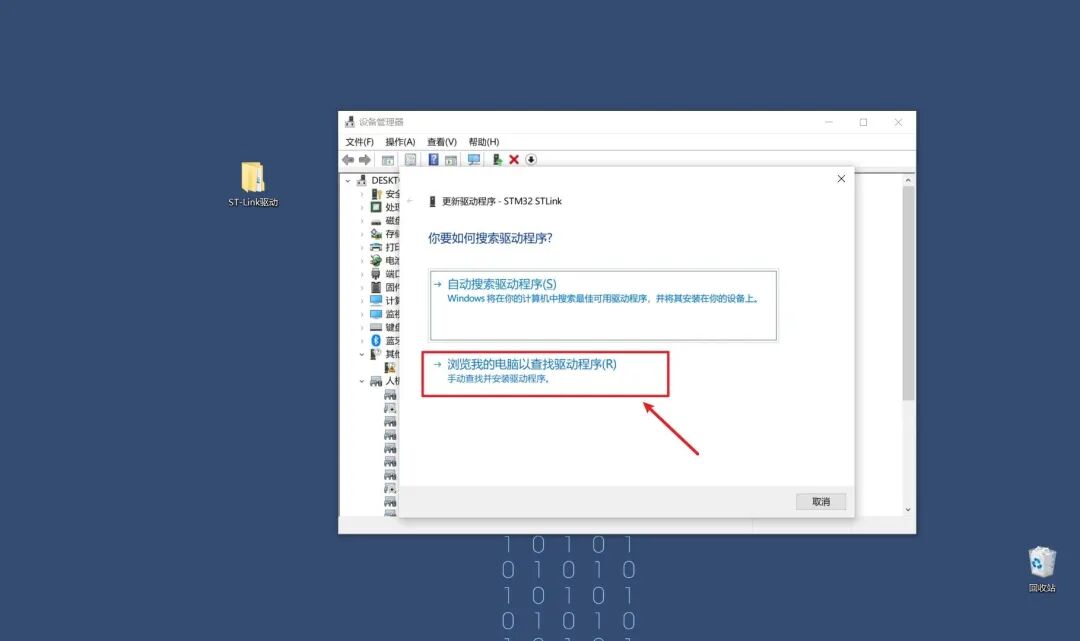
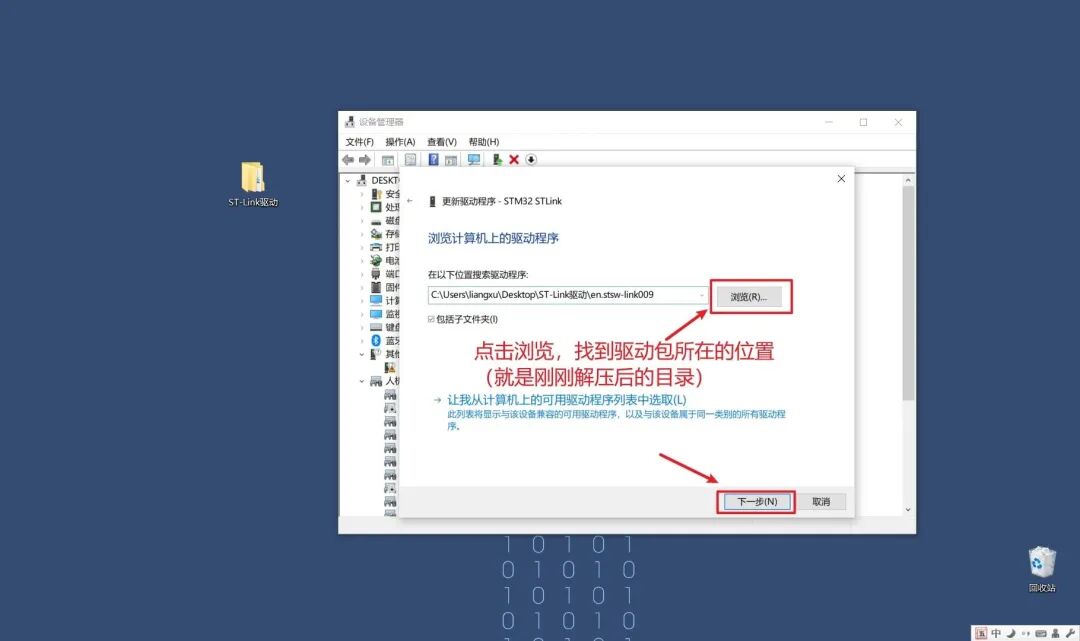
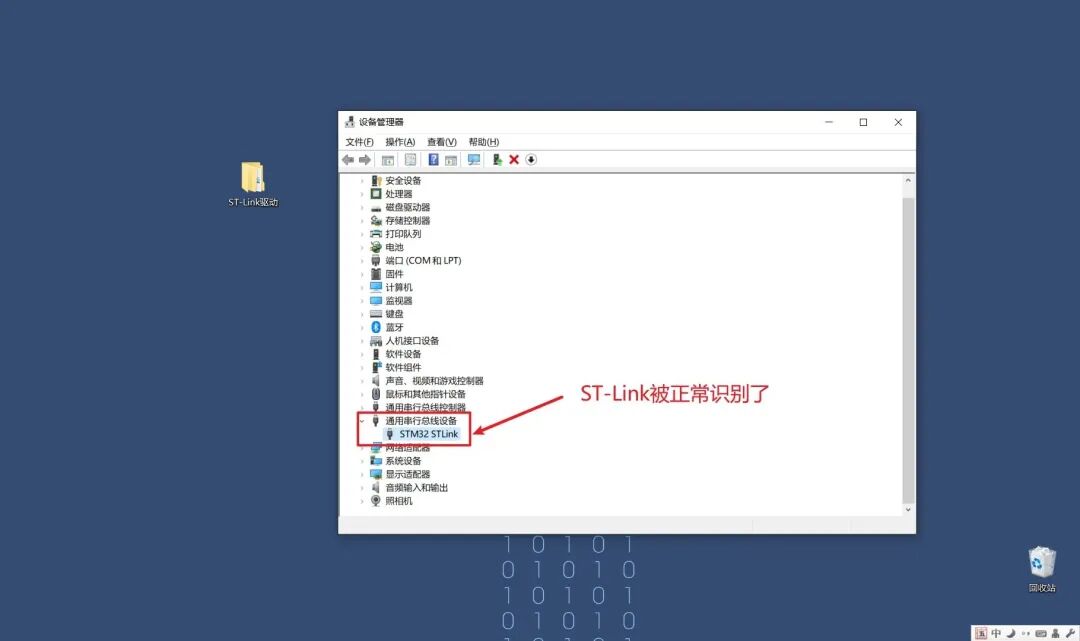
3.1 Installing ST-Link Driver

3.2 Installing MDK5
MDK5 is an embedded software development environment released by Keil. When we develop STM32, we usually do it in this software.
MDK5 can be downloaded from their official website, as follows:
https://www.keil.com/demo/eval/arm.htm#/DOWNLOAD

The current latest version is MDK538A, but a new version does not necessarily mean it is the best; it may have some strange issues and may not be stable.
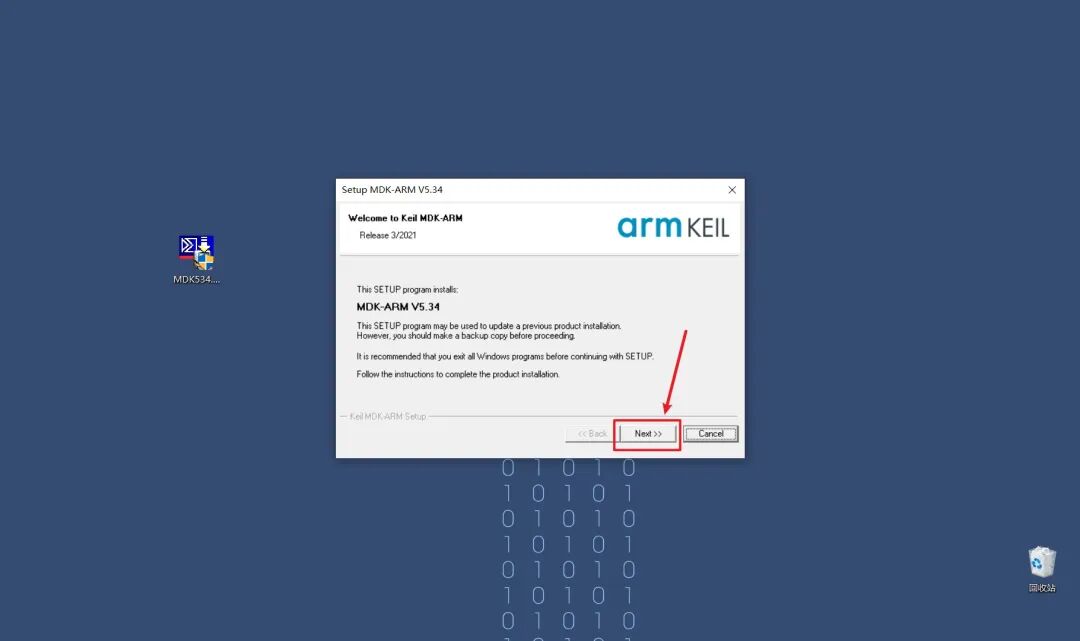
I recommend everyone use MDK534, which is the version I am currently using and has not had any issues. The installation package has been provided in 1. Preparing Installation Packages and Drivers, and now I will guide you step-by-step on how to install MDK5 on your computer.
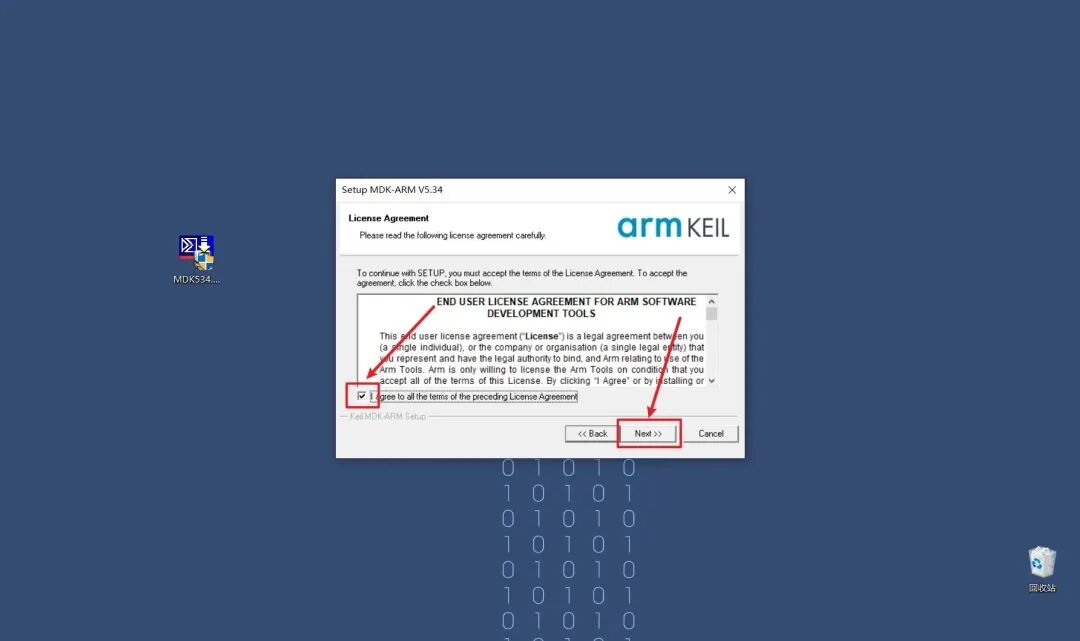
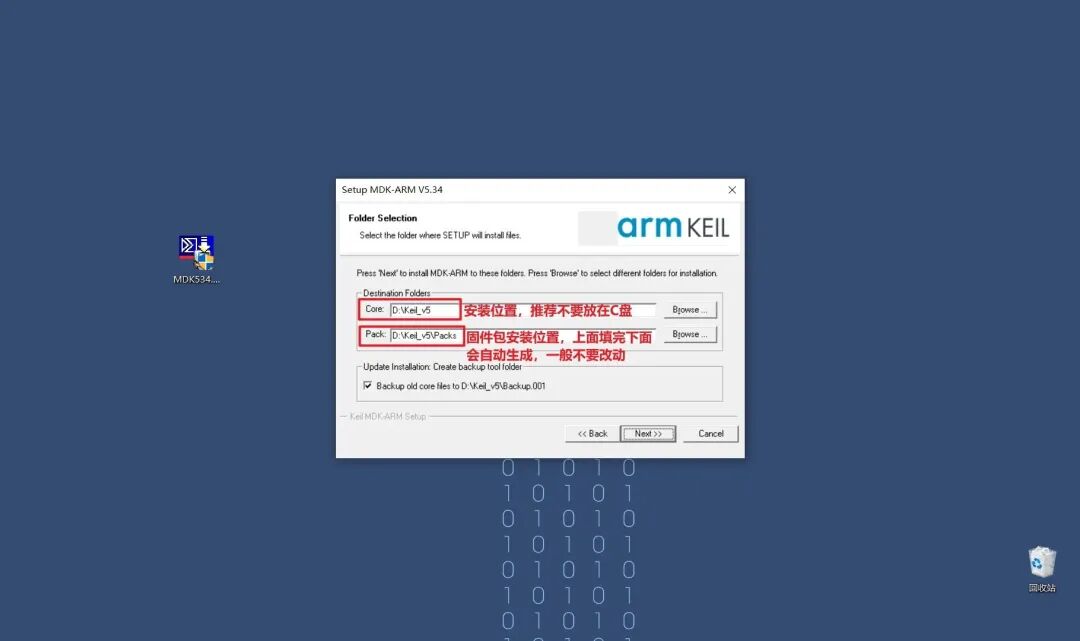
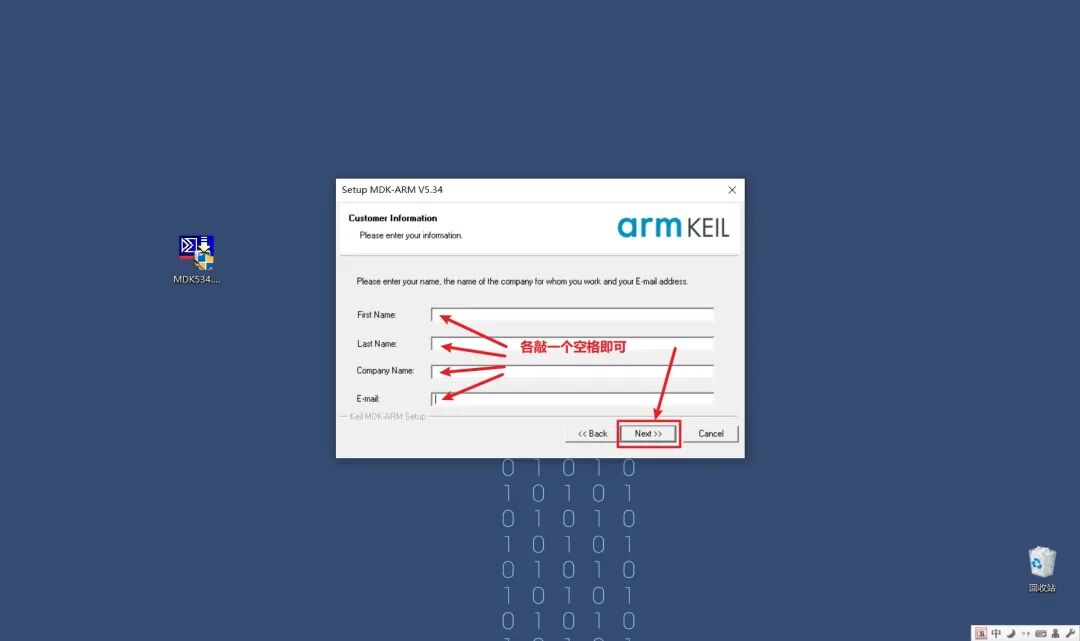
After double-clicking the installation package I provided, the following interface will appear. Just follow my images to operate:
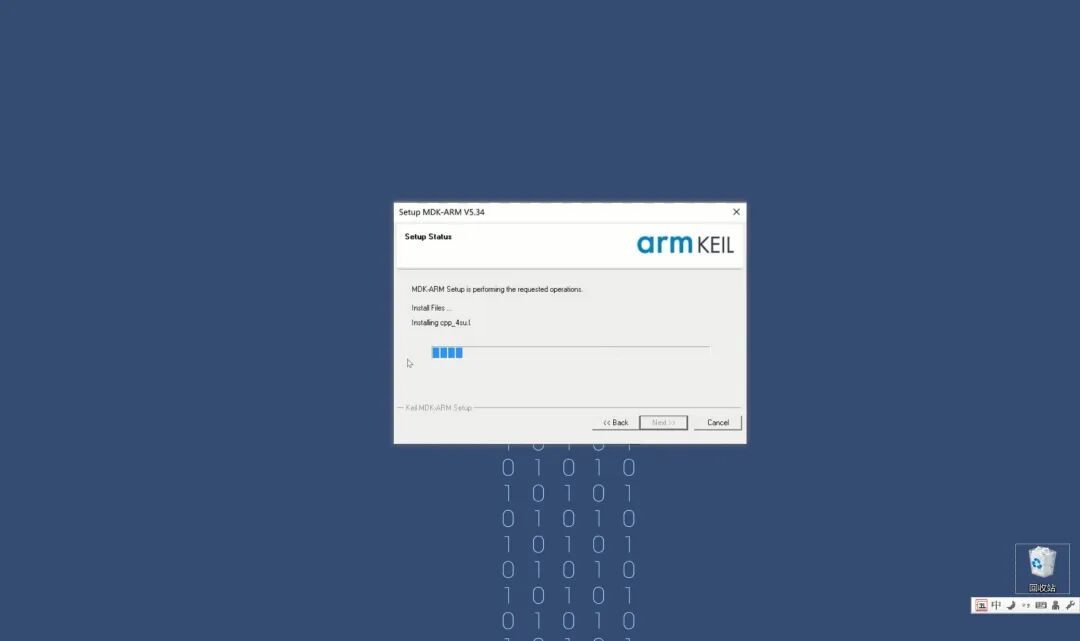
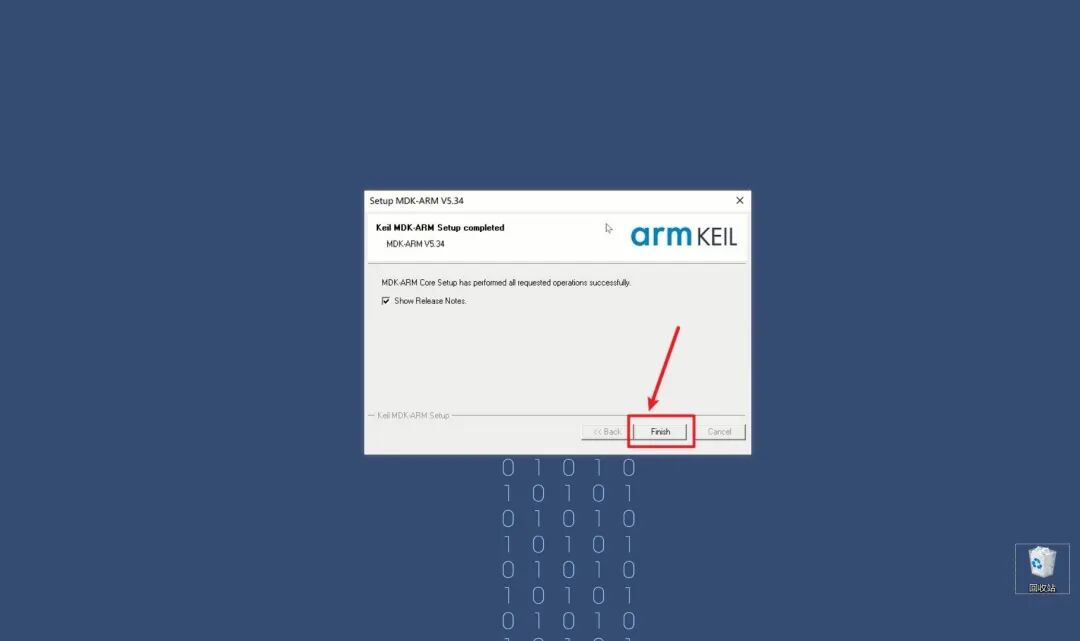
At this point, MDK5 is installed.
However, the installation package I provided is the official version downloaded from the website, and after a few days of trial, it will require payment. There are many methods for cracking available online, but I won’t discuss them here as I fear legal repercussions.
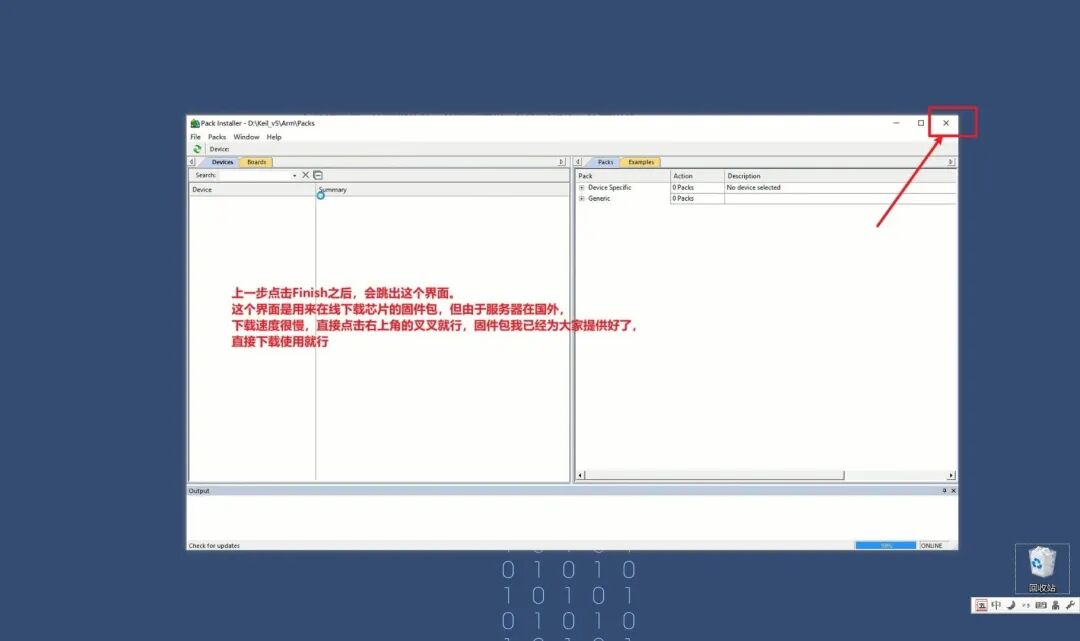
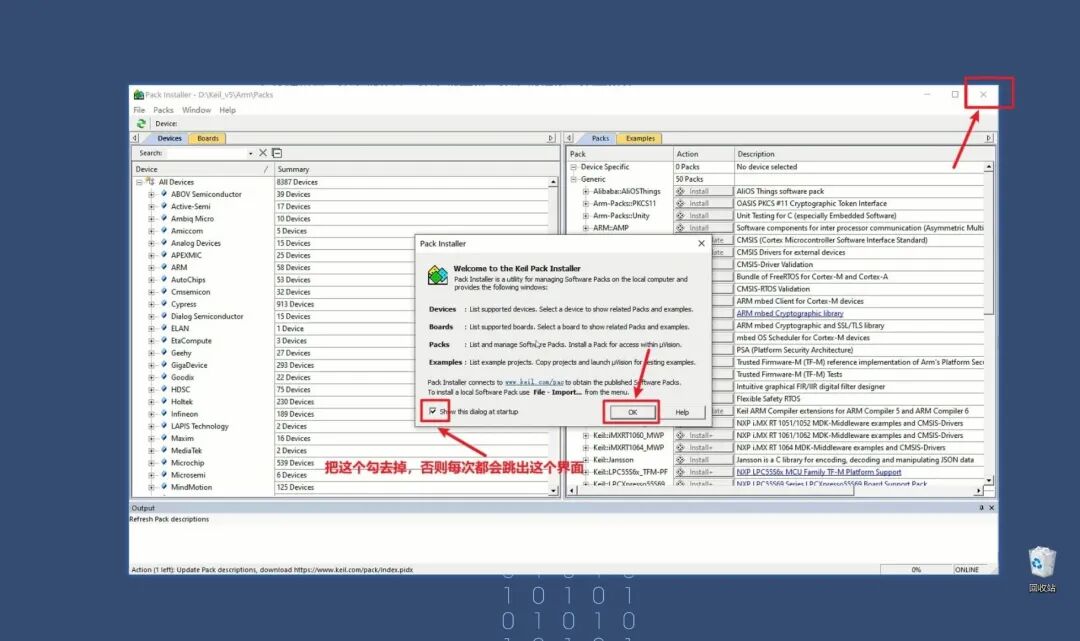
Next, you need to install the firmware package. What is a firmware package? Since ST produces many chips, each chip requires different support files, and these files combined make up the firmware package.
However, with so many chips, they cannot integrate all firmware packages into MDK5, or else the installation package would become extremely large, taking up space unnecessarily. A better solution is to install the corresponding firmware package for the chip you need.
The firmware package can also be downloaded from the official website, as follows:
https://www.keil.arm.com/packs/
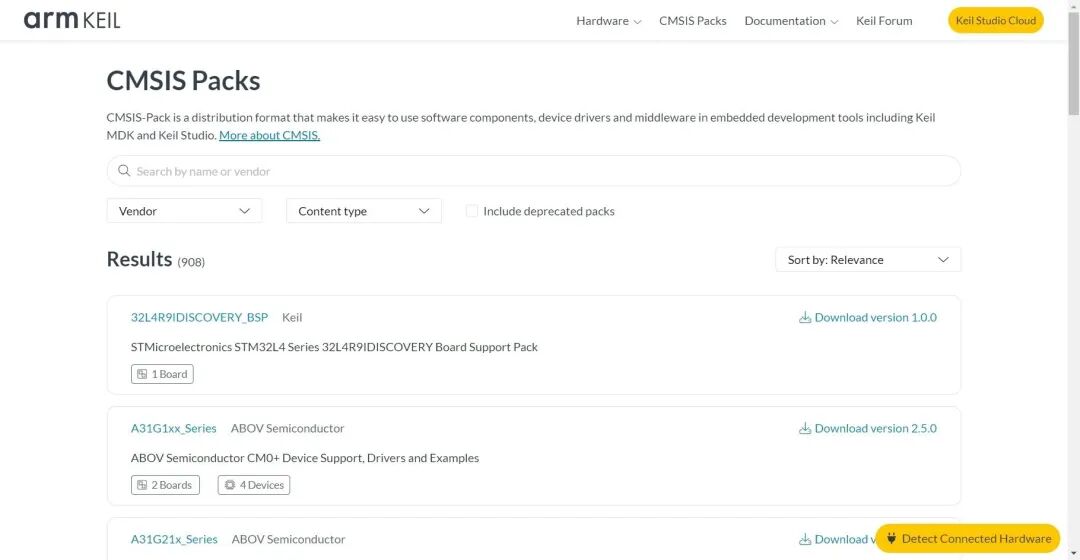
Since we are using the STM32F103C8T6 board, which belongs to the F1 series, just search for STM32F1 in the search box. If you are using other series chips, search for the corresponding series keywords; don’t just blindly search as shown in the picture below~
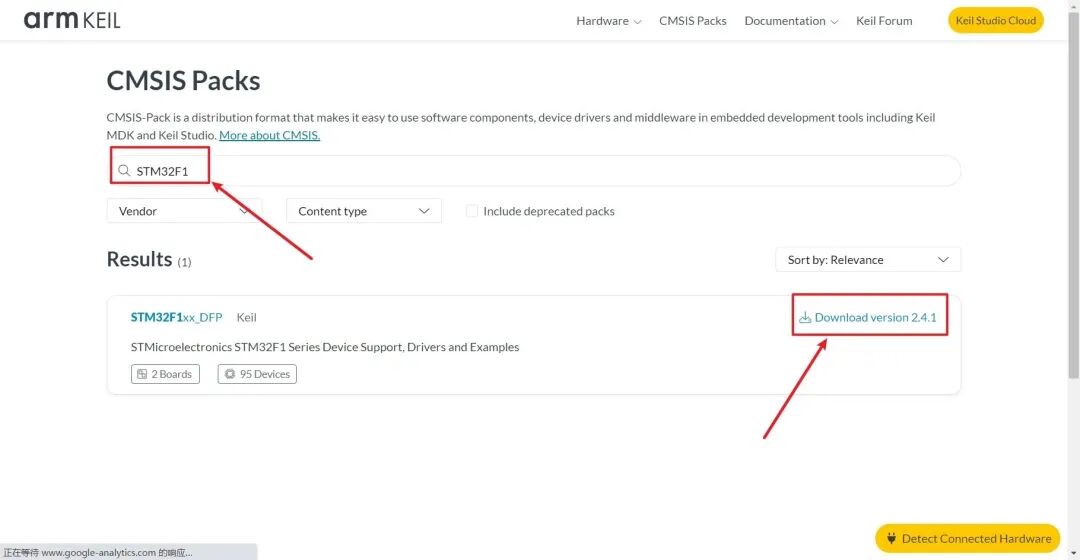
Similarly, since the server is located abroad, the download speed is very slow. You can use the files I provided, which are also downloaded from the official website, in their original form. The link can be found in 1. Preparing Installation Packages and Drivers.
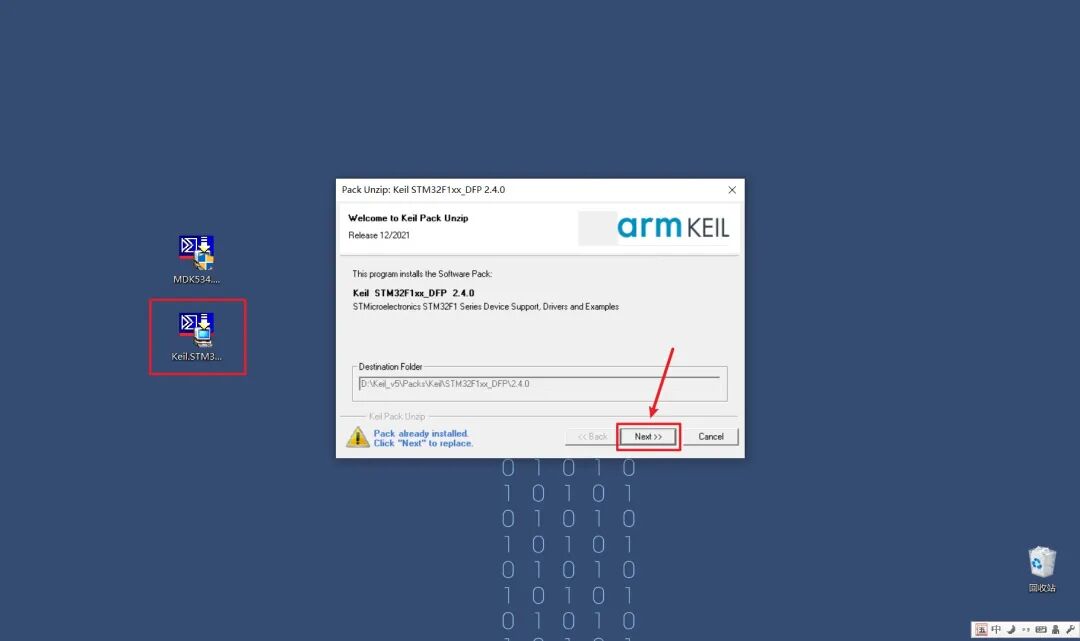
The installation method is simple; just double-click the installation package, and it will automatically recognize the directory of the firmware package. Click Next, and wait for the progress bar to finish, and you’re done.
3.3 Program Compilation
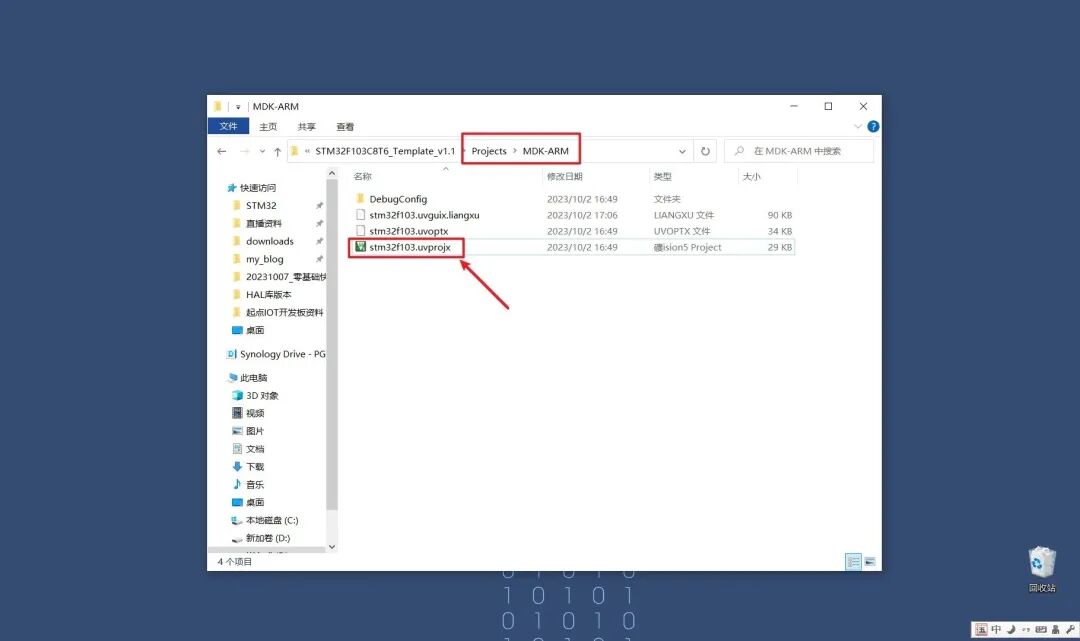
If you are using the STM32F103C8T6 core board I recommended above, please download the template project provided in 1. Preparing Installation Packages and Drivers and open this project.

After opening the program, in the upper left corner of the image, there are three buttons. The compilation work we do uses these three buttons. What do these three buttons do?
-
The first button: Translate checks the modified files for syntax errors; it does not link library files or generate executable files.
-
The second button: Build compiles the modified files, including syntax checks, linking dynamic library files, and generating executable files.
-
The third button: Rebuild recompiles the entire project, which is similar to the Build button but compiles all files in the project, taking a long time.
In actual work, we most often use the second button, while the other two are used less frequently, especially the first one.
3.4 Hardware Wiring

For the power line on the core board, you can use any micro USB cable, which is the flat type used for charging phones; it is used for power supply and does not transmit data.
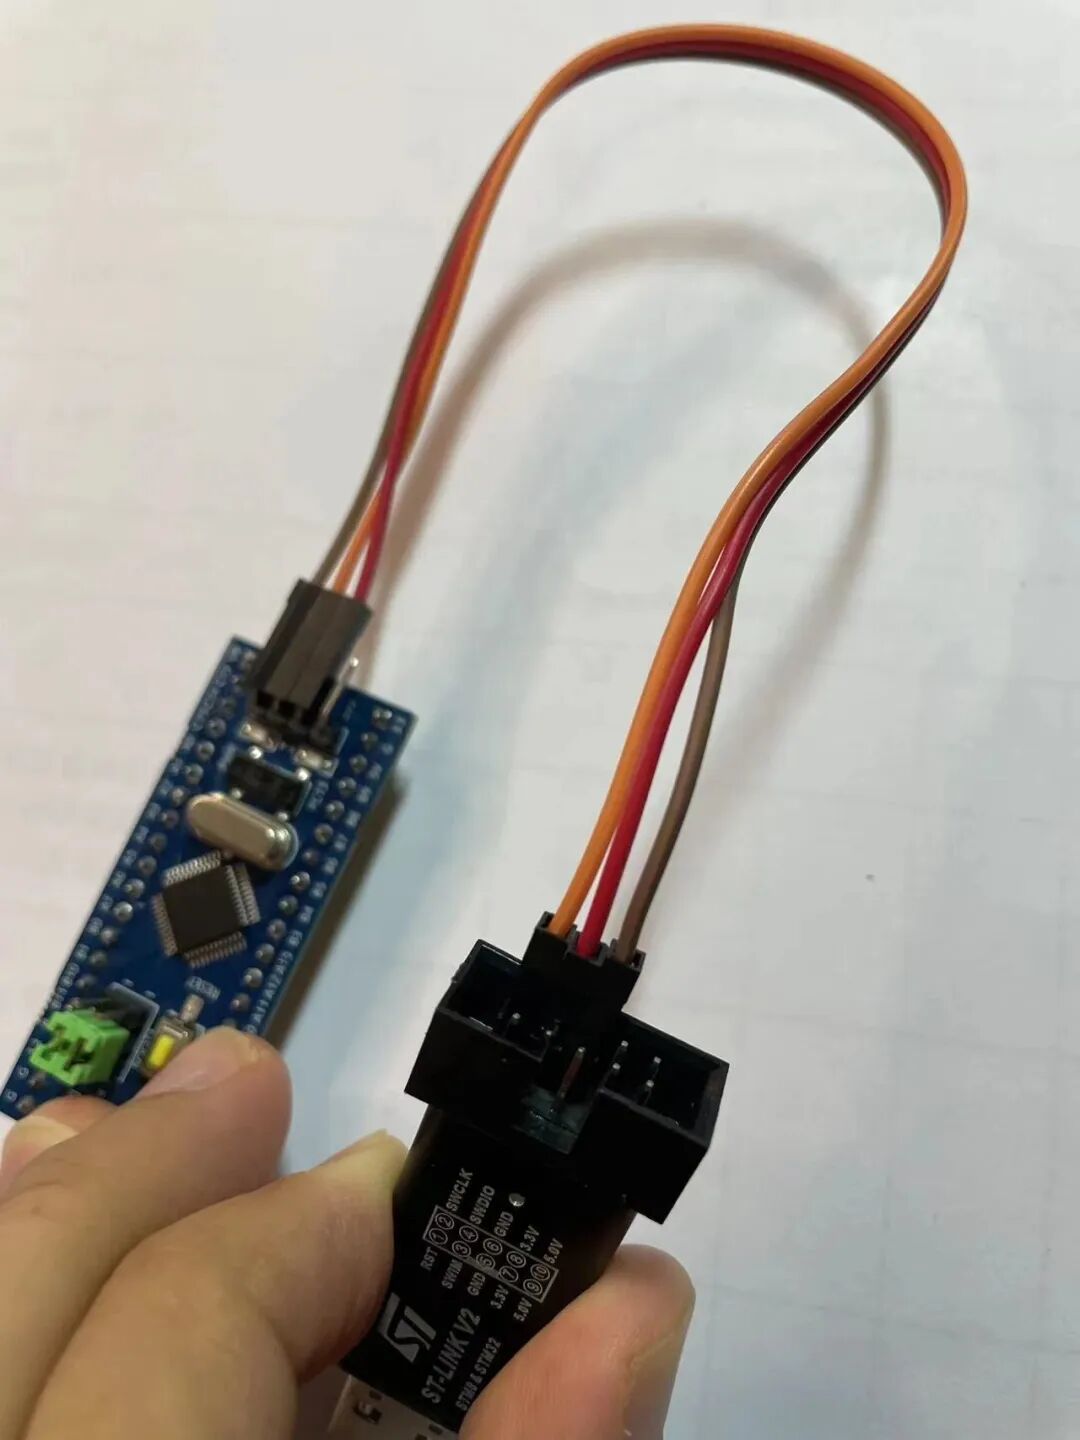
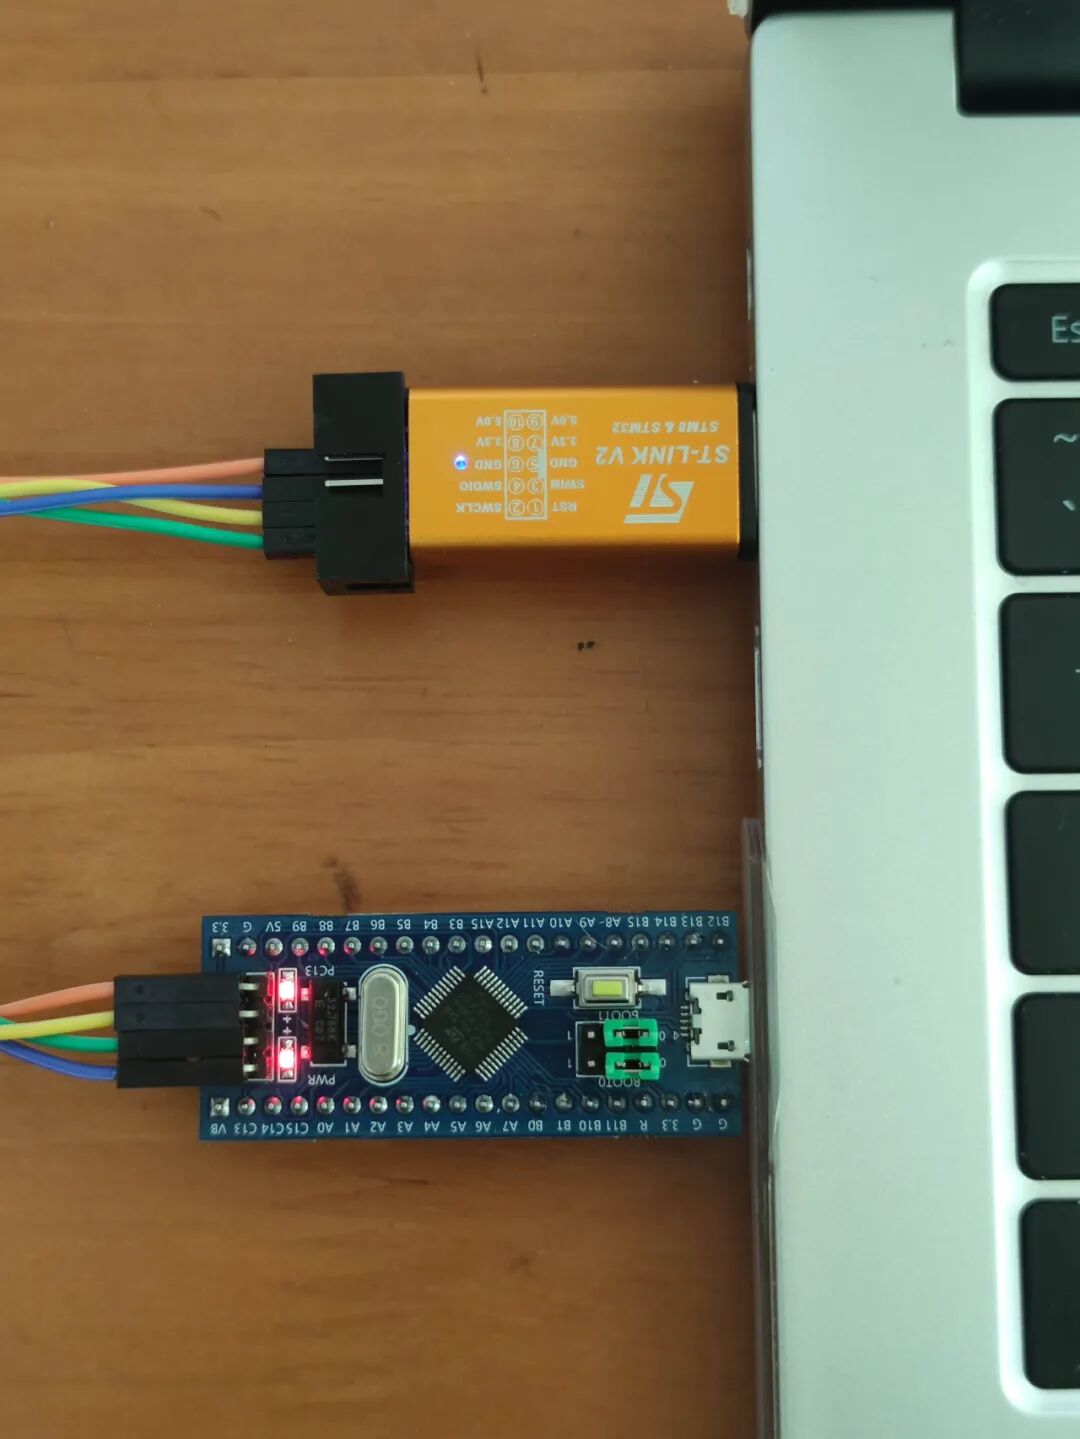
The download pins below mainly consist of three: SWDIO, SWDCLK, and GND. Please carefully compare the core board with ST-Link to avoid incorrect connections. Especially for ST-Link, connect to the row of pins opposite the notch, not the row of pins close to the notch. To make it clearer, I took a detailed picture (isn’t it very thorough?).
In the picture below, brown is GND, red is SWDIO, and yellow is SWDCLK. Please connect the wires accordingly.
3.5 Program Download
Before downloading, please follow the steps below to configure.
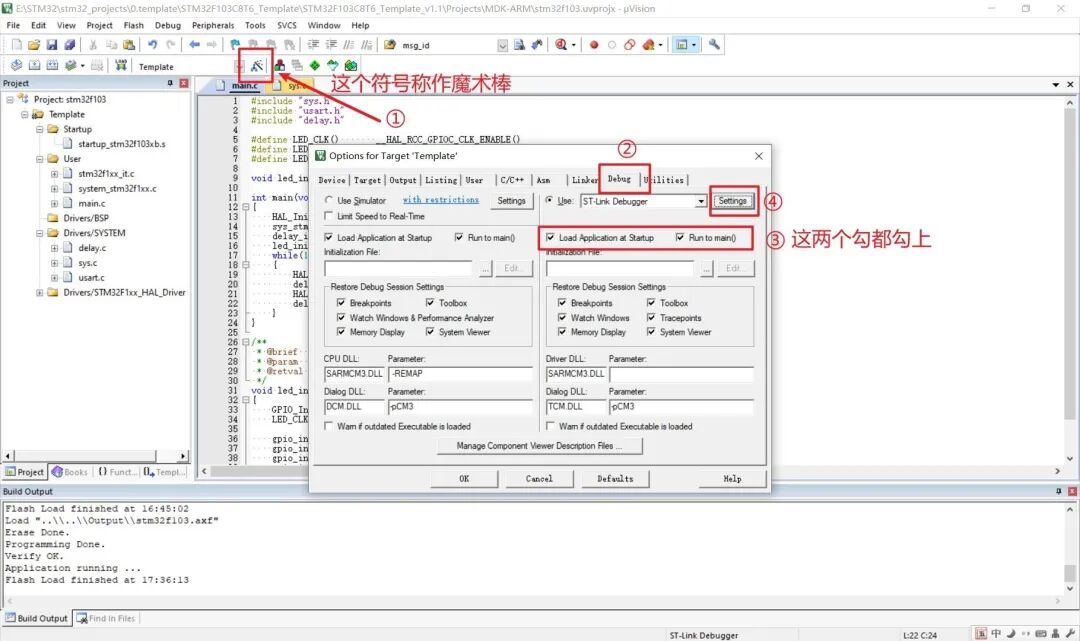
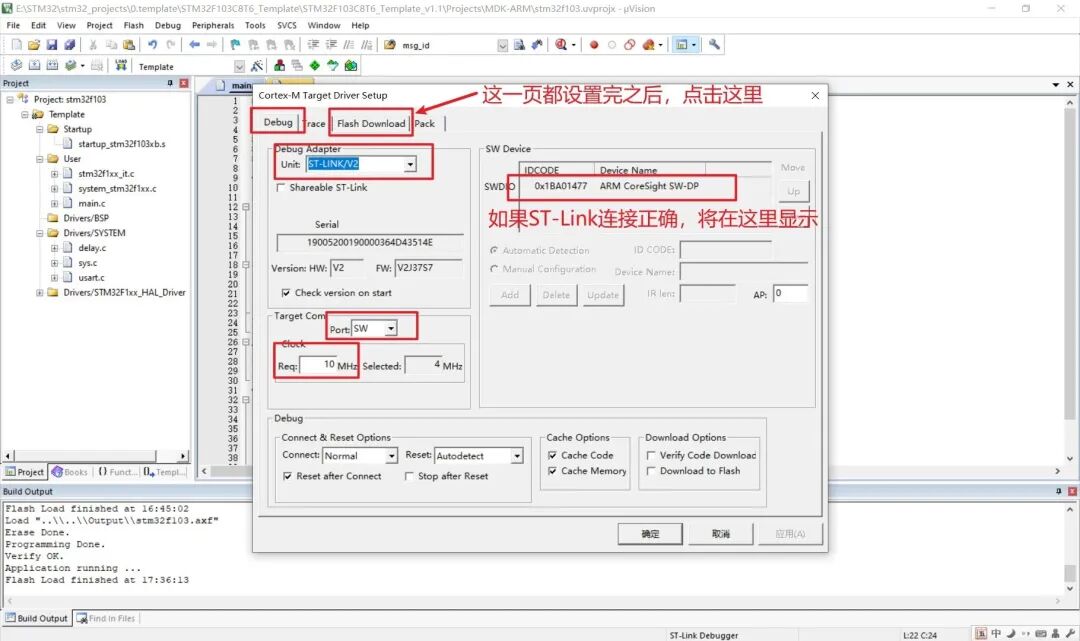
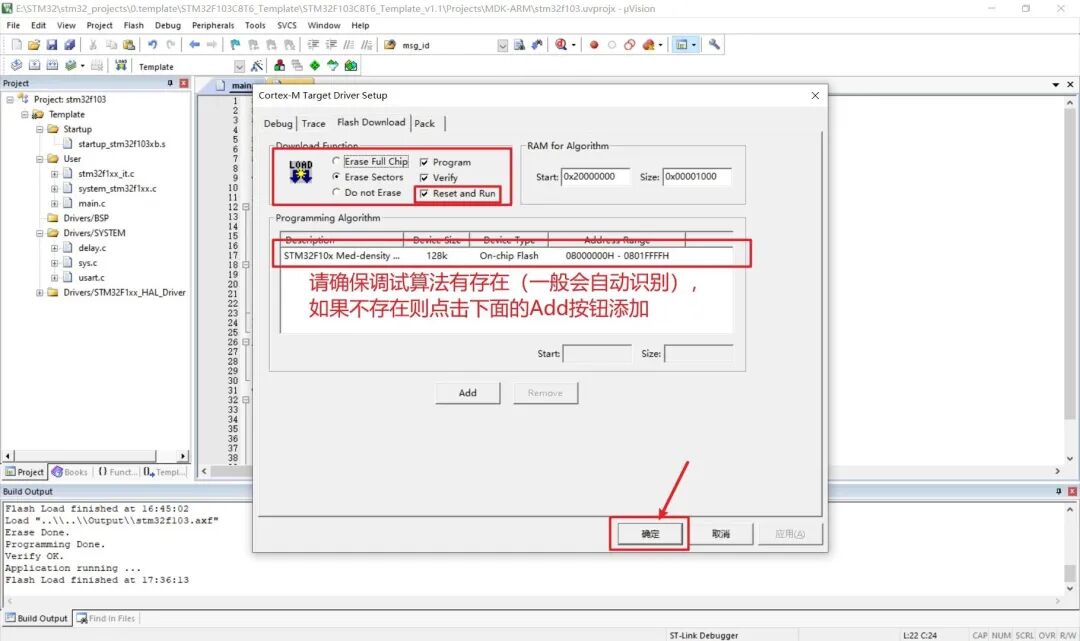
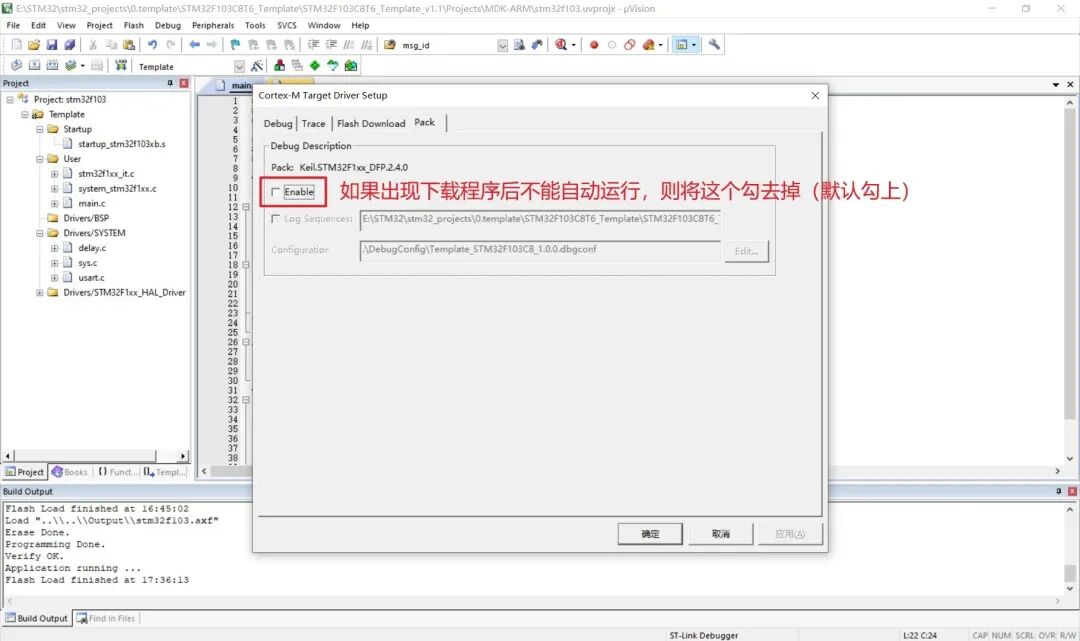

At this point, the configuration for MDK is complete, and you can proceed with the download.
Before downloading, please ensure the following four things:
- Ensure that the previous configuration is done correctly;
- Check the wiring; if any wire is not connected correctly, the download will fail;
- Compile the program;
- The board must be powered on.
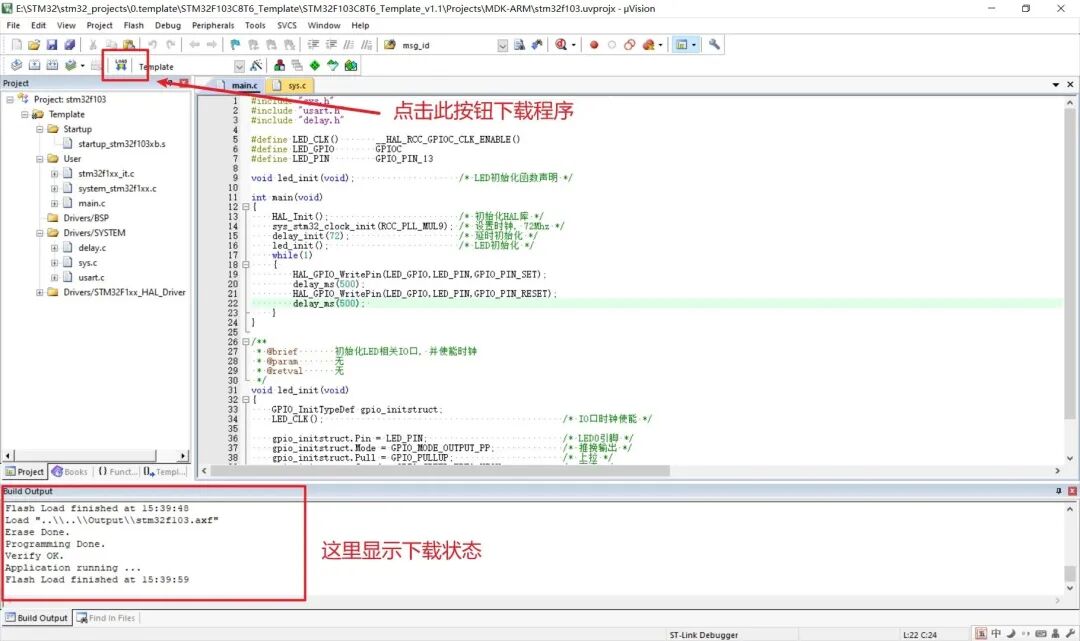
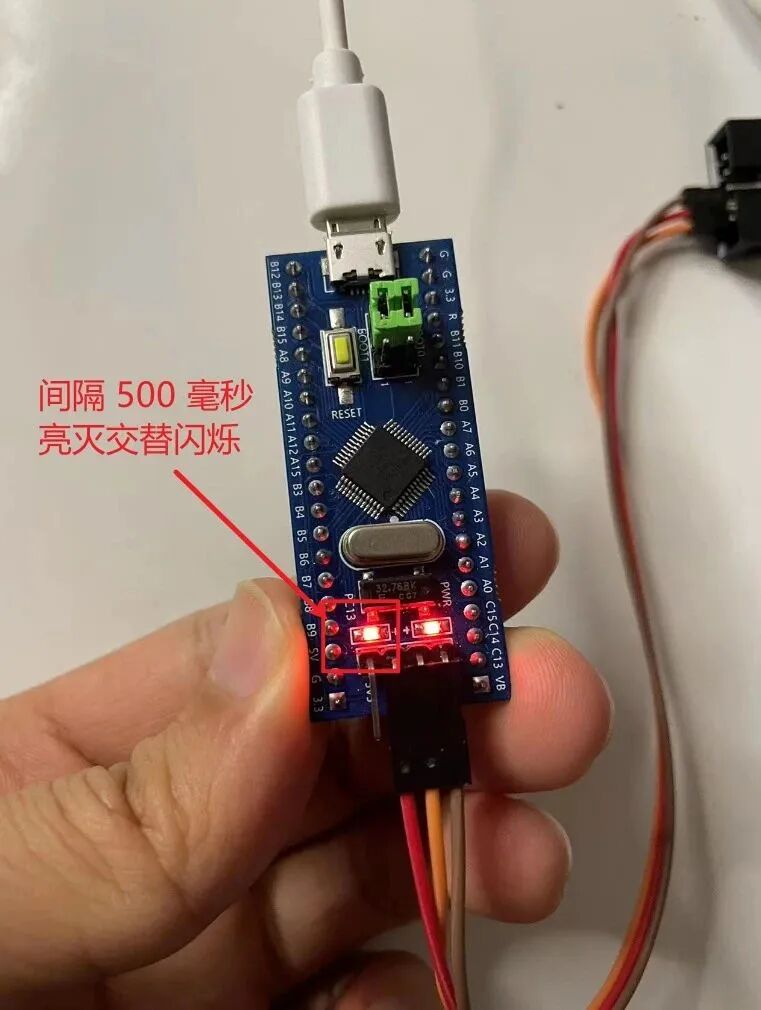
After the program is successfully downloaded, the board will automatically run the new code, and you will see the LED light blinking alternately every 500 milliseconds.
4. STM32 ST-LINK Utility Download
STM32 ST-LINK Utility is a tool for programming (reading, writing, erasing, option bytes) for all STM32 chips.
ST-LINK Utility only supports ST-Link (multiple versions) download debuggers and is compatible only with STM32 chips.
-
Need: ST-Link Downloader (same device used in
3. ST-Link V2 Download)
4.1 Installing ST-LINK Utility
Download from the official website:
https://www.st.com/en/development-tools/stsw-link004.html
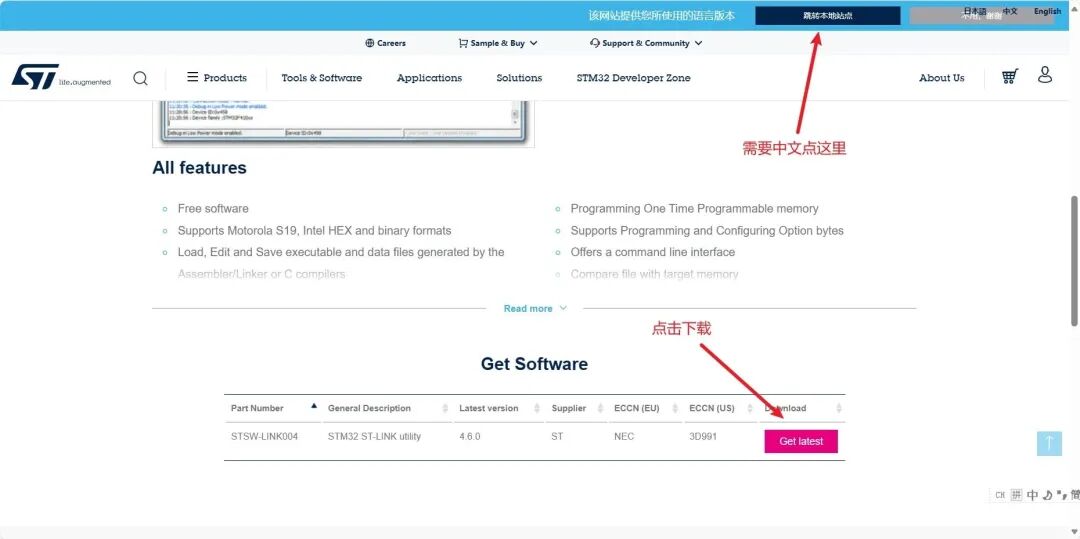
The official website requires registration and email filling, which is quite troublesome, so I recommend directly using the installation package I prepared (1. Preparing Installation Packages and Drivers), which is also downloaded from the official website, version 4.6.0.
There is not much to say about the installation; just click Next all the way, and if necessary, remember to change the installation path.
4.2 Hardware Connection
Connect ST-Link V2 and STM32 pins one-to-one, using SWD interface mode, and connect as shown in the figure, then plug it into the computer.
ST-Link V2 STM32
SWCLK —— SWCLK
SWDIO —— SWDIO
GND —— GND
3.3V —— 3V3

4.3 Program Download
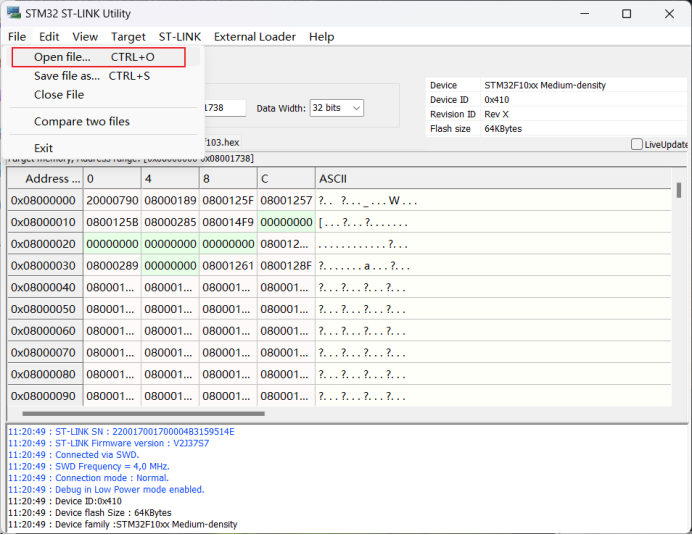
Open ST-LINK Utility and operate as shown:
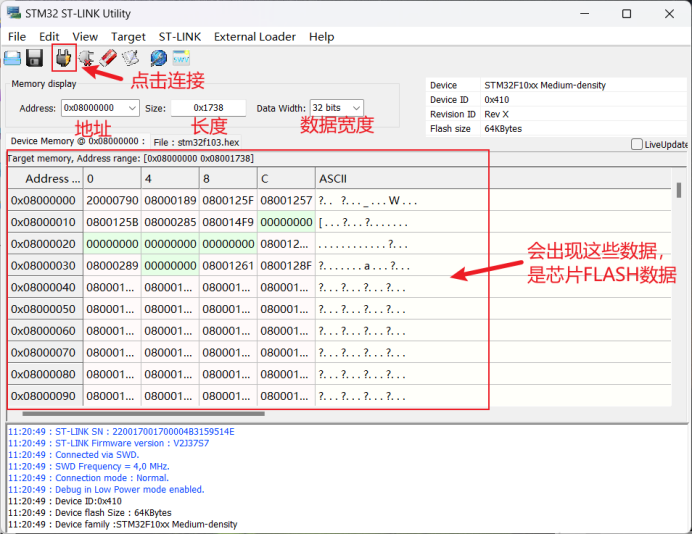
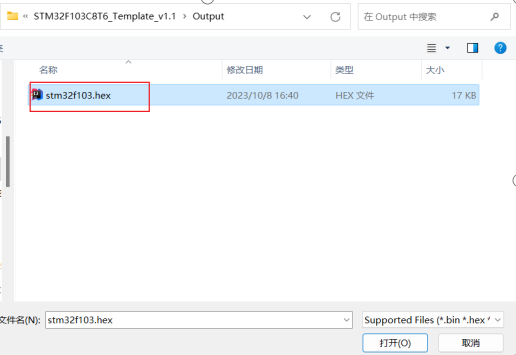
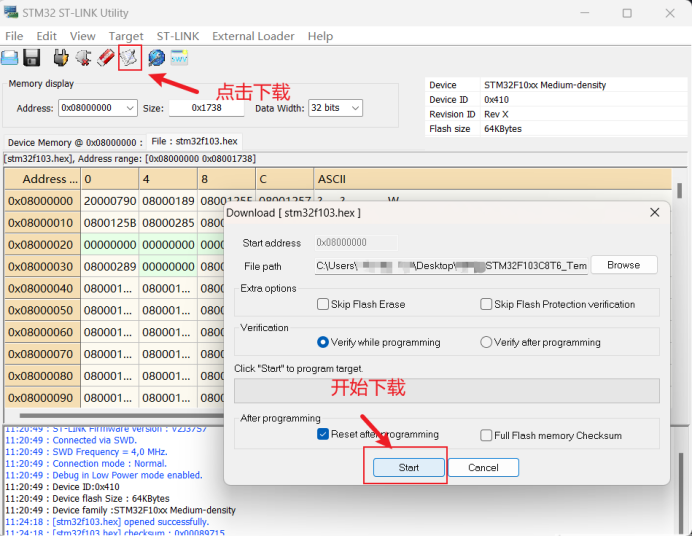
Here you need to select the hex file. If you are using the STM32F103C8T6 core board I recommended above, you can download the template project provided in 1. Preparing Installation Packages and Drivers and follow the steps. If you want to program your own code and do not have a hex file, you can generate it using MDK (Keil).
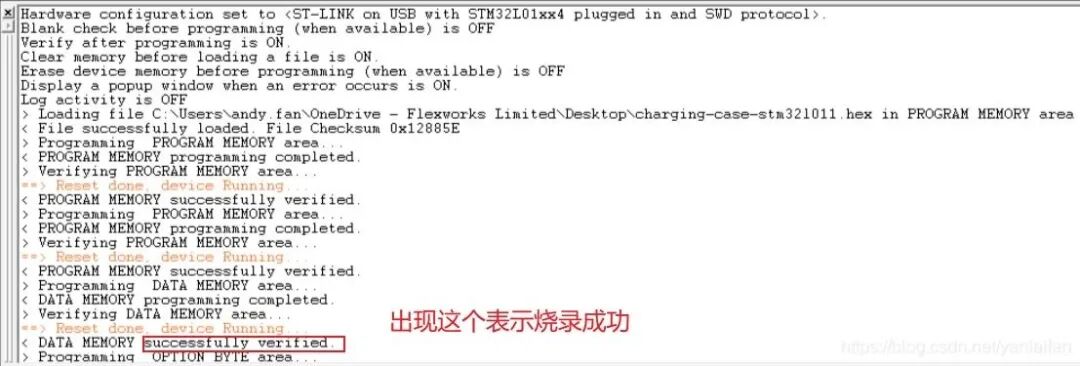
When you see “Verification…OK”, it means the download was successful.
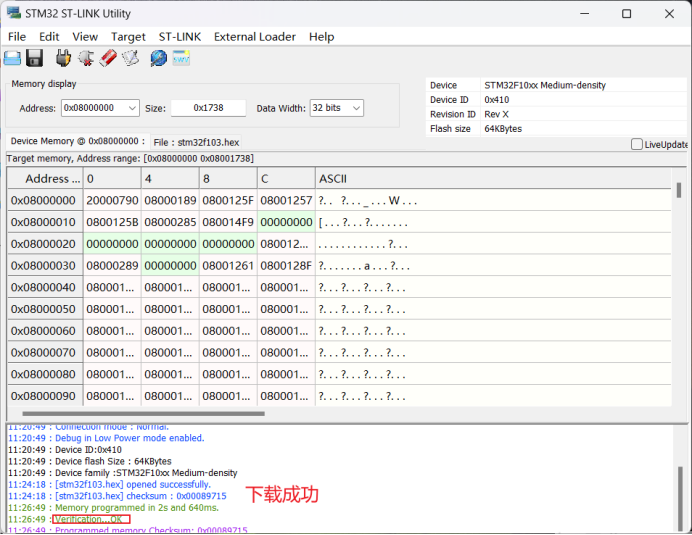
After the program is successfully downloaded, the board will automatically run the new code, and you will see the LED light blinking alternately every 500 milliseconds.
5. JLink Download
JLINK is a JTAG-compatible emulator that can program and debug.
To debug ARM, you need to follow the ARM debugging interface protocol, and JTAG is one of them. JTAG is an international standard testing protocol, also known as the ARM debugging protocol. Most advanced devices now support the JTAG protocol, such as DSP and FPGA devices.
Some online JLink downloads use JFlash, which I find a bit cumbersome as it requires downloading another software; you can directly use MDK.
-
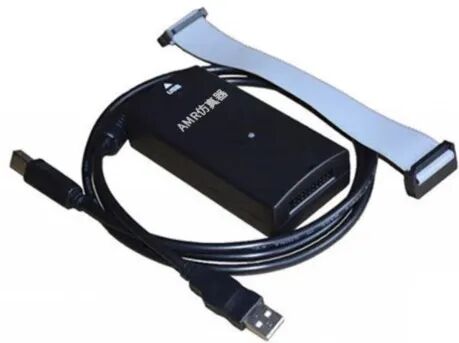
Need: J-Link Emulator Downloader
It supports KEIL, IAR, ADS, and other compilation and simulation software. Supported functions include JTAG, SWD, SWO, and VCOM modes. The official JLink price is over 2000 yuan, while the average price of clones on online stores is around 70, but they are prone to firmware loss (most sellers support re-flashing the firmware).
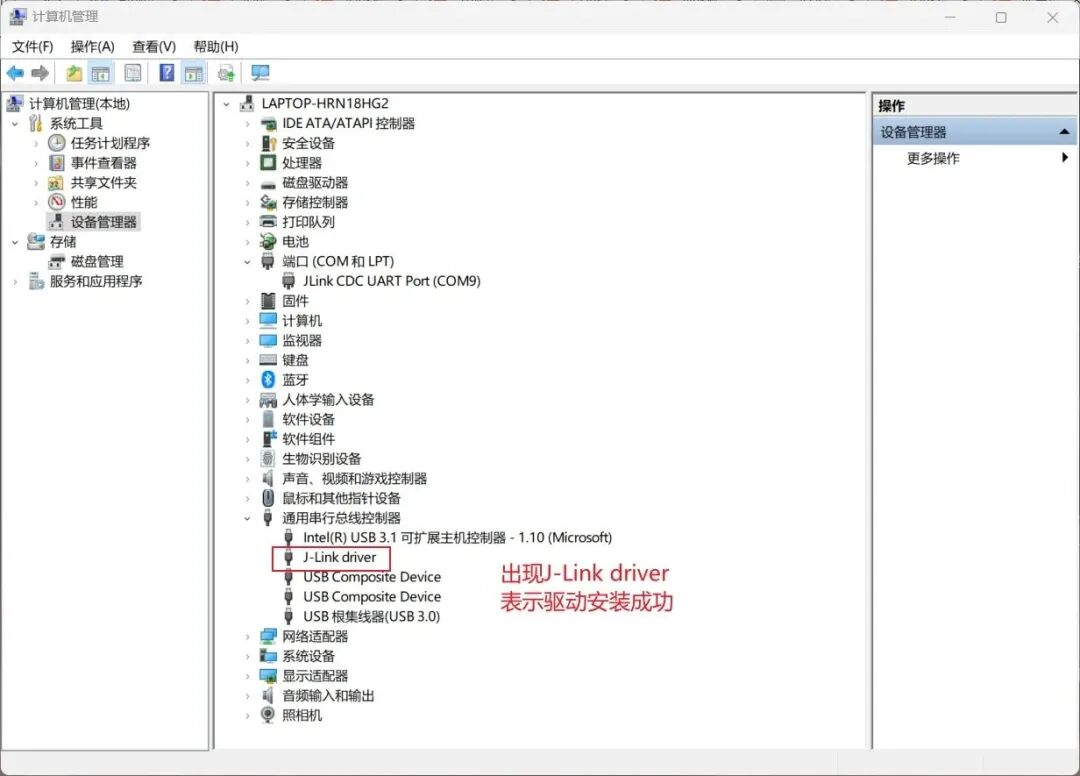
5.1 Installing J-Link Driver
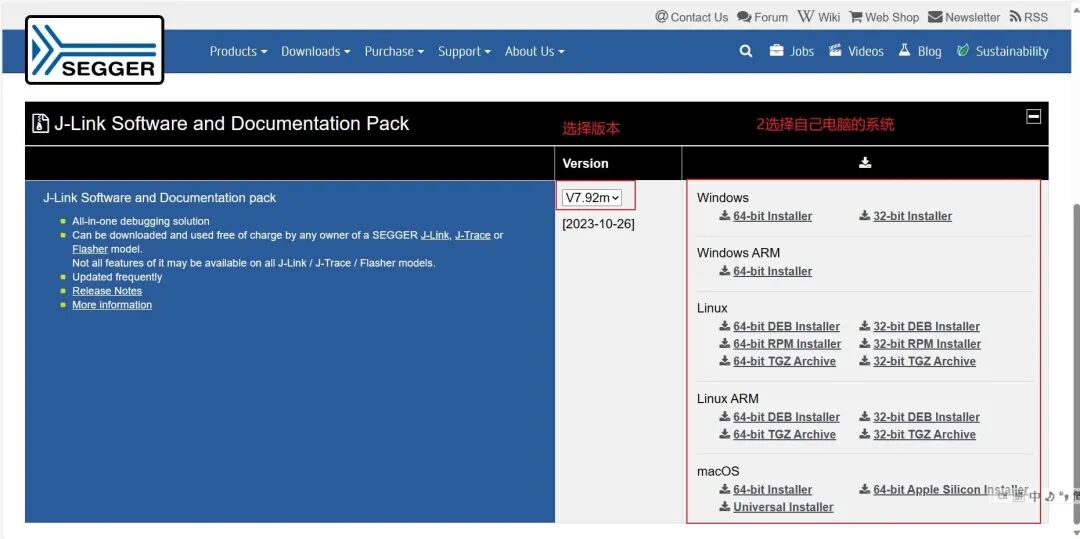
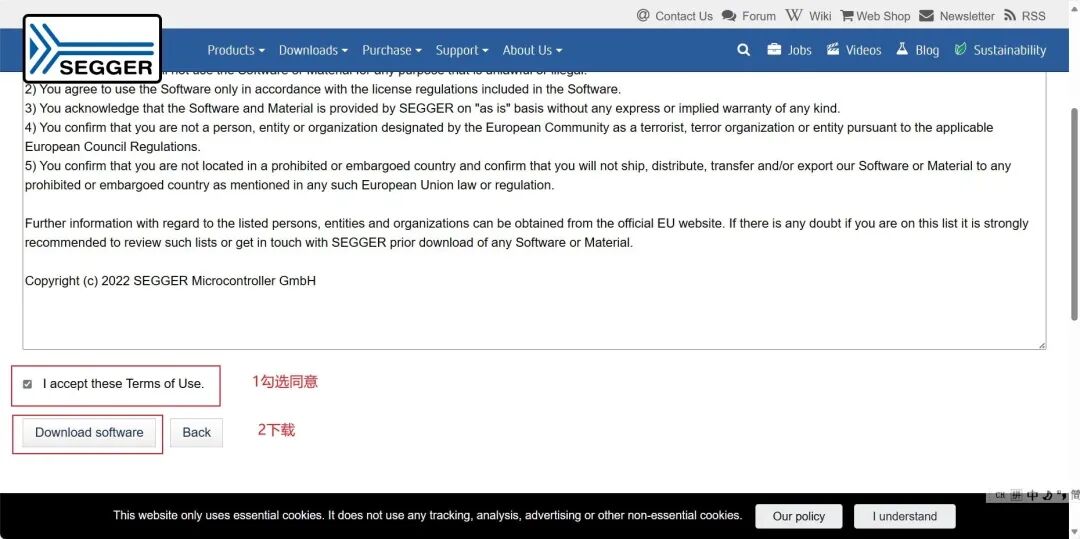
Download from the official website:
https://www.segger.com/downloads/jlink
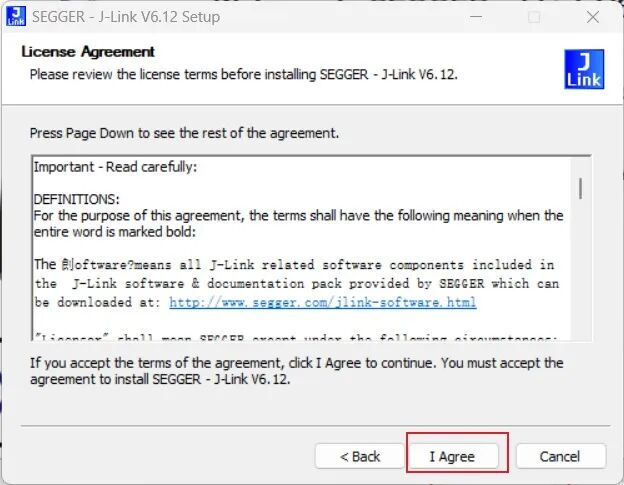
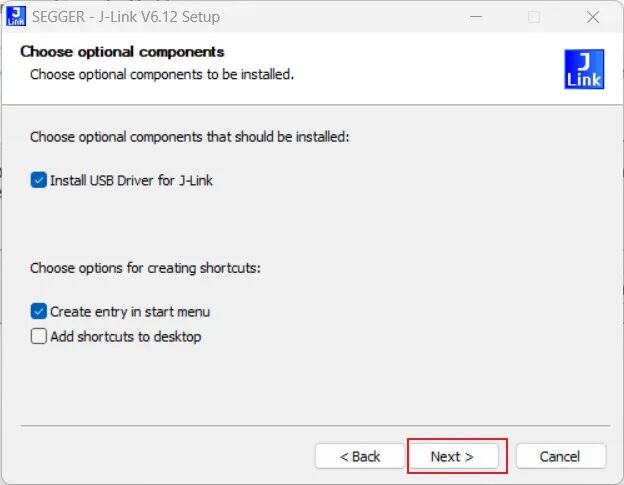
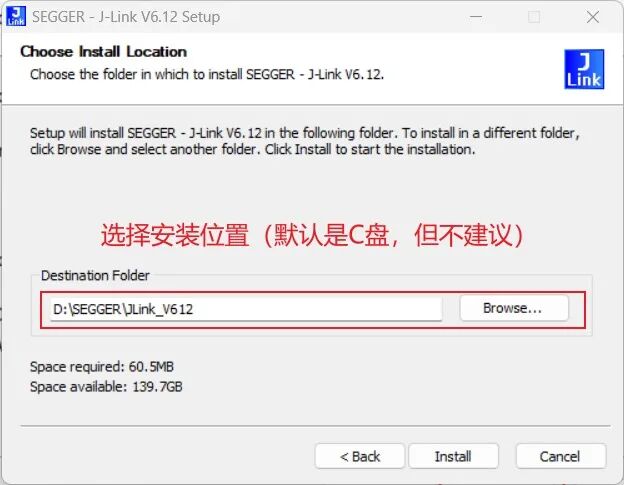
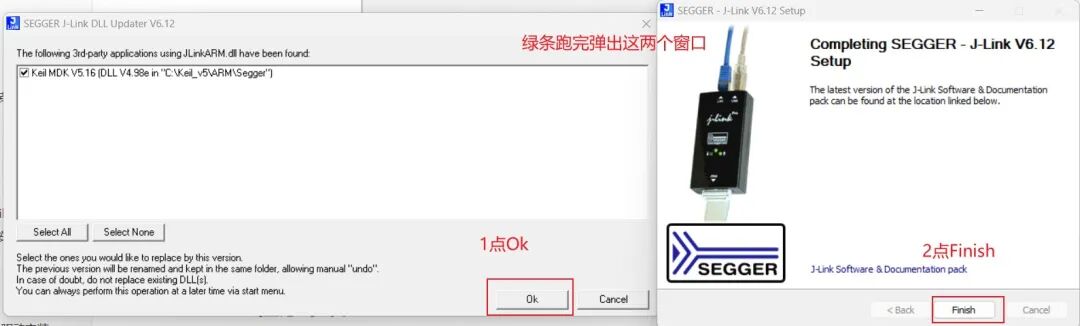
You can also use the driver installation package I provided; mine is V612, and it works with V1, V2, V8, and V9 emulators. Alternatively, you can ask the seller you bought it from; they usually have drivers (skip the next two images if you don’t go through the official website).
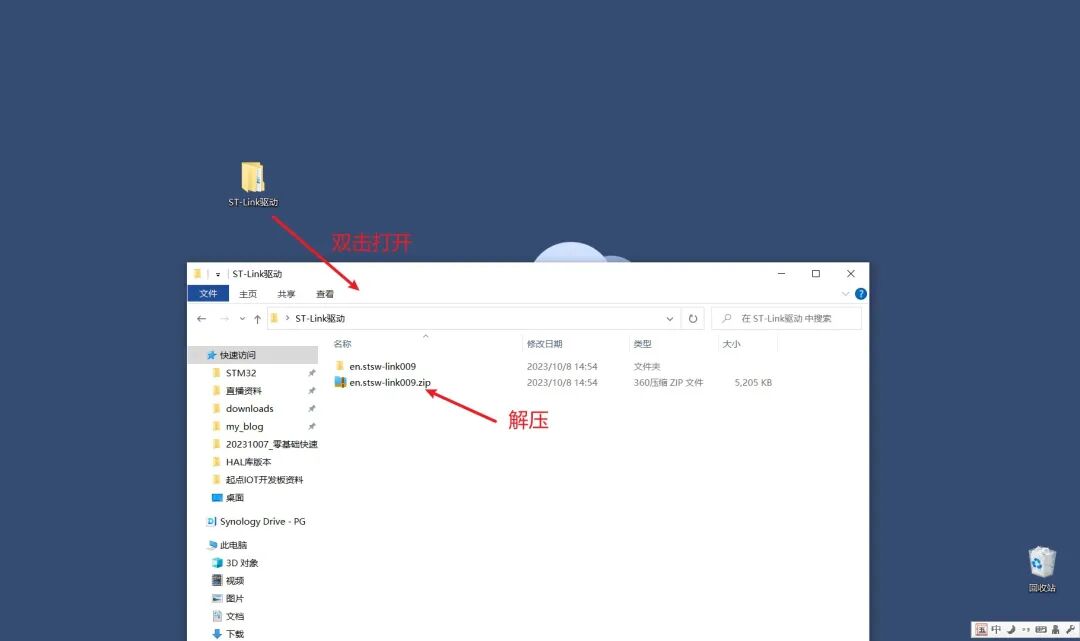
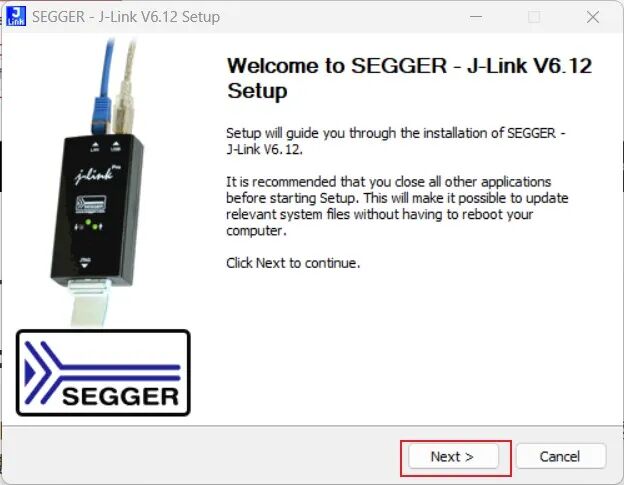
After installation, unzip and open the .exe file as shown in the image.

Follow the steps shown:
5.2 Hardware Wiring
To program STM32, you only need 4 Dupont wires, and the wiring is the same as for STM32 ST-LINK Utility download, using SWD interface mode. Here, VREF is the positive power supply.
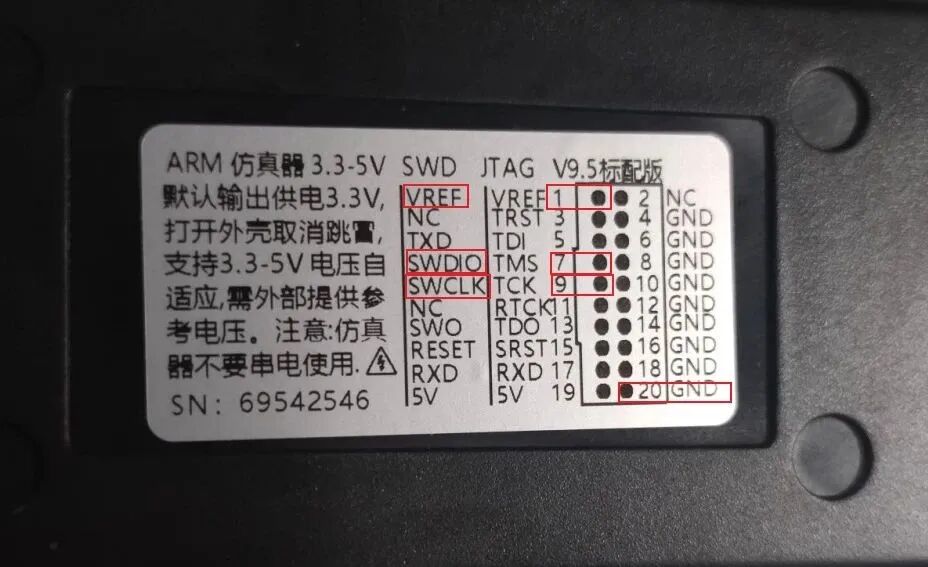
The wiring should be simple according to the diagram; 1, 7, and 9 are from the top row, and 20 is from the bottom row.
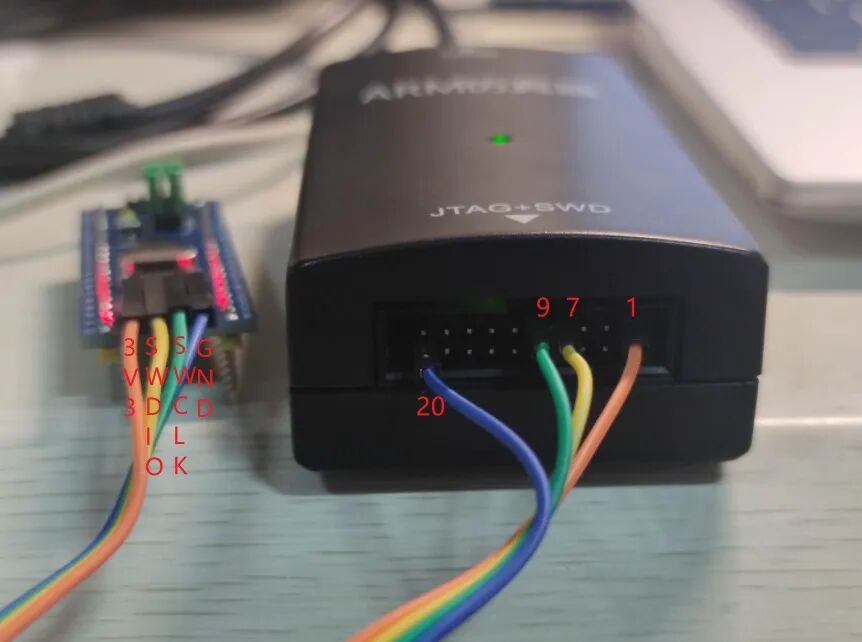
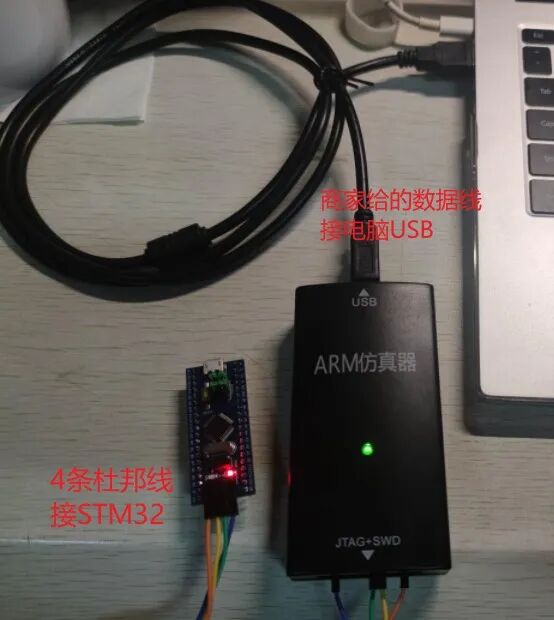
The overall connection looks like this:
5.3 Program Download
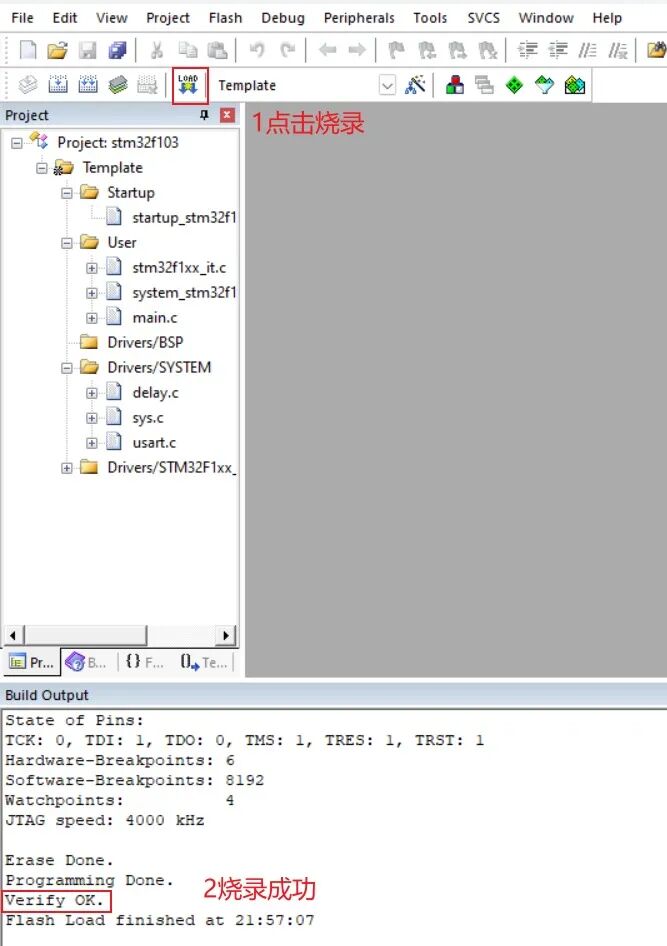
Use MDK5 to open the project (here I am using my template project), click the magic wand, and follow my operation.
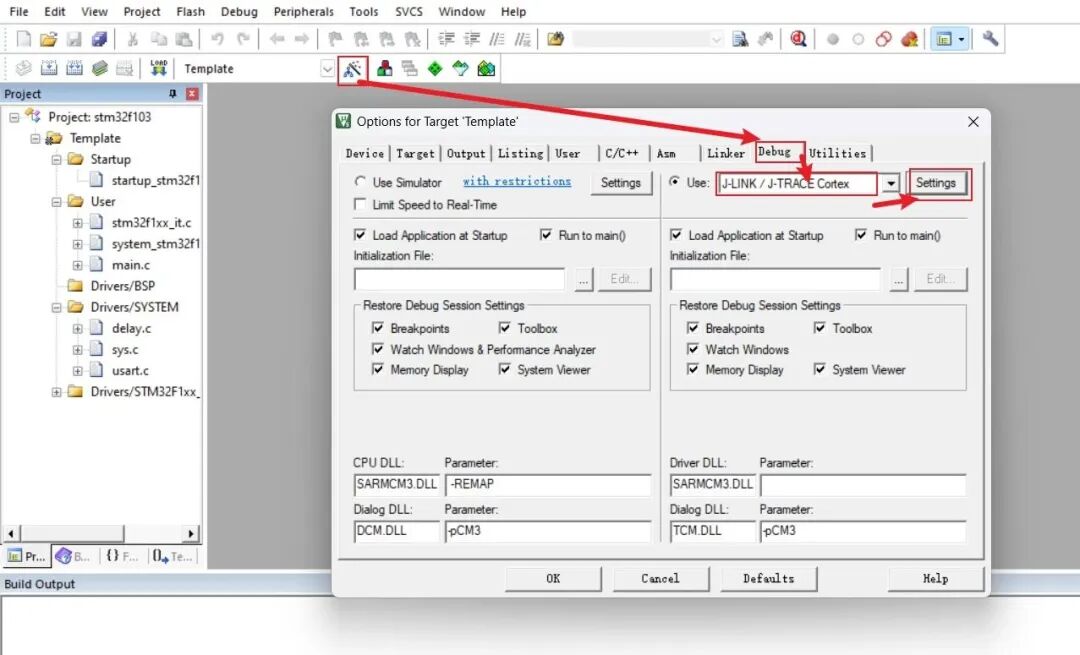
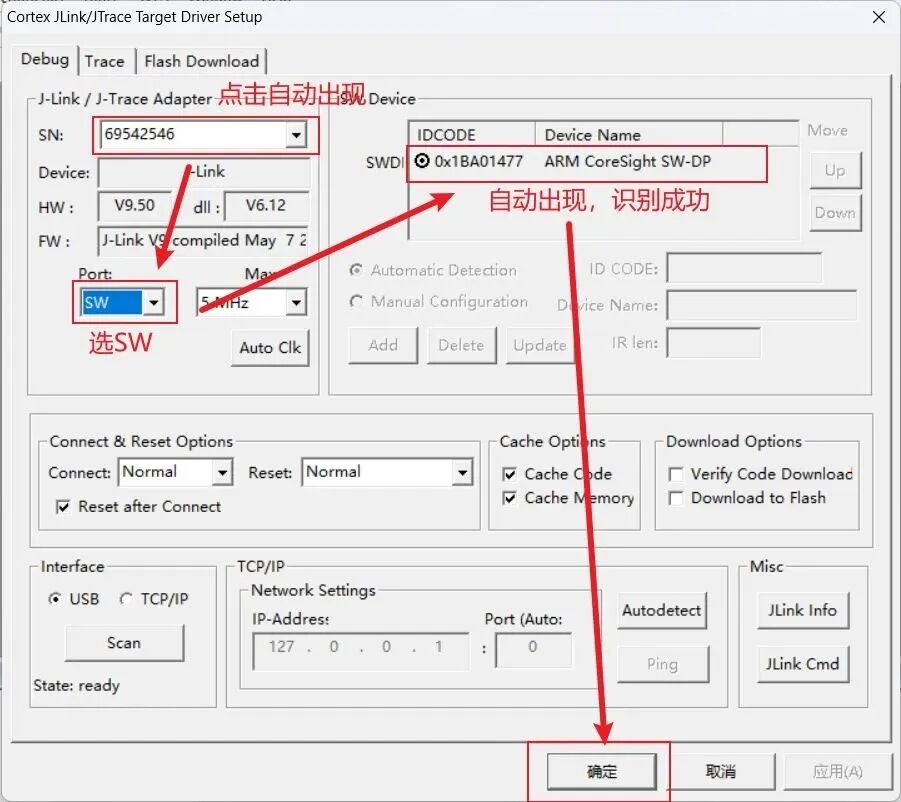
Generally, this setup should be sufficient. If the programming fails, you can refer to section 3.5.
6. STVP Download
STVP is an older download tool that supports ST7, STM8, and STM32 series. To be honest, this tool is too cumbersome from installation to use, and I really do not recommend using it.
-
Need: ST-Link Downloader
6.1 Installing STVP
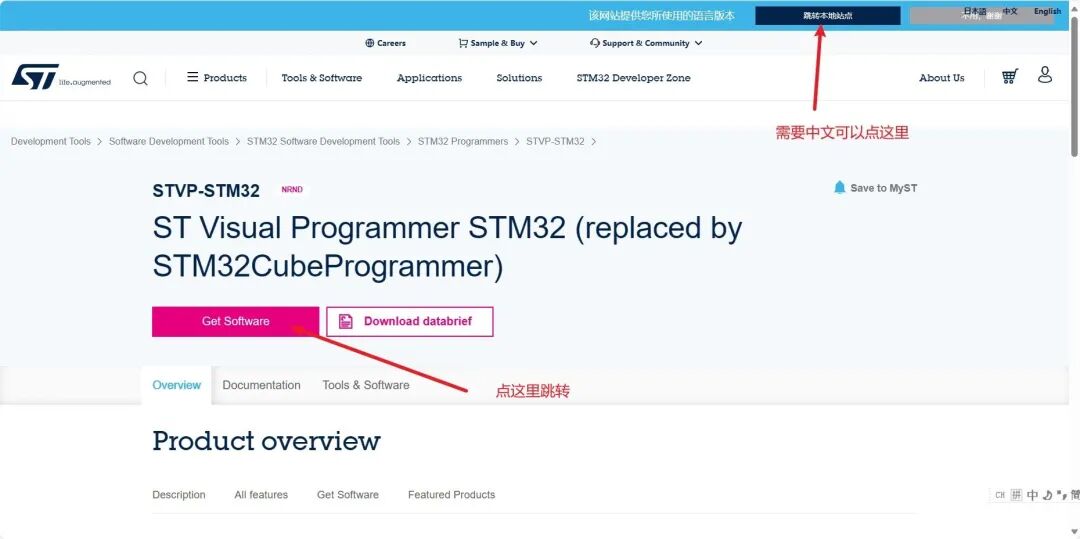
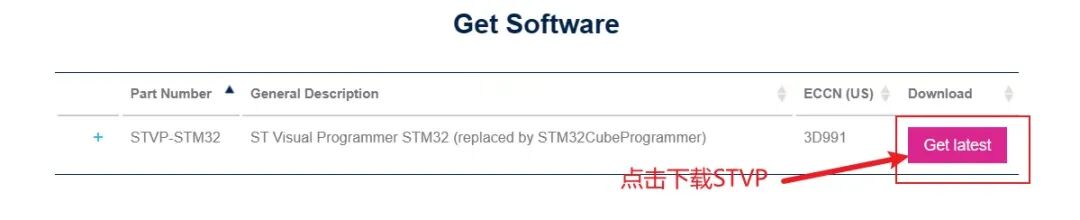
Download from the official website:
https://www.st.com/en/development-tools/stvp-stm32.html#get-software
Like ST-LINK Utility, the official website requires registration and email filling, which is quite troublesome, so I recommend directly using the installation package I prepared (1. Preparing Installation Packages and Drivers), which is also downloaded from the official website.
The installation process is also just click Next all the way. Since I cannot take screenshots during installation, I took a few key steps.
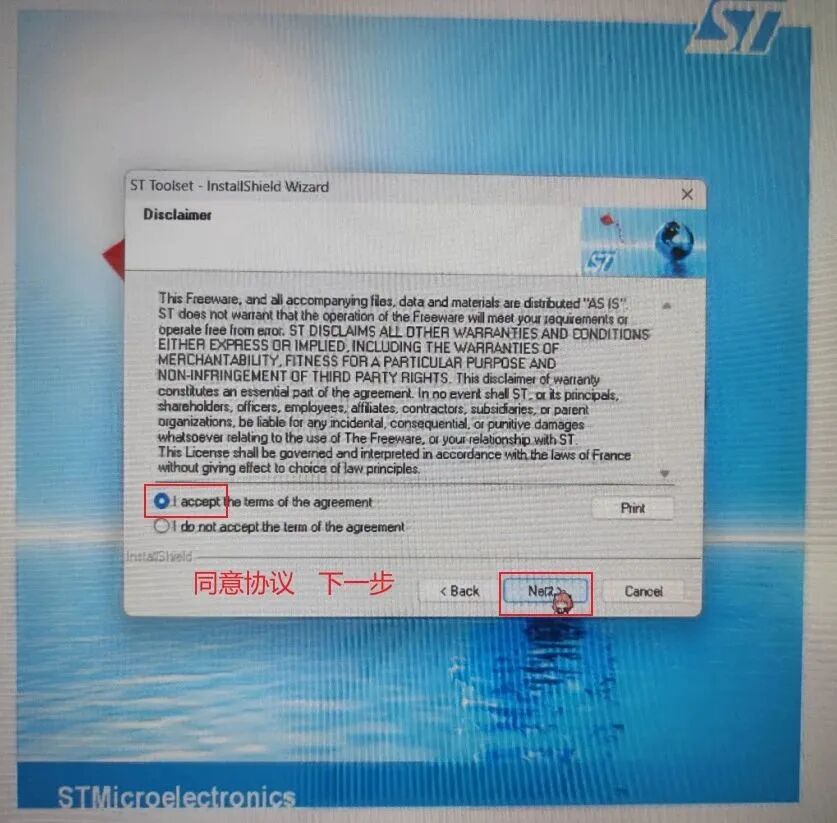
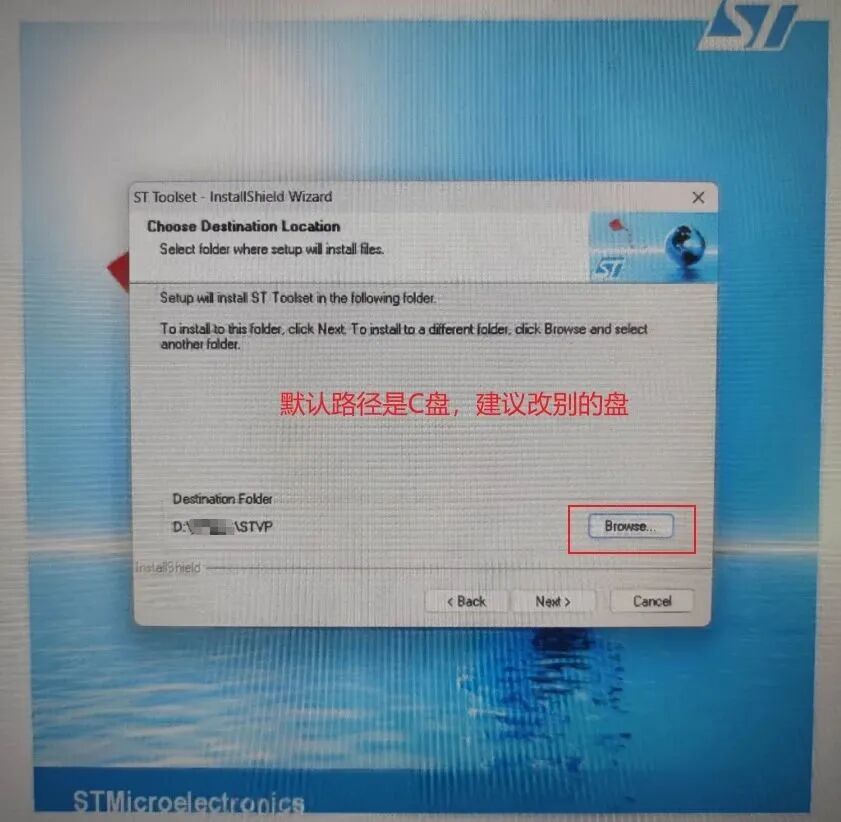
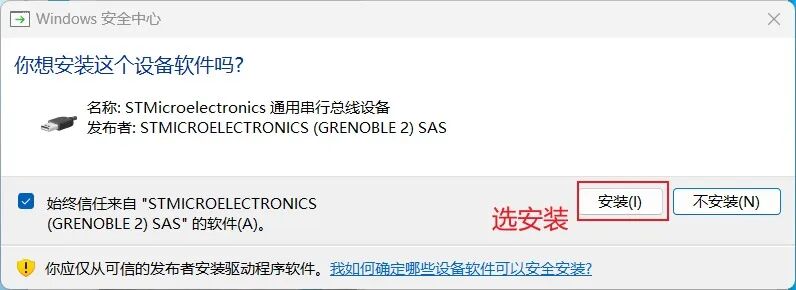
PS: After installation, you will see STVD and STVP; we will use STVP.
- STVD: ST Visual Develop, a visual development tool
- STVP: ST Visual Programmer, a visual programming tool
6.2 Hardware Connection
Like in section 3.4, connect ST-Link V2 and STM32 pins one-to-one, connect as shown in the figure, and plug it into the computer.
ST-Link V2 STM32
SWCLK —— SWCLK
SWDIO —— SWDIO
GND —— GND
3.3V —— 3V3
6.3 Program Download
After installation, you will see this icon on the desktop; click to open it.

Here, using the ST-Link downloader and STM32F103C8T6 core board as an example:
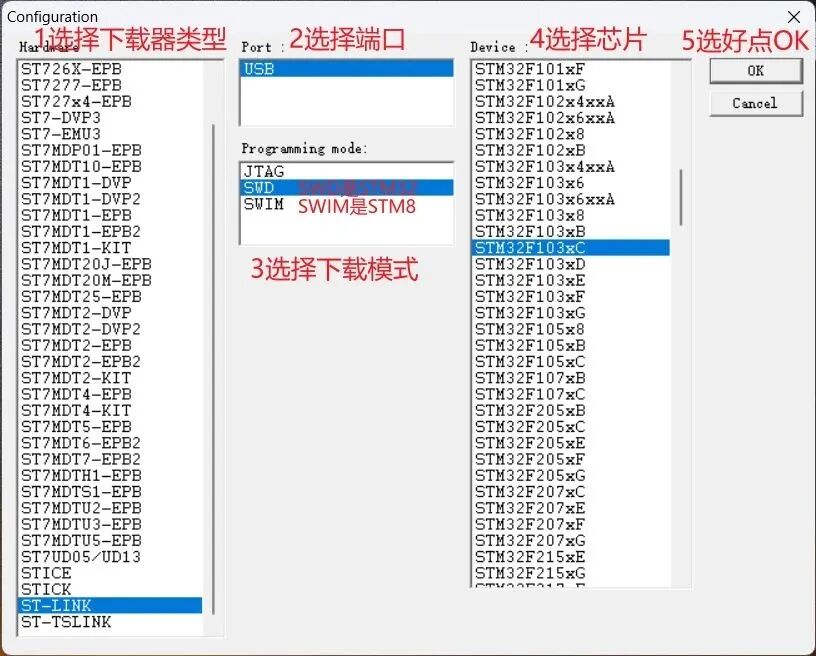
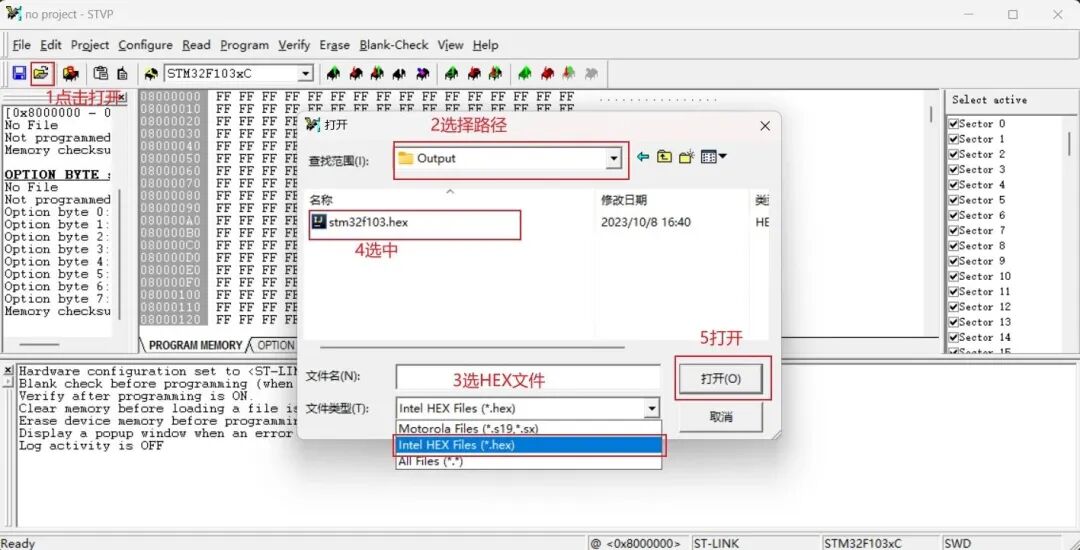
A new window will pop up; operate as shown. Here, I am opening the template project provided in 1. Preparing Installation Packages and Drivers. You can select your own project; if you do not have a hex file, you can generate it using MDK (Keil).

7. Summary
For beginners, it is not necessary to master so many programming methods. Among my fellow programmers, everyone prefers to use ST-Link V2 with MDK5 for writing and programming, so I recommend beginners start with the ST-Link V2 programming method, which is more convenient and quick.
Thank you for reading, peace and love!
Tips:
- Differences between hex files, bin files, and axf files:
Hex files, bin files, and axf files are common file formats in embedded system development used to store compiled program code and data.
Hex File (Intel HEX): A hex file is a hexadecimal text file format used to represent the binary content of program code and data. It consists of a series of hexadecimal values, each corresponding to a byte of data. Hex files typically contain address information, data record types, and actual data content. It is a common file format widely used in programming devices, debugging tools, and emulators.
Bin File (Binary): A bin file is a raw binary file format that directly stores program code and data in binary form. Unlike hex files, bin files are not encoded in hexadecimal but are stored according to the actual byte values. Bin files can represent the original binary data of the program more intuitively, but they lack address and other metadata information, so additional processing is required during programming and debugging.
Axf File (ARM eXtended Format): An axf file is a specific format developed for ARM architecture that contains executable program code, data, and symbol table information. Axf files are typically generated by ARM development toolchains and can include symbol tables, debugging information, and other additional metadata produced by the linker. Axf files are very useful during debugging, allowing you to view and analyze the program’s structure, variable information, etc.