Most routers on the market that support offline downloading are priced above 300 yuan and often have poor stability, especially for BT downloads. To achieve low-cost and stable offline downloading, we can modify a regular 3G router.
Offline downloading with a router means that the router can download files even when the computer is turned off, thus saving resources. 3G routers generally come with USB and Ethernet ports but do not support offline downloading. Can we connect a USB flash drive to the USB port and use the home broadband to achieve offline downloading? The answer is yes.
I selected the TP-Link WR703N (hereinafter referred to as 703N) for this project. This router has 32MB of RAM and 4MB of Flash, which is sufficient to install OpenWRT. However, integrating many software applications makes the 4MB Flash quite limited. Offline downloading consumes a lot of system resources, and the 32MB of RAM significantly affects system stability. Therefore, I plan to upgrade the RAM to 64MB and the Flash to 8MB.
Testing revealed that the latest v1.6 version of the 703N cannot be flashed with OpenWRT due to Flash incompatibility, but switching to the 8MB Flash described below allows it to run normally. It is recommended to use version v1.5. If you cannot find an older version of the 703N, you can use alternatives such as the FAST FWR171-3G or MERCURY MW151RM3G, which have identical hardware configurations to the 703N.
1. Hardware Modification and Flashing of the 703N
Open the case of the 703N. On the front of the motherboard, the long rectangular chip is the memory of the 703N. On the back of the motherboard, the small 8-pin chip is the Flash chip. Our target is these components (Figure 1).
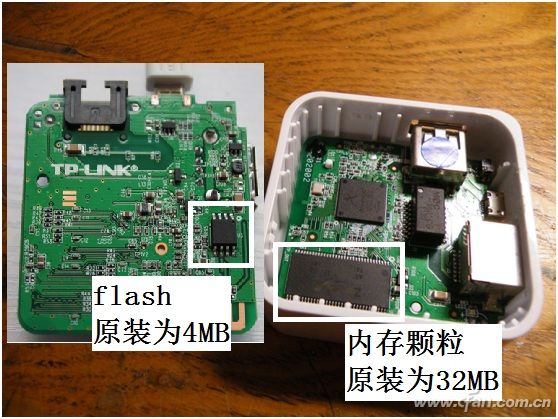
Figure 1
1. Hardware Selection
Memory Chip: The original memory of the 703N uses a 16-bit, 32MB (256MBit), 400MHz chip. The memory I used is the Hynix HY5DU121622CTP-D43 (Figure 2), which was taken from a 256MB first-generation memory (four memory chips) and is 64MB (512MBit). Most first-generation memory on the market uses 8-bit memory chips, so be sure to check the model of the memory chip carefully before purchasing.
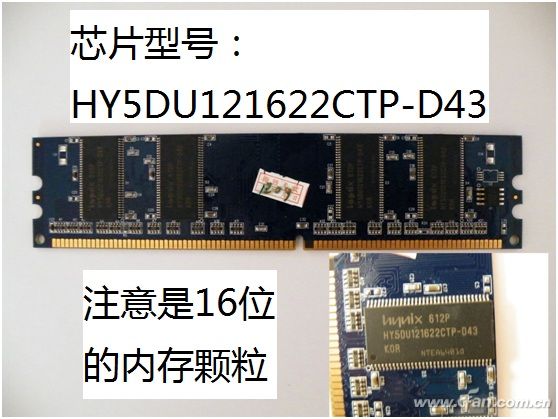
Figure 2
Flash Chip: Look for an 8MB SPI Flash chip. The chip model I used is: MX25L6445EM2I-10G.
Programmer: You need a programmer that can program MX25 series chips. The programmer’s role is to write firmware to the Flash chip, which can then be soldered directly onto the router for immediate use, making it very convenient (Figure 3).
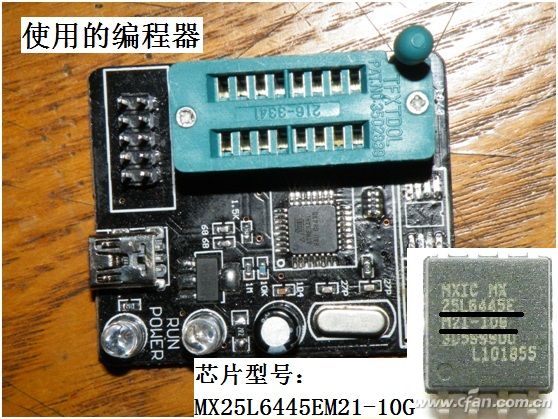
Figure 3
2. Hardware Modification and Flashing
Step 1. First, we will solder the memory chip. Note that one corner of the chip has a small dot, which should correspond to the small dot on the motherboard.
Step 2. The MAC address is the unique identifier for the network card. If two routers with the same MAC address operate in the same area, it will cause conflicts. If you use the same programmer firmware to flash multiple machines, all the flashed routers will have the same MAC address.
(1) If using only one 703N, there is no need to modify the MAC address: Place the purchased 8MB Flash chip onto the programmer and directly flash the firmware provided in the attachment. Then solder the flashed Flash chip onto the router. Access the router management interface and upgrade with the firmware named 703n.bin, ensuring to check the option to not retain the configuration. This completes the upgrade.
(2) If using multiple 703Ns, modify the MAC address: Here is a method to change the MAC address using the programmer. ① Remove the Flash from the router and back up the data inside using the programmer, selecting to back up as a 4MB data package. ② Replace it with the newly purchased 8MB Flash, write the backed-up data from step one into it, and then solder the programmed Flash onto the router. ③ At this point, it will have the original factory firmware. In the management interface, find the firmware upgrade option and upgrade with the firmware named openwrt-703n-factory.bin. ④ Access the router management interface and upgrade with the firmware named openwrt-703n.bin. Be sure to not retain the original settings. ⑤ After the upgrade, access the router management interface again and upgrade with the firmware named 703n.bin. This way, the upgraded router will retain the original MAC address.
Step 3. Modify the external antenna to enhance the signal. For detailed modification plans, refer to the 2012 issue 17, page 52 of this magazine titled “DIY Wireless Network Gain”.
2. Configure Software for Sharing and Offline Downloading
1. Set up mounting for network sharing
Step 1. First, format the USB flash drive/external hard drive to NTFS format, then insert the formatted storage device into the USB port of the 703N. For easier mounting, it is recommended to partition the USB flash drive/external hard drive. Please note that the 703N’s built-in power supply is 5V/1A, while external hard drives require more power, so it is advisable to provide external power to the hard drive.
Step 2. In the router management interface, click “System → Mount Points → Modify”; check the option to enable the mount item, change the mount point to /mnt; set the file system to “Custom” and enter ntfs-3g. Finally, click “Save & Apply”.
Step 3. After waiting for the refresh to complete, click “System → Mount Points”. The last item in the mounted file systems should show the USB flash drive or external hard drive that was just inserted. If it does not appear, please restart the router (Figure 4).
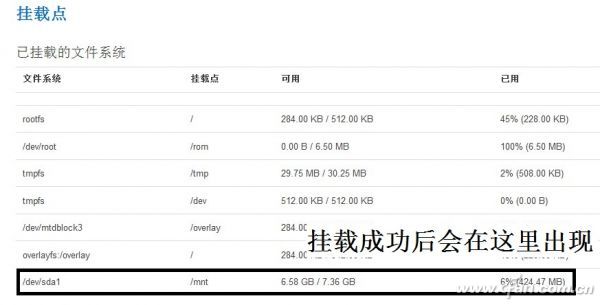
Figure 4
Step 4. In the router management interface, click “Services → Network Sharing”. In the “Shared Directory” section, change the name to download, set the directory to /mnt, uncheck the read-only option, and check the allow anonymous users option. Enter 0777 for both new file permissions and new directory permissions. Click “Save & Apply” (Figure 5).

Figure 5
Step 5. Close the router management interface, double-click “My Computer”, and enter \192.168.1.1 in the address bar to see the shared folder you just set up. The default is OpenWrt; double-click to enter and you can also transfer files into it.
Step 6. The above five steps will enable network sharing. Next, you can add a network location in My Computer. Here’s how to do it in Windows 7. Right-click in an empty area of My Computer, select “Add a Network Location” from the dialog that appears, and follow the prompts. In the specified website location, enter \192.168.1.1\download, and then follow the prompts to complete. Once established, a new network location will appear in My Computer, which is the USB flash drive/external hard drive connected to the 703N.
2. Set up offline downloading for BT/PT
Step 1. In the router management interface, click “Services → Transmission”. Check the box in the “Enable” section, change the “Configuration Directory” to /mnt/transmission; in the “File Location” section, find the “Download Directory” and change it to /mnt/download; in the “RPC Settings” section, uncheck the “Enable RPC Directory” option. Finally, click “Save & Apply”.
Step 2. Open a browser and enter http://192.168.1.1:9091. Click the icon in the upper left corner, and in the pop-up dialog, click “Browse” to upload the BT seed. Finally, click upload, and the system will automatically start downloading. The third icon in the lower left corner, resembling a wrench, is the settings icon, where you can set speed limits, download time limits, etc. To ensure stability, it is recommended to limit the download speed.
Step 3. Once the file download is complete, open My Computer, enter \192.168.1.1 in the address bar, open the folder, and find the folder named download, which contains the files downloaded offline.
3. Set up offline downloading for HTTP and FTP
Step 1. In the router management interface, click “System → Startup Items” and enter aria2c –event-poll=select –enable-rpc –rpc-listen-all=true –rpc-allow-origin-all –dir=/mnt/download –file-allocation=none -c –D in the “Local Startup Script” section. Click “Submit” and then restart the router (Figure 6).

Figure 6
Step 2. Install Aria2c Remote (attachment). After installation, do not open the software. Copy the Aria2cRemoteControl_cn.qm file from the attachment into the languages folder in the installation directory. Open Aria2c Remote, select “Languages” from the “Tools” menu, and choose Chinese. Click “Tools”, select “Options”, and fill in the router management address, which defaults to 192.168.1.1. In the menu bar, find the icon “Add HTTP/FTP” and enter the address of the file you want to download in the pop-up dialog.
Step 3. You can now close the software, and the router will automatically download the file. Once the download is complete, enter \192.168.1.1 in the address bar of My Computer, open the folder, and find the download folder, which will contain the files you downloaded.
Attachment download: http://pan.baidu.com/share/link?shareid=288401&uk=3425986022
This article is aimed at older devices with lower configurations. For newer, higher-configured routers without offline functionality on USB ports, no modification is necessary, and readers can skip the first part and proceed directly to the subsequent sections.
