 Follow the aboveHaodao Linux, reply with materials, to obtain a wealth of learning resources on Linux, Python, network communication, network security, and more!
Introduction
Hello everyone, this is Haodao Linux, mainly sharingLinux, Python, network communication, network security, and other related IT knowledge platforms.
Today, Haodao will share a very practical and powerful Linux command, nc, which is widely used for network-related troubleshooting. This article will provide a detailed analysis of its command usage through numerous examples. If you are interested, you can bookmark it for future reference!
1. Introduction to the nc Command
nc, short for netcat, is a powerful network tool known as the Swiss Army knife of the networking world. It can read and write data across networks based on the command line, connect to and scan specified port numbers, and supports both TCP and UDP protocols, providing engineers with unlimited potential functionalities. Whether you are a system administrator or a network engineer, being familiar with this command can significantly enhance your efficiency, especially in troubleshooting various network issues.
Netcat literally means “network cat”; in Linux systems, the actual command executed by nc is ncat. The main functions of the nc command are as follows:
- Listen on any TCP/UDP port; nc can act as a server to listen on a specified port using TCP or UDP.
- Port scanning; nc can act as a client to initiate TCP or UDP connections.
- File transfer between servers.
- Network speed testing between servers.
2. Usage of the nc Command
1. Installing the nc Command
On CentOS 7, the installation command is as follows:
yum install -y ncAfter successful installation, check the nc version as follows:
[root@master ~]# nc --versionNcat: Version 7.50 ( https://nmap.org/ncat )2. Common Syntax Format of the nc Command
nc [options] domain/IP address [port]3. Common Options of the nc Command
-h: online help; -v: show command execution process; -u: specify the transport protocol as UDP, default is TCP; -z: use zero input/output mode, only used when scanning communication ports; -l: use listening mode, indicating that nc acts as a server, listening and accepting connections, controlling incoming data; -w: sets the timeout in seconds, followed directly by a number;4. Environment Preparation
The following examples are tested using two servers: Server 1 IP: 192.168.20.231 Server 2 IP: 192.168.20.232
Both servers have their firewalls turned off during testing;
3. Classic Practical Cases of the nc Command
1. Testing whether the TCP or UDP port of the server host is functioning properly
This testing scenario is common in operations work. After deploying various services, if you find that the service cannot be accessed normally, you must first ensure that the network is functioning correctly. In addition to testing the link, the service port must also be tested, as sometimes firewall policies are not set correctly, leading to inaccessible service ports. There are many methods to test TCP ports, but fewer for UDP. The following tests for both TCP and UDP ports are based on the nc command.
(1) Testing whether a specific TCP port between Server 1 and Server 2 is functioning properly by starting a TCP listening port with nc;
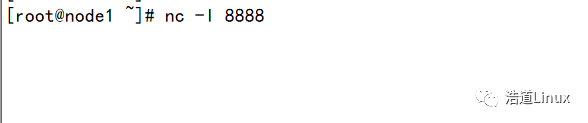
1) Use nc as the server to start a TCP listening port, for example, on Server 2, start listening on port 8888. The command is as follows:
nc -l 8888At this point, Server 2 is in TCP listening mode, as shown in the following image:
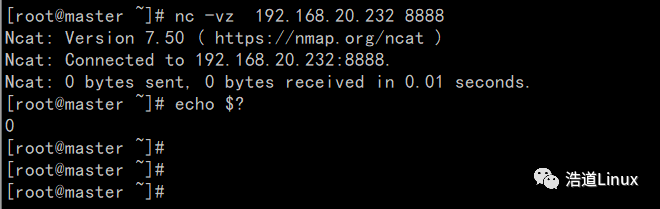
2) Now, on Server 1, use nc as the client to test whether the port is functioning properly. The command is as follows:
nc -vz 192.168.20.232 8888If the result appears as shown in the following image, such as 1 bytes sent, 0 bytes received in xxx seconds, then the TCP port is open; if the port is open, the command return code is 0.
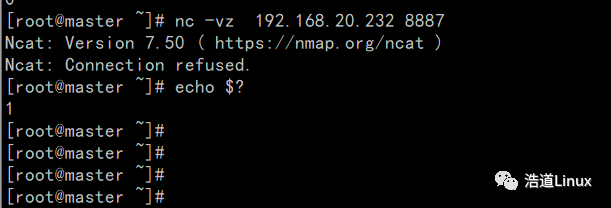
If the result appears as shown in the following image, such as Connection refused, it indicates that the TCP port is closed. If the port is closed, the command return code is 1.
(2) Testing whether a specific UDP port between Server 1 and Server 2 is functioning properly by starting a UDP listening port with nc;
1) Use nc as the server to start a UDP listening port, for example, on Server 2, start listening on port 9999 (note that this port should not be occupied on Server 2). The command is as follows:
nc -lu 9999At this point, Server 2 is in UDP listening mode, as shown in the following image:

2) Now, on Server 1, use nc as the client to test the network connectivity. The command is as follows:
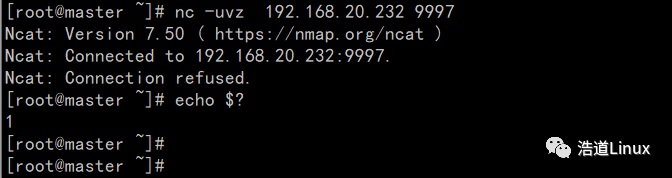
nc -vuz 192.168.20.232 9999If the result appears as shown in the following image, such as 1 bytes sent, 0 bytes received in xxx seconds, then the UDP port is open; if the port is open, the command return code is 0.
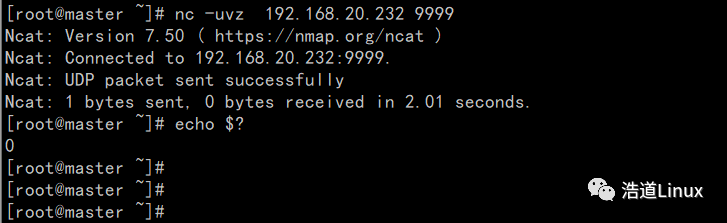
If the result appears as shown in the following image, such as Connection refused, it indicates that the UDP port is closed. If the port is closed, the command return code is 1.
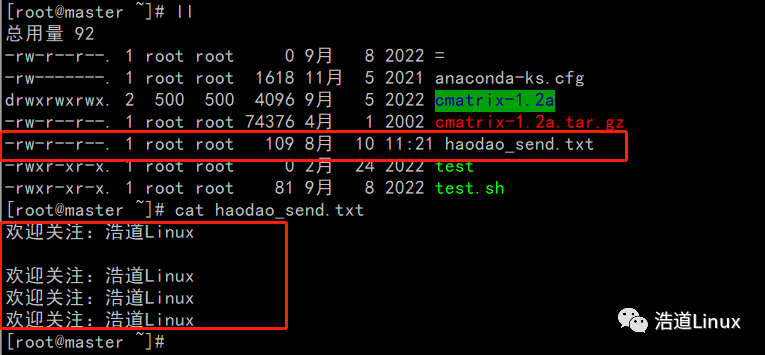
2. Transferring Files or Directories Between Two Servers Using the nc Command(1) Transfer the haodao_send.txt file from Server 1 to Server 2, renaming it to haodao_rece.txt; 1) The content of the haodao_send.txt file on Server 1 is shown in the following image:
2) Start the receiving listening port service on Server 2;
nc -l 9898 > haodao_rece.txtThis means that all data received on port 9898 will be written to the haodao_rece.txt file (the filename can be defined by yourself).
3) On Server 1, send data to Server 2 on port 9898, sending the haodao_send.txt file;
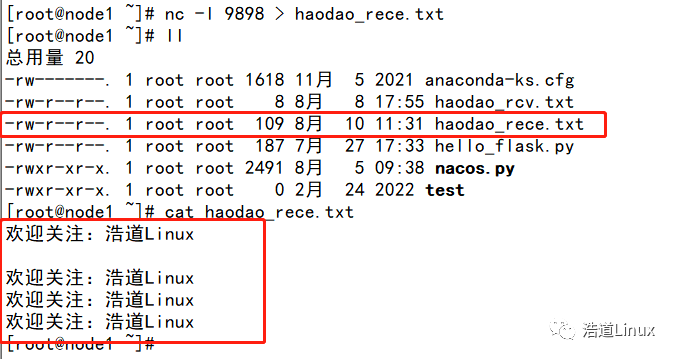
nc 192.168.20.232 9898 < haodao_send.txt4) After Server 2 finishes receiving, it will automatically disconnect the listening connection. At this point, you can check that the received file is the same as the sent one, as shown in the following image:
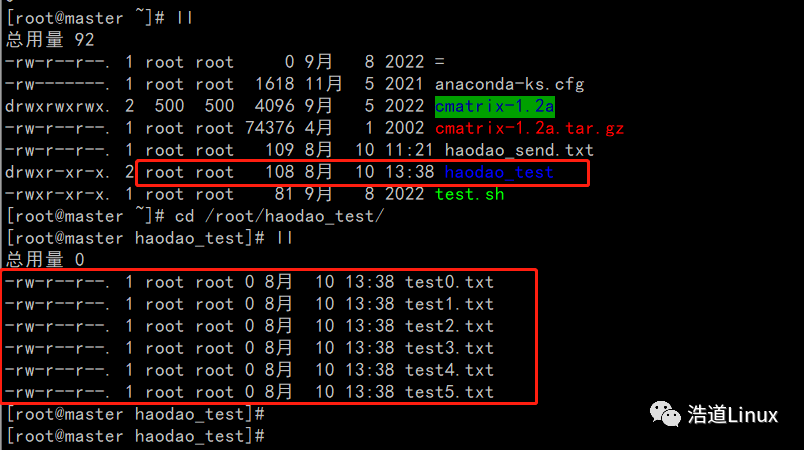
(2) Transfer the haodao_test directory (which contains multiple files) from Server 1 to Server 2; 1) The directory structure of /root/haodao_test on Server 1 is shown in the following image:
2) Start the receiving listening port service on Server 2;
nc -l 9898 | tar -xzvf -3) On Server 1, package and send data to Server 2 on port 9898, sending the haodao_test directory and its files;
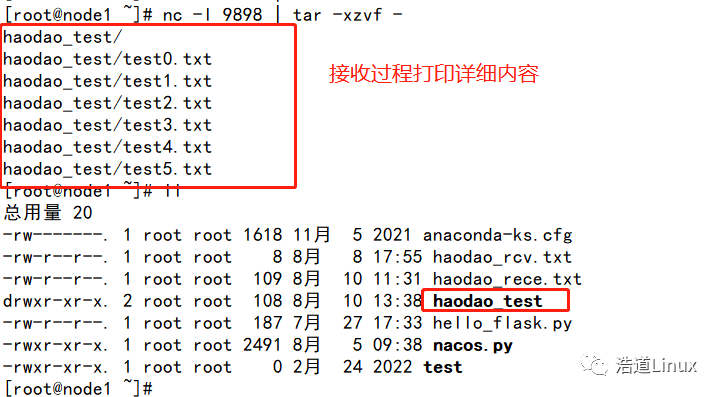
tar czvf - haodao_test |nc 192.168.20.232 98984) After Server 2 finishes receiving, it will automatically disconnect the listening connection. At this point, you can check that the received files are the same as the sent ones, as shown in the following image:
3. Testing Network Speed Between Two Servers Using the nc CommandThis speed test principle utilizes file transfer, specifically sending /dev/zero from Server 1 to /dev/null on Server 2, which is equivalent to sending an infinite number of zeros from Server 1 to an empty device on Server 2. The dstat command is used to monitor the network speed.
1) Install the dstat command on both servers to monitor network speed;
yum install -y dstat2) Start the receiving listening port service on Server 2, listening on port 9696, outputting all data from this port to /dev/null;
nc -l 9696 > /dev/null 3) On Server 1, send data to Server 2 on port 9696, sending an infinite number of zeros to Server 2’s port 9696;
nc 192.168.20.232 9696 < /dev/zero4) Open another SSH window on Server 1 and execute the dstat command to view the network speed, as shown in the following image:
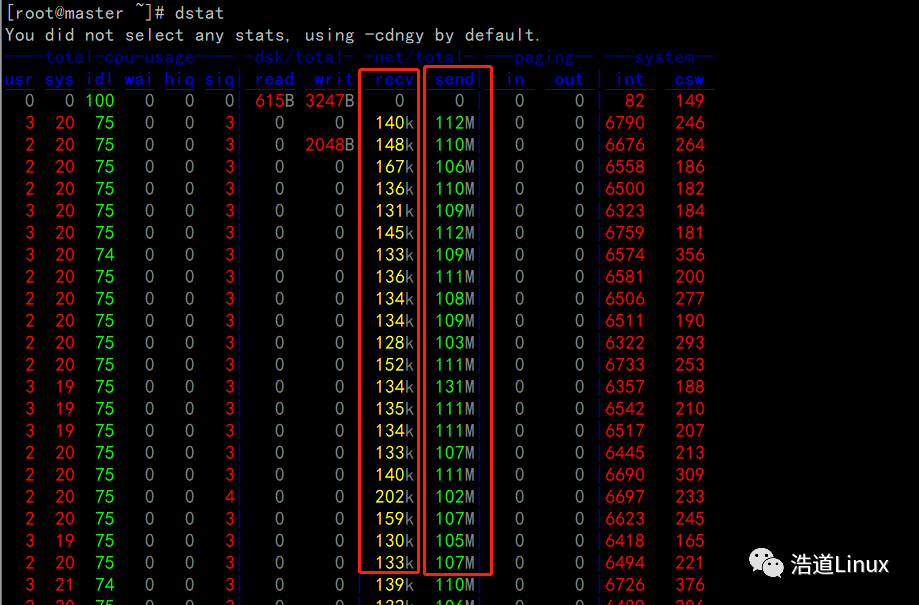
You can see that Server 1 received about 140K and sent about 110M;
5) Open another SSH window on Server 2 and execute the dstat command to view the network speed, as shown in the following image:
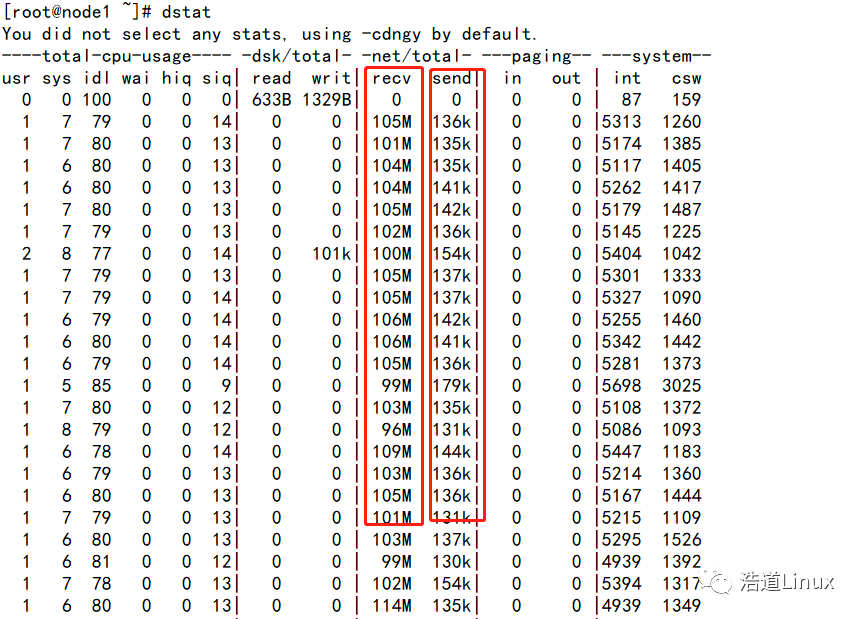
You can see that Server 2 received about 105M and sent about 140K;
4. Conclusion
The nc command has many functions, and if you are interested, you can explore its features. This article lists some commonly used functionalities in operations or testing work. Its simplicity and practicality help us appreciate this testing tool.
More Exciting Content
Follow the public account「Haodao Linux」
Haodao Linux, focusing onLinux system knowledge,network communication,network security,Python-related knowledge, and covering skills related to the IT industry, combining theory and practice to truly apply what you learn in your work. We will also share some interview experiences to help you find high-paying offers. Let’s learn together, progress together, and increase our salaries! We look forward to your joining~~~Follow and reply “materials” toget free learning materials (including e-books, videos, etc.).