
We often see the concept of teardrops, but many people express that they do not understand the meaning of this term and do not know how to add teardrops in PCB design. Please read on with this question in mind.
Function of Teardrops
● Avoid the disconnection of contact points between wires and pads or wires and vias when the circuit board is impacted by a large external force, and it can also make the PCB circuit board appear more aesthetically pleasing.
● During soldering, it can protect the pads, preventing the pads from falling off during multiple soldering processes, and during production, it can avoid uneven etching and cracks caused by misaligned vias.
● Smooth impedance during signal transmission, reduce abrupt changes in impedance, and avoid reflections caused by sudden reductions in line width during high-frequency signal transmission, making the connection between traces and component pads transition more smoothly.
How to Add Teardrops
Execute the menu command “Tools-Teardrops” or the shortcut key “TE” to enter the teardrop property setting dialog box as shown below, and select the operation object:
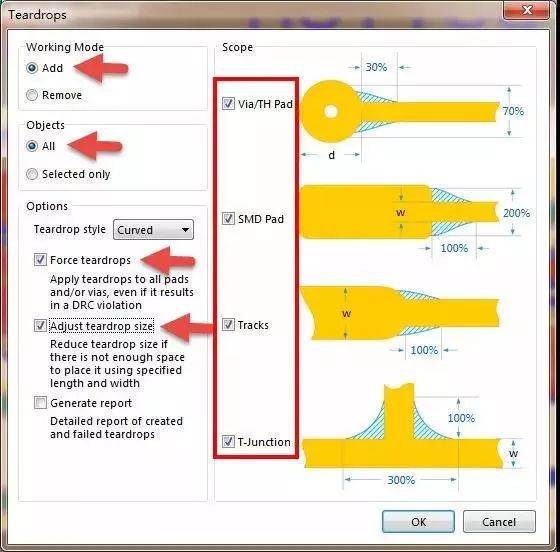
Teardrop Property Settings
● Working Mode-Add selects to execute the command to add teardrops;
● Objects-All selects matching objects, generally choose “All” for all; on the right side of the image, the corresponding objects will be adapted, including “Via/TH PAD (vias and through-hole pads)”, “SMD Pad (surface mount pads)”, “Track (wires)” and “T-Junction (T-junction nodes)”;
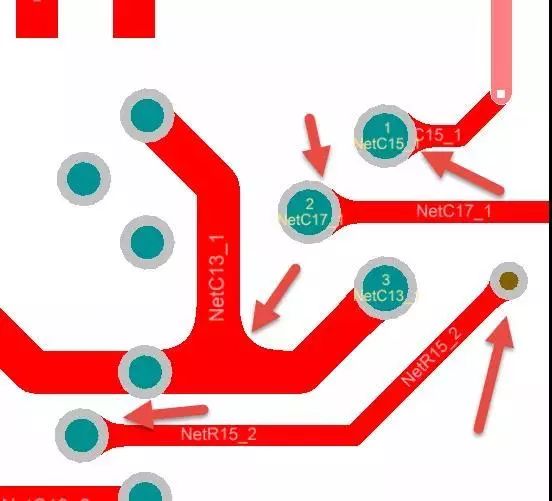
Teardrop Addition Effect Illustration
● Teardrop Style-Curved selects a curved supplemental shape for the teardrop;
● Force Teardrops takes a forced execution method for adding teardrops, even if there are DRC errors. Generally, we check this option to ensure the complete addition of teardrops, and we can correct DRC later;
● Adjust Teardrop Size changes the size of the teardrop when there is insufficient space to add it, allowing for a more intelligent completion of the teardrop addition action.
Source: Fan Yi PCB
About CS SHOW
The “6th Shenzhen International PCB Procurement Exhibition 2019” (CS SHOW 2019) focuses on providing one-stop PCB/FPC procurement services for electronic manufacturing enterprises, facilitating face-to-face communication between overseas buyers and PCB manufacturers, promoting the transformation of the Chinese PCB industry from manufacturing to creation, and showcasing the strong process capabilities, quick response, quality technical services, as well as the latest breakthroughs and development directions in smart production, green energy-saving technologies, new technologies, new processes, and new materials of Chinese circuit board companies to end electronic customers.
From August 28-30, 2019, at the Shenzhen Convention and Exhibition Center, don’t miss the excitement!


Disclaimer:
The copyright of this public account article belongs to the original author and source. The content is the author’s personal opinion and does not represent this public account’s agreement with its viewpoint or responsibility for its authenticity. This public account only provides reference and does not constitute investment or application advice. This public account is a platform for personal learning and communication, and some articles on the platform are reprinted and not for commercial purposes. If there are any infringements, please inform us in a timely manner, and we will handle it as soon as possible. This public account has the final interpretation rights for this statement.

Click to read the original text, register now!


Click to view again