Recently, I have been revising the control architecture for the company’s IoT devices (vending machines). The reason for this is that the new partner equipment manufacturer has adopted a completely different communication protocol (MQTT). To ensure compatibility between the old and new devices while minimizing the impact on existing operations, I decided to restructure the current control system.
The previous manufacturer provided a serial communication protocol, and I had to write the serial communication code myself, then build the entire IoT control solution on that basis. The new manufacturer seems to offer a more comprehensive solution, providing only the technical documentation for the MQTT protocol, without any reference to serial communication. Therefore, the previous solution is completely incompatible.
Although it is possible to redevelop a new solution for the new devices, since there are already operational devices, the solution that minimizes business impact is to restructure the existing device control system and make it compatible with the business interfaces. Hence, I decided to restructure; otherwise, the workload would be unnecessary…
Of course, this article is mainly a product of my understanding and learning of MQTT, applying the Feynman learning technique. If it helps the readers, that would be great.
What is MQTT
MQTT is a protocol developed internally by IBM staff and has been in use for nearly 10 years. Its initial positioning was for scenarios with limited computing resources and constrained network environments.
The name MQTT comes from the prefix “MQ” which was part of a series of IBM products, and “TT” originally stood for Telemetry Transport. The initial application scenario for MQTT was to reduce battery loss and bandwidth usage when connecting to oil pipelines via satellite.
In 2010, IBM opened the protocol with a royalty-free model; in 2013, the global non-profit standardization organization OASIS took over the MQTT protocol and released version 3.1.1 the following year. In 2016, the MQTT protocol became an ISO standard[1].
Due to subsequent developments, MQTT is no longer associated with IBM, and thus the abbreviation MQ Telemetry Transport has become its official name, which is simply MQTT.
In its subsequent development, especially with the rapid growth of consumer-related IoT devices starting in 2010, the features originally designed for MQTT have been well reflected, to the extent that in some scenarios and requirements, MQTT is referred to as the standard protocol for IoT device communication.
Why Choose MQTT
According to the ISO standard introduction, the characteristics of MQTT include:
- • Standard lightweight, simple to implement, and can be based on other network protocols
- • Provides one-to-many message delivery using a “publish-subscribe” method
- • Payload-independent message delivery (the protocol does not assume the payload type, which is agreed upon by the publisher and subscriber)
- • Multiple levels of message delivery QoS (Quality of Service) guarantees
The original version of MQTT was implemented based on the TCP/IP protocol, but it can also be based on other protocols such as WebSocket, UDP, or even Bluetooth.
Since MQTT uses a publish/subscribe messaging model, it allows for scenarios where the same sensor data can be sent to another server or another application simultaneously.
Of course, the most exciting aspect of MQTT is its QoS guarantees (hereinafter referred to as QoS). Anyone who has worked on engineering projects knows that message delivery failures can be very painful and troublesome to handle. MQTT provides three levels of QoS: at most once, at least once, and exactly once. Implementing these three levels of QoS is also quite simple, and I will briefly describe this in the following sections.
Core Working Principles and Configuration
The core working mode of MQTT is the “publish-subscribe” model. Architectures that adopt this model typically have a component similar to a message bus, message queue, or message broker, and the parts that send and subscribe to messages are collectively referred to as clients. MQTT is no exception; the intermediate component of MQTT is called the MQTT Broker. The following diagram illustrates the entire working architecture of MQTT. (Image from EMQX’s article “Quick Start to MQTT Protocol 2025: Basics and Practical Tutorials”[2]).
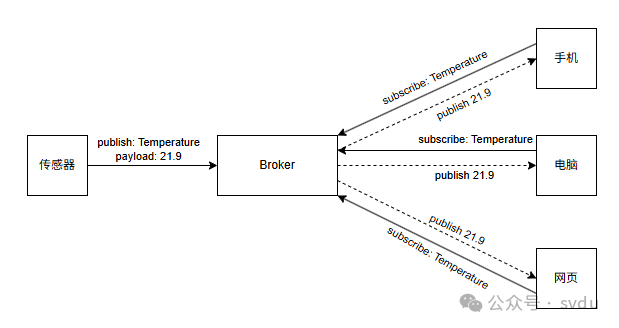
The temperature sensor connects to the MQTT Broker as a client and publishes temperature data to a specific topic (e.g.,
<span>Temperature</span>). The MQTT Broker receives this message and is responsible for forwarding it to the subscriber clients that have subscribed to the corresponding topic (<span>Temperature</span>).
In fact, it can be seen that as long as a device or program implements the functionality of an MQTT client, it can be referred to as an MQTT client. This client can be a library, a standalone program, or even an embedded device.
Publish-Subscribe Model
The publish-subscribe model used by MQTT means that clients are peer-to-peer, and unlike the client-server model, there is no direct association between the two. The publishing and subscribing of messages between clients must be based on a set of additional agreements, similar to how in the pager era, everyone agreed that a certain number represented different meanings. This agreement in MQTT is called a Topic.
Topics
MQTT is a very powerful tool that allows for subscriptions of different granularities.
The topics in MQTT are strings separated by <span>/</span>, similar to URL paths, where each <span>/</span> symbol represents a different level.
chat/room/1
sensor/10/temperature
When subscribing to MQTT messages, wildcards can be used to subscribe to multiple topics. MQTT supports two types of wildcards:
- •
<span>+</span>: represents a single-level wildcard; for example, subscribing to<span>user/+/chat</span>can match topics such as<span>user/alice/chat</span>or<span>user/bob/chat</span>. - •
<span>#</span>: represents a multi-level wildcard; for example, subscribing to<span>device/report/#</span>can match topics such as<span>device/report/sensor/10/temperature</span>or<span>device/report/computer/2/status</span>.
It is important to note that the <span>#</span> wildcard can only be used at the last level of the subscribed topic; for example, a subscription like <span>device/#/report</span> is invalid.
There is also a category of topics that start with <span>$</span>, but these are system topics and vary based on implementation, so I will not elaborate on them here.
QoS (Quality of Service)
MQTT provides three levels of message delivery QoS, which are:
- • QoS 0: At most once
- • QoS 1: At least once
- • QoS 2: Exactly once
When QoS is set to 0, MQTT guarantees that messages will be delivered at most once, which is the most efficient delivery method in MQTT. However, it does not guarantee information delivery.
QoS 1, on the other hand, guarantees that messages will be delivered at least once, but there is a limitation: the subscriber may receive multiple messages from the sender due to the implementation limitations of QoS 1. However, compared to QoS 2, QoS 1 has a smaller overhead and is suitable for situations where duplicate delivery is acceptable.
QoS 2 is an improvement over QoS 1, ensuring that messages are delivered successfully only once, but its implementation is more complex. The implementation of QoS 1 and 2 will be briefly described at the end of the article, and more detailed information can be found in the article “Analysis of MQTT QoS 0, 1, 2: Quick Start Guide”[3].
How to Choose QoS
In simple terms, the choice of QoS is proportional to the importance of the data. If a piece of data is not critically needed for core business within a certain time frame, QoS 0 can be chosen, as missing it within a short period is not a concern. For example, a humidity sensor for flowers and plants may not have significant issues even if there are problems for a certain period (unless the plants are highly sensitive to humidity).
QoS 1 is more widely applicable because it guarantees successful information delivery, and for cases where messages may be repeated, the subscriber can internally deduplicate. Therefore, QoS 1 is suitable for most critical operations, as long as deduplication is handled properly at the application layer. If one does not want to implement deduplication themselves, QoS 2 is also a better choice.
QoS 2 inherently guarantees message delivery and ensures that there are no duplicates, although the transmission cost is higher. For scenarios that require very strict reliability, such as finance, aviation, and transportation, QoS 2 may be used more frequently.
QoS Downgrade
In MQTT, both subscriptions and sends can set QoS levels. In most cases, when both the subscriber and sender agree on a QoS level, there will be no issues. However, when the QoS levels of the subscriber and sender do not match, the Broker will prioritize the subscriber’s QoS when forwarding the sender’s message, especially when the subscriber’s QoS level is lower than the message’s QoS level.
For example, for the topic <span>a</span>, if the subscriber subscribes with QoS 1 while the sender sends the message with QoS 2, the Broker will downgrade the message to QoS 1 when sending it to the subscriber, which may result in multiple repetitions.
The QoS downgrade in MQTT follows the “barrel effect,” ensuring the minimum QoS is available. Since QoS increases from 0 to 2, MQTT only guarantees that the smaller one can be implemented. Moreover, there is no possibility of upgrading QoS; for instance, it is not possible to upgrade from sender QoS 0 to subscriber QoS 2, as the sender has declared that it cannot handle QoS 1 and 2 response messages during sending.
Will Message
With QoS in place, the quality and stability of the MQTT system will be greatly assured. However, MQTT clients may run on relatively fragile or low-level devices, and their hardware reliability may be difficult to guarantee. Therefore, to ensure the overall system’s reliability, MQTT has a feature called the Will Message.
The Will Message in MQTT is sent by the client to the Broker when establishing a connection, containing the topic, retained message flag, properties, QoS, and payload. When an MQTT client disconnects abnormally from the Broker, the Broker will send a message to all clients subscribed to that topic.
Technically, an abnormal disconnection includes the following situations:
- 1. The Broker detects an IO error or network failure
- 2. The client does not communicate within the Keep Alive time
- 3. The client closes the network connection without sending a DISCONNECT message with Reason Code 0x00
- 4. The Broker closes the connection with the client due to receiving a message that does not comply with protocol requirements
Using the Will Message, we can conveniently monitor the status of clients. For more on this, the article “Introduction and Example of Will Message | Detailed Features of MQTT 5.0”[4] provides excellent best practices, and in MQTT 5.0, the newly added delayed will addresses the issue of will messages being published too immediately in older versions, which would send messages immediately upon reconnection.
Practical Application – Humidity Control System Based on MQTT
In this section, I will use Python as the demonstration programming language to explain the actual development process of an MQTT application. Of course, due to space limitations, the code in this article will only include important parts.
1. Run MQTT Broker
To develop with MQTT, you first need to run an MQTT Broker. There are many implementations of MQTT Broker, and here we will use Docker to run one developed by a domestic team, EMQX.
docker run -d --name emqx -p 1883:1883 -p 8083:8083 -p 8084:8084 -p 8883:8883 -p 18083:18083 emqx/emqx:5.8.62. Write Code for Sensor and Humidifier
Here we will skip some code details and assume that the serial communication code for the humidity sensor and humidifier has been encapsulated.
2.1 Install MQTT Library
pip install paho-mqttHere is a small piece of knowledge: the package name “paho” actually indicates that this MQTT client implementation comes from the Eclipse Paho project, which was initially supported by IBM to help various languages implement MQTT clients. To this day, many projects have been handed over to the open-source community for updates and maintenance.
2.2 Connect to MQTT Broker
import random
import json

from paho.mqtt import client as mqtt_client
from device import sensor, aircond

BROKER_URL = os.getenv('BROKER_URL')
BROKER_PORT = os.getenv('BROKER_PORT')

# All MQTT clients need a Client ID to identify their uniqueness
client_id = f'device-{random.randint(0,100)}'

# Method to connect to MQTT Broker
def connect_mqtt():
    def on_connect(client, userdata, flags, rc):
        if rc == 0:
            # Send a message indicating the device is online upon successful connection
            client.publish(f'device/online/{client_id}')
        else:
            print('failed to connect, return code %d\n', rc)
    client = mqtt_client.Client(client_id)
    client.on_connect = on_connect
    client.connect(BROKER_URL, BROKER_PORT)
    return client
2.3 Write a Scheduled Task to Read Humidity Information
We will implement a method that reads humidity from the sensor every 30 seconds and sends a message.
It is important to note that the <span>paho.mqtt</span> library provides methods that allow our MQTT client to handle subscription messages and reconnections in another thread, so we can handle this task in the main thread.
# Include previous code

TOPIC_HUMIDITY_REPORT = f'device/report/{client_id}/humidity'

def publish_humidity():
    while True:
        time.sleep(30)
        humi = sensor.get_humidity()
        payload = json.dumps({
            'humidity': humi
        })
        result = client.publish(TOPIC_HUMIDITY_REPORT, payload)
        status = result[0]
        if status == 0:
            print(f'send humidity to topic')
        else:
            print(f'failed to send humidity to topic')
2.4 Write a Task to Start the Humidifier Based on Subscription Messages
# Include previous code

TOPIC_AC_CONTROL = f'device/control/{client_id}/ac'

def on_ac_control(payload):
    datum = json.loads(payload.decode('utf-8'))
    aircond.set_humidity(datum['humidity'])

def subscribe_topics(client):
    def on_message(client, userdata, msg):
        match msg.topic:
            case TOPIC_AC_CONTROL:
                on_ac_control(msg.payload)
            case _:
                print(f'unknown topic received. {msg.topic}')
    client.subscribe(TOPIC_AC_CONTROL)
    client.on_message = on_message
2.5 Write the Run Function
# Include previous code

def run():
    client = connect_mqtt()

    # Subscribe to topics
    subscribe_topics(client)

    # Start the MQTT client thread
    client.loop_start()

    # Read humidity from the sensor in the main thread
    publish_humidity(client)

    # Stop the MQTT client thread
    # However, we will not handle forced shutdown here, as embedded devices are expected to run for long periods
    client.loop_stop()

if __name__ == '__main__':
    run()
Thus, the code for reading humidity and controlling the air conditioning on a “limited device” is complete.
3. Write the Management Program Code
Next, we will write a control program that records the humidity information of all devices and starts the air conditioning to adjust humidity when it exceeds a certain value. Here we will skip the part of creating clients repeatedly and focus on the MQTT message subscription and publishing content.
3.1 Subscribe to Humidity Sensor Report Topic
TOPIC_DEVICE_HUMIDITY_REPORT = 'device/report/+/humidity'

def on_device_humidity_report(client, msg):
    client_id = msg.topic().split('/')[2]
    msg_data = json.loads(msg.payload.decode())
    humidity = msg_data['humidity']
    # Here we omit the database insertion operation

    if humidity < 50:
        data = json.dumps({
            'humidity': humidity
        })
        client.publish(f'device/control/{client_id}/ac', data)

def subscribe_topics(client):
    def on_message(client, userdata, msg):
        match msg.topic:
            case TOPIC_DEVICE_HUMIDITY_REPORT:
                on_device_humidity_report(client, msg)
            case _:
                print(f'unknown topic received: {msg.topic}')
    client.subscribe(TOPIC_DEVICE_HUMIDITY_REPORT)
    client.on_message = on_message
3.2 Write the Run Function
Since this program only needs to ensure the database connection beforehand and does not need to create it again, it only needs to monitor humidity afterward. Therefore, we can use another way to start the MQTT client.
def run():
    # Here we omit the code for creating the database connection
    client = connect_mqtt()
    subscribe_topics(client)
    client.loop_forever()

if __name__ == '__main__':
    run()
Using the <span>loop_forever()</span> method, the MQTT client will execute in the main thread, unlike the <span>loop_start</span> method which starts in another process. This method will occupy the main thread, so some time-consuming initialization methods need to be called before this method.
Application Extension I: Dynamic Subscription
From the practical application above, it can be seen that MQTT client subscriptions occur after the connection is established, which gives developers many scenarios to use. For example, we can dynamically subscribe to certain topics based on the program’s needs, or even subscribe to new topics based on messages sent by other clients. A simple example is:
Client A sends a payload of
<span>{"topic": "client/name/report", "handler": "ClientReportHandler"}</span>to the topic target/topic/register, and the client B that receives this message subscribes to a new topic and sets the corresponding handler through an internal dictionary.
Application Extension II: Beyond IoT
MQTT is a very good protocol; it is lightweight enough that even implementing a Broker that supports QoS 1 is not a difficult task. Therefore, MQTT can be used in non-IoT scenarios, utilizing its low consumption and tolerance for weak networks and reliability to achieve many interesting applications.
In online games, some data can be transmitted via MQTT, especially for content that requires high reliability but has a small data volume. Additionally, some instant messaging software can use it to update and notify users of messages.
However, MQTT does have some limitations, namely that the size of a single message’s payload must be determined based on the specific Broker and client implementation, but it is usually not too large. For scenarios involving large data transmission, it is generally more appropriate to use slicing or to choose message queues specifically developed for larger data operations.
Further Reading: Implementation of QoS 1 and 2
In fact, the most attractive aspect of MQTT, aside from its tolerance for weak networks, is that it offers three different levels of QoS options, which is very practical for complex business development, avoiding issues that may arise from manually implementing QoS.
However, merely using it without understanding its essence is not good for network transmission-related work. Therefore, in the last chapter of this article, I intend to briefly discuss the implementation of MQTT QoS 1 and QoS 2. Most of the content in this chapter comes from the article “Analysis of MQTT QoS 0, 1, 2: Quick Start Guide”[5], and if there are any unclear parts, I recommend referring directly to the original text.
Implementation of QoS 1
If QoS 0 only requires delivery, then QoS 1 requires the sender to receive a response from the receiver to consider it complete.
From a technical perspective, when the sender sends a message with QoS set to 1, a unique value Packet ID is set in the <span>PUBLISH</span> message. The receiver, upon receiving the message, must return a <span>PUBACK</span> message with the same Packet ID. The sender releases the Packet ID after receiving the returned message, making it available for new message transmissions.
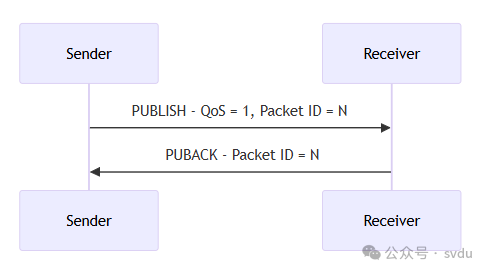
From the above diagram, it can be seen that the reason for message duplication in QoS 1 often occurs because the <span>PUBACK</span> message was not delivered to the sender, leading the sender to believe that the message was not successfully delivered, prompting it to resend until it receives the <span>PUBACK</span>.
To solve this problem, QoS 2 was introduced.
Implementation of QoS 2
The implementation of QoS 2 is complex, but its essence is achieved through storing pending messages and state sharing. Compared to QoS 1, which only adds a return message, QoS 2 requires a total of 4 messages to complete the entire message delivery.
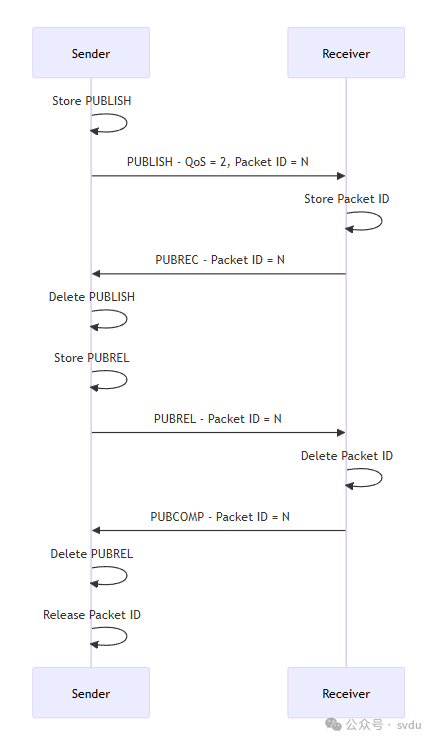
In simple terms, the communication work of QoS 2 adds many other operations compared to QoS 1:
- 1. The sender stores a copy of the message to be sent before sending it for later retransmission;
- 2. The receiver stores a Packet ID upon receiving the message to synchronize the sender’s state;
- 3. After receiving the message, the receiver replies to the sender with a
<span>PUBREC</span>message, indicating that the message has been received; - 4. At this point, the sender removes the temporarily stored message and enters the Packet ID release process, temporarily storing the
<span>PUBREL</span>message for later retransmission; - 5. The receiver, upon receiving the
<span>PUBREL</span>message, releases the Packet ID and replies with a<span>PUBCOMP</span>message to inform the sender to release it; - 6. The sender releases the Packet ID upon receiving the
<span>PUBCOMP</span>message.
The need for the receiver to store the Packet ID is actually the key point that ensures QoS 2 does not result in duplicates. In real scenarios, the receiver’s reply of <span>PUBREC</span> may still fail, but due to the implementation of QoS 2, the receiver must temporarily store the Packet ID, so even if the sender resends the same Packet ID message, the receiver will not process it but will directly retry sending <span>PUBREC</span>.
The subsequent Packet ID release process is to ensure that both parties can properly release the Packet ID. However, in real scenarios, this release process may still encounter network issues. For example, if the sender does not receive the receiver’s reply of <span>PUBCOMP</span> and resends the <span>PUBREL</span> message. Therefore, when implementing QoS 2, the receiver must ensure that the operation of releasing the Packet ID is idempotent (i.e., executing multiple times consecutively does not change the expected response and server state).
Postscript
At the beginning of the article, I mentioned that I was revising the existing architecture. The reason for my eagerness to replace it is not only due to serious flaws caused by the initial selection of the architecture but also because I had implemented an Agent using WebSocket that could cover 75% of MQTT’s functionality (mainly because it needed to assemble specific command scripts for devices based on circumstances, so it cannot be considered a simple Broker). I can say that I have completely broken the principle of not reinventing the wheel.
The current architecture uses a message bus to distribute messages and supports automatic reconnection and heartbeat mechanisms after device disconnection, and even supports feedback to the upstream after device disconnection (the will message). However, I still have not solved the issue of message delivery guarantees (QoS). The reason for not solving it is simple: first, I really do not know how to design safe data retransmission; second, the transmission cost is too high (the command for controlling a single device requires nearly 40KB of data, even after simple compression).
In fact, this architectural revision is essentially to repay the debt of the initial technical selection. At that time, due to just joining the company, my opinions did not have high reference value, leading to significant issues in the selection. Now, this work can be considered as repaying the debt.
Reference Links
<span>[1]</span> ISO Standard: https://www.iso.org/standard/69466.html<span>[2]</span> “Quick Start to MQTT Protocol 2025: Basics and Practical Tutorials”: https://www.emqx.com/zh/blog/the-easiest-guide-to-getting-started-with-mqtt<span>[3]</span> “Analysis of MQTT QoS 0, 1, 2: Quick Start Guide”: https://www.emqx.com/zh/blog/introduction-to-mqtt-qos<span>[4]</span> “Introduction and Example of Will Message | Detailed Features of MQTT 5.0”: https://www.emqx.com/zh/blog/use-of-mqtt-will-message<span>[5]</span> “Analysis of MQTT QoS 0, 1, 2: Quick Start Guide”: https://www.emqx.com/zh/blog/introduction-to-mqtt-qos