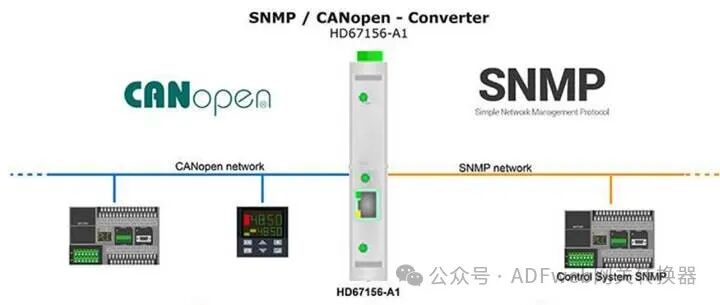
SNMP Proxy to CANopen – ADFweb Gateway Converter– Guangzhou Xinyu IoT
Author: Zou Wuyi Mobile185-020-77899 Email: [email protected]
1 Features:
HD67156 – A1 and HD67156 – B2 are SNMP Proxy /CANopen converters. They have the following features:
• Maximum data read capacity of 1024 bytes, maximum data write capacity of 1024 bytes;
• Triple isolation between CANopen power, CANopen Ethernet, and between power and Ethernet;
• Bidirectional information transmission between CANopen bus and SNMP bus;
• Can be installed on a 35mm DIN rail;
• Wide power input range: AC 8…24V or DC 12…35V;
• Wide operating temperature range:-40°C to 85°C (-40°F to +185°F).
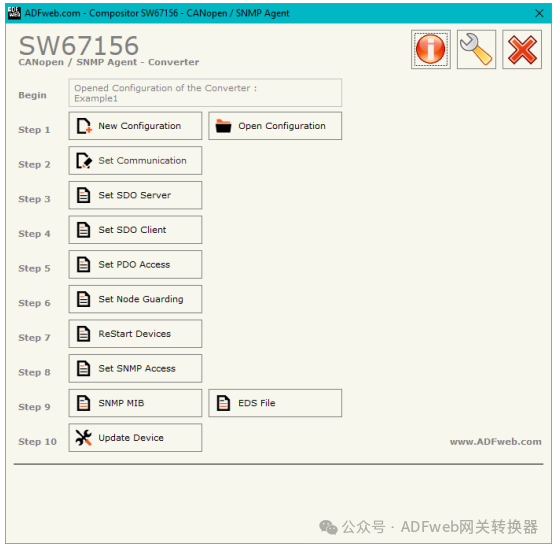
Configuration:
You need to install the Compositor SW67156 software on your computer to perform the following actions:
• Define parameters for the PROFINET line;
• Define parameters for the CAN line;
• Define SDO server information;
• Define SDO client information;
• Define PDO information (RPDO/TPDO);
• Define node watchdog functionality;
• Update the device.
2 New Configuration / Open Configuration:
The “New Configuration” button will create a folder containing the configuration information for the entire device.
The device configuration can also be imported or exported:
To clone the programmable “SNMP Proxy / CANopen Converter” configuration for configuring another device in the same way, you need to keep this folder and all its contents;
To clone a project for different versions of that project, simply copy the project folder and rename it, then use the “Open Configuration” button to open the new folder.
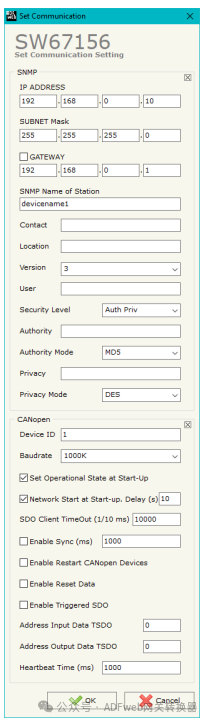
3 Communication Settings
This section defines the basic communication parameters for the two buses (Simple Network Management Protocol (SNMP and Controller Area Network Open Protocol (CANopen)).
In the main window (Figure 2), click the “Set Communication” button for SW67156 to pop up the “Set Communication” window (Figure 3).
This window is divided into two parts, one for SNMP and the other for CANopen.
SNMP Field Description
• In the “IP Address” field, define the SNMP endpoint IP address of the converter;
• In the “Subnet Mask” field, define the subnet mask of the SNMP endpoint of the converter;
• In the “Gateway” field, define the default gateway for the network. This feature can be enabled or disabled by checking the checkbox, which is used for accessing the external network;
• In the “SNMP Site Name” field, define the name of the SNMP proxy site;
• In the “Contact” field, define the contact person for the SNMP proxy site;
• In the “Location” field, define the location of the SNMP proxy site;
• In the “Version” field, define the version of SNMP;
If using SNMP V3, the following fields must be filled:
◦ In the “User” field, define the user for SNMP authentication;
◦ In the “Security Level” field, define the security type used;
◦ In the “Privilege” field, define the password used for SNMP authentication;
◦ In the “Authentication Mode” field, define the authentication mode used;
◦ In the “Privacy” field, define the password used for privacy authentication;
◦ In the “Privacy Mode” field, define the privacy mode used;
CAN Section Field Description
• In the “Device ID” field, define the CANopen endpoint ID;
• In the “Baud Rate” field, define the data transmission rate for the CANopen line;
• In the “Set to Run State on Startup” field, define the state of CANopen. If this option is checked, the board will start in run state; otherwise, it will start in pre-run state.