Click to View
System Description
Title: “Arduino Password Lock Design”
Functions:
-
Can set a password, unlock successfully
-
Five incorrect password inputs trigger an alarm (buzzer)
-
LCD display (1602)
-
RFID-RC522 radio frequency module (swipe card to unlock)
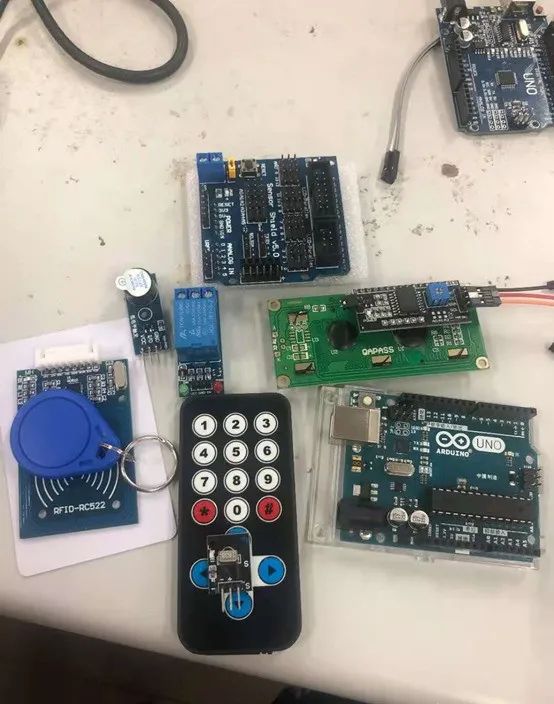
Modules Used:
-
Relay -
Infrared Remote Control (replaces matrix keyboard) -
RFID-RC522 radio frequency module -
LCD1602 (I2C)
Module Physical Diagram
Wiring Diagram
LCD1602
LCD1602 IIC — IIC
Infrared Receiver
Infrared Receiver — 5
Relay
Relay — 2
Buzzer
Buzzer — 3
RC522
SDA–10
SCK–13
MOSI–11
MISO–12
Other signal lines are idle.
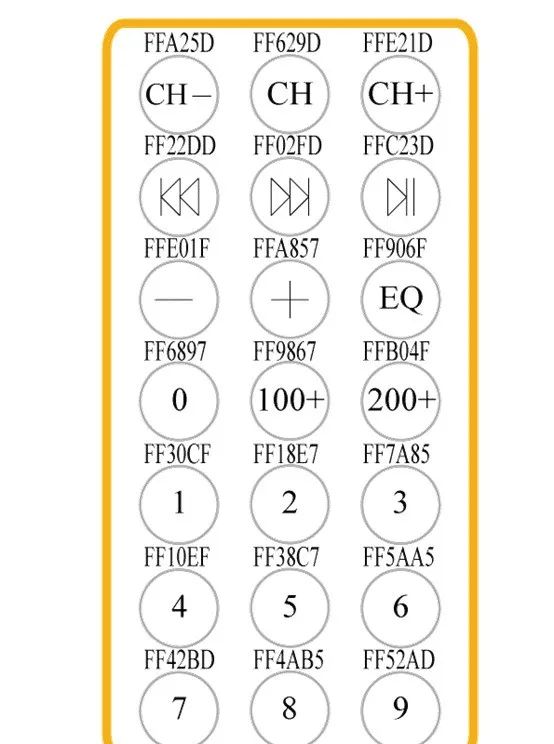
Infrared Remote Control Signal
Source Code
/***************************
 * Smart Door Lock Based on Arduino
 * Author: Liu Zenglin
 * Date: 2020.12.05
 ***************************
 */

#include <Wire.h>
#include <LiquidCrystal_I2C.h> //1602LCD Driver  Reference I2C Library
#include <IRremote.h>
#include <SPI.h>
#include <MFRC522.h>

#define SS_PIN 10
#define RST_PIN 9

unsigned char i = 0, j = 0, m = 0, n = 0;      // Loop variables

unsigned char code[6];           // Save password
unsigned char code_temp[6];      // Save temporary input password

int rf522_flag = 0;              // Access card flag
int Setpassword_flag = 1;        // Set password flag
int Inputpassword_flag = 1;      // Input password flag
int door_flag = 0;               // Door flag

// Pin definitions
const int buzzer = 3;
const int realy = 2;

LiquidCrystal_I2C lcd(0x27,16,2);  // Configure LCD address and rows/columns

int RECV_PIN = 5;
IRrecv irrecv(RECV_PIN);   // Define receive pin as pin 11.
decode_results results;    // Declare a variable type unique to IRremote library (decode_results)

MFRC522 rfid(SS_PIN, RST_PIN); // Instantiate class

// Initialize array to store the read NUID
byte nuidPICC[4];


void setup() {
  // put your setup code here, to run once:

  // Pin initialization
  pinMode(realy, OUTPUT);
  digitalWrite(realy, HIGH);

  pinMode(buzzer, OUTPUT);
  digitalWrite(buzzer, HIGH);

  SPI.begin(); // Initialize SPI bus
  rfid.PCD_Init(); // Initialize MFRC522

  //LCD1602
  lcd.init();      // Initialize LCD
  lcd.backlight(); // Set LCD backlight
  lcd.setCursor(0,0);            // Set display pointer
  lcd.print(" Set Clded Lock "); // Output characters to LCD1602
  lcd.setCursor(0,1);            // Set display pointer
  lcd.print("Password:");        // Output characters to LCD1602

  //Infrared reception
  irrecv.enableIRIn(); // Start receiving signals

  Serial.begin(9600);
}

void loop() {
  // put your main code here, to run repeatedly:

  while (Setpassword_flag) // Set password
  {
    if (irrecv.decode(&results))  // Check if infrared remote signal is received
    {
      Serial.println(results.value, HEX); // Output hexadecimal received data command information

      switch(results.value)// Compare through this loop
      {
        case 0xFF9867:
          lcd.print("0");delay(500);code[i]=0;i++;break;
        case 0XFFA25D:
          lcd.print("1");delay(500);code[i]=1;i++;break;
        case 0xFF629D:
          lcd.print("2");delay(500);code[i]=2;i++;break;
        case 0xFFE21D:
          lcd.print("3");delay(500);code[i]=3;i++;break;
        case 0xFF22DD:
          lcd.print("4");delay(500);code[i]=4;i++;break;
        case 0xFF02FD:
          lcd.print("5");delay(500);code[i]=5;i++;break;
        case 0xFFC23D:
          lcd.print("6");delay(500);code[i]=6;i++;break;
        case 0xFFE01F:
          lcd.print("7");delay(500);code[i]=7;i++;break;
        case 0xFFA857:
          lcd.print("8");delay(500);code[i]=8;i++;break;
        case 0xFF906F:
          lcd.print("9");delay(500);code[i]=9;i++;break;
        default:
          break;
      }

      irrecv.resume(); // Receive next instruction

      if (i == 6)
      {
        Setpassword_flag = 0; // Clear set password flag
        Serial.print("Password set successfully\n");
        for (j = 0; j < 6; j++)
        {
          Serial.print(code[j]);
          }
        Serial.println(" ");

        digitalWrite(realy, LOW);  // Password set successfully, unlock
        delay(2000);
        digitalWrite(realy, HIGH);

        lcd.clear();                   // Clear screen
        lcd.setCursor(0,0);            // Set display pointer
        lcd.print("===Clded Lock==="); // Output characters to LCD1602
        lcd.setCursor(0,1);            // Set display pointer
        lcd.print("Password:");        // Output characters to LCD1602
        }
    }
  }  // Password setting completed

  while (Inputpassword_flag)
  {
    if (irrecv.decode(&results))  // Check if infrared remote signal is received
    {
      Serial.println(results.value, HEX); // Output hexadecimal received data command information

      switch(results.value)// Compare through this loop
      {
        case 0xFF9867:
          lcd.print("0");delay(500);code_temp[m]=0;m++;break;
        case 0XFFA25D:
          lcd.print("1");delay(500);code_temp[m]=1;m++;break;
        case 0xFF629D:
          lcd.print("2");delay(500);code_temp[m]=2;m++;break;
        case 0xFFE21D:
          lcd.print("3");delay(500);code_temp[m]=3;m++;break;
        case 0xFF22DD:
          lcd.print("4");delay(500);code_temp[m]=4;m++;break;
        case 0xFF02FD:
          lcd.print("5");delay(500);code_temp[m]=5;m++;break;
        case 0xFFC23D:
          lcd.print("6");delay(500);code_temp[m]=6;m++;break;
        case 0xFFE01F:
          lcd.print("7");delay(500);code_temp[m]=7;m++;break;
        case 0xFFA857:
          lcd.print("8");delay(500);code_temp[m]=8;m++;break;
        case 0xFF906F:
          lcd.print("9");delay(500);code_temp[m]=9;m++;break;
        default:
          break;
      }

      irrecv.resume(); // Receive next instruction

      if (m == 6)
      {

        m = 0;

        if ((code[0] == code_temp[0]) && (code[1] == code_temp[1]) && (code[2] == code_temp[2]) && (code[3] == code_temp[3]) && (code[4] == code_temp[4]) && (code[5] == code_temp[5]))
        {
          digitalWrite(realy, LOW);  // Password set successfully, unlock
          delay(2000);
          digitalWrite(realy, HIGH);
          }
        else
        {
          n++;
          }

        lcd.clear();                   // Clear screen
        lcd.setCursor(0,0);            // Set display pointer
        lcd.print("===Clded Lock==="); // Output characters to LCD1602
        lcd.setCursor(0,1);            // Set display pointer
        lcd.print("Password:");        // Output characters to LCD1602

      }

      while (n == 5)// Error five times buzzer alarm
      {
        // Buzzer alarm for 2s
        digitalWrite(buzzer, LOW);
        }
    }

  // Find card
  if ( ! rfid.PICC_IsNewCardPresent())
  {
    rf522_flag = 1;
    return;
    }


  if (rf522_flag == 1)
  {
    digitalWrite(realy, LOW);
    delay(2000);
    rf522_flag = 0;
    digitalWrite(realy, HIGH);
    }
  }
}
Demo Video
About the Author
Last 11 Spots for Heavy Benefits

1
“Review | Common Classic Interview Questions for Embedded Software Engineers”
2
“[0 Yuan Package for Hardware] DIY Tmall Genie WiFi Controlled Smart Fan!”
3
“Xiaomi Company Embedded Software Engineer 2021 Interview Review”