Baibai Network has created a complete Ubuntu image, which can be downloaded from here:
-
Link: https://pan.baidu.com/s/1vw4VUV_Mvt0HXz8IC66ACg
-
Extraction code: iftb
We are also starting to teach driver basics using a pure Ubuntu environment for free starting from (2022.10.17).
If you are using our Ubuntu image, you can skip the content in chapters 1 to 6 and start from chapter 7.
1. Install Basic Development Tools
git clone https://e.coding.net/weidongshan/DevelopmentEnvConf.git
cd DevelopmentEnvConf
sudo ./Configuring_ubuntu.sh
2. Install VSCode
2.1 Download from Official Website
Use a browser in Ubuntu to download the deb package from https://code.visualstudio.com/ and execute:
cd /home/book/Downloads
sudo dpkg -i code_1.72.2-1665614327_amd64.deb
2.2 Install Extensions
After opening VSCode, click the left icon:
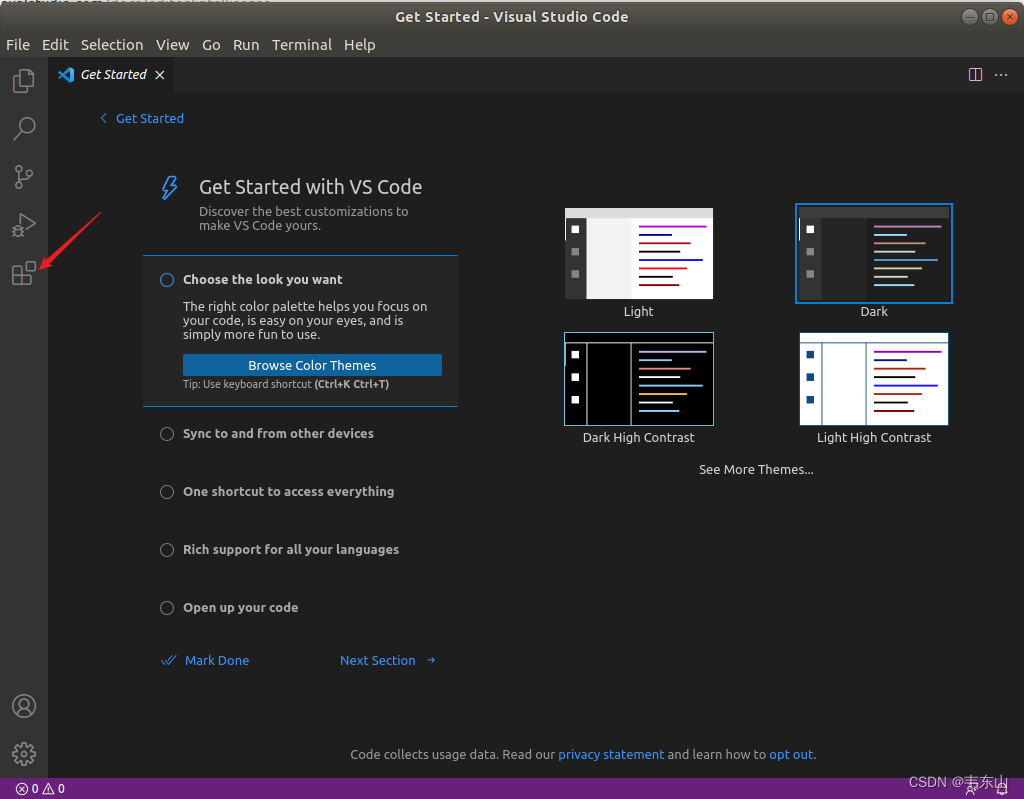
Enter the following plugin names in order to install:
-
C/C++
-
C/C++ Extension Pack
-
C/C++ Snippets
-
Code Runner
-
Code Spell Checker
-
compareit
-
DeviceTree
-
Tabnine AI Autocomplete
-
Bracket Pair Colorization Toggler
-
Rainbow Highlighter
-
Highlight text: shift + alt + z
-
Cancel highlight: shift + alt + a
-
Arm Assembly
-
Chinese
-
Hex Editor
-
One Dark Pro
-
Clangd
-
Markdown All in One
-
Markdown Preview Enhanced
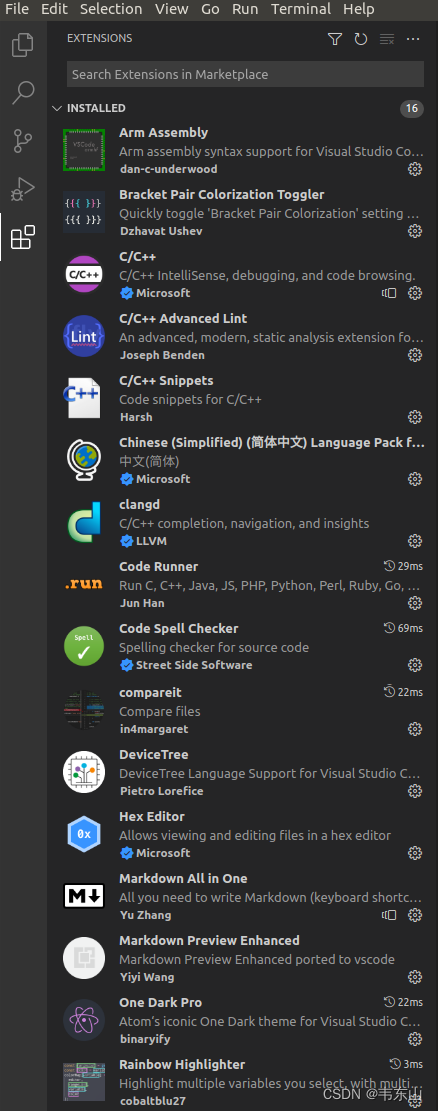
These are the plugins we have installed:
The previous step only installed the Clangd plugin; its usage also requires a Clangd program.
When we open C files in VSCode, it will prompt you to install the Clangd program, which will install the latest version (version 15), but this version has some bugs, so we will manually install version 13.
Open a browser in Ubuntu and go to https://github.com/clangd/clangd/releases/tag/13.0.0 to download the Linux installation package:
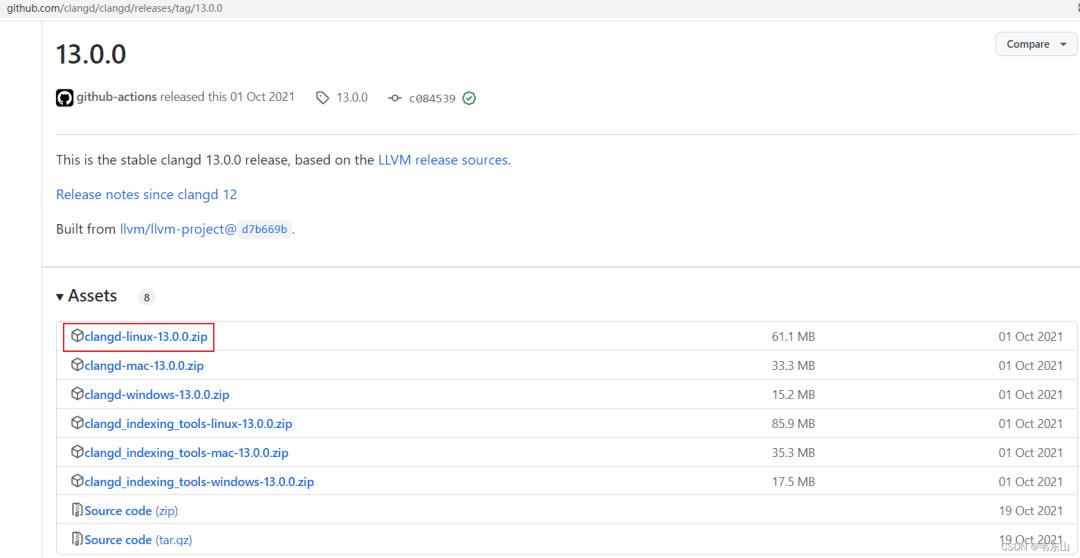
Place the downloaded clangd-linux-13.0.0.zip in the /home/book directory and execute the unzip command:
cd /home/book
unzip clangd-linux-13.0.0.zip
2.3.2 Configure Clangd
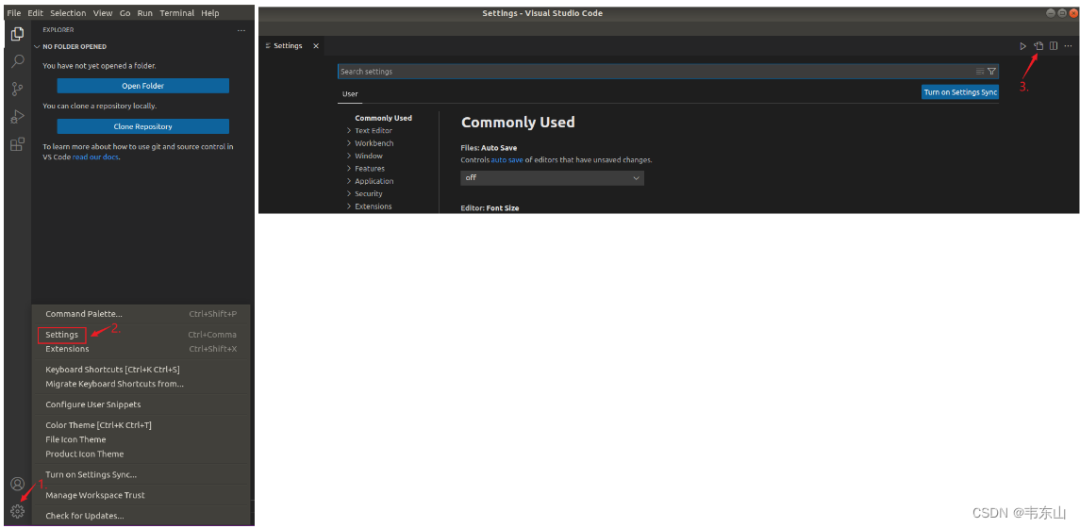
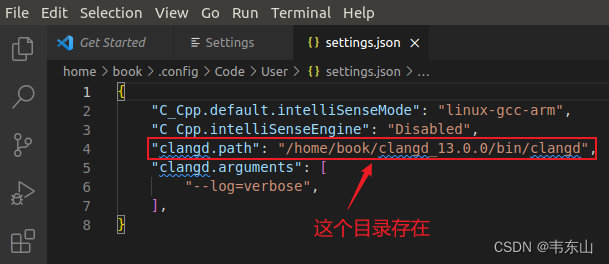
Press the steps shown in the image to open the setting.json file in the VSCode interface:
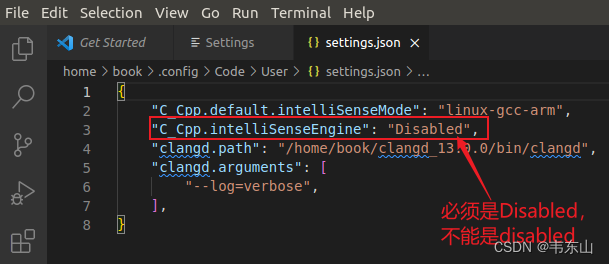
In the setting.json, write the following content (this file may be automatically modified after you first open the source code directory, and you need to modify it again):
{
    "C_Cpp.default.intelliSenseMode": "linux-gcc-arm",
    "C_Cpp.intelliSenseEngine": "Disabled",
    "clangd.path": "/home/book/clangd_13.0.0/bin/clangd",
    "clangd.arguments": [
        "--log=verbose",
    ],
}
The IntelliSense in the C/C++ plugin conflicts with Clangd. If we do not manually set the setting.json, when opening C files in VSCode, it will prompt to disable IntelliSense, and clicking the mouse will disable it. Essentially, it modifies the setting.json and writes the following text:
"C_Cpp.intelliSenseEngine": "disabled",The above file has a bug; “disabled” should be changed to “Disabled”.
2.3.3 Install Bear
To use Clangd in VSCode and achieve precise navigation, Bear is needed to analyze the source code and generate compile_commands.json.
Execute the following command to install:
sudo apt install bear2.4 Common Shortcuts
After opening a C file, right-click in the file to see most of the shortcuts.
Open file by entering file name: Ctrl + P
Jump to a specific line: Ctrl + G + line number
Open file and jump to a specific line: Ctrl + p file name:line number
List functions in the file: Ctrl + Shift + O, you can enter the function name to jump
Jump to function/variable: Hold Ctrl while clicking the left mouse button, F12
Forward: Ctrl + Shift + -
Backward: Ctrl + Alt + -
List references: Shift + F12
Find all references: Alt + Shift + F12
Toggle sidebar display/hide: Ctrl + B
Open command menu: Ctrl + Shift + P
Manually trigger suggestions: Ctrl + Space
Manually trigger parameter hints: Ctrl + Shift + Space
Open/Hide terminal: Ctrl + `(the key above Tab)
Rename symbol: F2
Current configuration debugging: F5
Scroll editor up/down: Ctrl + ↑/↓
Search/Replace: Ctrl + F/H
Highlight text: shift + alt + z
Cancel highlight: shift + alt + a
3. Using WindTerm
3.1 Install WindTerm
WindTerm is a useful terminal software in the Linux environment, with a GUI interface, supporting ssh, serial port, and other protocols, and can record history commands.
We use it to open the serial port to operate the development board.
Open a browser in Ubuntu and go to https://github.com/kingToolbox/WindTerm/releases/tag/2.5.0 to download the Linux version of the software package:
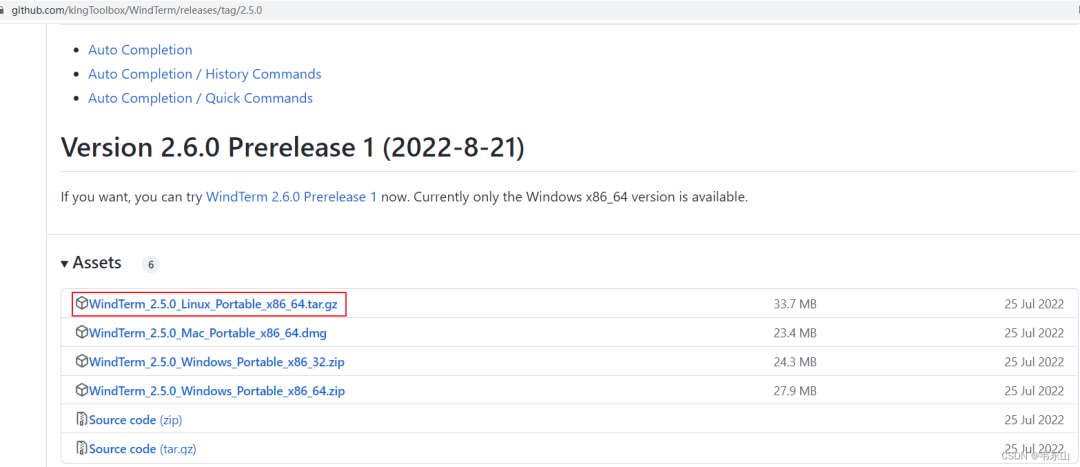
Place the downloaded WindTerm_2.5.0_Linux_Portable_x86_64.tar.gz in the /home/book directory and execute the unzip command:
cd /home/book
tar xzf WindTerm_2.5.0_Linux_Portable_x86_64.tar.gz
cd WindTerm_2.5.0
chmod +x WindTerm
In the future, you can open WindTerm by executing the following command after opening the terminal in the desktop system:
cd /home/book/WindTerm_2.5.0
sudo ./WindTerm
3.3 Configure WindTerm
You can refer to the usage method of WindTerm here: https://zhuanlan.zhihu.com/p/468501270
The goal of this section:
-
Problem-solving: When we use WindTerm to open /dev/ttyUSB0 or /dev/ttyACM0 and encounter permission issues without using the sudo command
-
Convenience: We want to click the mouse on the left startup bar in Ubuntu to start WindTerm
3.3.1 Solve Permission Issues
Execute the following command to add the book user to the group (dialout, tty):
sudo newgrp dialout tty
sudo usermod -a -G dialout book
sudo usermod -a -G tty book
3.3.2 Add to Startup Bar
Create a file `/usr/share/applications/windterm.desktop` with the following content:
[Desktop Entry]
Name=WindTerm
Comment=A professional cross-platform SSH/Sftp/Shell/Telnet/Serial terminal
GenericName=Connect Client
Exec=/home/book/WindTerm_2.5.0/WindTerm
Type=Application
Icon=/home/book/WindTerm_2.5.0/windterm.png
StartupNotify=false
StartupWMClass=Code
Categories=Application;Development
Actions=new-empty-window
Keywords=windterm
[Desktop Action new-empty-window]
Name=New Empty Window
Icon=/home/book/WindTerm_2.5.0/windterm.png
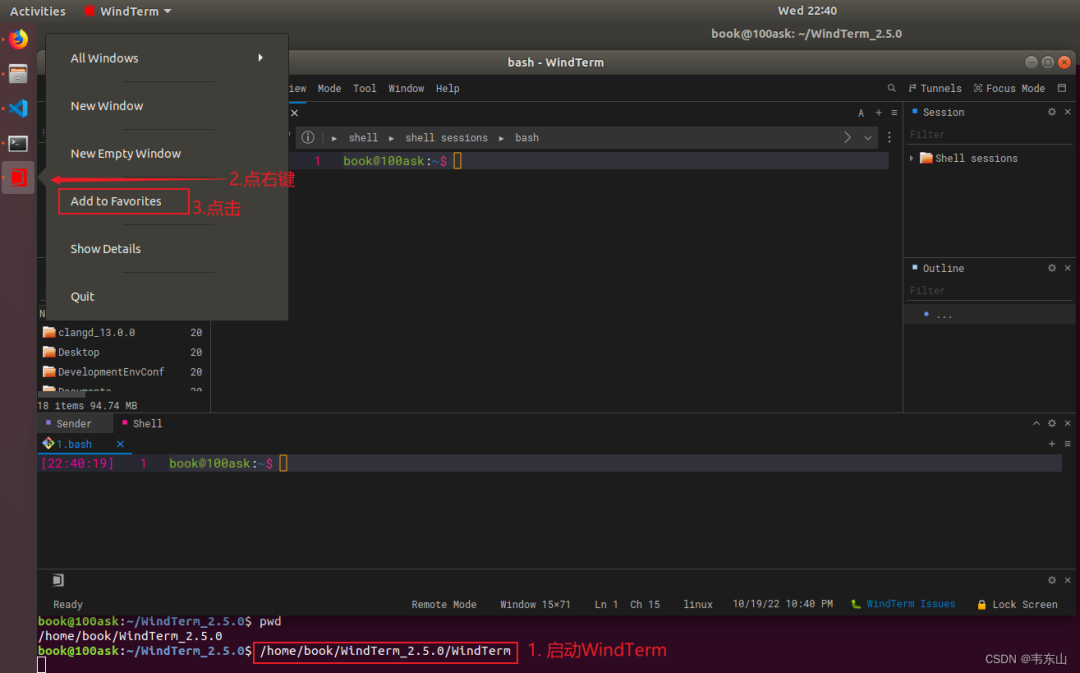
Exec=/home/book/WindTerm_2.5.0/WindTermThen increase the executable permissions and start the program:
sudo chmod +x /usr/share/applications/windterm.desktop
/usr/share/applications/windterm.desktop
Finally, follow the operations shown in the image, and you will be able to start WindTerm by clicking the mouse on the left startup bar in Ubuntu:
4. Install Sogou Input Method
Follow the instructions: https://shurufa.sogou.com/linux/guide
Switch between Chinese and English shortcut key: Ctrl+Space.
5. Install Calculator
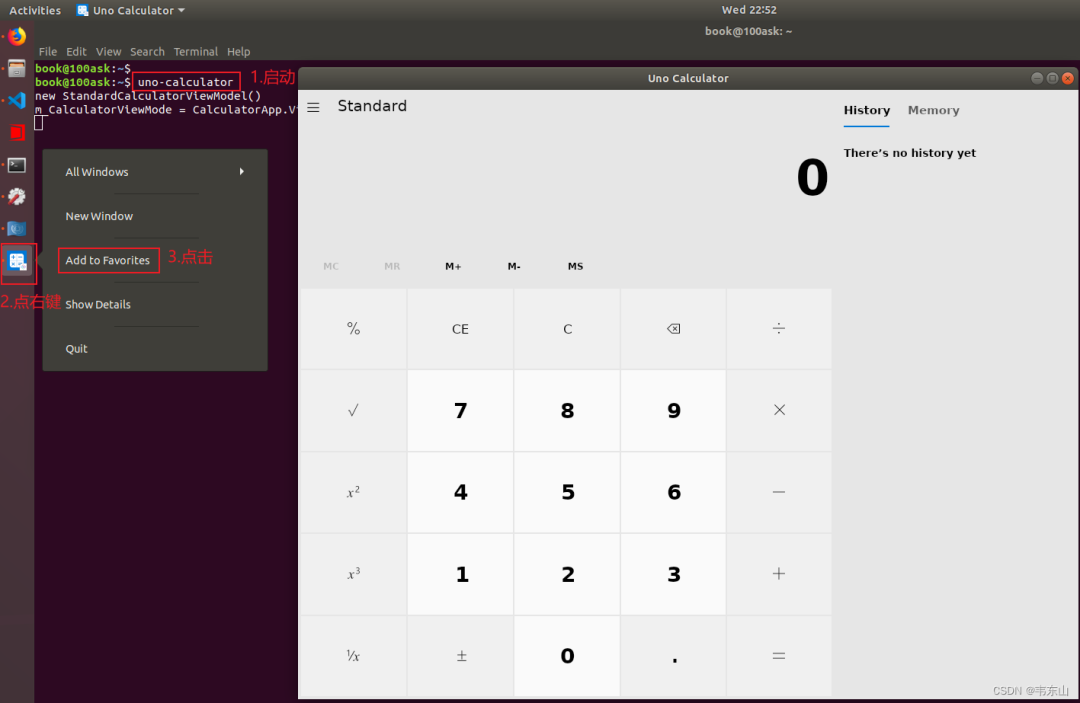
Execute the following command to install:
sudo snap install uno-calculatorThen start it and add it to the left startup bar in Ubuntu, as shown in the image:
6. Download and Compile the Kernel
Taking the Baibai Network IMX6ULL_Pro development board as an example.
6.1 Download the Kernel
Execute the following command:
$ git clone https://e.coding.net/codebug8/repo.git
$ mkdir -p 100ask_imx6ull-sdk && cd 100ask_imx6ull-sdk
$ ../repo/repo init -u https://gitee.com/weidongshan/manifests.git -b linux-sdk -m imx6ull/100ask_imx6ull_linux4.9.88_release.xml --no-repo-verify
$ ../repo/repo sync -j4
6.2 Configure Toolchain
Execute the following command:
gedit ~/.bashrcAt the end, add the following content:
export ARCH=arm
export CROSS_COMPILE=arm-buildroot-linux-gnueabihf-
export PATH=$PATH:/home/book/100ask_imx6ull-sdk/ToolChain/arm-buildroot-linux-gnueabihf_sdk-buildroot/bin
Close and reopen the terminal.
6.3 Compile the Kernel
Execute the following command:
$ cd /home/book/100ask_imx6ull-sdk/Linux-4.9.88
$ make 100ask_imx6ull_defconfig
$ make zImage -j4
Close and reopen the terminal.
7. Use VSCode to Read Kernel Source Code
7.1 Generate compile_commands.json
The bear command is used to generate compile_commands.json, and its usage is as follows:
bear make [other make parameters]It will record the commands used during the make process of compiling files.
When compiling the kernel, use the following command:
// If the kernel has been compiled before, clean it up
// Then recompile
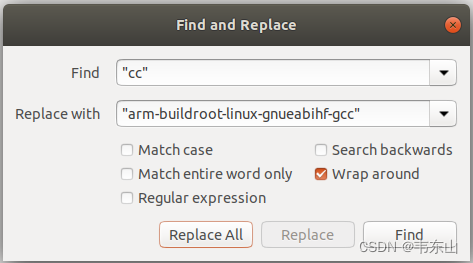
bear make zImage -j 4After successful compilation, a file compile_commands.json will be generated in the current directory, which needs to be modified as follows:
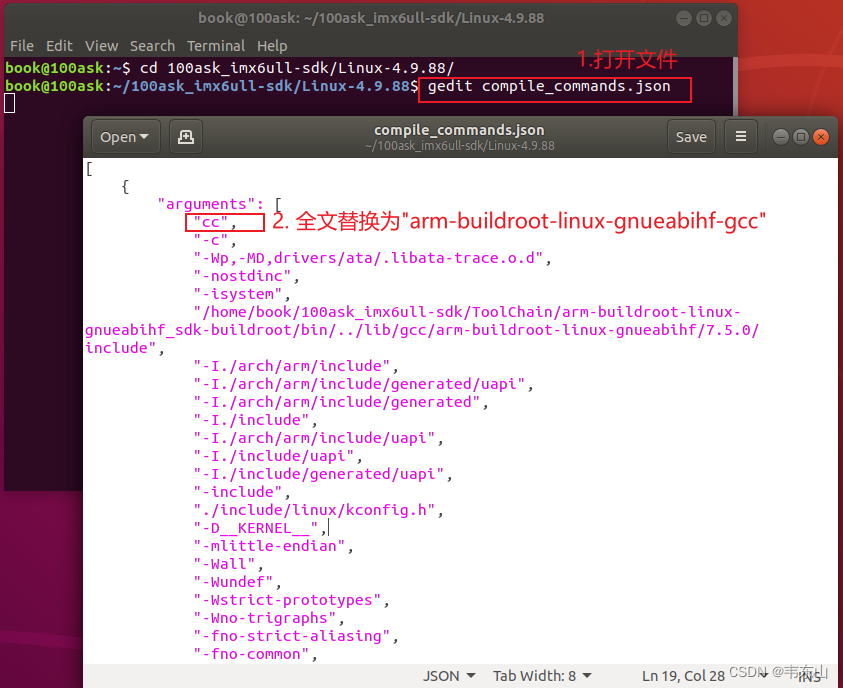
In gedit, use the shortcut “Ctrl+H” to operate as shown:
7.2 Open the Kernel in VSCode
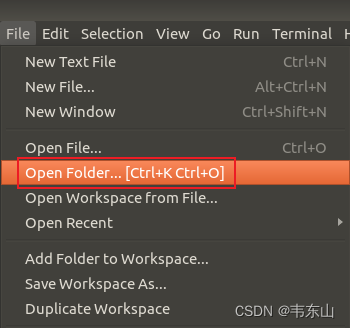
7.2.1 Open Directory
There are two methods:
In VSCode, perform the following operation to select and open the directory “/home/book/100ask_imx6ull-sdk/Linux-4.9.88”
Enter the kernel directory in the terminal and execute the command:
code .7.2.2 Trigger Clangd to Build Index
Open any C file in VSCode to trigger Clangd to build an index:
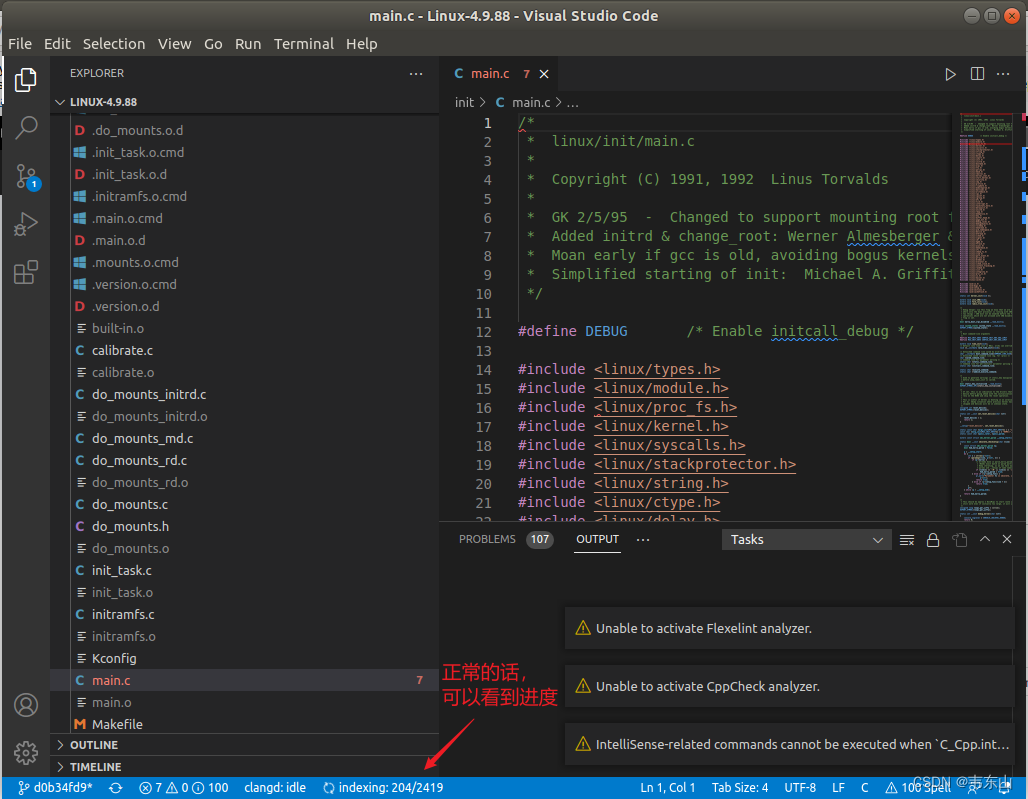
If you do not see the above status, you can handle it as follows:
-
Re-edit setting.json according to “2.3.2 Configure Clangd”
-
Restart VSCode, reopen the kernel source code directory, and reopen the C file
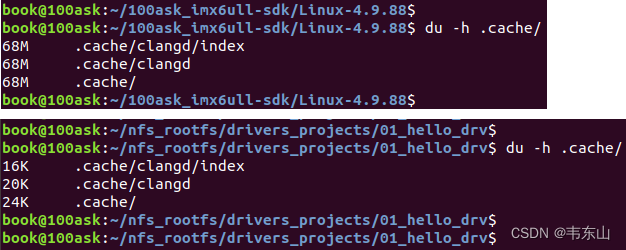
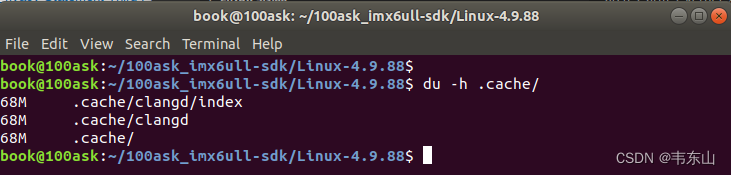
During the index creation process, you can use the following command to check the .cache directory, which will continue to grow (final size around 60M):
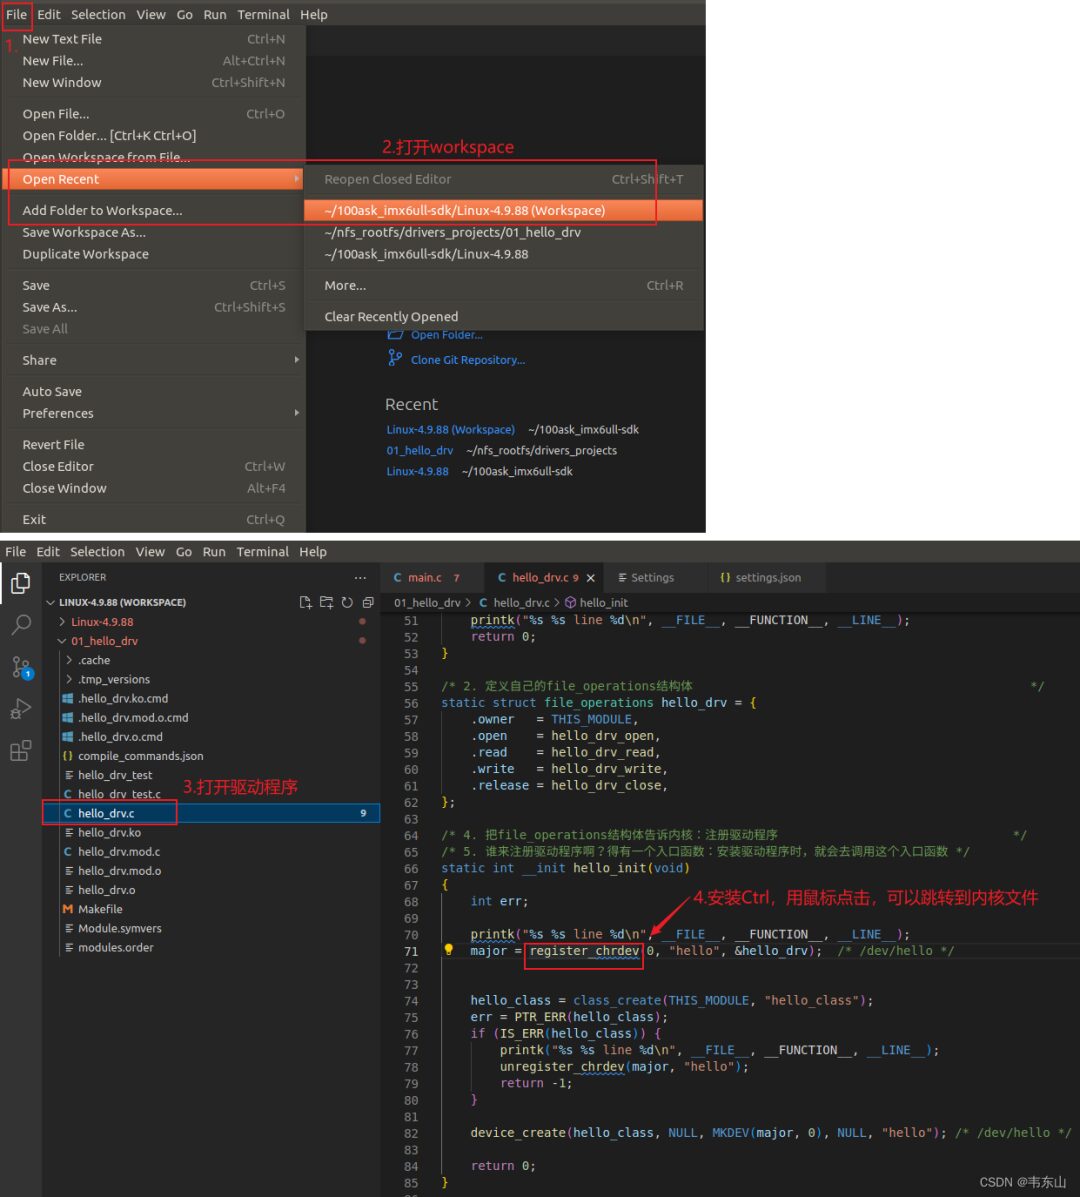
7.2.3 Verification
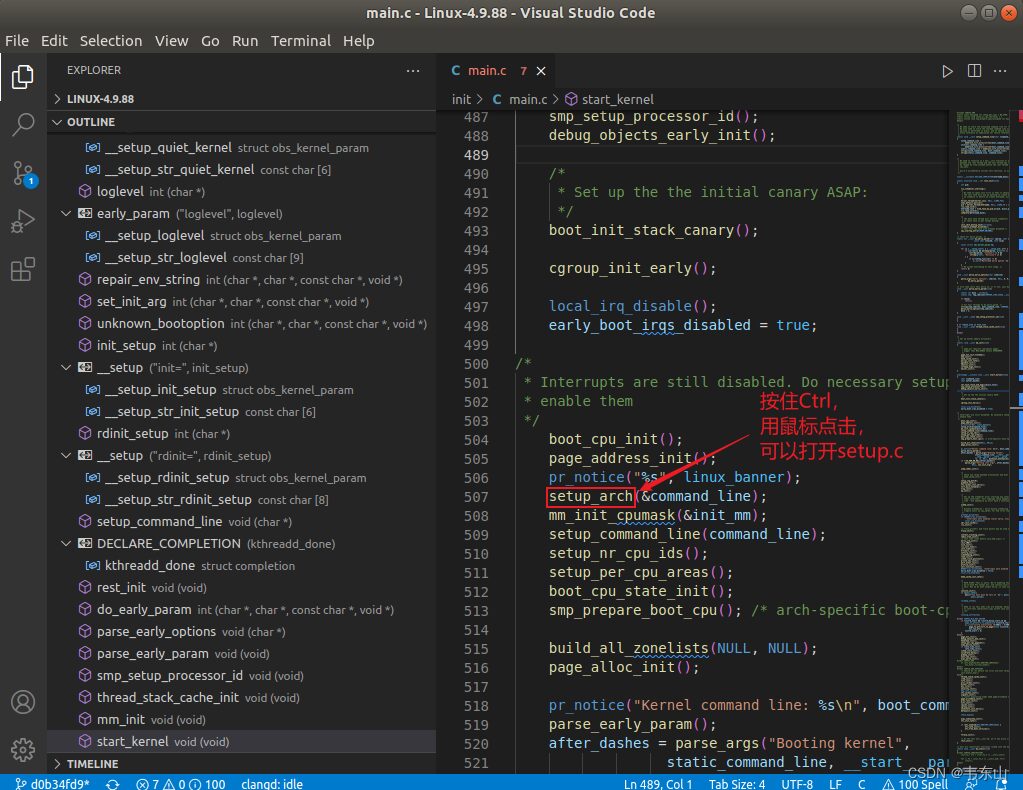
8. Use VSCode to Read External Kernel Source Code
For example, if we write a hello driver program that uses header files and functions in the kernel, we want to open the kernel file when clicking on the function in the hello driver.
A workspace needs to be created:
-
It contains the kernel directory and the hello driver source directory
-
The kernel directory has compile_commands.json
-
The hello driver source directory has compile_commands.json
8.1 Create Workspace
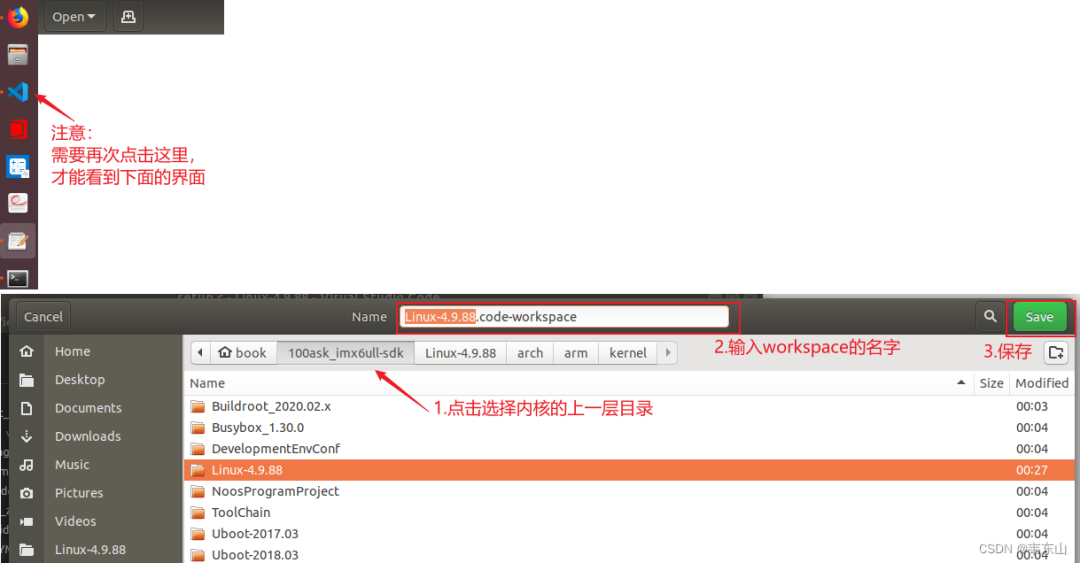
Use VSCode to open the kernel directory, then save it as a Workspace, as shown:
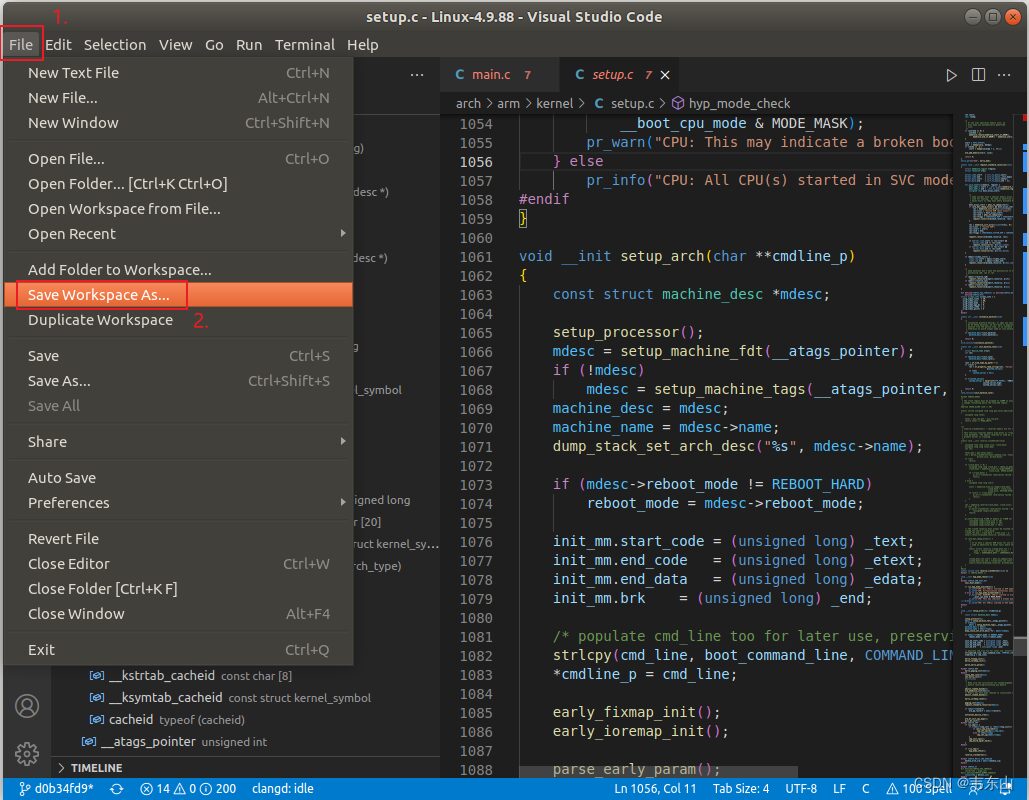
Save it in the parent directory of the kernel source:
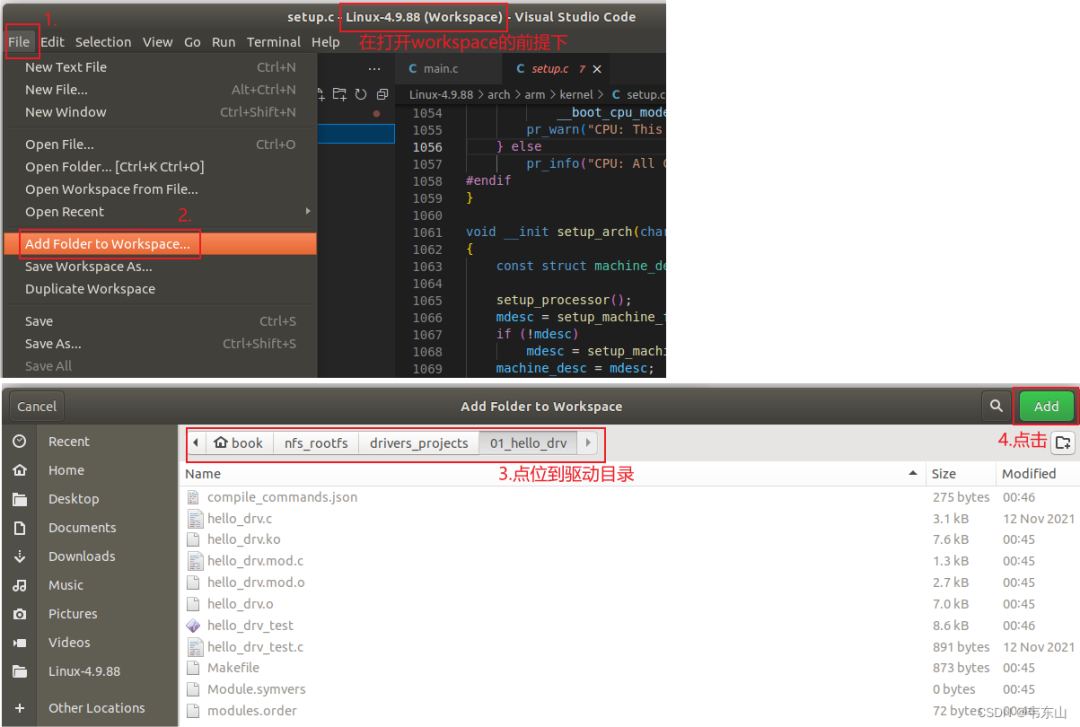
8.2 Add Driver Directory to Workspace
Assuming the driver program is located in this directory:
8.2.1 Compile Driver
Use the following command to compile; it will generate compile_commands.json:
cd /home/book/nfs_rootfs/drivers_projects/01_hello_drv/
bear make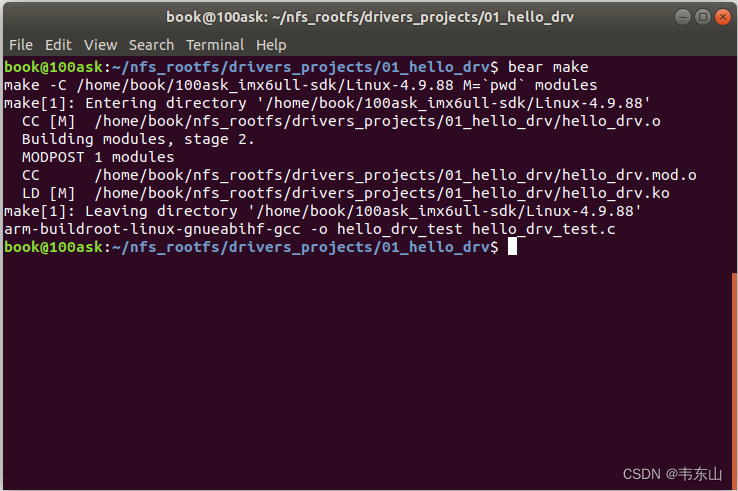
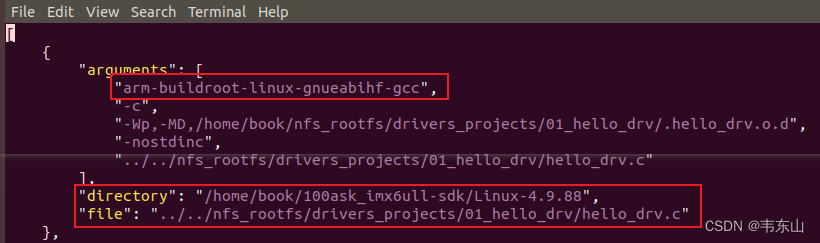
8.2.2 Modify compile_commands.json
Change all instances of “cc” to “arm-buildroot-linux-gnueabihf-gcc”.
8.2.3 Add to Workspace
8.3 Verification
9. Common Errors
9.1 Unable to Jump
Step 1, confirm that IntelliSense has been turned off:
Step 2, confirm that Clangd is installed:
Step 3, confirm that compile_commands.json exists in the source code directory and contains the source code, with “cc” changed to “arm-buildroot-linux-gnueabihf-gcc”:
Step 4, after opening a C file in VSCode, confirm that the .cache directory has been generated: