
Scan to FollowLearn Embedded Together, learn together, grow together

Introduction
When I first started using STM32, I used Keil as my IDE. Due to my previous experience with VS and Eclipse, I found it difficult to tolerate the rudimentary functionality of the Keil editor, which provided an extremely poor coding experience.
Later, I tried various IDEs, using Eclipse + Keil, but found that Eclipse’s support for C language was also lacking. Using emBits + gcc was complicated when collaborating with others. Eventually, I discovered PlatformIO, which also uses gcc as the compiler, but it only supports the HAL library. Additionally, my colleagues were all using Keil, so if I used gcc, I couldn’t collaborate effectively.
Finally, by using VS Code + Keil, I perfectly resolved the coding experience issues as well as the project collaboration problems. In fact, there are many tutorials online that use VS Code as the editor and Keil as the compiler, but they usually require editing in VS Code and then compiling, downloading, and debugging in Keil. This article aims to achieve editing, compiling, downloading, and debugging all within VS Code.
Part 1 Environment
(1) VS Code; (2) Keil; Python; (3) GNU Arm Embedded Toolchain (arm gcc toolchain); (4) C/C++ (VS Code plugin); (5) Cortex-Debug (VS Code plugin); (6) Other VS Code plugins (to enhance experience).
Part 2 Prerequisites
Before writing code, you need to set up a project using Keil, which includes project configuration, file addition…
Part 3 Editing
After installing the VS Code plugins, the experience of writing C code in VS Code is already quite good.
However, since we are using the Keil environment, we need to configure header file inclusion, macro definitions, etc. Open the c_cpp_properties.json file in the .vscode folder of the project path, or create a new one if it doesn’t exist. The content configuration is as follows:
{
    "configurations": [
        {
            "name": "STM32",
            "includePath": [
                "D:/Program Files/MDK5/ARM/ARMCC/**",
                "${workspaceFolder}/**",
                ""
            ],
            "browse": {
                "limitSymbolsToIncludedHeaders": true,
                "databaseFilename": "${workspaceRoot}/.vscode/.browse.c_cpp.db",
                "path": [
                    "D:/Program Files/MDK5/ARM/ARMCC/**",
                    "${workspaceFolder}/**",
                    ""
                ]
            },
            "defines": [
                "_DEBUG",
                "UNICODE",
                "_UNICODE",
                "__CC_ARM",
                "USE_STDPERIPH_DRIVER",
                "STM32F10X_MD"
            ],
            "intelliSenseMode": "msvc-x64"
        }
    ],
    "version": 4
}
In this, you need to add the header file paths to includePath and path. ${workspaceFolder}/** is the project path and should not be changed. You also need to add the Keil header file paths.
Then, add macros to the defines, which are the macros configured in the C++ tab of the Options for Target in Keil. After that, you can experience the powerful code suggestions and function navigation features in VS Code (leaving Keil’s editor in the dust).
Part 4 Compilation and Programming
Compilation and programming are achieved through the Task feature in VS Code, using command line calls to Keil for compilation and programming.
Keil itself supports command line calls; refer to Keil’s manual for specifics, but the problem is that when using command line calls to Keil, no matter what operation you perform, its output will not be displayed in the console!!! (What’s the use of command line support if you can’t see the output?)
Fortunately, Keil supports output to files, so we can use this to perform some tricks. By executing commands and reading file contents simultaneously, we can print them to the console, allowing us to see the compilation process directly in VS Code.
For this, I wrote a Python script that calls Keil from the command line and simultaneously reads the file output to the console.
#!/usr/bin/python
# -*- coding:UTF-8 -*-

import os
import threading
import sys

runing = True

def readfile(logfile):
    with open(logfile, 'w') as f:
        pass
    with open(logfile, 'r') as f:
        while runing:
            line = f.readline(1000)
            if line != '':
                line = line.replace('\', '/')
                print(line, end = '')

if __name__ == '__main__':
    modulePath = os.path.abspath(os.curdir)
    logfile = modulePath + '/build.log'
    cmd = '"D:/Program Files/MDK5/UV4/UV4.exe" '
    for i in range(1, len(sys.argv)):
        cmd += sys.argv[i] + ' '
    cmd += '-j0 -o ' + logfile
    thread = threading.Thread(target=readfile, args=(logfile,))
    thread.start()
    code = os.system(cmd)
    runing = False
    thread.join()
    sys.exit(code)
This script needs to be run with VS Code’s Task feature. By configuring the Task, we also need to match error messages (compilation errors) in the output, allowing us to click on errors in Keil and jump directly to the error code. For specific configuration, please refer to the VS Code documentation; here is my Task.
{
    // See https://go.microsoft.com/fwlink/?LinkId=733558
    // for the documentation about the tasks.json format
    "version": "2.0.0",
    "tasks": [
        {
            "label": "build",
            "type": "shell",
            "command": "py",
            "args": [
                "-3",
                "${workspaceFolder}/scripts/build.py",
                "-b",
                "${config:uvprojxPath}"
            ],
            "group": {
                "kind": "build",
                "isDefault": true
            },
            "problemMatcher": [
                {
                    "owner": "c",
                    "fileLocation": [
                        "relative",
                        "${workspaceFolder}/Project"
                    ],
                    "pattern": {
                        "regexp": "^(.*)\((\d+)\):\s+(warning|error):\s+(.*):\s+(.*)$",
                        "file": 1,
                        "line": 2,
                        "severity": 3,
                        "code": 4,
                        "message": 5
                    }
                }
            ]
        },
        {
            "label": "rebuild",
            "type": "shell",
            "command": "py",
            "args": [
                "-3",
                "${workspaceFolder}/scripts/build.py",
                "-r",
                "${config:uvprojxPath}"
            ],
            "group": "build",
            "problemMatcher": [
                {
                    "owner": "c",
                    "fileLocation": [
                        "relative",
                        "${workspaceFolder}/Project"
                    ],
                    "pattern": {
                        "regexp": "^(.*)\((\d+)\):\s+(warning|error):\s+(.*):\s+(.*)$",
                        "file": 1,
                        "line": 2,
                        "severity": 3,
                        "code": 4,
                        "message": 5
                    }
                }
            ]
        },
        {
            "label": "download",
            "type": "shell",
            "command": "py",
            "args": [
                "-3",
                "E:\Work\Store\MyWork\STM32F1\FreeModbus_M3\scripts\build.py",
                "-f",
                "${config:uvprojxPath}"
            ],
            "group": "test"
        },
        {
            "label": "open in keil",
            "type": "process",
            "command": "${config:uvPath}",
            "args": [
                "${config:uvprojxPath}"
            ],
            "group": "test"
        }
    ]
}
For projects compiled with ARM Compiler 6, the problemMatcher in build and rebuild should be configured as follows:
"problemMatcher": [
    {
        "owner": "c",
        "fileLocation": ["relative", "${workspaceFolder}/MDK-ARM"],
        "pattern": {
            "regexp": "^(.*)\((\d+)\):\s+(warning|error):\s+(.*)$",
            "file": 1,
            "line": 2,
            "severity": 3,
            "message": 4,
        }
    }
]
The config:uvPath and config:uvprojxPath in the file are the paths to the Keil UV4.exe file and the project path (.uvprojx), which can either be modified directly or added to the corresponding items in VS Code’s setting.json. Thus, we have perfectly achieved editing, compiling, and downloading in VS Code.
Compilation Output:

Output When Errors Occur:
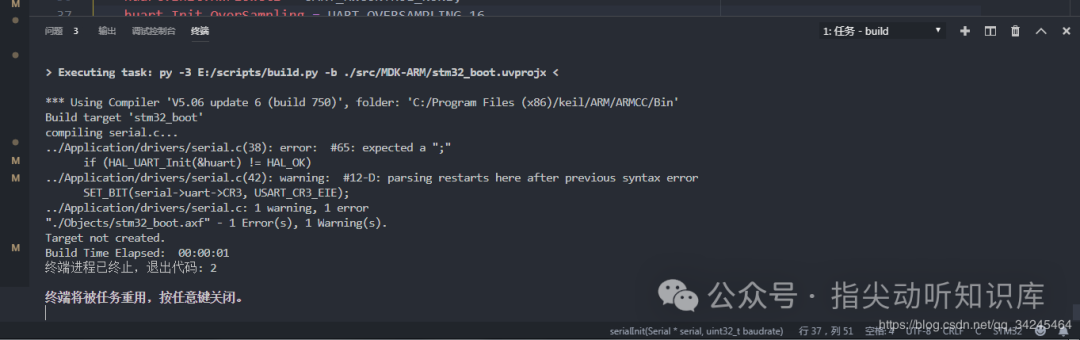
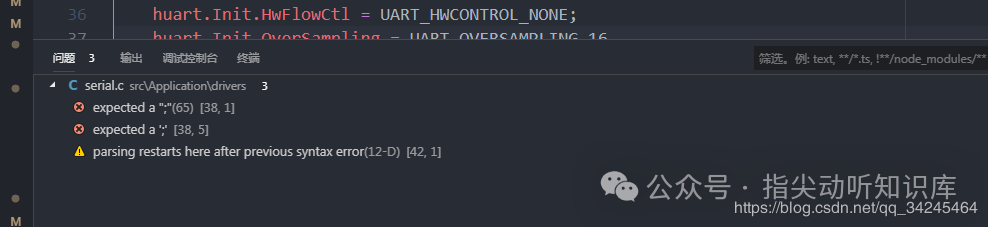
Error Matching:
Part 5 Debugging
Debugging requires the use of the Cortex-Debug plugin and the arm gcc toolchain; this part can be referenced in the Cortex-Debug documentation, which is quite detailed.
First, install the Cortex-Debug plugin and the arm gcc toolchain, then configure the environment path. If using Jlink for debugging, download the Jlink suite and after installation, find the JLinkGDBServerCL.exe program, and add “cortex-debug.JLinkGDBServerPath“: “C:/Program Files (x86)/SEGGER/JLink/JLinkGDBServerCL.exe” in the VS Code settings, where the latter path is your own path.
Additionally, here is the configuration for the arm gcc toolchain: “cortex-debug.armToolchainPath: “D:\Program Files (x86)\GNU Arm Embedded Toolchain\9 2020-q2-update\bin“, where the latter path is your own path. If using STLink for debugging, download the stutil tool, which can be found by searching GitHub, and configure the path accordingly.
Once the above steps are completed, you can directly click the debug button in VS Code. This will create a launch.json file, which is the debug configuration file for VS Code, and you can refer to my file for configuration.
{
    // Use IntelliSense to learn about related properties.
    // Hover to view descriptions of existing properties.
    // For more information, visit: https://go.microsoft.com/fwlink/?linkid=830387
    "version": "0.2.0",
    "configurations": [

        {
            "name": "Cortex Debug(JLINK)",
            "cwd": "${workspaceRoot}",
            "executable": "${workspaceRoot}/Project/Objects/Demo.axf",
            "request": "attach",
            "type": "cortex-debug",
            "servertype": "jlink",
            "device": "STM32F103C8",
            "svdFile": "D:\Program Files\ARM\Packs\Keil\STM32F1xx_DFP\2.3.0\SVD\STM32F103xx.svd",
            "interface": "swd",
            "ipAddress": null,
            "serialNumber": null
        },
        {
            "name": "Cortex Debug(ST-LINK)",
            "cwd": "${workspaceRoot}",
            "executable": "${workspaceRoot}/Project/Objects/Demo.axf",
            "request": "attach",
            "type": "cortex-debug",
            "servertype": "stutil",
            "svdFile": "D:\Program Files\ARM\Packs\Keil\STM32F1xx_DFP\2.3.0\SVD\STM32F103xx.svd",
            "device": "STM32F103C8",
            "v1": false
        }
    ]
}
Note the several places that need to be modified: executable should be modified to your project’s generated target file, which is the project’s .axf file, and svdFile is used to monitor the MCU peripherals; this file can be found in the Keil installation path, you can refer to my path to locate it. After configuration, click the debug button again to start debugging.
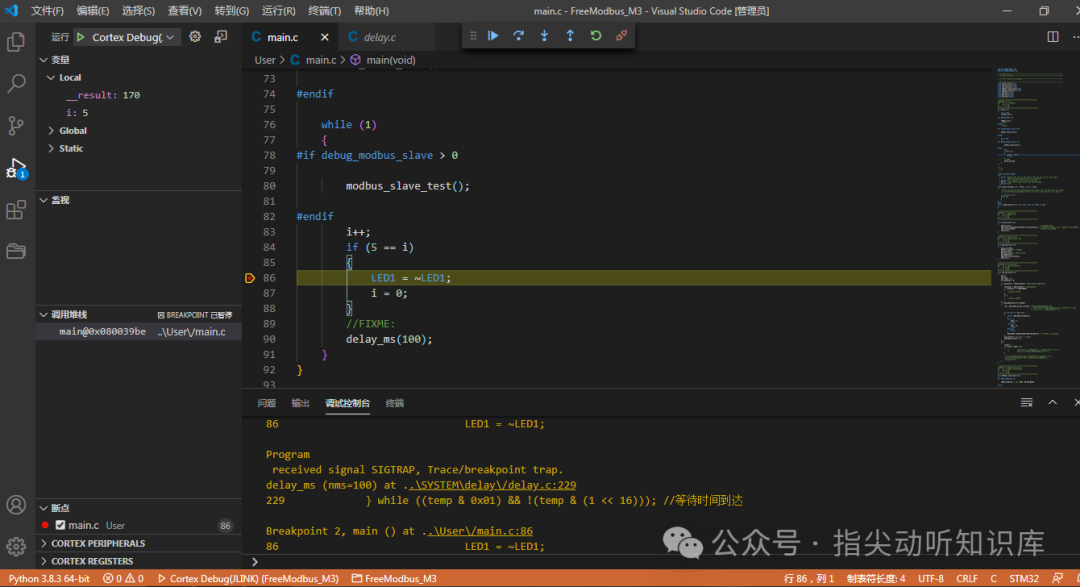
Compared to Keil’s own debugging features, VS Code also supports conditional breakpoints, allowing you to set hit conditions, counts, etc., which greatly facilitates debugging.
Conclusion
Through the above configuration, we basically no longer need to open Keil for anything other than creating projects and adding files to the project. So I can say, goodbye, incompetent Keil!
Source:http://b.mtw.so/5W5Xlt

Follow 【Learn Embedded Together】, reply“Join Group” to enter the technical exchange group.
If you find the article good, click “Share”, “Like”, “Read”!