/ Today’s Tech News /Recently, according to numerous user reports, the iQIYI App has started to impose restrictions on its casting feature. Previously, Gold VIP members could cast at a maximum resolution of 4K, but now they can only select the lowest resolution of 480P. To cast in 4K, one must purchase a Platinum VIP membership. Many users have expressed that the 480P resolution is too low to watch effectively./ Author’s Bio /Hello everyone, today is the last article before the New Year. I will be taking a break next week to celebrate the holiday, and the public account will temporarily stop updating. Here, I wish everyone a Happy New Year in advance, and we will see each other after the holiday.This article is adapted from coder_pig‘s blog, which mainly shares a quick start guide for system source code, and I believe it will be helpful for everyone!Original article link:
https://juejin.cn/post/7038543675109933070
/ Introduction /A few years ago, when I just graduated, I was involved in developing a Launcher at my previous company and got acquainted with AOSP. At that time, the early education tablet was customized based on the Android 4.4 source code. After leaving that job, I have been dabbling in the application layer, and recently I felt inspired to review some foundational skills, hence this article~Tips:This article is not based on the author’s personal practice but is a summary derived from the articles of several experts referenced in the bibliography. Downloading the AOSP source code is time-consuming, and the author does not have the need to compile and write the source code; they only look at the source code when debugging or understanding the underlying mechanisms. The SDK’s built-in android.jar and some online source code sites are sufficient. The environment setup process is generally consistent, and when encountering issues, make good use of search engines~/ Terminology /① AOSPOfficial Website:https://source.android.google.cn/Android Open Source Package, Android System Open Source Package, the Android mobile terminal platform (Qualcomm, MTK, etc.) first modifies the native Android code to form its platform code, and other mobile manufacturers then provide their mobile solutions (system customization) based on the platform code.The AOSP source code compilation will generate a series of products (in the out directory):
- /out/host → Products related to Android development tools, including various SDK tools such as adb, dex2oat, aapt, etc.;
- /out/target/common → Some common compilation products, including Java application code and Java libraries;
- /out/target/product/[product_name] → Compilation products for specific devices, as well as platform-related C/C++ code and binary files (such as system.img, ramdisk.img, userdata.img, boot.img, etc.);
The source code library android.jar we usually see in AS is the packaged classes.jar, detailed path:out/target/common/obj/JAVA_LIBRARIES/framework_intermediates/classes.jar. In some scenarios, when it is necessary to use hidden APIs in the SDK (@hide annotation), one solution is to replace the native sdk’s android.jar with the classes.jar generated by aosp compilation. For specific import examples, see: “Importing AOSP Compiled classes.jar in Android Studio 3.5” (https://www.jianshu.com/p/d5c3e191865e).② GerritAndroid uses Git as its code management tool and has developed Gerrit for code review to better manage code centrally. It is essentially a Git server that provides a series of permission controls for Git repositories hosted on its server, as well as a web page for code review.③ RepoRepo command-line tool, which encapsulates Git commands in Python, simplifies centralized management of multiple Git repositories./ Repo Workflow /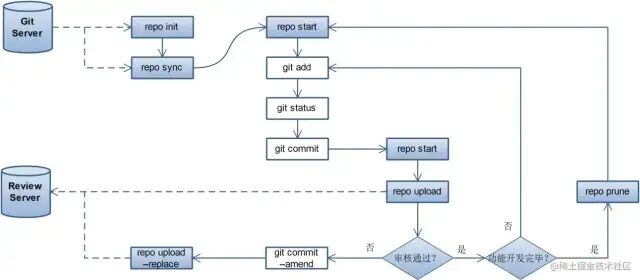 Brief description of key commands:
- repo init → Initializes Repo in the current directory, generating a .repo directory that contains a manifest.xml file listing the cloning methods for each project (repository address, corresponding workspace address, branch correspondence, etc.);
- repo sync → Synchronizes all projects to the local workspace;
- repo start → Creates and switches to a local working branch;
- Git related commands → Locally modifies the code of certain projects and performs regular commits;
- repo upload → Publishes code modifications to the review server;
- repo prune → After feature development is complete and merged, safely removes outdated topic branches;
For more detailed content, see: “Source Code Control Workflow” (https://source.android.google.cn/setup/create/coding-tasks?hl=zh-cn)./ System Preparation /Simply downloading the source code can be done on any system, but if you want to compile, you need a Linux or Mac OS system.If you want to compile on Windows, you can achieve this indirectly by installing the above systems through a virtual machine, commonly using Docker or VirtualBox. For installation examples, see: “Basic Android AOSP (1) Installing Ubuntu on VirtualBox” (http://liuwangshu.cn/framework/aosp/1-install-ubuntu.html).For more detailed content, see: “Setting Up the Build Environment” (https://source.android.com/setup/build/initializing#using-a-separate-output-directory)./ Source Code Download /Run the following commands~
# ① Install Git, Curl, Python, some systems come with them~
sudo apt-get install git
sudo apt-get install curl
sudo apt-get install python

# ② Create bin and add to PATH
mkdir ~/bin
PATH=~/bin:$PATH

# ③ Download Repo tool and set it as executable
# Tips: Foreign sources may have issues, you can replace them with domestic mirrors, for example: https://mirrors.tuna.tsinghua.edu.cn/git/git-repo
curl https://storage.googleapis.com/git-repo-downloads/repo > ~/bin/repo
chmod a+x ~/bin/repo

# ④ Create a working directory (to store the source code)
mkdir aosp
cd aosp

# Tips: Repo will attempt to access the official Git source to update itself during operation. If you want to use the tuna mirror for updates, you can copy the following content to ~/.bashrc
export REPO_URL='https://mirrors.tuna.tsinghua.edu.cn/git/git-repo/'

# ⑤ Git set identity information (name, email)
git config --global user.name  "User Name"
git config --global user.email "[email protected]"

# ⑥ Initialize the repository (also supports replacing mirror sources)
repo init -u https://android.googlesource.com/platform/manifest

# You can also specify a branch, optional values can be viewed at: https://source.android.com/source/build-numbers#source-code-tags-and-builds
repo init -u https://android.googlesource.com/platform/manifest -b android-9.0.0_r8

# ⑦ Sync code (pull AOSP source code to the working directory, usually takes several hours)
repo sync

# Tips: During the download process, some projects may not be found, which could be due to mirror issues or network problems. You can try to sync that project individually, supporting the -jN parameter, for example: -j4
repo sync -c platform/frameworks/layoutlib

# Note: AOSP does not include kernel code, if needed, you can download it separately. There are many versions, such as:
# common → General Linux kernel, goldfish → Android emulator kernel, msm → Qualcomm MSM chip
mkdir kernel
cd kernel
git clone https://aosp.tuna.tsinghua.edu.cn/kernel/goldfish.git
cd goldfish
# You can check which kernel version branches are available for download
git branch -a
# Download the corresponding version kernel code
git checkout remotes/origin/android-goldfish-3.4
For more detailed content, see: “Downloading Source Code” (https://source.android.com/setup/build/downloading).Additionally, foreign mirrors can be unstable, you can also directly use the Tsinghua mirror (https://mirrors.tuna.tsinghua.edu.cn/help/AOSP/), the first sync may easily fail, so it is recommended to first use software like Thunder to directly download the initialization package aosp-latest.tar (https://mirrors.tuna.tsinghua.edu.cn/aosp-monthly/aosp-latest.tar) for initialization, and then sync./ Compilation /Similarly, first, some terminology explanations:
- Makefile → The Android platform compilation system, an independent project written with Makefile, defines compilation rules, implements automated compilation, integrates code scattered across hundreds of Git repositories, unifies compilation, and outputs products categorized into a directory, packaging them into mobile ROMs, and can also generate SDKs, NDKs, etc. used during application development.
- Android.mk → Defines the necessary parameters of a module, allowing the module to compile with the platform. In simple terms, it tells the system how to compile the source code and generate the corresponding target files;
- kati → A small tool developed by Google specifically for Android, based on Golang and C++, which converts Android’s Makefile into Ninja files.
- Ninja → A small compilation system focused on speed, treating Makefile as a high-level language, while it is akin to assembly language, with file extensions of .ninja;
- Android.bp → Configuration file that replaces Android.mk;
- Blueprint → Parses Android.bp files and translates them into Ninja syntax files;
- Soong → A replacement for the Makefile compilation system, responsible for parsing Android.bp files and converting them into Ninja files;
Relationship description:
- The Android project is getting larger, and the Makefile compilation takes longer. Android 7.0 introduced Ninja for better speed and parallel efficiency in compiling the system;
- Soong uses the Android.bp syntax defined by Blueprint to complete the parsing of Android.bp, ultimately converting it into Ninja files;
- Makefile files (.make or .mk) are converted into Ninja files (.ninja) by kati;
- Makefile is designed for developers to write, while Ninja is designed for other programs to generate, comparable to high-level languages and assembly languages;
① Preparing the Compilation Environment
# ① Install jdk 8
sudo apt-get update
sudo apt-get install openjdk-8-jdk

# Tips: If using Ubuntu 14+, you also need to install the following dependencies
sudo apt-get install git-core gnupg flex bison gperf build-essential zip curl zlib1g-dev gcc-multilib g++-multilib libc6-dev-i386 lib32ncurses5-dev x11proto-core-dev libx11-dev lib32z-dev ccache libgl1-mesa-dev libxml2-utils xsltproc unzip
② Source Code Compilation
# ① Initialize the environment
source build/envsetup.sh

# ② Delete out and intermediate files, clean will delete the files generated in this setup, clobber will delete all files generated in all configurations
make clobber

# ③ Choose the compilation target, the following command will enter a menu to select the corresponding version, press the number and enter
# Compilation targets are in the form of BUILD-BUILDTYPE, where BUILD represents a specific feature code, and BUILDTYPE is one of the following types:
# user → Restricted permissions, suitable for production environments, no root permissions, cannot debug, adb is disabled by default;
# userdebug → Similar to user, but has root and debug permissions, generally used for debugging on real devices.
# eng → A development configuration with additional debugging tools, having maximum permissions (root, etc.), generally used for emulators.
# Example of a compilation target → Compilation target for Pixel 3a XL → aosp_bonito-userdebug
lunch

# You can also directly specify the compilation target, such as: lunch aosp_bonito-eng
# You can also directly use the number, such as: lunch 8, but it is not recommended, as the corresponding numbers may vary across different system versions~

# ③ Start compilation, the -jN parameter is used to set the number of parallel tasks for compilation, with 6 CPU cores, N value should ideally be between 6-12
# Adjust dynamically based on your CPU core count, I have seen up to 32~
make -j6

# You can also print the output results to a log file: make -j6 2>&1 | tee build_20211206_1403.log

# After successful compilation, an out directory will be generated, for example: ~/aosp/out/target/product/bonito

# Tips: If needed, you can also type: make sdk to compile the SDK and generate the modified android.jar
③ Single Module CompilationGeneral compilation may take several hours, but sometimes you may only need to modify a specific application module and only need to compile that module. For example, for the settings module:
source build/envsetup.sh
lunch aosp_bonito-eng
# Enter the module directory
cd package/apps/Setting

# Optional commands for compiling a single module are as follows:
# mm → Compile the module in the current directory without compiling dependent modules
# mmm → Compile the module in the specified directory without compiling dependent modules
# mma → Compile the module in the current directory and its dependencies
# mmmma → Compile all modules in the specified path, including dependencies
mm

# Successful compilation will prompt the storage path of the generated files. In addition to generating Setting.odex, it will also generate Settings.apk in the priv-app/Settings directory, which can be directly adb push or adb install to verify the effect. You can also use the make snod command to repackage and generate system.img to view in the emulator.
/ Flashing /① For Pixel or Nexus DevicesCongratulations, you can flash directly. First, go to Driver Binaries for Nexus and Pixel Devices (https://developers.google.com/android/drivers) to download the corresponding drivers based on your device model and Android version. Then extract and execute:
./extract-qcom-sargo.sh
./extract-google_devices-sargo.sh
Enter the bootloader and execute the flashing command (-w means wipe data)
adb reboot bootloader
fastboot flashall -w
Then wait for the flashing to complete~② Android Virtual MachineYou need to compile the AVD image yourself, selecting sdk_phone_x86_64 as the compilation target. In addition to the regular compilation, you also need to include the sdk and sdk_repo packages.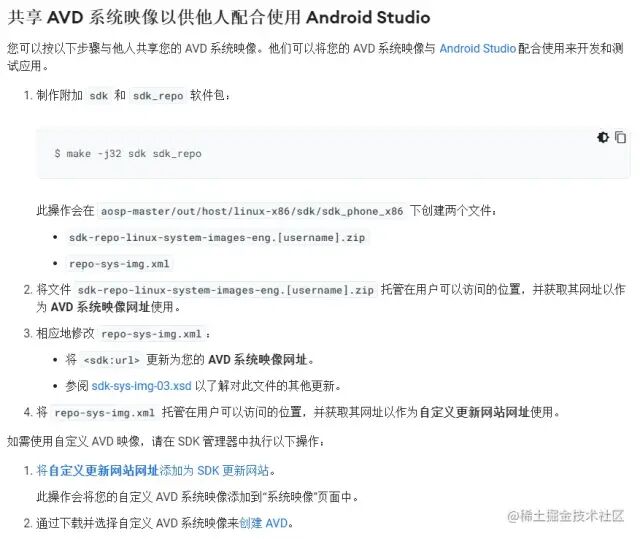 If the above method does not work, you can copy the image to one of the directories in SDK/system-images/android-xx/.③ Other PhonesFor non-Pixel devices, drivers, vendor libraries, etc., you can only look for third-party ROMs for secondary development. Previously, the most famous was CM (CyanogenMod), but it seems to have faded away. You can try LineageOS (https://download.lineageos.org/chiron).
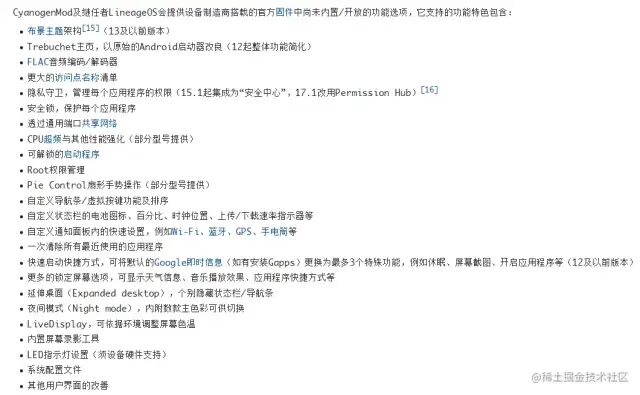 Due to space limitations, I have only briefly described each point. If you are interested in trying it yourself, you can refer to: “Compiling Android (LineageOS) Source Code Yourself” (https://www.cnblogs.com/luoyesiqiu/p/10701419.html)./ Viewing Source Code /In addition to directly downloading the complete source code to your local machine, you can also view it online or directly through AS.① Online ViewingNo need to download a bunch of code, and you can choose from multiple versions, which is very convenient~
- cs.android.com (official, fast, may require VPN) (https://cs.android.com/)
- platform_frameworks_base (view directly on Github) (https://github.com/aosp-mirror/platform_frameworks_base)
- googlesource (very comprehensive, suitable for directly git cloning single modules) (https://android.googlesource.com/)
- AndroidXref (a bit outdated, latest version up to Android 9) (http://androidxref.com/)
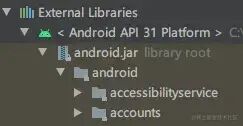
② Quick Viewing in ASClick in sequence: Settings → Appearance & Behavior → System Settings → Android SDK → Select the required Android SDK version source code to download: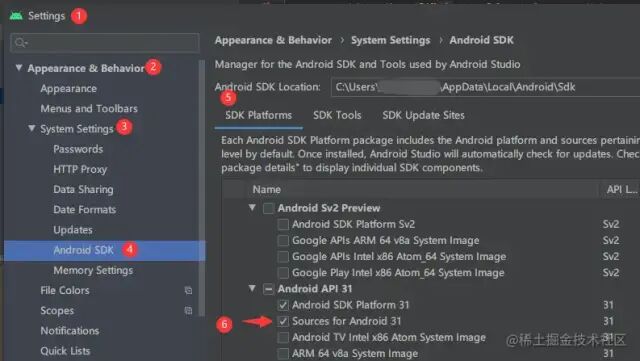 Then set the compileSdk version number in build.gradle, sync, and click to jump to the Framework class.
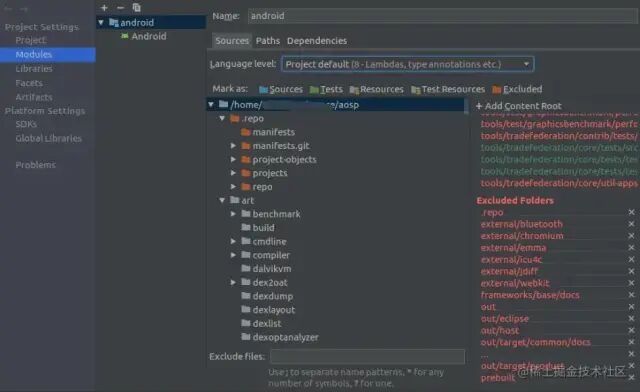
 / Debugging Source Code /① Generating IndexThe Android source code provides a tool to directly generate files recognizable by AS. After compiling the Android source code, an android.ipr file will be generated in the root directory of the source code.Open this file in AS using the “Open an existing Android Studio Project” method and wait for the index to be generated.After the index is generated, adjust the AS to monitor the source code directories, such as the out directory, which will change after each compilation, but is generally not used, so exclude it from the index (strong>Excluded it). For the out directory, other unnecessary directories should be handled similarly:
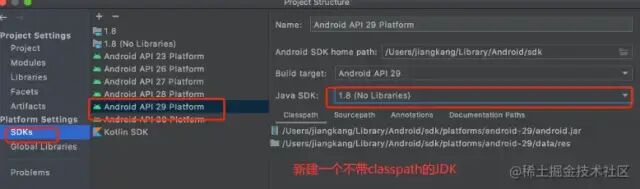
 ② Setting JDK and SDK
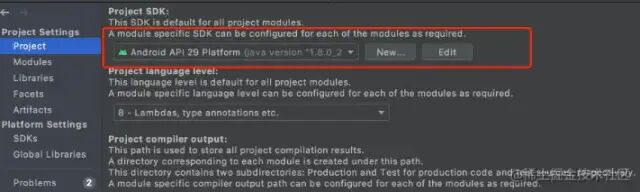 Select the corresponding SDK based on the source code version:
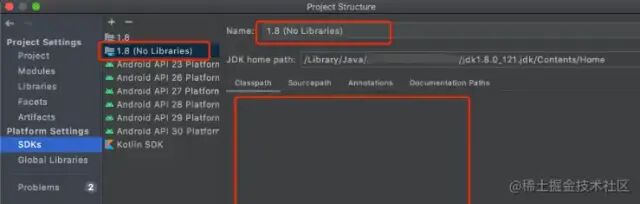 Set the JDK:
 ③ Debugging Source CodeSet breakpoints in the source code, then click Attach Debugger to Android Process
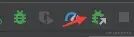 Select the process to debug, and then you can happily debug~To debug system processes on a real device, root permissions are required, and you can modify it using software like Magisk: ro.debuggable = 1. You can also choose a non-Google Play 64-bit image when creating an emulator to obtain a device with ro.debuggable = 1.Most of the time, debugging source code does not require all AOSP source code; you can also directly import part of the source code for debugging.Additionally, for real device debugging, there may be discrepancies between the debug line numbers and the source code, with line numbers running into comments. The most common reason is that domestic ROMs have modified the relevant source code. You can see the calling methods in Debugger/Frames, understand which method you entered at this step, and then Ctrl+F to search for the method name to locate the correct position.Recommended reading:My new book, “The First Line of Code, 3rd Edition” has been published!2022 Year-End Summary, My 10-Year Android JourneyRevisiting LayoutInflater, you may have a new understanding this timeFeel free to follow my public accountfor learning technology or submissions