Many scripts used for live streaming sources are based on Python, which can effectively enhance the acquisition of live streaming sources and ensure a continuous supply.
Therefore, if you want to work with live streaming sources, you need to learn some knowledge to enrich yourself.
Today, I will share a script at the end of this article.
Since Python is cross-platform, it can run on Windows, Mac, and various Linux/Unix systems. A Python program written on Windows can also run on Linux.
To start learning Python programming, you first need to install Python on your computer. After installation, you will get the Python interpreter (which is responsible for running Python programs), a command-line interactive environment, and a simple integrated development environment.
Installing Python 3
Currently, Python has two versions: 2.x and 3.x, which are not compatible with each other. As version 3.x becomes more popular, our tutorial will be based on the latest Python 3.x version. Please ensure that the Python version installed on your computer is the latest 3.x, so you can learn this tutorial without any issues.
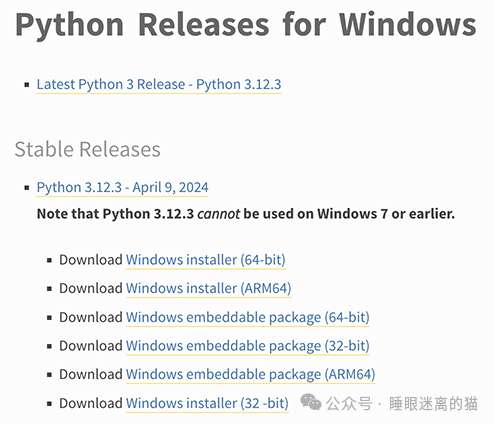
Installing Python on Windows
There are two methods to install Python on Windows.
Method 1: You can directly download the Windows installer for Python 3 from the official Python website. It is recommended to download the <span>Windows installer (64-bit)</span>, then run the downloaded <span>python-3.x-amd64.exe</span> installation package:
Be sure to check <span>Add Python 3.x to PATH</span>, then click “Install Now” to complete the installation.
Method 2: First, install a package manager, recommended Scoop, then install Python via the following command in PowerShell:
C:> scoop install pythonInstalling Python on macOS
If you are using a Mac, the system comes with Python version 2.x. To install the latest Python 3.x, there are two methods:
Method 1: Download the macOS installer for Python 3 from the Python website, double-click to run and install it;
Method 2: If you have the Homebrew package manager installed, you can install it directly using the command <span>brew install python3</span>.
Installing Python on Linux
If you are using Linux, I can assume you have experience managing Linux systems, and installing Python 3 should not be a problem. Otherwise, please switch back to Windows.
For many students who are still using Windows, if you do not plan to switch to Mac in the short term, you can continue reading the following content.
Running Python
Note:
The command for Python on Linux/macOS is <span>python3</span>, while the command on Windows is <span>python</span>. Please choose the appropriate command based on your operating system.
After successful installation, open the command line window (open PowerShell on Windows), type <span>python</span>, and you will encounter two situations:
Situation 1:
┌─────────────────────────────────────────────────────────┐
│Windows PowerShell                                 - □ x │
├─────────────────────────────────────────────────────────┤
│Windows PowerShell                                       │
│Copyright (C) Microsoft Corporation. All rights reserved.│
│                                                         │
│PS C:\Users\liaoxuefeng> python                          │
│Python 3.13 ...                                          │
│Type "help", "copyright", "credits" or "license" for ... │
│>>> _                                                    │
│                                                         │
└─────────────────────────────────────────────────────────┘
If you see output similar to <span>Python 3.x</span>, it means Python has been installed successfully!
If the prompt changes to <span>>>></span>, it indicates that we are now in the Python interactive environment, where you can enter any Python code and get immediate execution results. Now, type <span>exit()</span> and press Enter to exit the Python interactive environment (you can also simply close the command line window).
Situation 2: You receive an error: “The term ‘python’ is not recognized as the name of a cmdlet, function, script file, or executable program.”
┌─────────────────────────────────────────────────────────┐
│Windows PowerShell                                 - □ x │
├─────────────────────────────────────────────────────────┤
│Windows PowerShell                                       │
│Copyright (C) Microsoft Corporation. All rights reserved.│
│                                                         │
│PS C:\Users\liaoxuefeng> python                          │
│python : The term 'python' is not recognized as ...      │
│...                                                      │
│    + FullyQualifiedErrorId : CommandNotFoundException   │
│                                                         │
└─────────────────────────────────────────────────────────┘
This is because Windows looks for <span>python.exe</span> based on the path set in the <span>Path</span> environment variable, and if it cannot find it, it will throw an error. If you missed checking <span>Add Python 3.x to PATH</span> during installation, you will need to manually add the path where <span>python.exe</span> is located to the Path.
If you do not know how to modify the environment variable, it is recommended to rerun the Python installation program and make sure to check <span>Add Python 3.x to PATH</span>.
Summary
Learn how to install Python on your computer and how to proficiently open and exit the Python interactive environment;
When running Python on Windows, please start the PowerShell command line first, then run <span>python</span>;
When running Python on macOS and Linux, please open the terminal and run <span>python3</span>;
To exit the Python interactive environment, you need to type <span>>>></span> and enter <span>exit()</span> to confirm.
Script sharing (copy the following content and save it as xxx.py):
import cv2
import threading
# Here is the starting id and ending id, modify as needed
start_url = "rtsp://60.13.39.18:554/PLTV/88888910/224/3221220000/10000100000000060000000000101780_0.smil"
end_url = "rtsp://60.13.39.18:554/PLTV/88888910/224/3221228219/10000100000000060000000000109999_0.smil"

lock = threading.Lock()
output_file = "valid_streams.txt"
num_threads = 20  # Number of threads

def parse_url(url):
    parts = url.split("/")
    stream_id = int(parts[-2].split("322122")[-1])
    video_id = int(parts[-1].split("_")[0][-4:])
    return stream_id, video_id
# Here is the scanning link, modify accordingly
def generate_url(stream_id, video_id):
    return f"rtsp://60.13.39.18:554/PLTV/88888910/224/322122{stream_id}/1000010000000006000000000010{video_id}_0.smil"

def check_rtsp_stream(url):
    cap = cv2.VideoCapture(url)
    if cap.isOpened():
        with lock:
            with open(output_file, "a") as f:
                f.write(url + "\n")
        print(f"Valid {url}")
        cap.release()
        return True
    else:
        print(f"Invalid {url}")
        cap.release()
        return False

def validate_streams(start_stream_id, end_stream_id, start_video_id, end_video_id):
    for i in range(end_stream_id - start_stream_id + 1):
        stream_id = start_stream_id + i
        video_id = start_video_id + i
        url = generate_url(stream_id, video_id)
        check_rtsp_stream(url)

def threaded_validation(start_stream_id, end_stream_id, start_video_id, end_video_id):
    total_checks = end_stream_id - start_stream_id + 1
    chunk_size = (total_checks // num_threads) + 1
    threads = []
    for i in range(num_threads):
        thread_start = start_stream_id + i * chunk_size
        thread_end = min(thread_start + chunk_size - 1, end_stream_id)
        if thread_start > end_stream_id:
            break
        thread = threading.Thread(target=validate_streams, args=(thread_start, thread_end, start_video_id + (thread_start - start_stream_id), end_video_id))
        threads.append(thread)
        thread.start()
    for thread in threads:
        thread.join()
# Main function
def main():
    start_stream_id, start_video_id = parse_url(start_url)
    end_stream_id, end_video_id = parse_url(end_url)
    with open(output_file, "w") as f:
        pass
    threaded_validation(start_stream_id, end_stream_id, start_video_id, end_video_id)
if __name__ == "__main__":
    main()
This is a script for scanning RTSP sources.