
Introduction
This article mainly introduces the basic usage and some considerations of selection and loop statements in C++.
if Series Statements
if Statement
The if statement is used to determine whether to execute a certain piece of code based on a condition. Its syntax format is
if(<expression>){ <statement>}</statement></expression>Look at the following code
int x, y;cin >> x;if(x <= 10){ y = x*3;}We use x to represent Zhang San’s electricity consumption this month to calculate his electricity bill y. Here, the meaning of the if statement is that if Zhang San’s consumption is less than or equal to 10 degrees, then each degree is charged at 3 yuan. This is a very simple usage scenario of the if statement.
if-else Statement
Then a clever classmate might ask, what if the electricity bill exceeds 10 degrees and we want to adopt a different billing method? Thus, we introduce the if-else statement, whose syntax format is as follows
if(<expression>){ <statement1>}else{ <statement2>}</statement2></statement1></expression>If the condition in the if parentheses is true, then statement1 is executed; otherwise, statement2 is executed.
Still using Zhang San’s example, if we want to indicate that the part exceeding 10 degrees is charged double, then the code can be modified to
int x, y;cin >> x;if(x <= 10){ y = x*3;}else{ y = (x-10)*6 + 10*3;}if-else if-else Statement
What if we want to charge in three tiers? Suppose the part exceeding 20 degrees is charged three times? Thus, we introduce the if-else if-else statement, whose syntax format is
if(<expression1>){ <statement1>}else if(<expression2>){ <statement2>}else if(<expression3>){ <statement3;}... <statementn="" any="" be="" can="" else="" have="" ifelse="" last="" number="" of="" omitted{="" the="">}</statement3;}...></expression3></statement2></expression2></statement1></expression1>The program will choose to execute the statement that meets the condition. Zhang San’s example can be written as
int x, y;cin >> x;if(x <= 10){ y = x*3;}else if(x > 10 && x <= 20){ y = (x-10)*6 + 10*3;}else{ y = (x-20)*9 + 10*6 + 10*3;}Or
int x, y;cin >> x;if(x <= 10){ y = x*3;}else if(x > 10 && x <= 20){ y = (x-10)*6 + 10*3;}else if(x > 20){ y = (x-20)*9 + 10*6 + 10*3;}Thus, we have implemented a simple tiered electricity bill calculation using the if statement.
Nested if Statements
Poor Zhang San was kicked out of the apartment by the landlord for not being able to pay the electricity bill. He currently has two choices: either stay in the big city or return to his hometown. If he returns home and finds a job, he can continue to rent and live independently; if he doesn’t find a job, he can only go back home and rely on his parents; if he stays in the big city, he can plead with the landlord, and if the landlord agrees, he can sleep back in the apartment; otherwise, he will have to sleep on the street.
The logic of the above statement can be represented using nested if series statements
if(<return hometown="" to="">){ if(<find a="" job="">) { <rent a="" by="" himself="" house=""> } else { <go and="" back="" home="" on="" parents="" rely=""> }}else if(<stay big="" city="" in="" the="">){ if(<landlord is="" merciful="">) { <sleep apartment="" in="" the=""> } else { <sleep in="" park="" the=""> }}</sleep></sleep></landlord></stay></go></rent></find></return>This example makes it easy to understand the nesting of if statements, which is essentially making a choice and then making another choice. The number of nested layers is not limited; when designing complex programs, we may write more layers of nesting.
Some Considerations
We mentioned the nesting of if statements above. If our code looks like this
if(<return hometown="" to="">){if(<find a="" job="">){<rent a="" by="" himself="" house="">}else{<go and="" back="" home="" on="" parents="" rely=""> }}else if(<stay big="" city="" in="" the="">){if(<landlord is="" merciful="">){ <sleep apartment="" in="" the="">}else{<sleep in="" park="" the="">}}</sleep></sleep></landlord></stay></go></rent></find></return>It is believed that everyone will find it difficult to see the logical relationship at a glance. Here, it is important to note the pairing of if and else if or else, else always pairs with the closest if or else if. For example, in the above code, the last else is paired with if(
Additionally, if there is only one statement after if, else if, or else, we can omit the braces, for example
if(x <= 10) y = x*3;else if(x > 10 && x <= 20) y = (x-10)*6 + 10*3;else y = (x-20)*9 + 10*6 + 10*3;Another thing
Look at the following two pieces of code
int x, y;cin >> x;if(x < 5){ y = x*2;}else if(x < 10){ y = x*3;And
int x, y;cin >> x;if(x < 5){ y = x*2;}if(x < 10){ y = x*3;}What is the difference between these two codes?
This is the flowchart of the first piece of code
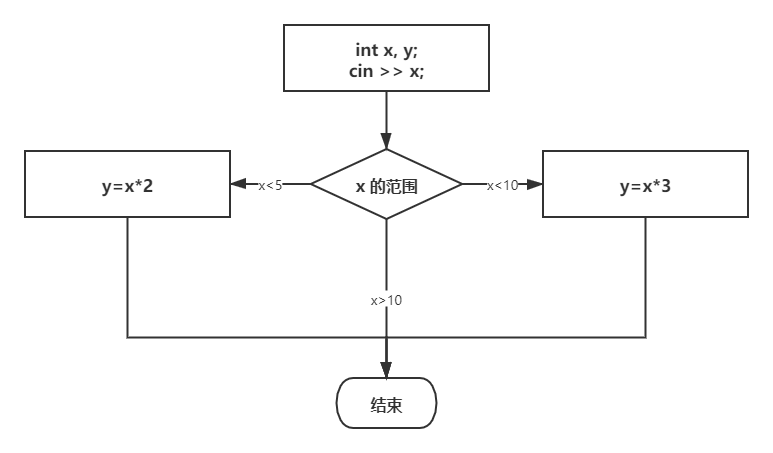
Here, only one branch is taken. If the input is 3, although it satisfies the conditions in both the if and else if parentheses, the program will only take one branch, which is the x<5 branch.
This is the flowchart of the second piece of code
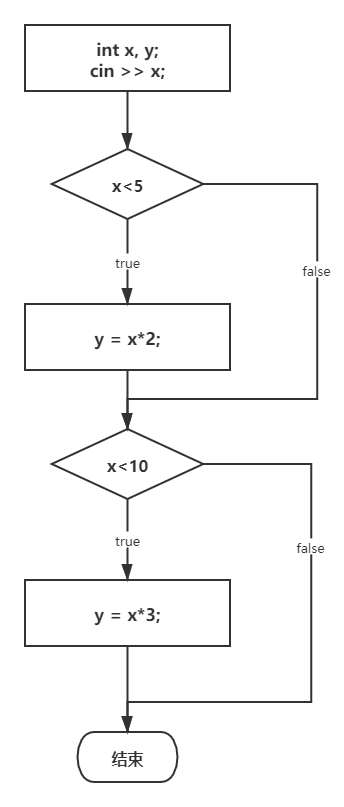
Here, two branches are taken consecutively. The latter y=x*3 may overwrite the previous value of y=x*2. If the input is 3, it will first execute y=6, and then execute y=9.
switch Statement
Poor Zhang San returned to his hometown to find a job after being ruthlessly rejected by the landlord. He went to an interview at a game company, and the interviewer would assign Zhang San a position y based on his education level x. How can we represent this process in code?
Isn’t this easy? We just talked about the if statement
int x, y;cin >> x;//0 indicates primary school educationif(x == 0) y = 0; // indicates the position of a preschool educational game tester//1 indicates secondary school educationelse if(x == 1) y = 1; // indicates the position of a mobile game tester//2 indicates undergraduate educationelse if(x == 2) y = 2; // indicates the position of a bug tester//Above undergraduate educationelse y = 3; // indicates the position of a programmerHowever, we find that here we are always discussing whether the value of x is a certain integer, which means the range we are discussing is discrete, while the above electricity bill example discusses a continuous range of electricity fees.
For this discrete case discussion, there is another statement that can meet the requirements, which is the switch statement introduced below.
Usage of switch
The syntax format is as follows
switch(<expression>){ case <constant expression1="">: <some statement1=""> break; case <constant expression2="">: <some statement2=""> break; ... case <constant expressionn="">: <some statementn=""> break; default: <some statementn+1="">}</some></some></constant></some></constant></some></constant></expression>Here,
It looks a bit complicated, right? Let’s look at an example, converting Zhang San’s job-seeking if code into switch
int x, y;cin >> x;switch(x){ case 0: y = 0; break; case 1: y = 1; break; case 2: y = 2; break; default: y = 3;}This logic is quite clear; it looks at the value of x to decide which case to execute. The default here is somewhat similar to the previous else, which executes the statements below default when none of the cases meet the condition. Note that if you want to express such logic, the break statement in each case cannot be omitted (the situation without break will be discussed later).
Next, let’s look at a character type example. Zhang San successfully got the job as a glorious preschool educational game tester. In the game, there are four buttons A, B, C, D. When Zhang San presses different buttons, the program will respond differently
char b;cin >> b;switch(b){ case 'A': cout << "A Apple Apple. The apple is ripe\n"; break; case 'B': cout << "B Bird Bird. The little bird has flown away\n"; break; case 'C': cout << "C Cat Cat. The kitten meows\n"; break; default: cout << "D Dog Dog. The puppy barks\n";}This is the basic usage of switch.
Considerations
Look at the following piece of code
int x;cin >> x;switch(x){ case 1: cout << "A"; case 2: cout << "B"; break; default: cout << "D"; case 3: cout << "C";}We can find two special points: one is that the default position is not at the end, and the other is that some cases do not have a break statement.
Here we need to understand that although we can use the switch statement to achieve the same functionality as the if statement, the functionality of the switch statement is very different from that of the if statement. The if statement will execute only one branch of code based on different conditions, while the remaining branches will be automatically skipped. In contrast, to achieve the same functionality with switch, we actually rely on adding break statements in each case, and the break statement is not mandatory.
The execution process of the switch statement is to find the first case (or default) that meets the condition from top to bottom, and then execute the statements within it. If there is a break statement within the case (or default), then after executing this case, it will jump out of the switch statement; if there is no break statement within the case (or default), then after executing the statements within this case, it will continue to execute the statements of the next case until it encounters a break statement.
Therefore, the cases in switch do not represent branches but rather entry points, determining only the first part to be executed.
In the above code, if the input is 1, it will enter case 1, print A, and since there is no break statement, it will not jump out but will continue to execute the content of case 2, printing B. Case 2 has a break statement, so it jumps out of the switch and ends. The final output is AB.
If the input is 2, it will enter case 2, print B, and since there is a break statement, it jumps out of the switch and ends. The final output is B.
If the input is 3, it will enter case 3, print C, and since there is no break statement, but it is already the last case, there are no statements to execute below, and the switch ends. The final output is C.
If the input is 4, it will enter default, print D, and since there is no break statement, it will not jump out of the switch but will continue to execute the content of case 3, printing C, and ends. The final output is DC.
while Statement
The syntax of the while statement is as follows
while(<expression>){ <statement>}</statement></expression>The expression after while is usually a conditional expression. When the expression is true, the loop executes, and the statements inside the braces are what need to be done in each loop. Typically, we define a loop variable before the while, and the condition inside the parentheses is to check the range of this loop variable. After executing the statements, we change the value of the loop variable.
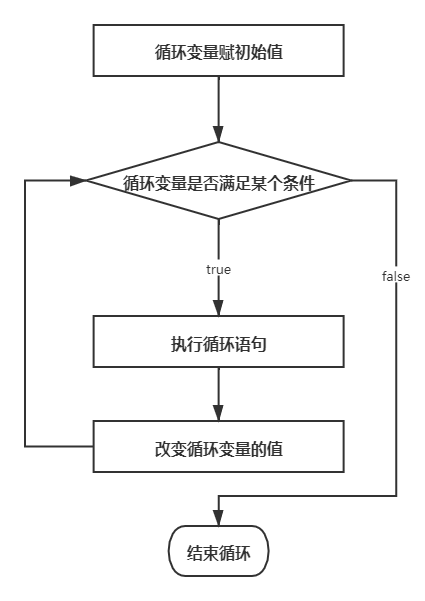
Zhang San was caught slacking off at work while learning C++ by his boss, who punished him to copy the employee handbook 100 times. Fortunately, Zhang San just started learning C++ and understood that he could use a loop to solve this problem. Zhang San then wrote the simplest while loop to complete this process
int i = 0;while(i < 100){ cout << "Goodbye, world!" << endl; i++;}Here, i is the loop variable. When i<100, the loop will continue to execute; in each loop, we print a sentence, and after printing, we increase the value of i by 1. This continues until the value of i becomes 100, making i<100 false, and the loop ends. The value of i ranges from 0 to 99, executing a total of 100 times.
After learning while, combined with the previous if statement, we can write some more complex and interesting programs. For example, if we want to output all odd numbers between 100 and 500, we can do this
int i = 100;while(i <= 500){ if(i%2 == 1) { cout << i << ' '; }}do while Statement
The syntax of the do while statement is as follows
do{ <statement>}while(<expression>); // Don't forget the semicolon here</expression></statement>The difference between do while and while is that while checks whether the condition is met first; if it is met, it starts executing the statements; if it is not met, it exits the loop. In contrast, do while executes the statements first regardless of any conditions, and then checks whether the condition is met.
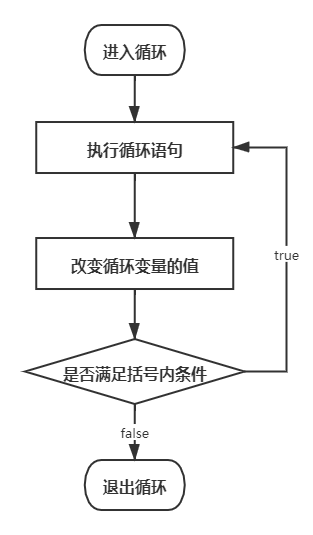
The boss discovered that Zhang San had actually self-studied C++, believing that Zhang San was very ambitious, so he promoted him to the head of a project. If Zhang San does well in his work, he will be forgiven, promoted, and continue to work as a programmer; otherwise, he will be fired. To represent this process using a do while statement
bool flag = false;do{ <zhang san="" works=""> if(<zhang good="" is="" performance="" san's="">) { flag = true; }}while(flag);<zhang fired="" is="" san=""></zhang></zhang></zhang>for Statement
The syntax of the for statement is as follows
for(<expression1>;<expression2>;<expression3>){ <statement>}</statement></expression3></expression2></expression1>The for loop is the most complex of the three types of loops; it actually incorporates some of the preparatory work of while and do while.
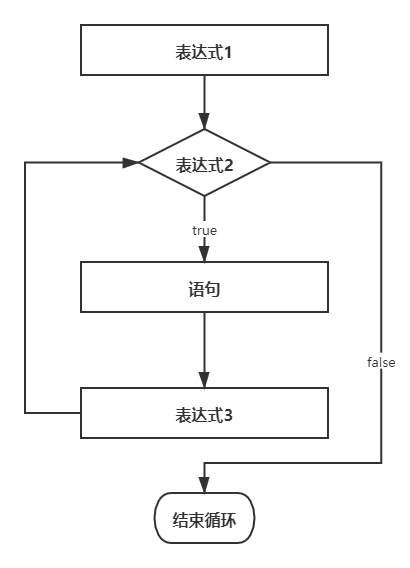
Let’s illustrate this with an example. For instance, if we want to print numbers from 1 to 100 on the screen, we can write it like this using while
int i = 1;while(i<=100){ cout << i << endl; i++;}If we use the for statement, it would be like this
for(int i=1; i<=100; i++){ cout << i << endl;}It is not difficult to see that the for loop consolidates the definition of the loop variable, the assignment of the initial value to the loop variable, and the change of the loop variable’s value into the parentheses.
We can leave all three parts of the for loop empty to create an infinite loop; note that the semicolon cannot be omitted
for(;;){ <statement>}</statement>Nesting Loops
According to the requirements, we can also use nested loops. For example, if we need to print a 9*9 square made of &, we can write it like this
for(int i=0; i<9; i++){ for(int j=0; j<9; j++) { cout << "&"; } cout << endl; // Change line after printing 9}break Statement
We have already mentioned the break statement when discussing the switch statement; it is used to exit the switch. In fact, break can also be used to exit a layer of loop statements, ending the loop early.
After becoming the project leader, Zhang San became arrogant and even started workplace bullying. He made the newcomer Li Si loudly say “I am a pig” 1000 times. If Li Si says it sincerely, he can stop early and not have to continue. We can represent this in code as
for(int i=0; i<1000; i++){ cout << "I am a pig\n"; if(<li is="" si="" sincere="" very="">) break;}</li>Originally, Li Si needed to say it 1000 times, but if he says it sincerely at some point, the if statement will trigger the break statement, ending the loop early. The break statement is usually used in conjunction with if series statements to handle situations that require early termination of loops. The while loop and do while loop can also use break.
It is important to note that C++’s break can only exit one layer of loops (unlike Java and other languages, which can add parameters to exit multiple layers), for example
for(int i=0; i<10; i++){ for(int j=0; j<10; j++) { if(j == 7) { break; } }}Here, the break only exits the inner loop, while the outer loop continues to execute.
continue Statement
Zhang San became even more excessive, making Li Si first say “I am a pig” once, then say “I am a dog” once, repeating this 1000 times; however, if the first time he says “I am a pig” sincerely, he can skip that time of saying “I am a dog”. Unlike before, when a certain condition is met, instead of directly ending the loop, we skip the remaining part of the current loop, which clearly cannot use break. At this point, we introduce continue.
for(int i=0; i<1000; i++){ cout << "I am a pig\n"; if(<li is="" si="" sincere="" very="">) continue; cout << "I am a dog\n";}</li>The usage of continue is similar to that of break, but the logic it represents is different. Suppose Li Si sincerely says “I am a pig” on the 4th time; this will trigger the continue statement, and then the content after continue in the 4th loop will be skipped, meaning that he does not have to say “I am a dog” that time. However, he will enter the 5th loop, not directly ending the entire loop. Continue also applies to while loops and do while loops.
When using continue with for loops, it is important to note that continue does not skip the third statement in the for parentheses; for example, in the above example, the execution of i++ is not affected by continue.
The End
Text | Wang Yaoyong
Editor | Zhao Jingxuan
Review | Luo Yong Gao Xi
