Arduino is familiar to electronics enthusiasts and engineers, but the 8-bit CPU and slow clock speed are not suitable for deep development. When combined with the STM32F103C8T6, a whole new application emerges, allowing us to program STM32 boards using the Arduino IDE.
The materials required for this project include: STM32 Blue Pill (STM32F103C8T6), FTDI programmer, breadboard and wires, and a laptop with internet access.
Understanding the STM32 Blue Pill
The STM32 development board is referred to as the Blue Pill due to its blue PCB and uses the STM32F103C8T6 chip, which is slightly larger than the Arduino Nano board. In addition to the chip itself, the board has an 8MHz crystal and a 32KHz crystal to drive the internal real-time clock. This circuit board uses 3.3V logic levels, but most of its pins are 5V tolerant, and it can operate in deep sleep mode. The STM32F103C8T6 is a 32-bit ARM processor with a clock speed of 72MHz, providing 20KB of RAM and 64KB of flash memory, sufficient for building large projects. The chip has 37 GPIO pins, 10 ADC pins, SPI, I2C, CAN, UART buses, and a DMA controller. This impressive chip is priced at $3. When we compare the specifications of the STM32 with those of the Arduino Uno, we can see that this small board outperforms the Arduino Uno in every area. The operating frequency of the STM32 chip is 4.5 times that of the Arduino Uno. Therefore, it is expected that the STM32 is at least 4.5 times faster than the Arduino Uno.
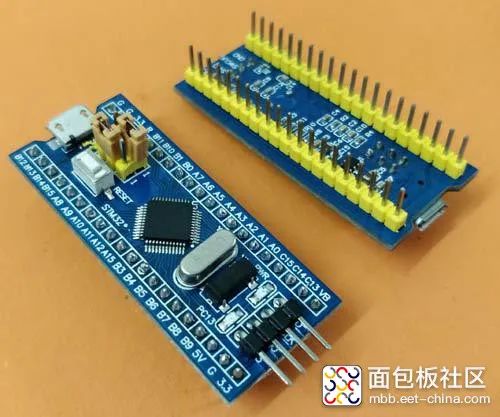
Unlike Arduino boards, the Blue Pill must manually set the boot 1 and boot 0 jumpers to change to programming mode; during programming, boot 0 should be set to 3.3V, and during operation, it should be grounded.
Programming Preparation
The STM32 Blue Pill can be programmed using all ARM chip programming methods. Some common IDEs include: Keil ARM MDK, IAR Workbench, Atollic TrueStudio, MicroC Pro ARM, Crossworks ARM, Ride 7, PlatformIO+STM32. This project uses the Arduino IDE for convenience, as many are familiar with the Arduino IDE environment.
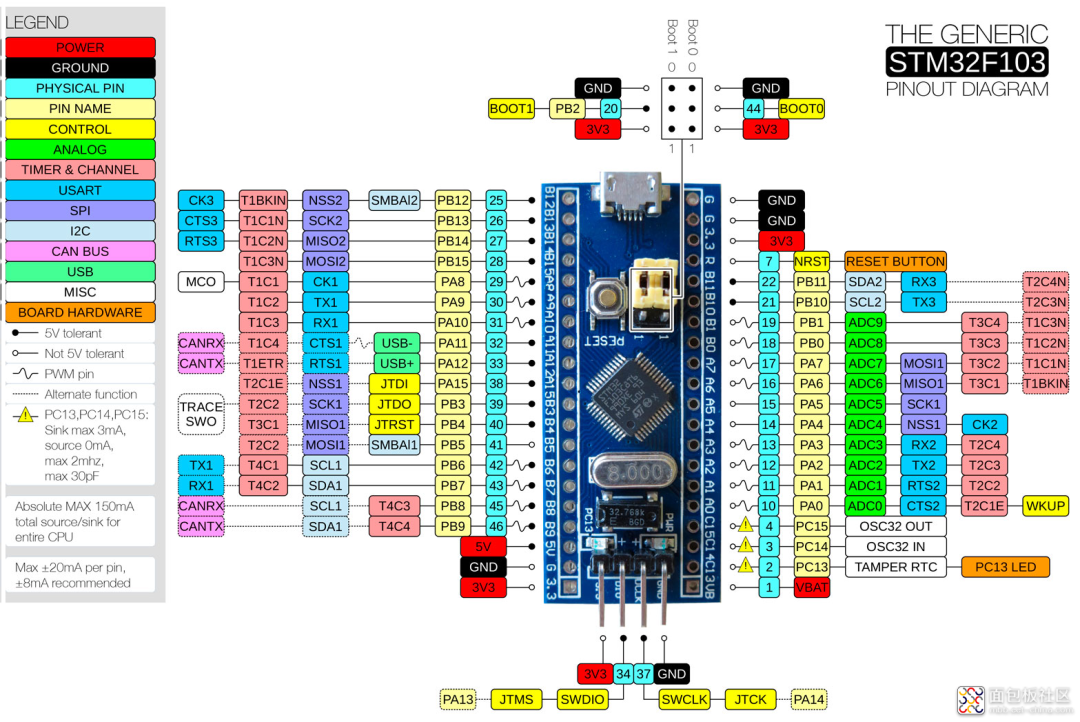
When programming the STM32 Blue Pill board directly using the Arduino IDE, we need a serial FTDI board, which connects to the Rx and Tx pins of the Blue Pill.
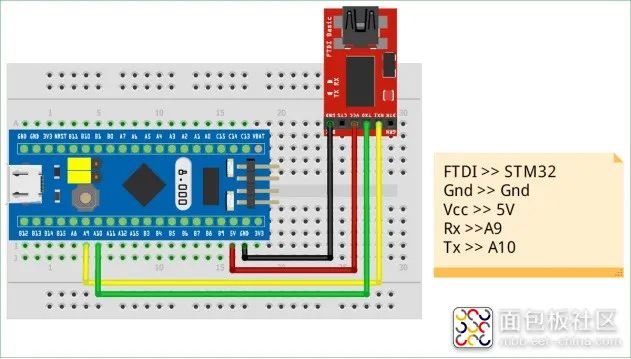
Here, the Vcc pin of the FTDI board connects to the 5V power pin of the STM32, and the ground pins of both boards are connected, with the Rx and Tx pins connected to the A9 and A10 pins of the STM32 Blue Pill, respectively.
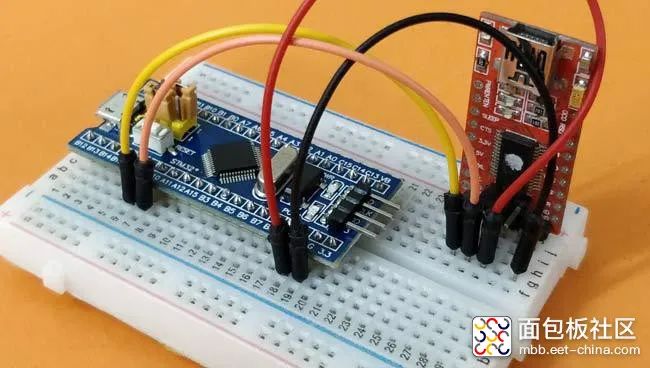
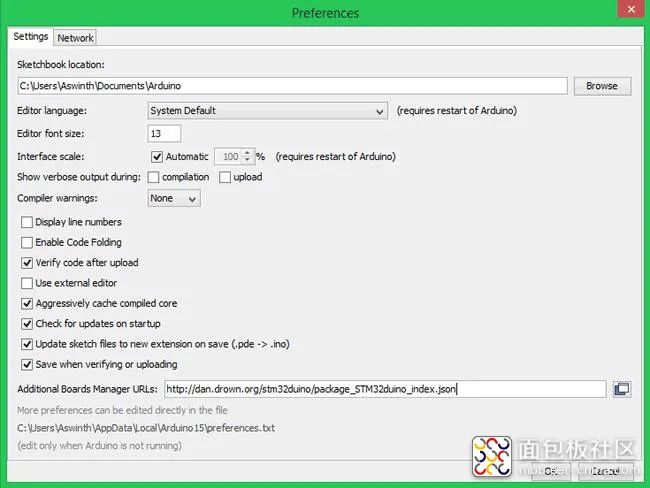
Of course, if convenient, you can also program the STM32 Blue Pill directly using the micro-USB port; this method is introduced to familiarize everyone with another approach. The steps are as follows: Step 1: Select the correct Arduino IDE and install it. Step 2: Open the Arduino IDE and download the required package for the STM32 Blue Pill. Step 3: Click on references, open the dialog box, paste the link http://dan.drown.org/stm32duino/package_STM32duino_index.json in the Boards Manager URL text box, and press OK.
Step 4: Go to Tools -> Boards -> Board Manager to open the board manager and select ‘STM32F1’, then install the package that appears. Step 5: After installation is complete, look for Generic STM32F103C series under Tools dropdown, confirm the parameters are: 64k Flash type, CPU speed is 72MHz, and change the upload mode to Serial.
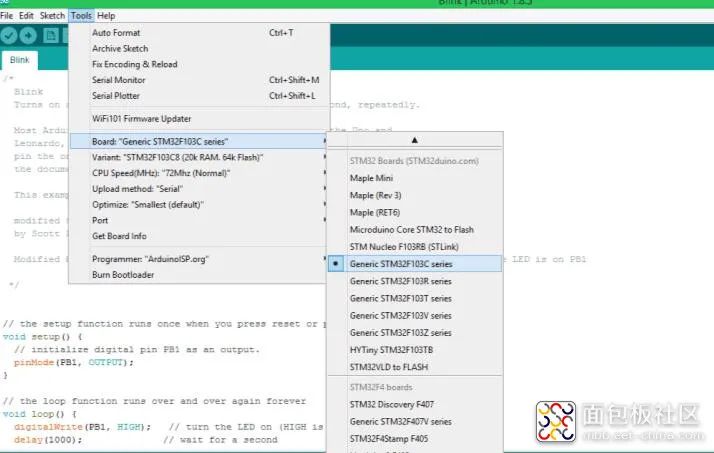
Step 6: Connect the FTDI board to the computer, check which COM port the FTDI board is connected to for device management. Then, select the same port number in Tools -> Port.
Step 7: After completing the above changes, check that the Arduino IDE shows that it is setting up in the lower right corner. This way, the Arduino IDE is ready to program the STM32 Blue Pill.

Upload STM32F103C8T6 Sample Code
Upload the Sample Blink Program from the Arduino IDE to the STM32 Blue Pill, ensuring it runs correctly.
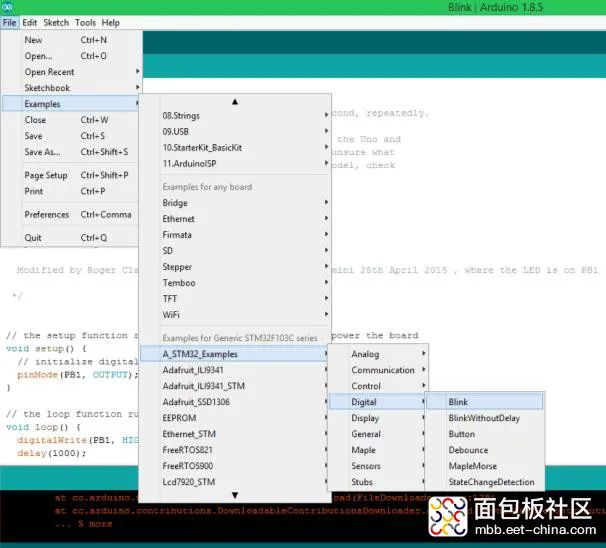
After opening the sample program, a small modification is needed. By default, it writes to PB1, but our project’s LED is connected to PC13, so we need to replace PB1 with PC13. Since we have managed this well, note the following program, so that the LED will blink with a 1000 millisecond interval: digitalWrite(PC13, HIGH); // turn the LED on (HIGH is the voltage level) delay(1000); // wait for a second digitalWrite(PC13, LOW); // turn the LED off by making the voltage LOW delay(1000); // wait for a second. Since earlier STM32 boards must be set to programming mode before uploading programs, this requires setting the boot 0 jumper to low.
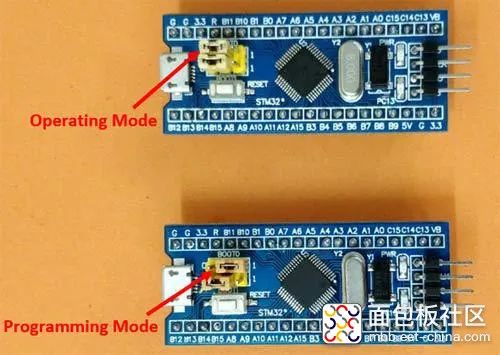
Now, press the reset button to enter programming mode; the green LED will go out, indicating that the board is ready.
Press the upload button in the Arduino IDE to start programming and uploading. If everything goes well, the Arduino IDE interface will appear:
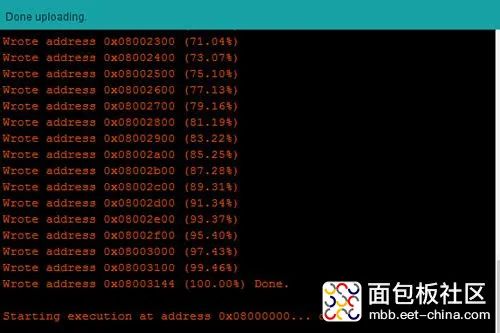
Running the STM32 Blink Program
After the program is successfully uploaded, the green LED will blink at 1-second intervals. Of course, you can also change the program to increase or shorten the time interval to achieve different blinking effects.
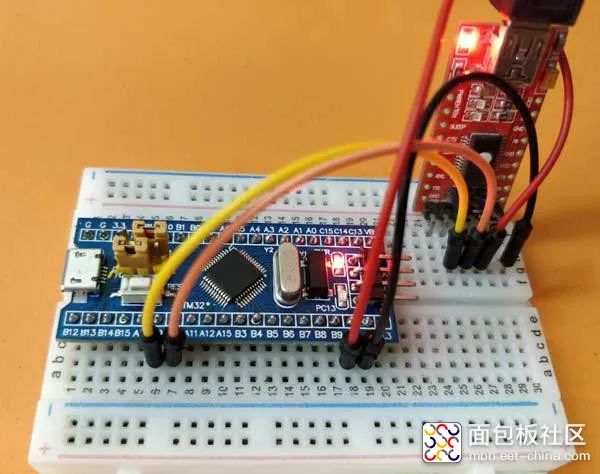
After the program upload is complete, the boot 0 jumper should be returned to the running mode, so that the next time the board is powered on, it will automatically start uploading the program.
Appendix: STM32 Blink Code/* circuitdigest.com Sample STM32 Blink Program for Blue Pill board */// the setup function runs once when you press reset or power the boardvoid setup() { // initialize digital pin PC13 as an output. pinMode(PC13, OUTPUT);}// the loop function runs over and over again forevervoid loop() { digitalWrite(PC13, HIGH); // turn the LED on (HIGH is the voltage level) delay(1000); // wait for a second digitalWrite(PC13, LOW); // turn the LED off by making the voltage LOW delay(1000); // wait for a second }
Author: Hard City Allchips, Source: Breadboard Community
Link: https://mbb.eet-china.com/blog/uid-me-3975615.html
Copyright Notice: This article is the original work of the author, and reproduction is prohibited without permission!

Electronic technology dry goods, delivered at the first time

-
Path of a Hardware Engineer: I Love This Job, Not Just for Making a Living
-
A Simple, Useful, and Low-Risk Analog Circuit, A Must-See for Engineering Students!
-
A Female Electronics Engineer’s Startup Story
-
What Circuit is Used to Implement the Button Function on a TV? Classic ADC Button Circuit
-
This Small Electric Mosquito Swatter Actually Has So Many Basic Circuits, How Many Can You Understand?
-
The Principle of the 220V Light String Circuit Is Actually Like This!