Note:This is for security research and learning purposes only. If the tools are used for other purposes, the user assumes all legal and joint responsibilities. The author and publisher do not bear any legal or joint responsibilities.
|
Statement:The security tools and projects shared by this public account are sourced from the internet and are for security research and learning purposes only. If used for other purposes, the user assumes all legal and joint responsibilities, and it is unrelated to the tool authors and this public account. |
Currently, only public accounts that are frequently read and starred display large image pushes. It is recommended that everyone set Cat and Mouse Security as a star, otherwise it may not be visible!
0x01 Introduction
A few days ago, I saw in the team group that it is now possible to use AI to create a video from a single photo to bypass face recognition functions, leading me to think and research this new generation of social engineering attacks.
0x02 Face Recognition
Face Recognition is a biometric recognition technology based on facial features. It captures facial images through cameras or images, extracts key feature information (such as eye spacing, nose shape, face contour, etc.), and compares it with a known facial database to achieve “who is it” or “confirm if it is someone”.
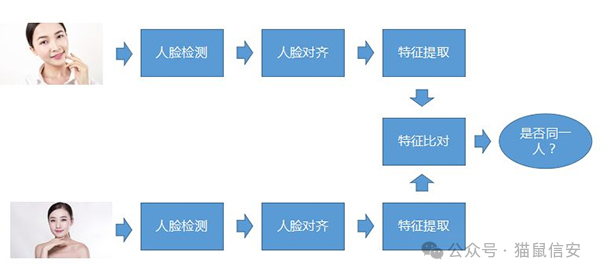
The Core Process of Face Recognition
- Face Detection: Locating the facial area from images or videos. Common algorithms: Haar Cascade, MTCNN, RetinaFace, YOLO-face.
- Face Alignment: Rotating, scaling, and cropping the detected face to ensure it is in a uniform posture.
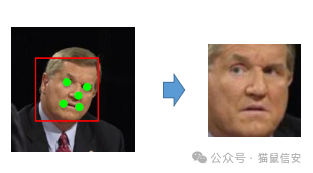
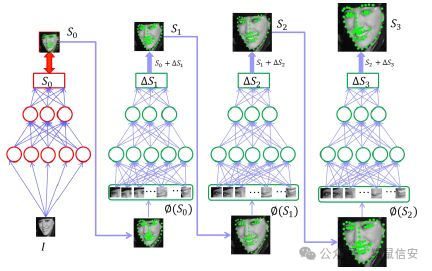
- Feature Extraction: Extracting high-dimensional facial feature vectors (e.g., 128-dimensional or 512-dimensional vectors). Common models include FaceNet, ArcFace, Dlib.
- Feature Comparison / Classification Recognition: Matching the extracted facial features with known facial features in the database using methods such as Euclidean distance and cosine similarity.
Common Face Recognition Models and Algorithms
| Name | Type | Description |
|---|---|---|
| OpenCV HaarCascade | Detection | Classic cascade classifier, suitable for rapid detection |
| Dlib | Detection + Feature Extraction | Contains 68 key point detection and 128-dimensional facial encoding |
| MTCNN | Detection + Alignment | Multi-task CNN, good effect but average speed |
| FaceNet | Feature Extraction | Generates 128-dimensional features, suitable for face comparison |
| ArcFace | Feature Extraction | High accuracy, commercial level, often used to train one’s own recognition system |
0x03 Bypassing Face Recognition
Bypassing a face recognition system with a single image is a typical face recognition attack technique, collectively referred to as Presentation Attack, with “photo attack” being the most basic type.
| Method | Principle | Success Rate | Easy to Detect |
|---|---|---|---|
| Static Photo Attack | Using a printed photo facing the camera | Low (most systems have defenses against it) | Easy to detect (lacks depth/dynamics) |
| Screen Replay Attack | Playing facial photos or videos on a phone or tablet | Medium (effective against older systems) | Medium (may recognize screen edges) |
| 3D Head Model Attack | Using a 3D model of a face (e.g., silicone mask) | High (can fool some depth detection) | Hard to detect (more realistic shape) |
| Paper Glasses Attack | Attaching a facial photo to paper glasses for wearing | Medium (deceives specific angle recognizers) | Requires specific conditions |
| Adversarial Sample Attack | Modifying images with specific algorithms to deviate recognition results from the truth | High (requires algorithm support) | High technical threshold, hard to detect |
Here, I simulate a face recognition system based on static photo recognition, using selfies of friends stored in known_face and screenshots of friends’ selfies stored in spoof_images. This demonstration system is written in Python + OpenCV + face_recognition (based on Dlib).
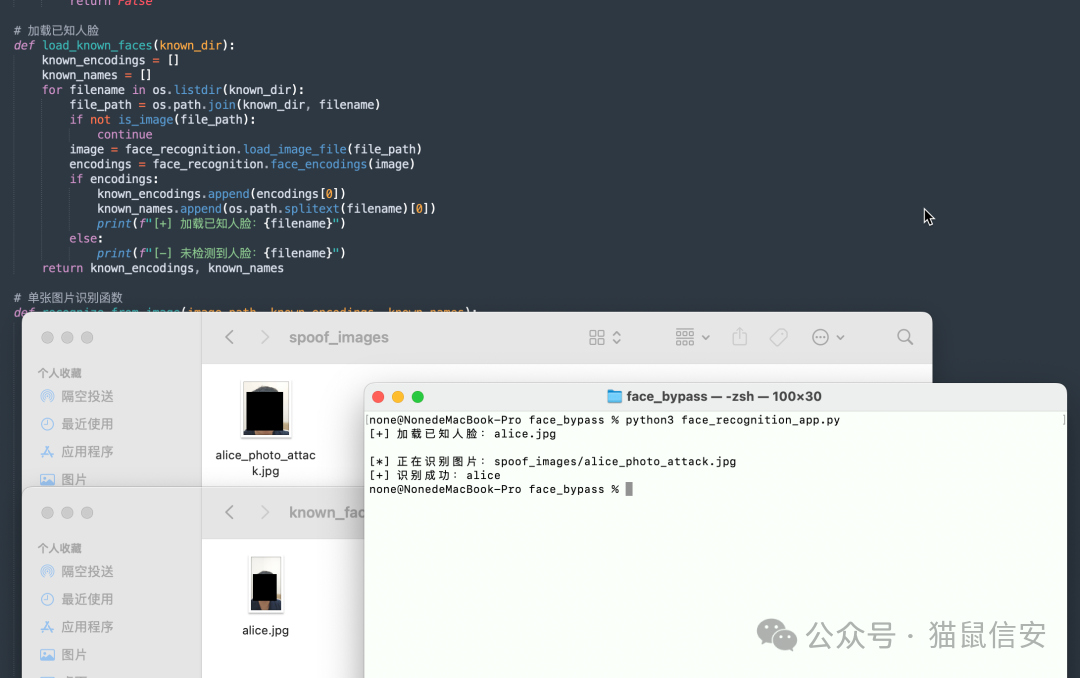
In modern times, face recognition has five mainstream liveness detection mechanisms. What are they?
| Detection Method | Principle |
|---|---|
| Blink Detection | Requires the user to blink or open their mouth |
| Head Movement Detection | Asks the user to look left and right or nod |
| Infrared Detection | Uses infrared cameras to detect facial depth and heat distribution |
| 3D Structured Light | Like iPhone’s Face ID, constructs a 3D point cloud of the face |
| Deep Learning Liveness Detection | Trains models to distinguish between real faces and images/screens based on features (reflection, flatness, edges, etc.) |
This article mainly explains how to bypass the five mainstream liveness detection mechanisms.
1. Blink/Open Mouth Detection
The most basic method aims to prevent the use of a photo or screenshot to deceive the system.
-
1. Blink Detection
- When EAR drops below a certain threshold → indicates eyes are closed → judged as a blink.
- Detecting changes in eye features during the “open → closed → open” process.
- Core metric: EAR (Eye Aspect Ratio)
-
2. Mouth Open Detection
- Detecting changes in mouth height (e.g., distance between upper and lower lips).
- Common metric: MAR (Mouth Aspect Ratio).
Normal people might think of video replay attacks, which require pre-recording the victim’s blink or mouth-opening video. However, with the rapid iteration of technology, it is no longer necessary to deceive the victim into recording these videos. A single photo can successfully generate a video of the victim blinking and opening their mouth.
Using the First Order Motion Model (FOMM) project: https://github.com/AliaksandrSiarohin/first-order-model/

Combining a static photo with a recorded blink video, the FOMM model defaults to a resolution of 256×256. For more realism, it can be fine-tuned to 512×512.
python demo.py
  --config config/vox-256.yaml
  --driving_video blink.mp4
  --source_image victim.jpg
  --checkpoint checkpoints/vox-cpk.pth.tar
  --result_video result.mp4
The final result.mp4 is the blinking video of victim.jpg.
Of course, we can also use the Deepfake + Blink Control attack method for a more challenging attack.
- DeepFake model training: Using open-source projects like DeepFaceLab or FaceSwap, train a target face conversion model using a large amount of target face video and image data to transfer one person’s facial features to another person’s video.
- Blink/Mouth Open Action Generation: During training, the model can learn the rules of facial muscle movement using natural blink and mouth-opening information contained in the original video; it can also use additional action drivers to control the blink or mouth-opening actions of the fake face in the output video using other videos (driving videos).
Through this combination, the output video can not only achieve facial replacement but also naturally perform actions like blinking and opening the mouth, thereby confusing liveness detection systems that use static detection techniques.

We can use the DeepFaceLab project (https://github.com/iperov/DeepFaceLab)
To collect materials for the victim and extract and align data. Start the training script, and the model will continuously learn the details and movement patterns of the target face. If the training data contains enough samples of blinking and mouth-opening, the model will automatically capture these action features.
python DeepFaceLab/main.py train --training-data-src_dir data_src --training-data-dst_dir data_dst --model-dir model
When the training results meet expectations (the model converges, and the output face-swapping video is natural enough), use the conversion script to replace the face in the target video with the fake face generated by the trained model.
python DeepFaceLab/main.py convert --input-video driving_video.mp4 --output-video result_deepfake.mp4 --model-dir model
At this point, the output video result_deepfake.mp4 has the target face with the fake conversion, retaining the blinking and mouth-opening actions from the driving video. Video editing software can be used for color correction, frame rate adjustment, and other post-processing to further enhance naturalness and detail.
2. Head Movement Detection
Used for liveness detection to prevent static attacks such as photos/videos, ensuring that the operation is genuinely executed.
By calculating the Euler angles (pitch/yaw/roll) based on the changes in key point positions across consecutive frames, it determines whether the action is completed and tracks facial key points (e.g., Dlib, MediaPipe), and head pose estimation.
Here we need to use the 3D Modeling + Skeletal Animation attack method, using 3D modeling software (such as Blender, FaceGen, Maya) to construct a complete head model of the target person, then add skeletal binding (Rig) to simulate any action, and finally render or play the video in real-time to bypass detection.
- Technical Steps:
- Construct 3D Model: Use FaceGen or Blender’s Photogrammetry technology to create a 3D model from photos;
- Bind Skeleton (Rig): Add bones for the head, eyeballs, chin, etc.;
- Create Action Animation: Add keyframes, such as turning the head from front to left by 30°;
- Render video or import into Unity/Unreal for real-time driving;
- Attack through virtual cameras or projections.
The 3D Rig control panel in Blender allows for precise control of the following actions:
| Action | Control Method |
|---|---|
| Look Left / Right | Rotate Yaw Axis |
| Nod / Shake Head | Pitch and Roll Joint Control |
| Micro-expressions | Blend Shape or Morph Target |
3. Infrared Detection
Identifies whether the object being recognized is a real face by detecting temperature distribution and material characteristics in the infrared spectrum.
Using IR LED mask attack technology can bypass this detection, which is one of the most practical dynamic infrared bypass methods. It utilizes invisible infrared LED light sources (850nm or 940nm) to illuminate specific areas of the face, simulating a “thermal emission effect”.
Arrange IR LEDs to uniformly illuminate the face or photo in these areas, simulating the infrared image effect of “natural heat”.
Core Materials and Components
| Name | Recommended Model/Description |
|---|---|
| Infrared LED | 940nm (invisible to most IR cameras) or 850nm (slightly visible red light) |
| Power Supply | Optional 5V 18650 lithium battery, 9V battery pack, or USB power supply |
| Controller | Recommended to use Arduino Nano or ESP32 |
| Resistor | Each IR LED needs a series resistor (e.g., 100~220Ω) to prevent burning out |
| PWM Control Module | If dynamic temperature changes are to be simulated, the brightness of the IR LEDs can be controlled via PWM |
| Glasses/Hat Shell | Used to hide the IR LEDs and circuit parts |
| Heat Sink (Optional) | Used for cooling when multiple IR LEDs are turned on simultaneously |
Recommended facial simulation heat spot areas: nose bridge center (2-3 LEDs), below each eye (2 LEDs each), center of forehead (2 LEDs), cheekbones (1 LED each), center of chin (1 LED)
Can add a MOSFET (e.g., IRF520) as a control switch, controlled by the MCU’s PWM, all LEDs should preferably be controlled in parallel, with individual current limiting.
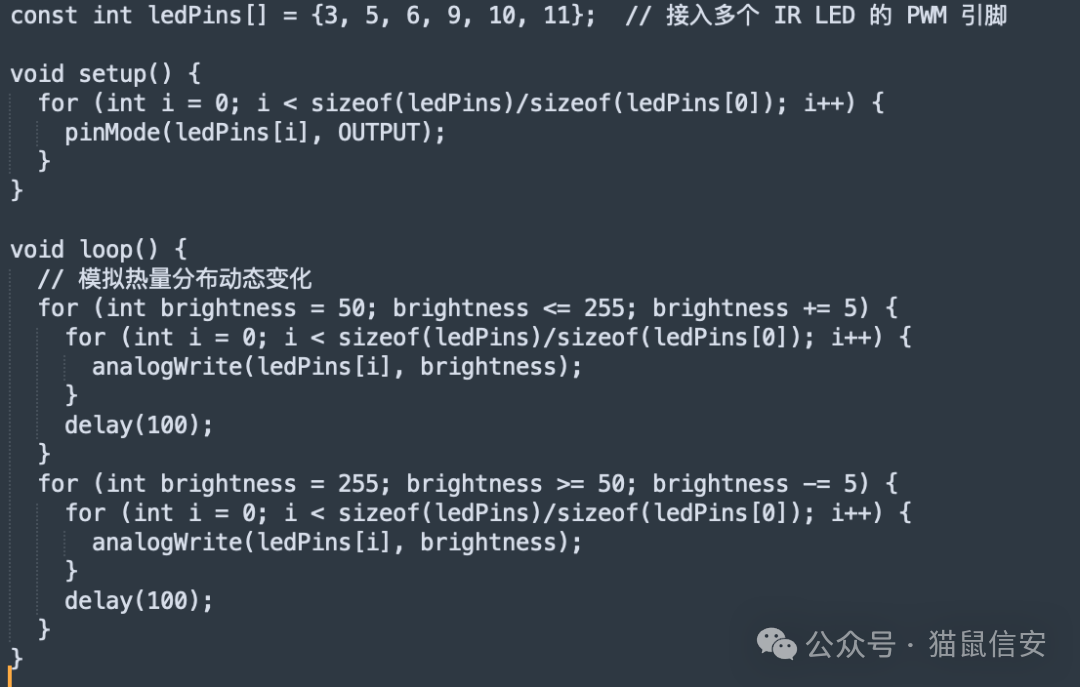
The above code simulates a “breathing heat effect”, allowing the IR image to present dynamic heat flow changes, which can bypass some “temperature static detection”.
4. 3D Structured Light
Determines whether the recognized object is a real three-dimensional facial structure, preventing attacks from photos, videos, and flat screens (“2D” attacks).
Bypassing this liveness detection is a high-difficulty operation, requiring a high-fidelity silicone mask (wearable 3D mutation bionic attack). The silicone mask simulates the 3D geometric shape and skin texture of the target face, allowing it to bypass structured light detection by wearing the mask.
Requirements for this silicone mask:
- Precise geometric shape
- Strong skin surface texture, simulating pores and sweat glands
- Optionally, an embedded movable version of facial features (eyelids, lips)
To enhance infrared performance, an infrared reflective layer can be embedded in the mask, or the IR powder/silicone mixed color agent can be applied to the forehead, nose bridge, and cheekbones. If the system lacks material analysis, it is easily recognized as a “real face”.
5. Deep Learning Liveness Detection
This is currently the most advanced liveness detection method, based on CNN or Transformer to recognize “photo attacks”, “video playback attacks”, and other non-living face behaviors.
However, we can bypass deep learning liveness detection through adversarial sample attacks by injecting small perturbations into the image, deceiving the model into outputting incorrect results, making it recognize the attack image as a “real person”.
In deep learning, image classification/recognition models essentially map from pixel space → feature space → classification labels:
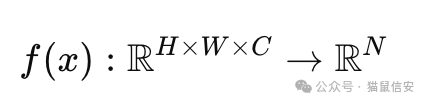
Without drawing attention, modify the input image 𝑥 to x∗=x+δ, causing the model 𝑓 to output the wrong category or recognize the attack image as the specified person, making the model think the photo/screen is a “real person” or “live person”.
Here we can use PGD (Projected Gradient Descent), an attack method for generating adversarial samples, which is an iterative extension of the basic method FGSM (Fast Gradient Sign Method).
Example code:
for i in range(num_steps):
    image.requires_grad = True
    output = model(image)
    loss = loss_fn(output, label)
    model.zero_grad()
    loss.backward()
    data_grad = image.grad.data
    adv_image = image + alpha * data_grad.sign()
    # Project back to the defined perturbation range
    eta = torch.clamp(adv_image - original_image, min=-epsilon, max=epsilon)
    image = torch.clamp(original_image + eta, 0, 1).detach()
- 𝜖: Maximum perturbation
- 𝛼: Perturbation strength per step;
This method can gradually “penetrate” the model defense layers, suitable for attacking robust models.
Key Parameters and Tuning Tips
| Parameter | Function | Recommended Value |
|---|---|---|
| Maximum Perturbation Amplitude | 0.03~0.1 | |
| Per-step Perturbation Strength (for PGD) | 0.005~0.01 | |
| Step | PGD Steps | 10~40 |
| Mask | Adversarial Area (eyes, nose, mouth) | Select face ROI area |
| Loss Target | CrossEntropy / Feature loss | Can be combined |
| Input Image Size | Liveness detection commonly uses 112×112 ~ 224×224 | Keep consistent |
There is also another adversarial method called Adversarial Patch. This involves placing a deceptive local pattern anywhere in the image, not relying on overall image perturbation, suitable for printing and sticking on the face, usually using Expectation Over Transformation (EOT) training for transferable patches.