
Introduction
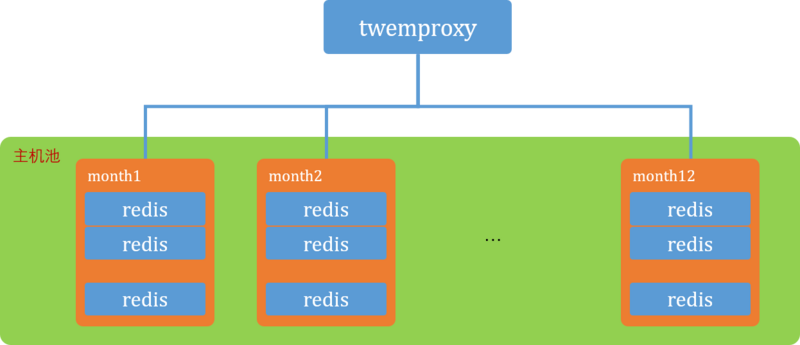
There is a Redis cluster online, and at the time, the built-in Redis cluster was not mature. Moreover, the requirements and application scenarios of our project were relatively simple, so the Redis cluster was built using Twemproxy and Redis. This cluster actually has many shortcomings.
-
Although single nodes were set for persistence, the master-slave mode was not used, and there was no Sentinel for master-slave switching.
-
Twemproxy does not have HA, which poses a single point of failure problem.
-
When scaling the cluster (adding or removing nodes), data in the cluster cannot be automatically balanced.
If the requirements are placed in the present, the built-in clustering features of Redis 3.x and above can be used, and open-source solutions like Codis can also be chosen.
Recently, I happened to be studying and practicing Kubernetes and planned to try to migrate this online cluster to Kubernetes, after all, Kubernetes can ensure that the actual state of the cluster is consistent with the user’s expectations, especially since the online environment may experience host restarts and multiple Redis instances going down, using Kubernetes can improve the availability of the cluster.
After a preliminary analysis, to migrate this online cluster, StatefulSet needs to be used because:
-
Each Redis instance needs to be persistent; online persistence is to a specific directory on its host, and each instance is tightly coupled with the persistence directory.
-
The configuration file of Twemproxy is also tightly coupled with the IP of each Redis instance, requiring Redis services to be exposed at stable addresses and ports.
Thus, the following experiment was planned.
-
Use PV/PVC to solve the Redis persistence problem.
-
Bring up N instances through StatefulSet, which will have stable hostnames (an online deployment unit consists of 108 Redis instances).
-
Inject configuration files and sensitive information through ConfigMap and Secret.
-
Due to the characteristics of the online system, our underlying Redis instances do not need to start or stop in order, so PodManagementPolicy will adopt Parallel.
Creating a Kubernetes Cluster
Referencing the article on setting up a Kubernetes cluster with Vagrant (https://jimmysong.io/posts/setting-up-a-kubernetes-cluster-with-vagrant/), a Kubernetes cluster can be quickly created. In fact, because I use Windows operating system at work, I made a few modifications to the actual Vagrantfile.
Creating PV/PVC
For simplicity, the purpose of this experiment is mainly to verify the idea, so I simply used NFS-based PV and PVC. First, set up the NFS service on the nodes of the Kubernetes cluster.
# Install NFS on each node
yum -y install nfs-server nfs-utils rpcbind
# Choose node1 to provide the service
systemctl enable nfs rpcbind
systemctl start nfs rpcbind
# Enable other nodes
systemctl enable rpcbind
systemctl start rpcbind
# Configure NFS on node1
mkdir /root/data
vi /etc/exports
/root/data    172.17.8.0/24(rw,sync,no_root_squash)
# Restart the service on node1 to apply the configuration
systemctl restart nfs
# Check on node1
showmount -e localhost
/root/data 172.17.8.0/24
# Check on other nodes
mount -t nfs 172.17.8.101:/root/data /mnt
Then create PV/PVC.
# Create PV
apiVersion: v1
kind: PersistentVolume
metadata:
  name: pv-nfs
spec:
  capacity:
    storage: 2Gi
  accessModes:
    - ReadWriteMany
  nfs:
    server: 172.17.8.101
    path: "/root/data"

# Create PVC
kind: PersistentVolumeClaim
apiVersion: v1
metadata:
  name: pvc-nfs
spec:
  accessModes:
    - ReadWriteMany
  resources:
    requests:
      storage: 2Gi
Creating Redis Image
I initially did not plan to customize the Redis image and intended to use the Redis image directly from the hub, then inject the Redis configuration redis.conf through ConfigMap. However, since only the same ConfigMap can be used, the persistence location of Redis in the pod would be the same, which is not what I expected. Later, I thought I could associate the dir in redis.conf with the hostname, using the different hostnames of each pod to achieve persistence in different locations, and based on this idea, I conducted two experiments.
-
Modify the injected redis.conf by executing a shell through the init-container in spec.
-
Modify the injected redis.conf by executing a shell through the poststart in spec.lifecycle.
Both ideas were unsuccessful in experiments. So I decided to customize a Redis image, as this would be much more versatile.
Reference articles: https://www.kubernetes.org.cn/2516.html and the article mentioned https://github.com/kubernetes/kubernetes/tree/master/examples/storage/redis/image. They were quite inspiring, but relatively complex compared to my experimental goals. I only need a simple Redis image, so I made some modifications: the specific content is on https://github.com/arashicage/docker-image-river/tree/master/redis-glibc-slim.
Here I mainly want to talk about run.sh, which uses the stable hostname of the pod in StatefulSet to configure the persistence directory.
if [[ ! -e /data/$(hostname) ]]; then
  echo "Redis data dir doesn't exist, data won't be persistent!"
  mkdir -p /data/$(hostname)
fi
echo dir /data/$(hostname) >> /usr/local/etc/redis/redis.conf
redis-server /usr/local/etc/redis/redis.conf --protected-mode no
Creating StatefulSet
---
apiVersion: v1
kind: Service
metadata:
  name: svc-redis
  labels:
    app: redis
spec:
  ports:
  - port: 6379
    name: redis
  clusterIP: None
  selector:
    app: redis
---
apiVersion: apps/v1
kind: StatefulSet
metadata:
  name: stateful-redis
spec:
  podManagementPolicy: Parallel
  serviceName: "redis"
  replicas: 4
  selector:
    matchLabels:
      app: redis
  template:
    metadata:
      labels:
        app: redis
    spec:
      containers:
      - name: redis
        image: arashicage/redis-glibc-slim
        ports:
        - containerPort: 6379
          name: redis
        volumeMounts:
        - name: nfs
          mountPath: "/data"
      volumes:
      - name: nfs
        persistentVolumeClaim:
          claimName: pvc-nfs
Submit the above manifest to the Kubernetes cluster, wait for it to be created, and verify (if the image is not clear, drag it to a new tab to view the larger image).
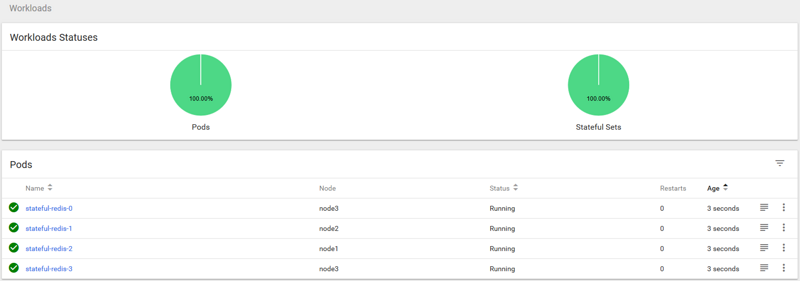
Then you can enter the shell to take a look.
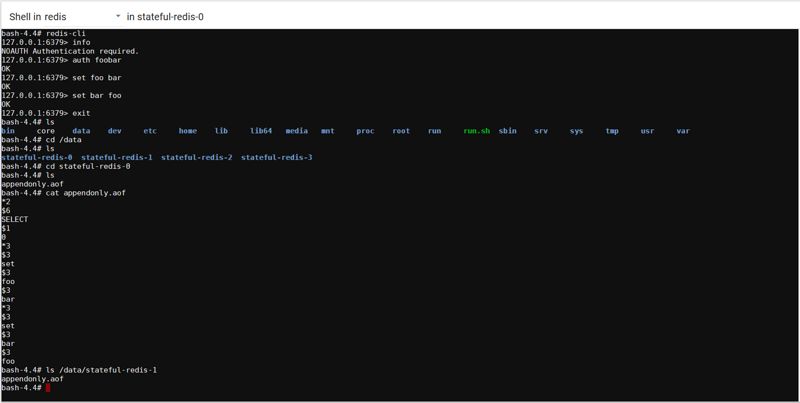
Check the NFS directory; the StatefulSet successfully created the persistent directories used by each pod.
[root@node1 ~]# ll /root/data
total 0
drwxr-xr-x. 2 root root 28 Apr 17 14:38 stateful-redis-0
drwxr-xr-x. 2 root root 28 Apr 17 14:38 stateful-redis-1
drwxr-xr-x. 2 root root 28 Apr 17 14:38 stateful-redis-2
drwxr-xr-x. 2 root root 28 Apr 17 14:38 stateful-redis-3
Testing Redis Pod
Check the <span>stateful-redis-x</span> IP and test by connecting with redis-cli.
Twemproxy Service
In this step, since Twemproxy is stateless, I plan to create a deployment and a service. After searching on the hub, I found that many Twemproxy images get their configuration from external etcd through confd (I first heard about confd from a friend at QingCloud, they made some modifications to it, which is a great software). The idea is good, but it complicates my current experiment, so I decided to find a simpler Twemproxy. Eventually, I chose zapier/twemproxy, but it is also 4 years old, using Twemproxy v0.3.0, while the latest v0.4.1 supports Authentication and is used in AWS cloud, which affects the experiment. I thought I would need to modify it (removing Python-related parts and Memcached-related parts). Later, I found fblgit/twemproxy-nutcracker, which fits my needs better, but this image also has issues (the chmod 755 in the Dockerfile actually didn’t work, reporting Permission denied when running, https://github.com/moby/moby/issues/12779. Additionally, this image places both the nutcracker configuration file and binary file together at /scripts; I need to mount it at runtime or inject it through ConfigMap in Kubernetes, and I modified the location of the configuration file). After modification, it looks like this:
# ref https://hub.docker.com/r/zapier/twemproxy/~/dockerfile/
# ref https://hub.docker.com/r/jgoodall/twemproxy/~/dockerfile/
# ref https://hub.docker.com/r/fblgit/twemproxy-nutcracker/~/dockerfile/
FROM ubuntu:16.04
MAINTAINER [email protected]
ENV DEBIAN_FRONTEND=noninteractive
ENV VERSION=v0.4.1
RUN apt-get update && DEBIAN_FRONTEND=noninteractive && apt-get install -qy gcc autoconf make libtool binutils wget
RUN cd /root && wget https://github.com/twitter/twemproxy/archive/${VERSION}.tar.gz && tar zxf ${VERSION}.tar.gz && cd twemproxy-* && \
    autoreconf -fvi && ./configure --prefix=/usr && make -j4 && make install
ADD start.sh /start.sh
RUN chmod 755 /start.sh
CMD ["/start.sh"]
Upload the files to GitHub, and through the automatic build of hub.docker, finally pull it down for testing:
# /root/config/ contains the nutcracker.yml file, see below
docker run -it --name xxx -d -v /root/config/:/usr/local/etc/nutcracker/ docker.io/arashicage/twemproxy:0.4.1
Find the container’s IP and check if the service is available.
# Find IP
docker inspect xxx |grep IPAddress
172.33.96.3
# Check nutcracker service
curl 172.33.96.3:22222
{"service":"nutcracker", "source":"34a2f6582378", "version":"0.4.1", "uptime":61, "timestamp":1524019442, "total_connections":2, "curr_connections":1, "alpha": {"client_eof":0, "client_err":0, "client_connections":1, "server_ejects":0, "forward_error":0, "fragments":0, "server0": {"server_eof":0, "server_err":0, "server_timedout":0, "server_connections":0, "server_ejected_at":0, "requests":0, "request_bytes":0, "responses":0, "response_bytes":0, "in_queue":0, "in_queue_bytes":0, "out_queue":0, "out_queue_bytes":0},"server1": {"server_eof":0, "server_err":0, "server_timedout":0, "server_connections":0, "server_ejected_at":0, "requests":0, "request_bytes":0, "responses":0, "response_bytes":0, "in_queue":0, "in_queue_bytes":0, "out_queue":0, "out_queue_bytes":0},"server2": {"server_eof":0, "server_err":0, "server_timedout":0, "server_connections":0, "server_ejected_at":0, "requests":0, "request_bytes":0, "responses":0, "response_bytes":0, "in_queue":0, "in_queue_bytes":0, "out_queue":0, "out_queue_bytes":0},"server3": {"server_eof":0, "server_err":0, "server_timedout":0, "server_connections":0, "server_ejected_at":0, "requests":0, "request_bytes":0, "responses":0, "response_bytes":0, "in_queue":0, "in_queue_bytes":0, "out_queue":0, "out_queue_bytes":0}}}
The configuration file for the nutcracker in the above image (refer to nutcracker) is located at /usr/local/etc/nutcracker/nutcracker.yml, injected through ConfigMap.
# nutcracker.yml
alpha:  listen: 0.0.0.0:22121
  hash: fnv1a_64
  hash_tag: "{}"
  distribution: ketama
  auto_eject_hosts: false
  timeout: 400
  redis: true
  redis_auth: foobar
  servers:   - stateful-redis-0:6379:1 server0   - stateful-redis-1:6379:1 server1   - stateful-redis-2:6379:1 server2   - stateful-redis-3:6379:1 server3
2018-05-03 Supplement: In the above nutcracker.yml, the format should use svc-redis.stateful-redis-0.
Create ConfigMap.
mv nutcracker.yml /root/config
kubectl create configmap twemproxy-config --from-file=config/# Result
key=nutcracker.yml
val=File content
Then, create a deployment.
---
kind: Service
apiVersion: v1
metadata:
  name: svc-twemproxy
spec:
  selector:
    app: twemproxy
  ports:
  - name: proxy
    protocol: TCP
    port: 22121
    targetPort: 22121
  - name: state
    protocol: TCP
    port: 22122
    targetPort: 22122
---
apiVersion: apps/v1
kind: Deployment
metadata:
  name: twemproxy-deployment
  labels:
    app: twemproxy
spec:
  replicas: 2
  selector:
    matchLabels:
      app: twemproxy
  template:
    metadata:
      labels:
        app: twemproxy
    spec:
      containers:
      - name: twemproxy
        image: arashicage/twemproxy:0.4.1
        ports:
        - containerPort: 22121
          name: proxy
        - containerPort: 22122
          name: state
        volumeMounts:
        - name: config-volume
          mountPath: "/usr/local/etc/nutcracker"
      volumes:
        - name: config-volume
          configMap:
            name: twemproxy-config
            items:
            - key: nutcracker.yml
              path: nutcracker.yml
Testing Twemproxy to Stateful-Redis-X
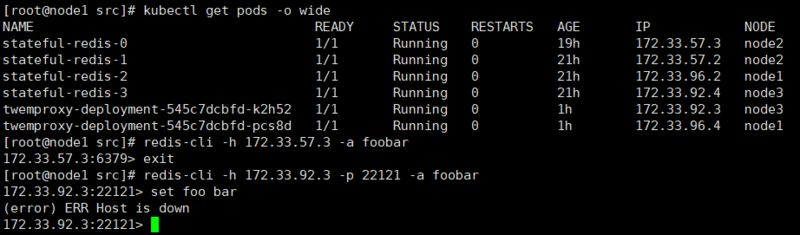
It’s working! Based on past experience, this indicates that nutcracker cannot connect to the underlying Redis instances (it could be that Redis crashed or the host crashed, but that’s not the case now). I suspect that the nutcracker pod cannot resolve the address for <span>stateful-redis-x</span>, let’s verify (enter from the dashboard):
root@twemproxy-deployment-545c7dcbfd-k2h52:/# ping stateful-redis-0
bash: ping: command not found
Unfortunately, the image lacks practical tools like ping and nslookup. I have to use other methods:
# First, pull busybox
docker pull busybox
# Then check the container ID of the twemproxy pod (on the node of stateful-redis-0, find the pause ID by judging the pod name)
docker ps -a
# Find df4af96008ed
# Start busybox into the network space of pause
docker run -it --name busybox --rm --network:container:df4af96008ed busybox
# Ping hostname different, ping IP is reachable, ping svc-redis is also reachable
/ # ping stateful-redis-0
ping: bad address 'stateful-redis-0'/ # ping 172.33.57.3
PING 172.33.57.3 (172.33.57.3): 56 data bytes
64 bytes from 172.33.57.3: seq=0 ttl=62 time=1.274 ms
/ # ping svc-redis
PING svc-redis (172.33.57.2): 56 data bytes
64 bytes from 172.33.57.2: seq=0 ttl=62 time=0.965 ms
This means that the nutcracker.yml here cannot directly use the hostname of the StatefulSet because it cannot resolve the domain name (pinging the IP or svc-redis is reachable due to DNS reasons). To solve this problem, it is necessary to modify nutcracker.yml to use IP addresses. Although the IP addresses of StatefulSet are immutable, explicitly setting them still feels insufficiently generic; I’ll come back to resolve it through confd later.
Modify the ConfigMap to:
# nutcracker.yml
alpha:  listen: 0.0.0.0:22121
  hash: fnv1a_64
  hash_tag: "{}"
  distribution: ketama
  auto_eject_hosts: false
  timeout: 400
  redis: true
  redis_auth: foobar
  servers:   - 172.33.57.3:6379:1 server0
   - 172.33.57.2:6379:1 server1
   - 172.33.96.2:6379:1 server2
   - 172.33.92.4:6379:1 server3
Rebuild the ConfigMap, deployment, svc, and verify.
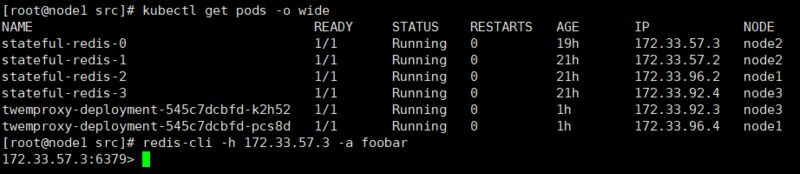
[root@node1 ~]# kubectl get pods -o wide
NAME                                    READY     STATUS    RESTARTS   AGE       IP            NODE
stateful-redis-0                        1/1       Running   0          20h       172.33.57.3   node2
stateful-redis-1                        1/1       Running   0          22h       172.33.57.2   node2
stateful-redis-2                        1/1       Running   0          22h       172.33.96.2   node1
stateful-redis-3                        1/1       Running   0          22h       172.33.92.4   node3
twemproxy-deployment-545c7dcbfd-5k2xh   1/1       Running   0          35s       172.33.92.3   node3
twemproxy-deployment-545c7dcbfd-r7d6h   1/1       Running   0          35s       172.33.96.4   node1
[root@node1 ~]#
[root@node1 ~]#
[root@node1 ~]#
[root@node1 ~]# redis-cli -h 172.33.92.3 -p 22121 -a foobar
172.33.92.3:22121> set a b
OK
172.33.92.3:22121> exit
[root@node1 ~]# redis-cli -h 172.33.96.4 -p 22121 -a foobar
172.33.96.4:22121> get a
"b"
172.33.96.4:22121>

[root@node1 ~]# kubectl get svc -o wide
NAME            TYPE        CLUSTER-IP     EXTERNAL-IP   PORT(S)               AGE       SELECTOR
kubernetes      ClusterIP   10.254.0.1     <none>        443/TCP               1d        <none>
svc-redis       ClusterIP   None           <none>        6379/TCP              23h       app=redis
svc-twemproxy   ClusterIP   10.254.68.39   <none>        22121/TCP,22122/TCP   4m        app=twemproxy
[root@node1 ~]# redis-cli -h 10.254.68.39 -p 22121 -a foobar
10.254.68.39:22121> get a
"b"
10.254.68.39:22121>

# Twemproxy also has HA, and it can be accessed through the service. The service can self-heal even if it crashes, which is impressive.
Headless Service
Sometimes, load balancing or a separate Service IP is not needed or desired. In such cases, you can create a Headless Service by specifying the value of Cluster IP (spec.clusterIP) as “None”. This option allows developers to freely find their desired way, reducing coupling with the Kubernetes system. Applications can still use a self-registering pattern and adapter, making it easy for other systems needing discovery mechanisms to build based on this API.
Original text:
https://segmentfault.com/a/1190000014453291

Recommended Reading
-
Recommended for KubeCon+CloudNativeCon 2018 conference, with discount code
-
Internal referral | Alibaba, K8S/Docker/container technology expert
-
CSDN points resource download service
-
Docker milestones from its inception to 2018!
-
Beijing Kubernetes CKA training is coming
-
I wrote a resume, deployed with Docker, then… I open-sourced it!
-
Installing the latest version of Kubernetes 1.12 using Kubeadm