YIDA JIAOYUFundamentals of Computer Applications
Every summer vacation, some students manage to overtake their peers and stand out, leaving others with a sense of awe. Review is an important part of the learning process. It helps us “prevent problems before they arise,” fundamentally eliminating knowledge gaps and solidifying the knowledge we have painstakingly built, and it can also “repair the barn after the sheep are lost, fixing past omissions. To review and learn anew, the essence of learning is continuous repetition and persistence. Let’s learn together with the editor!
 Knowledge Point 1: Overview of Operating Systems
(1) Definition
Operating System is a set of system software that controls and manages the hardware and software resources of a computer system, controls program execution, improves the human-computer interface, organizes computer workflows reasonably, and provides a good operating environment for users to use the computer.
(2) Functions of the Operating System
1. Processor Management (Microprocessor)
2. Memory Management (Memory)
3. Device Management (I/O Devices)
4. File Management
5. Job Management
(3) Main Features of the Operating System
1. Concurrency (two programs running simultaneously in the same time period)
2. Sharing (of resources)
3. Virtualization
4. Asynchrony (randomness)
(4) Classification of Operating Systems
1. Classified by functional characteristics of the operating system
(1) Batch Processing Systems
(2) Time-Sharing Systems
(3) Real-Time Systems
2. Classified by usage environment:
(1) Embedded Operating Systems (Chip)
(2) Personal Computer Operating Systems
(3) Network Operating Systems
(4) Distributed Operating Systems
(5) Usage of Operating Systems
Here are some commonly used operating systems.
1. DOS (Disk Operating System, single-user, single-task, non-graphical interface)
2. Windows (multi-tasking, graphical interface)
3. UNIX
4. Linux
5. iOS
6. Android

Knowledge Point 2: Windows 10 Operating System

(1) Basic Operations of Windows 10
1. Starting Windows 10
(1) After installing the Windows 10 system, press the power button to turn on the host. After a wait of several seconds to a few minutes, the welcome screen will appear.
(2) Click the left mouse button on the blank area of the welcome screen to enter the system desktop.
(3) If a password was set during the installation of some Windows systems, you will need to enter the password to access the system desktop; if the system is set to default login, it will automatically log in with the default username and display the desktop after booting.
2. Exiting Windows 10
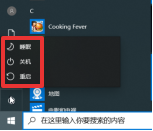
Click the “Start” button in the lower left corner of the desktop  , then click the “Power” button
  , in the pop-up menu, there are the following three options:
(1) Sleep: Puts the computer into sleep mode, minimizing power consumption while keeping the computer powered on.
(2) Shut Down: Properly closes the Windows system.
(3) Restart: Automatically restarts Windows after shutting down the system.
Right-click the “Start” button or press the
(2) Desktop
The entire screen area displayed on the monitor is called the desktop.
1. Main Elements of the Desktop
(1) Icons. Double-clicking these small icons can quickly open the corresponding application, file, or folder.
① Default desktop icon: Recycle Bin
② Shortcut
③ Move icons (drag)
④ Delete icons from the desktop (Delete)
2. Adding Shortcuts to the Desktop
(1) Right-click – “Send to” – “Desktop (create shortcut)”
(2) Right-click – “Create Shortcut”
(3) Shortcut keys: Alt + drag
Ctrl + Shift + drag
(4) Relationship with target files:
① A file can have multiple shortcuts
② A shortcut can only point to one file
(5) Extension: .lnk
3. Taskbar
(1) The functions of each component are as follows:
① “Start” button: Used to open the “Start” menu.
② Pin icon: You can pin the launch icons of frequently used programs to the taskbar, and clicking the icon will open the corresponding program.
③ Task icons: Display the icons of user tasks that are currently running.
④ Notification area: Displays the current date and time as well as icons for some special programs and computer settings status.
⑤ “Show Desktop” button: Located at the far right of the taskbar, clicking this button will minimize all open windows and switch to the desktop.

Note:
① The main function of the taskbar: window switching
② The taskbar button of the active window is highlighted (in bright color)
③ The taskbar is a horizontal bar located at the bottom of the screen, by default in locked state
④ In the unlocked state, the taskbar’s position (top, bottom, left, right) and size can be changed, the taskbar can be hidden but not deleted.
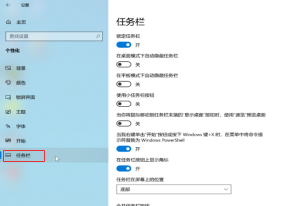
(2) In the “Start” menu, click “Settings” – “Personalization” – “Taskbar” to open the taskbar properties settings window, where you can customize the taskbar.
(3) Start Button
Left-click the “Start” button or press the
The menu that appears when left or right-clicking the “Start” button is different, and its main functions include:
Launching Applications: The application list is sorted alphabetically by default, making it easy for users to find programs.
Opening Frequently Used Files: Recently opened files will be displayed in the “Quick Access” list of the “Start” menu.
Search: Perform local or internet searches on the input content.
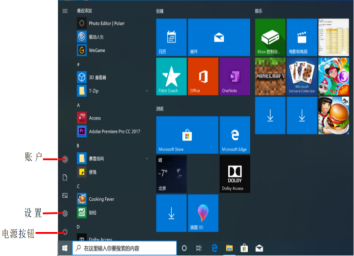
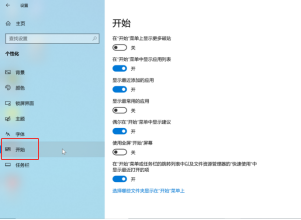
(4) The “Start” menu allows users to fine-tune the layout interface by clicking “Settings” – “Personalization” – “Start” in the “Start” menu, which opens the “Start” menu properties settings window.
Right-clicking the “Start” menu brings up a shortcut menu, allowing quick access to “Task Manager,” “Settings,” “File Explorer,” and options to shut down, log off, or switch to the desktop.
(3) Using Programs
1. Methods to Open Programs:
(1) Double-click the icon
(2) Right-click – Open
2. Methods to Exit Programs:
(1) Alt + F4
(2) Close button in the upper right corner
(4) Composition of Windows
A window is the basic display method of the Windows system, and a window appears when opening a file or application. Taking the Windows 10 File Explorer window as an example, it mainly consists of a title bar, ribbon, workspace, and navigation pane.
Title Bar: Located at the top of the window, it displays the file name, quick access tools, window control menu, maximize/minimize/close buttons, etc.
Ribbon: Below the title bar, there are multiple tabs, each corresponding to a ribbon, containing a rich set of tool commands to choose from.
Workspace: Occupies the largest area of the window, listing file icons, file names, and other information about the files.
Navigation Pane: Located on the left side of the workspace, it displays the hierarchical relationship of files and folders on the computer in a tree structure.
Status Bar: Located at the bottom of the window, it displays information about the current operation or the status of the current object.
The shape of the window can be adjusted as needed. Adjustment operations include opening/closing windows, changing window size, moving windows, and switching between multiple windows.
1. Opening/Closing Windows
(1) Double-clicking the application icon or file icon will open the window;
(2) Click the close button in the upper right corner to close the window.
2. Maximizing and Minimizing Windows
Clicking the maximize button will enlarge the window to cover the entire screen, clicking the restore button will return it to the previous window size; clicking the minimize button will shrink the window to the taskbar, and clicking the task button will expand the window again.
3. Changing Window Size
(1) Click the maximize/restore button on the title bar
(2) Double-click the title bar
(3) Drag the corners of the border (a maximized window cannot be resized)
4. Closing Windows:Alt + F4
5. Moving and Switching Windows
(1) Move the window: Move the mouse to the blank area of the window title bar, hold down the left mouse button, and move the mouse.
(2) Switch to the current window: Click on the blank part of the window to make it the current window.
(3) Cascade or stack windows: Right-click in the blank area of the taskbar to bring up the shortcut menu and select the corresponding option.
(4) Alt + Tab key combination for quick window switching
(5) Win + Tab key combination for multi-window preview
 Quick window switching Multi-window preview
(5) Using Menus, Scroll Bars, Buttons, and Checkboxes
1. Using Menus
(1) Explanation of command items in the drop-down menu
Gray menu commands: currently unavailable
Menu commands with ellipses: (…) open a dialog box
Shortcut keys: Some menu commands are followed by Ctrl + “letter” key combinations
Menus marked with ● or √ indicate that the command is in use
Menu commands followed by “>” indicate that the menu contains submenus.
2. Shortcut Menus
(1) Menus generated by right-clicking an object
(2) Shift + F10
(3) Different right-clicking an object produces different menus
3. Scroll Bars
When a document, webpage, or image exceeds the window size, a scroll bar will appear (if necessary).
(6) Composition and Operation of Dialog Boxes
The purpose of a dialog box is to provide users with information and operational choices. For example, the dialog box on the right contains seven common components: Tabs, Text Boxes, Drop-down Lists, Radio Buttons, Checkboxes, Command Buttons, and Spin Buttons.
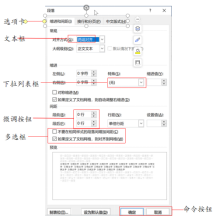
Note:
(1) Click on the menu with … to open the dialog box
(2) Similarities with windows: have a title bar, can be closed, moved
(3) Differences from windows: dialog boxes do not have a menu bar, cannot be maximized, minimized, or resized
(7) Clipboard
1. The clipboard is a temporary storage space opened in memory that can store selected content through cut, copy, or screenshot
2. Print Screen: captures the entire screen
Alt + PrintScreen: captures the currentwindow
3. Differences between Windows Clipboard and Office Clipboard
Windows Clipboard can only hold one item at a time
Office Clipboard can hold up to 24 items
4. Cut files can only be pasted once, while copied files can be pasted multiple times

Issue 7
